How To: GM 1 wire alternator to a 3 wire in Toyota
 01-20-2013, 12:37 PM
#1
Registered User
Thread Starter
A common modification on early Toyota Pickup's and 4Runner's is to replace the small factory alternator with a GM 2-terminal 10si or 12si case alternator. You can pick up a 100A or 140A Powermaster from http://www.summitracing.com (Manufacturer's Part Number: 47294, Summit Racing Part Number: PWM-47294). You can purchase the alternator bracket from http://www.trail-gear.com. Many people doing this swap replace the factory 5-wire Toyota alternator (Sense, Ignition, Alt Light, Ground, Output) with a 1-wire alternator for simplicity's sake - although all 10si and 12si alternators come 3-wire capable. The only real advantage to a self-exciting (one-wire) alternator is that it is very easy to wire - obviously. However, in my humble opinion it has many drawbacks including:
- Inability to do remote voltage sensing likely to result in low system voltage and poor electrical performance.
- Related to its inability to do remote voltage sensing a powerful self-exciting alternator can cause damage overcharging when re-charging a battery with a low state of charge.
- When used in low RPM range it may not generating sufficient alternator RPM to get the alternator to self-excite.
All it takes is a little research and a few minutes of extra time to wire it up properly as 3-wire.
1) Once you have your new high output alternator installed you need to pick up an alternator wiring harness. I got mine from Partsource it says HP3870 GM 1963-1990.
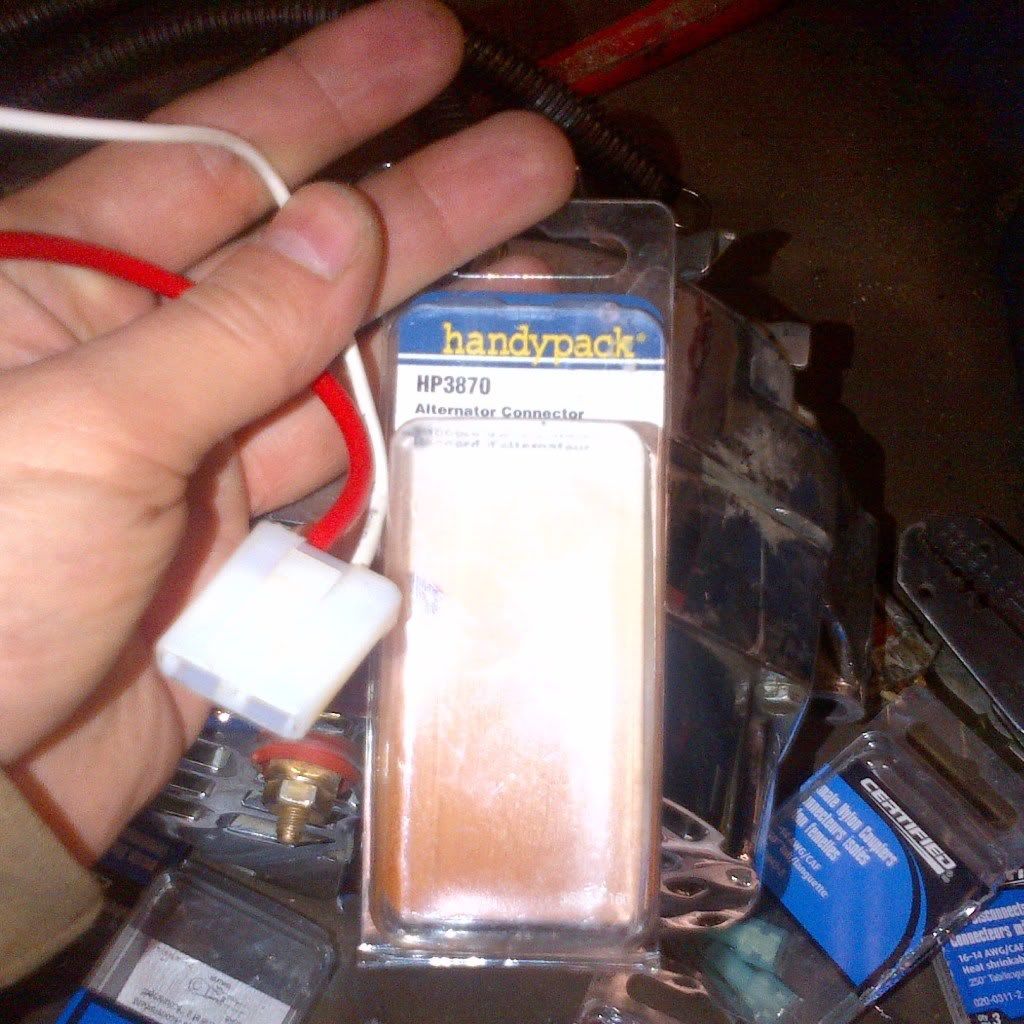
2) Match the pins on your new alternator to the corresponding plug on the wiring harness you just picked up. Don't connect it just yet but make a mental note what wire goes to what pin. It only plugs in one way.
3) Cut the plug off your Toyota harness.

4) Connect the wires coming off the alternator wiring harness with the corresponding wires on your Toyota harness.
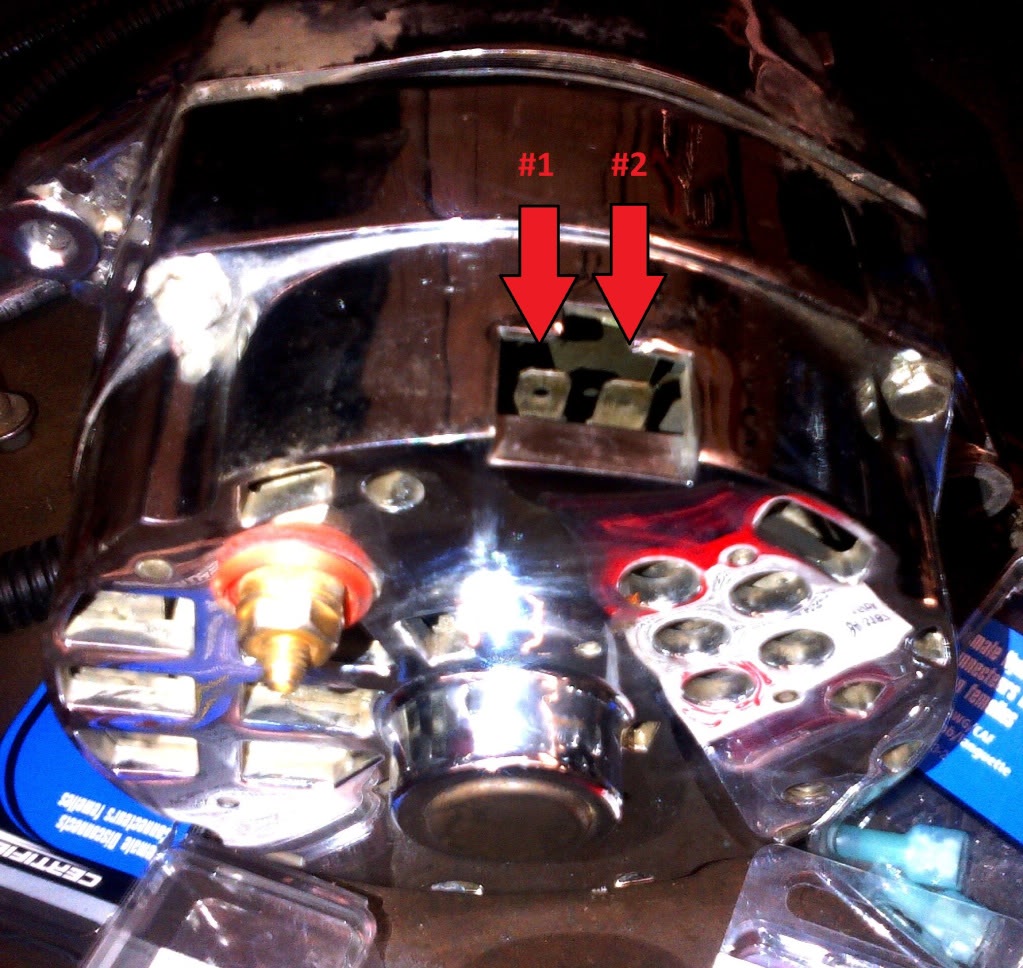
#1 goes to the Toyota yellow "L" (light) wire.
#2 goes to the Toyota white "S" (sense) wire.
The Toyota red "IG" (ignition) wire is left unused.
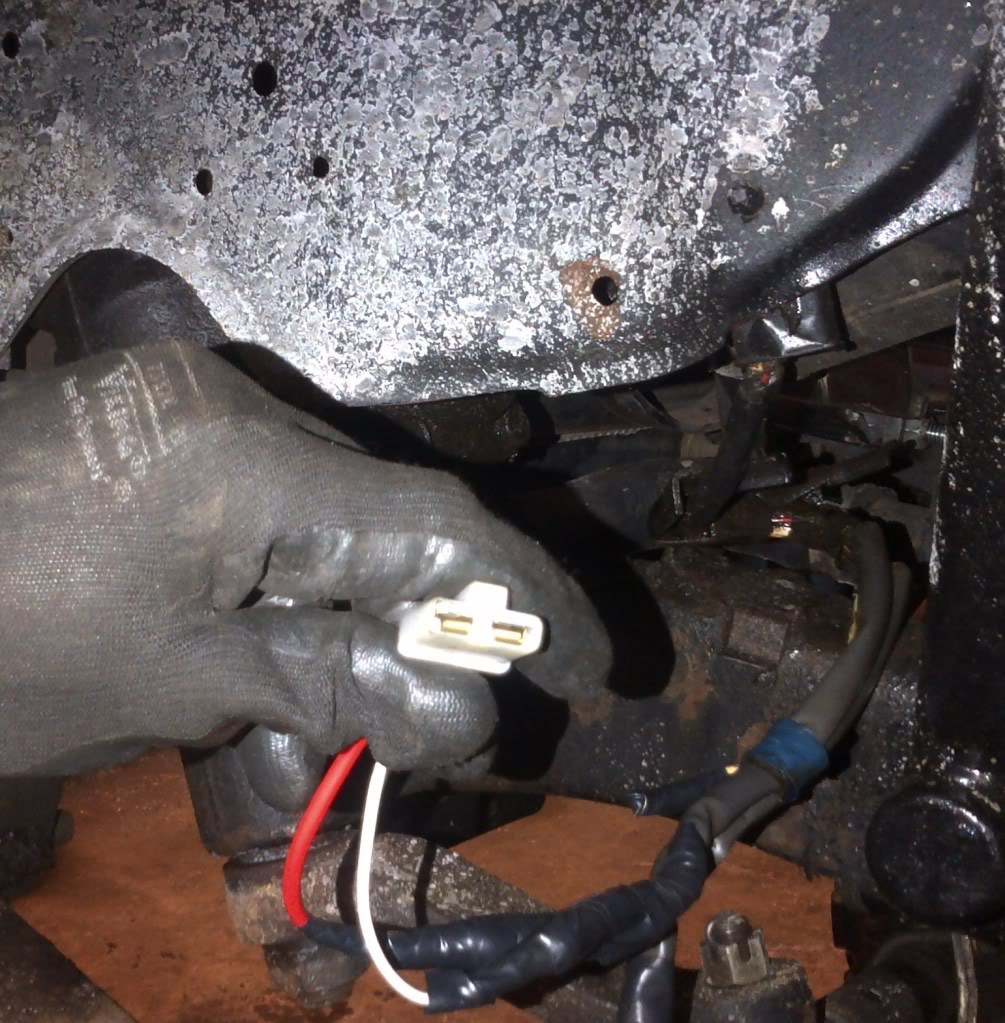
Connect the + post on the new alternator to the + post on your battery using 4ga high quality cable.
Tape up and secure any unused factory wires.
NOTE: you should also connect a 50 Ohm resistor in parallel with the #1 light wire so that if the bulb burns out the alternator will still be excited.
That's it, your done. Connect the alternator wiring harness to the terminals on your new alternator. Enjoy being able to run your winch or your rock lights without worrying about your truck stalling.
- Inability to do remote voltage sensing likely to result in low system voltage and poor electrical performance.
- Related to its inability to do remote voltage sensing a powerful self-exciting alternator can cause damage overcharging when re-charging a battery with a low state of charge.
- When used in low RPM range it may not generating sufficient alternator RPM to get the alternator to self-excite.
All it takes is a little research and a few minutes of extra time to wire it up properly as 3-wire.
1) Once you have your new high output alternator installed you need to pick up an alternator wiring harness. I got mine from Partsource it says HP3870 GM 1963-1990.
2) Match the pins on your new alternator to the corresponding plug on the wiring harness you just picked up. Don't connect it just yet but make a mental note what wire goes to what pin. It only plugs in one way.
3) Cut the plug off your Toyota harness.
4) Connect the wires coming off the alternator wiring harness with the corresponding wires on your Toyota harness.
#1 goes to the Toyota yellow "L" (light) wire.
#2 goes to the Toyota white "S" (sense) wire.
The Toyota red "IG" (ignition) wire is left unused.
Connect the + post on the new alternator to the + post on your battery using 4ga high quality cable.
Tape up and secure any unused factory wires.
NOTE: you should also connect a 50 Ohm resistor in parallel with the #1 light wire so that if the bulb burns out the alternator will still be excited.
That's it, your done. Connect the alternator wiring harness to the terminals on your new alternator. Enjoy being able to run your winch or your rock lights without worrying about your truck stalling.
Last edited by too_cool_3; 01-20-2013 at 03:11 PM.
 01-20-2013, 12:48 PM
#2
Registered User
A common modification on early Toyota Pickup's and 4Runner's is to replace the small factory alternator with a GM 2-terminal 10si or 12si case alternator. You can pick up a 100A or 140A Powermaster from summitracing.com (Manufacturer's Part Number: 47294, Summit Racing Part Number: PWM-47294). You can purchase the alternator bracket from trail-gear.com. Many people doing this swap replace the factory 5-wire Toyota alternator (Sense, Ignition, Alt Light, Ground, Output) with a 1-wire alternator for simplicity's sake - although all 10si and 12si alternators come 3-wire capable. The only real advantage to a self-exciting (one-wire) alternator is that it is very easy to wire - obviously. However, in my humble opinion it has many drawbacks including:
- Inability to do remote voltage sensing likely to result in low system voltage and poor electrical performance.
- Related to its inability to do remote voltage sensing a powerful self-exciting alternator can cause damage overcharging when re-charging a battery with a low state of charge.
- When used in low RPM range it may not generating sufficient alternator RPM to get the alternator to self-excite.
All it takes is a little research and a few minutes of extra time to wire it up properly as 3-wire.
1) Once you have your new high output alternator installed you need to pick up an alternator connector. I got mine from Partsource it says HP3870 GM 1963-1990.
2) Match the pins on your new alternator to the corresponding plug on connector you just picked up. Don't connect it just yet but make a mental note what wire goes to what pin. It only plugs in one way.

3) Cut the plug off your Toyota harness.

4) Connect the wires coming off the alternator connector with the corresponding wires on your Toyota.
#1 goes to the Toyota yellow "L" (light) wire.
#2 goes to the Toyota white "S" (sense) wire.
The Toyota red "IG" (ignition) wire is left unused.
Connect the + post on the new alternator to the + post on your battery using 4ga high quality cable.
Tape up and secure any unused factory wires.
NOTE: you should also connect a 50 Ohm resistor in parallel with the #1 light wire so that if the bulb burns out the alternator will still be excited.

That's it, your done. Connect the alternator plug to the terminals on your new alternator. Enjoy being able to run your winch or your rock lights without worrying about your truck stalling.
- Inability to do remote voltage sensing likely to result in low system voltage and poor electrical performance.
- Related to its inability to do remote voltage sensing a powerful self-exciting alternator can cause damage overcharging when re-charging a battery with a low state of charge.
- When used in low RPM range it may not generating sufficient alternator RPM to get the alternator to self-excite.
All it takes is a little research and a few minutes of extra time to wire it up properly as 3-wire.
1) Once you have your new high output alternator installed you need to pick up an alternator connector. I got mine from Partsource it says HP3870 GM 1963-1990.
2) Match the pins on your new alternator to the corresponding plug on connector you just picked up. Don't connect it just yet but make a mental note what wire goes to what pin. It only plugs in one way.
3) Cut the plug off your Toyota harness.
4) Connect the wires coming off the alternator connector with the corresponding wires on your Toyota.
#1 goes to the Toyota yellow "L" (light) wire.
#2 goes to the Toyota white "S" (sense) wire.
The Toyota red "IG" (ignition) wire is left unused.
Connect the + post on the new alternator to the + post on your battery using 4ga high quality cable.
Tape up and secure any unused factory wires.
NOTE: you should also connect a 50 Ohm resistor in parallel with the #1 light wire so that if the bulb burns out the alternator will still be excited.
That's it, your done. Connect the alternator plug to the terminals on your new alternator. Enjoy being able to run your winch or your rock lights without worrying about your truck stalling.
01-20-2013, 03:26 PM
#4
Registered User
Thread Starter
Attached you will find a PDF for �85 Toyota 4Runner Alternator Upgrade Project by Al Dolney. It's an excellent resource.
Here are some more helpful links I've compiled:
Link to 140 amp Powermaster 12si case style alternator from Summit: http://www.summitracing.com/parts/pwm-47294
The Alternator BibleBy Bill "BillaVista" Ansell (excellent info in here on alts and for wiring your alt):
http://www.pirate4x4.com/tech/billavista/Wiring/Part2/
Thread with good info on other people who have done this swap before:
http://www.pirate4x4.com/forum/toyot...-get-them.html
Some part numbers for the PWM 47294 alt. swap:
-new NAPA belt number is 7360
-GM pig tail number is 85841
-Bussman fuse holder is 782-1143
-175 amp fuse is omeg175xp from local napa
---------
update part numbers (from NAPA):
Fuse holder: Balkamp 782-1143
Fuses for this holder: Balkamp 82-1138 (150A) Balkamp 82-1136 (100A)
They have fuses in this style up to 300A at Napa
01-20-2013, 04:20 PM
#5
Registered User
Join Date: Oct 2009
Location: AZ to close to the border
Posts: 92
Likes: 0
Received 0 Likes
on
0 Posts
04-27-2014, 05:15 PM
#6
Registered User
Join Date: Mar 2007
Location: Phoenix, Arizona
Posts: 680
Likes: 0
Received 0 Likes
on
0 Posts
i wired my gm 12si just like this and i have a constant .5 amp draw from the battery which kills it just sitting overnight. ive tried a bunch of diff diagrams ive found off the net, and neither work. any advice? if i pull the plug out the back of the alt(term 1+2) it drops to 0.0 draw on the battery. if i pull the 7.5 amp fuse under the hood the draw goes away as well. what am i doing wrong?
and ive seen other diagrams that say the number 2 on the alt goes to the pos post on alt, i do that and it throws a charge light on the dash and the alt doesnt charge the battery.
and ive seen other diagrams that say the number 2 on the alt goes to the pos post on alt, i do that and it throws a charge light on the dash and the alt doesnt charge the battery.
Last edited by sh0kk86; 04-27-2014 at 06:00 PM.

Trending Topics
04-29-2014, 09:20 PM
#9
Registered User
Join Date: Mar 2007
Location: Phoenix, Arizona
Posts: 680
Likes: 0
Received 0 Likes
on
0 Posts
the charge fuse 7.5 amp in the box near the battery.
i split apart the wire loom from alt wiring to fuse box and found one section of wire where the two thicker guage white wires connect, was corroded into white powder , its weird, ive had an optima in there for almost 5 years so no battery leakage lately. fixed that and checked all the wires. will report back tomrrow when i work on it more, going in for the night.
i split apart the wire loom from alt wiring to fuse box and found one section of wire where the two thicker guage white wires connect, was corroded into white powder , its weird, ive had an optima in there for almost 5 years so no battery leakage lately. fixed that and checked all the wires. will report back tomrrow when i work on it more, going in for the night.
Last edited by sh0kk86; 04-29-2014 at 09:22 PM.
04-30-2014, 03:13 PM
#10
Registered User
Join Date: Mar 2007
Location: Phoenix, Arizona
Posts: 680
Likes: 0
Received 0 Likes
on
0 Posts
update-
so i cleaned up a bunch of wiring, cleaned grounds even more thorough.
i have it wired up with the gm alt harness white wire to yellow toyalt wire, and red looped to the b post on alt. 12.7 v battery with key off, and 14.5 with it running instantly, but it still has the charge and brake lite lit up .i redline it, thinking maybe if it hits a certain rpm itll go away but no luck. ill look into getting that resistor, maybe it will help with the light? no parasitic draw as of today as well so im happy about that.
i also have noticed i have a hard time finding key on hot wires. the ones the 85 fsm and my 86 fsm wiring diagram have labeled as ignition key on hot wires are constant hot, might have something to do with it.
the truck sat outside at my previous rental houses with no windshield, rear window or doors for about three years, so i know the rain and dust have done some damage, but not sure of the extent.
fck it i just want it running for some summer night runs and the next fall/winter wheeling season. next spring i plan on ditching my body and exo and going for a ftoy chasis, then it will be stupid easy wiring needed to run the damn thing.
hope it works out.
Last edited by sh0kk86; 05-06-2014 at 11:50 AM.

 06-12-2018, 05:52 PM
#13
Registered User

Join Date: Jun 2018
Posts: 1
Likes: 0
Received 0 Likes
on
0 Posts
GM to toyota alternator wiring
I don't know what wires I hook my 2 GM alternator wireless too. In the pic it shows Toyota having yellow,white,and red wires to alternator,while my plug in on my Toyota has yellow,green and black wires. I don't know what to wires to use. Please give me support on this. Thanks Mark R.

Thread
Thread Starter
Forum
Replies
Last Post
bigblue82
General Electrical & Lighting Related Topics
10
07-06-2015 08:27 AM


