
1st Gen 4Runner Canopy Headliner Replacement how to
 04-02-2012, 09:01 PM
#1
1st Gen 4Runner Canopy Headliner Replacement how to
Starting this thread to document my replacement of the canopy headliner:
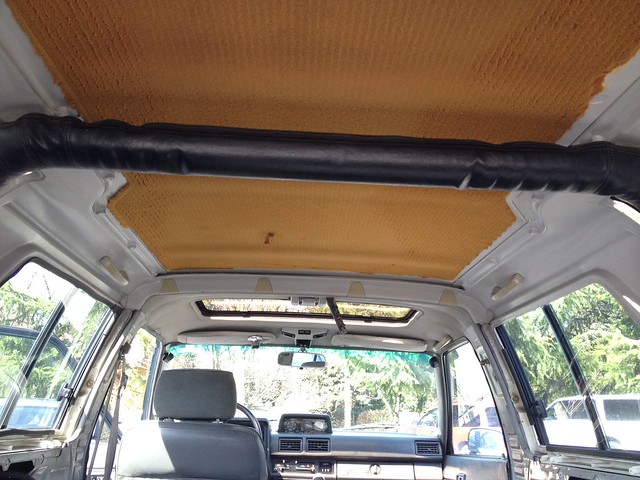
My headliner in my 86 4Runner was stained, torn, had cigarette burns and was duct taped up in the corners by the previous owner. It was time for a new one.
I had assumed that the headliner was glued to a backer board that was held up by the metal strips and perhaps glued to the roof in the middle.
My assumption was wrong, the vinyl headliner peeled cleanly off the foam which was glued directly to the roof. Ugh!!!
This then meant hours of scraping the roof with a paint scraper (picture to follow shortly).
Next step making a new backer board to be glued up to the roof. I used a piece of thin mdf paneling from Home Depot:
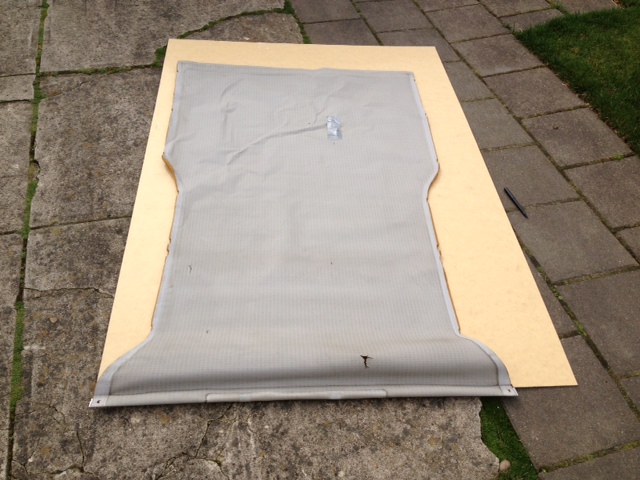
Backer board cut and primed with Kilz primer to lock out moisture (I cut the board wider than the original vinyl so that the metal trim strips would can hold up the edges):
Next steps: Apply 3M adhesive to glue on 1/4" foam. Then spray adhesive fabric to the foam. Then, mount to roof!
More pics to follow shortly.
My headliner in my 86 4Runner was stained, torn, had cigarette burns and was duct taped up in the corners by the previous owner. It was time for a new one.
I had assumed that the headliner was glued to a backer board that was held up by the metal strips and perhaps glued to the roof in the middle.
My assumption was wrong, the vinyl headliner peeled cleanly off the foam which was glued directly to the roof. Ugh!!!
This then meant hours of scraping the roof with a paint scraper (picture to follow shortly).
Next step making a new backer board to be glued up to the roof. I used a piece of thin mdf paneling from Home Depot:
Backer board cut and primed with Kilz primer to lock out moisture (I cut the board wider than the original vinyl so that the metal trim strips would can hold up the edges):
Next steps: Apply 3M adhesive to glue on 1/4" foam. Then spray adhesive fabric to the foam. Then, mount to roof!
More pics to follow shortly.
Last edited by stanz; 04-02-2012 at 09:08 PM.

 04-02-2012, 09:22 PM
#3
If you have any option to take the canopy off and work on it upside down, it will make scraping the foam a lot easier and less back breaking. You can't use acetone as the canopy was manufactured in multiple parts and glued together. Acetone can actually weaken these factory joints... so for me that meant alot of overhead elbow grease.
02-17-2013, 10:20 AM
#6
It's been 10 months since I started this project. I finally got around to finishing it this weekend.
I was originally going to lay down foam and fabric for the headliner. Instead I opted to go with the faux carbon fiber peel and stick material. I found some on ebay in light silver for $40.
Here's how I did it...
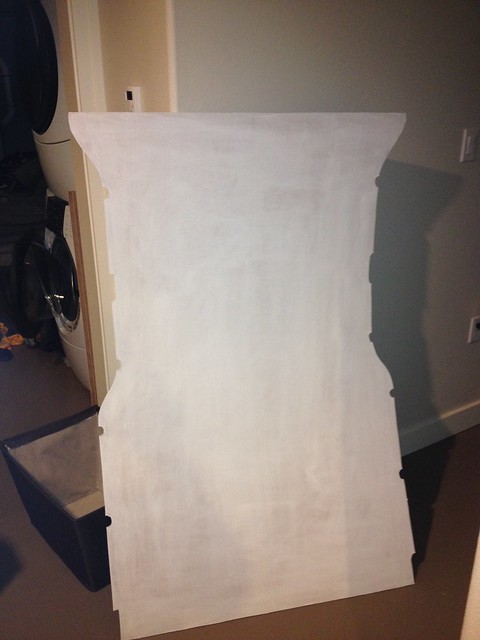
Cleaned and sanded backer board. For the past several months I had it propped with some weight against it to give it slight concave:
http://www.flickr.com/photos/72188695@N05/8482168469/
Backer board wrapped in carbon:
http://www.flickr.com/photos/72188695@N05/8482185429/
The factory headliner also terminates in the rear with a small metal bar with some push pins in it. The bar was originally wrapped in foam, then coated with the headliner. I was originally going to try to integrate this into the headliner mounted on the backer board (making it all one piece) but decided that it was too difficult to do with the tackiness and creaseability of the faux carbon. Instead I decided to wrap it and mount it separately:
Close up of the bar and pin:
http://www.flickr.com/photos/72188695@N05/8482169783/
Gluing the bar to closed cell foam:
http://www.flickr.com/photos/72188695@N05/8482178009/
To glue the backer board up I used tubes of standard latex tub and tile caulk. I chose this because it's mold resistant, somewhat removable and easy to clean up during install. I used a lot, something like a full tube every 18 inches. I let the board flop over the roll bar and tried to glob as much as I could on every few inches. The roof surface is not perfectly flat, so I wanted the globs to compensate for peaks and valleys. I also didn't want it rattling around or dropping in some spots.
I am a drummer so, I used one of my drum stands to prop of the middle overnight as it dried:
http://www.flickr.com/photos/72188695@N05/8482176723/
Here are some shots of the rear termination bar at the rear wiper cover:
http://www.flickr.com/photos/72188695@N05/8483263936/
http://www.flickr.com/photos/72188695@N05/8482175421/
Finished product:
http://www.flickr.com/photos/72188695@N05/8483325598/
I was originally going to lay down foam and fabric for the headliner. Instead I opted to go with the faux carbon fiber peel and stick material. I found some on ebay in light silver for $40.
Here's how I did it...
Cleaned and sanded backer board. For the past several months I had it propped with some weight against it to give it slight concave:
http://www.flickr.com/photos/72188695@N05/8482168469/
Backer board wrapped in carbon:
http://www.flickr.com/photos/72188695@N05/8482185429/
The factory headliner also terminates in the rear with a small metal bar with some push pins in it. The bar was originally wrapped in foam, then coated with the headliner. I was originally going to try to integrate this into the headliner mounted on the backer board (making it all one piece) but decided that it was too difficult to do with the tackiness and creaseability of the faux carbon. Instead I decided to wrap it and mount it separately:
Close up of the bar and pin:
http://www.flickr.com/photos/72188695@N05/8482169783/
Gluing the bar to closed cell foam:
http://www.flickr.com/photos/72188695@N05/8482178009/
To glue the backer board up I used tubes of standard latex tub and tile caulk. I chose this because it's mold resistant, somewhat removable and easy to clean up during install. I used a lot, something like a full tube every 18 inches. I let the board flop over the roll bar and tried to glob as much as I could on every few inches. The roof surface is not perfectly flat, so I wanted the globs to compensate for peaks and valleys. I also didn't want it rattling around or dropping in some spots.
I am a drummer so, I used one of my drum stands to prop of the middle overnight as it dried:
http://www.flickr.com/photos/72188695@N05/8482176723/
Here are some shots of the rear termination bar at the rear wiper cover:
http://www.flickr.com/photos/72188695@N05/8483263936/
http://www.flickr.com/photos/72188695@N05/8482175421/
Finished product:
http://www.flickr.com/photos/72188695@N05/8483325598/
02-17-2013, 11:28 AM
#7
Registered User
That came out looking pretty darn good!
My headliner has peeled as well, can the 3M adhesive be used to attach the headliner directly to the old foam? Otherwise I will likely make a similar backing board and wrap it with black fabric or something.
Thanks! Good work!
My headliner has peeled as well, can the 3M adhesive be used to attach the headliner directly to the old foam? Otherwise I will likely make a similar backing board and wrap it with black fabric or something.
Thanks! Good work!
Trending Topics
02-17-2013, 09:26 PM
#11

+1 for creative clamping! Nice job sir.
To get a better seam line on the rear, pull more material thru the pinch (between the bracket and liner backer), and attach it farther up the board then bring it back down and wrap the bracket. (Just a tip.. You did great really, we'd of never noticed those tiny gaps if you hadn't pointed them out!)
Yes you can use"spray glue". 3m spray adhesives are use by professional auto upholstery. 3m contact adhesive aka spray glue, 77 is fine 90 is slightly stronger has different wetting characteristics, original formula 77 is the best(not made any more stupid glue sniffers). Just remeber with contact adhesives, spray glues and rubber cement, you need to coat both sides liberally and wait till they are dry then press them together firmly. If you wait passed the tacky stage untill fully dryed you can reposition them some as long as you haven't applied pressure.
02-17-2013, 09:30 PM
#12
+1 for creative clamping! Nice job sir.
To get a better seam line on the rear, pull more material thru the pinch (between the bracket and liner backer), and attach it farther up the board then bring it back down and wrap the bracket. (Just a tip.. You did great really, we'd of never noticed those tiny gaps if you hadn't pointed them out!)
To get a better seam line on the rear, pull more material thru the pinch (between the bracket and liner backer), and attach it farther up the board then bring it back down and wrap the bracket. (Just a tip.. You did great really, we'd of never noticed those tiny gaps if you hadn't pointed them out!)
Thanks for the props!
02-18-2013, 01:27 PM
#13
Registered User

Join Date: Sep 2007
Location: San Francisco East Bay
Posts: 8,254
Likes: 0
Received 822 Likes
on
649 Posts
So get all the old foam off before you do anything else. Then you have lot of options.
04-13-2013, 05:58 PM
#14
Registered User

Join Date: Apr 2013
Location: Arizona desert
Posts: 1
Likes: 0
Received 0 Likes
on
0 Posts
Life saver
I am 100% newbie and absolutely thank god I found this forum just bought an 85 4runner and have to pull what's left of the head liner down this is a life saver

Thread
Thread Starter
Forum
Replies
Last Post


