The Fab Shop Tube buggies, armor protection and anything else that requires cutting, welding, or custom fab work

Homemade 4runner bumper...

Thread Tools
 
Search this Thread
 
Old 07-22-2011, 06:53 AM
  #61  
Registered User
iTrader: (1)
 
cman1's Avatar
 
Join Date: Jul 2010
Location: greenville,wi
Posts: 856
Likes: 0
Received 1 Like on 1 Post
put your d-rings in a little closer and you wont have to weld in anything for your chains for towing ,just hook them on your d-rings!
Old 07-22-2011, 10:27 AM
  #62  
Registered User
 
Teuf's Avatar
 
Join Date: Apr 2009
Location: Dixon, Ca
Posts: 5,592
Received 24 Likes on 14 Posts
D rings should be opposite bumper mount brackets going to the frame, yes?
Old 07-22-2011, 10:31 AM
  #63  
Registered User
iTrader: (4)
 
irab88's Avatar
 
Join Date: Jul 2010
Location: MD
Posts: 6,495
Received 37 Likes on 31 Posts
Originally Posted by Teuf
D rings should be opposite bumper mount brackets going to the frame, yes?
x2 on that. it makes sense.
Old 07-22-2011, 10:44 AM
  #64  
Registered User
Thread Starter
 
dlucky894runner's Avatar
 
Join Date: Jan 2011
Location: Springville, UT
Posts: 115
Likes: 0
Received 0 Likes on 0 Posts
Originally Posted by irab88
x2 on that. it makes sense.
Ya, that is what I thought, too. I got them close to the frame mounts.
Old 07-22-2011, 01:06 PM
  #65  
Registered User
 
Adk_Yota's Avatar
 
Join Date: Jan 2011
Location: Glens Falls, NY
Posts: 82
Likes: 0
Received 0 Likes on 0 Posts
What do you mean by having the D-ring mounts opposite the frame mounts. I'm getting ready to build a rear bumper in the next week or so for my truck
Old 07-22-2011, 01:48 PM
  #66  
Registered User
 
WD_40's Avatar
 
Join Date: Jun 2009
Location: Corona, CA
Posts: 153
Likes: 0
Received 0 Likes on 0 Posts
Originally Posted by Adk_Yota
What do you mean by having the D-ring mounts opposite the frame mounts. I'm getting ready to build a rear bumper in the next week or so for my truck
He means the the D-rings should be in line/tied into the frame mounts to provide strength when being used for recovery.
Old 07-29-2011, 12:44 PM
  #67  
Registered User
Thread Starter
 
dlucky894runner's Avatar
 
Join Date: Jan 2011
Location: Springville, UT
Posts: 115
Likes: 0
Received 0 Likes on 0 Posts
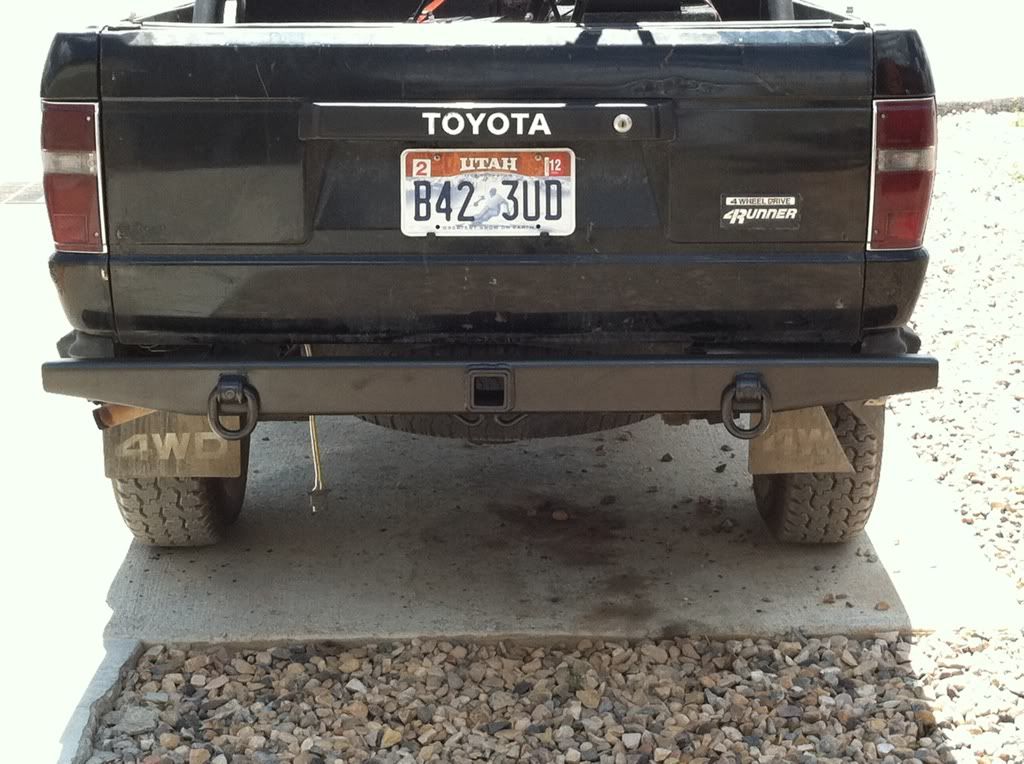
Here is a pic of the finished, for now, project. I am looking at putting my spare up on it, but needed it back on, so the cops will leave me alone. been driving it without a bumper on.


Old 07-29-2011, 01:05 PM
  #68  
Registered User
iTrader: (4)
 
irab88's Avatar
 
Join Date: Jul 2010
Location: MD
Posts: 6,495
Received 37 Likes on 31 Posts
* like *

that is one good-looking bumper
Old 07-29-2011, 01:19 PM
  #69  
RBX
Registered User
 
RBX's Avatar
 
Join Date: Jan 2010
Location: Bloodymore
Posts: 3,794
Received 33 Likes on 22 Posts
Looks good, I guess it's bumper building season.
Old 07-29-2011, 03:02 PM
  #70  
Registered User
 
87 Deathtrap's Avatar
 
Join Date: Apr 2011
Location: Phoenix, Az
Posts: 668
Likes: 0
Received 0 Likes on 0 Posts
Nice job! That's a great looking bumper!
Old 08-01-2011, 05:43 AM
  #71  
Registered User
iTrader: (1)
 
Utah4Runner86's Avatar
 
Join Date: Dec 2010
Location: Salt Lake City, UT
Posts: 314
Likes: 0
Received 0 Likes on 0 Posts
Originally Posted by 87 Deathtrap
Nice job! That's a great looking bumper!
x2. Simple and clean.

What did you use for frame brackets?
Old 08-01-2011, 08:09 AM
  #72  
Registered User
Thread Starter
 
dlucky894runner's Avatar
 
Join Date: Jan 2011
Location: Springville, UT
Posts: 115
Likes: 0
Received 0 Likes on 0 Posts
Thanks guys. I like how it turned out. I used 1/2 plate for the mounting brackets. I forgot to take some pics of them. If I have an opportunity to take it off I will take some pics.
Old 08-01-2011, 02:11 PM
  #73  
Registered User
 
87 Deathtrap's Avatar
 
Join Date: Apr 2011
Location: Phoenix, Az
Posts: 668
Likes: 0
Received 0 Likes on 0 Posts
You sure built one sharp looking bumper. Simple yet functional, it doesn't get any better than that!
Old 08-02-2011, 02:22 PM
  #74  
Registered User
 
sseaman's Avatar
 
Join Date: Jan 2007
Posts: 39
Likes: 0
Received 0 Likes on 0 Posts
The welds look good
Old 08-02-2011, 02:42 PM
  #75  
Registered User
iTrader: (2)
 
Philbert's Avatar
 
Join Date: Dec 2009
Location: Pleasanton, CA - SF Bay Area
Posts: 2,159
Likes: 0
Received 7 Likes on 5 Posts
Originally Posted by dlucky894runner
Thanks guys. I like how it turned out. I used 1/2 plate for the mounting brackets. I forgot to take some pics of them. If I have an opportunity to take it off I will take some pics.

I was just re reading this thread and wondering where the part was about the mounting brackets

Looking forward to seeing how you fabbed them up!
Old 08-02-2011, 07:13 PM
  #76  
Registered User
 
michael1963's Avatar
 
Join Date: Apr 2010
Location: Kingston, Ontario CANADA
Posts: 815
Likes: 0
Received 0 Likes on 0 Posts
Originally Posted by Utah4Runner86
x2. Simple and clean.

What did you use for frame brackets?
X3. Good looking bumper. Excellent looking welding going on there. Man I wish I could do that. Thanks for your thread.

Mike
Old 08-02-2011, 07:19 PM
  #77  
Registered User
 
85gijunk4x4's Avatar
 
Join Date: May 2010
Location: piney hicks nj
Posts: 3,120
Received 1 Like on 1 Post
looks great. i was actually planning on building the exact same thing LOL glad your tunred out nice! nice welds, and i like the look of it.
Related Topics
Thread
Thread Starter
Forum
Replies
Last Post
Flying91
86-95 Trucks & 4Runners (Build-Up Section)
45
04-11-2024 04:39 PM
icentropy
86-95 Trucks & 4Runners
22
09-16-2020 02:47 PM
chukarhunt
Tires & Wheels
13
12-08-2019 11:39 AM
coreyedwards7611
Vehicles - Trailers (Complete)
4
01-16-2016 06:38 PM
BeMiceElf
Misc Stuff (Vehicle Related)
7
10-10-2015 09:40 PM


Quick Reply: Homemade 4runner bumper...


All times are GMT -8. The time now is 12:14 AM.