Quick dual battery setup question
 04-07-2010, 06:49 AM
#21
Registered User
Join Date: Sep 2009
Location: East Alton, IL
Posts: 178
Likes: 0
Received 0 Likes
on
0 Posts
Yes, in Mode 1 the solenoid turns on and off with the ignition. So if you were diligent and turned your kill switch on and off with the ignition this would be the same. Or in modes 2 and 3 (off and on), this is identical to your kill switch. So with the solenoid, you have both full manual control like a manual switch (turn the solenoid on and off with the switch) or you can have the fully automatic mode where the solenoid turns on and off automatically.
A solenoid setup is pretty simple, think of a switch and relay for something like fog lights. Same thing, only the relay is a bit bigger.
A solenoid setup is pretty simple, think of a switch and relay for something like fog lights. Same thing, only the relay is a bit bigger.
Yep yep

 04-07-2010, 06:51 AM
#22
Registered User
Thread Starter

Join Date: May 2005
Posts: 664
Likes: 0
Received 0 Likes
on
0 Posts
Ok. Not really. If you use a solenoid it will kill the power the same way. but when you turn it on it has no regulation when charging.
I suggest a isolator. They dont cost much but they regulate the power draw from the alt a little better. Im just trying to save you an alternator down the road.
Your call though haha. Im just a guy on the forum.
I suggest a isolator. They dont cost much but they regulate the power draw from the alt a little better. Im just trying to save you an alternator down the road.
Your call though haha. Im just a guy on the forum.
So how is roger's setup not going to kill his alt. like you are suggesting the kill switch would. He hasn't mentioned anything about an isolator with his
04-07-2010, 07:01 AM
#23
Registered User
Join Date: Sep 2009
Location: East Alton, IL
Posts: 178
Likes: 0
Received 0 Likes
on
0 Posts
Now I was just thinking that to. But when I ran just a kill switch I was constantly draining my batteries. And after the isolator it keeps both batts evenly charged. Maybe I just did something correct and fixed it but I will swear by it that an isolator evenly distributes that charge and thus saves the alt. Because I had to replace my alt not long before putting the isolator on. Running the dual batts just killed it in no time.
Maybe I'm completely lost on this but an isolator isolates each battery and charges it independently from the other one. Thus keeping it a balanced charge.
Maybe I'm completely lost on this but an isolator isolates each battery and charges it independently from the other one. Thus keeping it a balanced charge.
04-07-2010, 07:17 AM
#24
Registered User
Thread Starter
Join Date: May 2005
Posts: 664
Likes: 0
Received 0 Likes
on
0 Posts
yes that seems logical. but the alternator isnt going to be loaded that much higher in charging two batteries is it?
also, with the kill switch idea. I wouldnt be connecting it every day because the optima holds a charge for a really long time, so only would need to connect to top off the charge or to run some large draw items when truck is off.
also, with the kill switch idea. I wouldnt be connecting it every day because the optima holds a charge for a really long time, so only would need to connect to top off the charge or to run some large draw items when truck is off.
04-07-2010, 07:18 AM
#25
Registered User
Thread Starter
Join Date: May 2005
Posts: 664
Likes: 0
Received 0 Likes
on
0 Posts
04-07-2010, 08:52 AM
#26
I suppose an isolator would help to balance the charge on both batteries with the in-line diodes. If one battery were more charged than the other, the diode on that side would have less voltage drop across it and if that is below it's threshold voltage, it would not pass as much current as the one on the lower charged battery. That and the small series resistance of the isolator helps a little to balance the charging current to each battery.
04-07-2010, 09:33 AM
#28
Depends on the isolator. A true isolator, like you have in an RV for example, keeps both batteries isolated from each other 100% of the time. They are charged in parallel but discharge into separate loads. The fancier isolators with internal relays or solenoids, can connect the batteries together for parallel operation.
05-13-2013, 01:19 AM
#29
Registered User
Join Date: Jul 2012
Posts: 13
Likes: 0
Received 0 Likes
on
0 Posts
i run duel batteries on my 85 one mounted behind the cab and one in the stock position. i needed the extra power for both wenches. it fried the stock alt so i went with the gm upgrade and it charges like a champ i can run both winches at the same time and it doesnt phase the system
05-13-2013, 07:37 AM
#30
Registered User
Thread Starter
Join Date: May 2005
Posts: 664
Likes: 0
Received 0 Likes
on
0 Posts
old thread revival, but to mention what I ended up with was 2 yellow tops in parallel, one in stock location on the 96 tacoma, the other in a marine battery box behind my seat on the floor. 0 ga. wire connecting the two +, and the - terminal grounded to the rear seat belt bolt inside the cubby under the seat. I went with the simplest method I could think of and have a large plastic connector similar to the ones shown here 
No isolator or breaker, I just manually connect and disconnect as needed. very simple and cheap. Basically been connected 100% of the time for 3 years and perfectly fine.
did GM CS130 alternator upgrade recently as well. search my username and you'll find a post on it.
No isolator or breaker, I just manually connect and disconnect as needed. very simple and cheap. Basically been connected 100% of the time for 3 years and perfectly fine.
did GM CS130 alternator upgrade recently as well. search my username and you'll find a post on it.
11-28-2014, 10:40 AM
#32
Registered User
Join Date: Feb 2010
Location: Medford Oregon
Posts: 205
Likes: 0
Received 0 Likes
on
0 Posts
I like the information that this post had.I too am going to run the second battery on the floor behind the driver in my 1985 ex cab. I was wondering if i should vent the box the battery will be in to the outside? I will be running the setup how 4crawler has laid it out as I have read a lot of posts about electrical wiring and he seems to nail it a good portion of the time. I also will be doing the cs144 upgrade to charge them. I am kind of using the second battery as an rv type battery for the bed/camp area I am working on.
11-29-2014, 07:26 AM
#33
The battery inside the cab, or any enclosed space, should probably have some external venting to let the hydrogen gas formed while charging/discharging escape. Nothing fancy needed, just some tubing from the vent hose fitting on the battery box up and outside. Since my batteries are mounted below the bed floor, I don't need any venting.
11-30-2014, 12:48 PM
#34
Registered User
Join Date: Feb 2010
Location: Medford Oregon
Posts: 205
Likes: 0
Received 0 Likes
on
0 Posts
you dont have problems with the battery under the bed? I was worried that they may get damaged or incredibly dirty. do have a picture of how you mounted them?
11-30-2014, 12:53 PM
#35
They hardly get any dirt on them at all:
- http://www.4crawler.com/4x4/CheapTri...l#Installation
This photo is after they have been up there for some years:
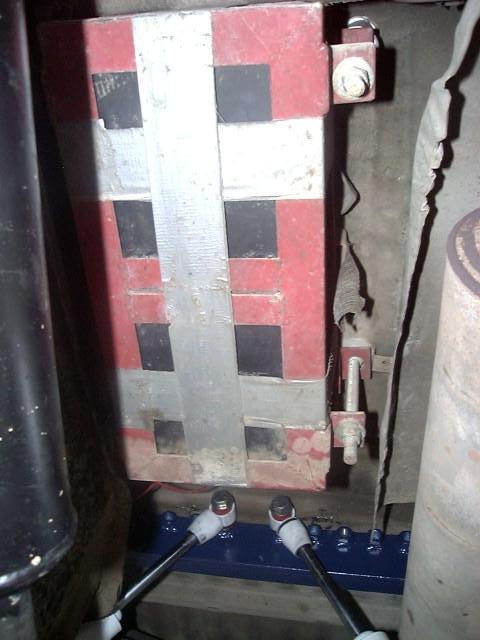
If I damaged them where they are located, I would have more serious issues to worry about, like my rear drive shaft would have to have been destroyed and my gas tank crushed as a minimum. Basically they sit behind the step in the 4Runner bed where is steps down for the rear seat.
- http://www.4crawler.com/4x4/CheapTri...l#Installation
This photo is after they have been up there for some years:
If I damaged them where they are located, I would have more serious issues to worry about, like my rear drive shaft would have to have been destroyed and my gas tank crushed as a minimum. Basically they sit behind the step in the 4Runner bed where is steps down for the rear seat.
11-30-2014, 01:34 PM
#36
Registered User
Join Date: Feb 2010
Location: Medford Oregon
Posts: 205
Likes: 0
Received 0 Likes
on
0 Posts
Nice I might be looking into something of that manner as it looks up there pretty safe. I am running them on an extended cab but that position looks pretty secure and safe. the duct tape looks pretty structural for sure  . Thank you for the picture I will probably do something similar as I was kinda worried about them being inside
. Thank you for the picture I will probably do something similar as I was kinda worried about them being inside
11-30-2014, 01:41 PM
#37
The duct tape is only to hold the whole assembly together for installation. There are top and bottom frames with the batteries in the middle and the whole thing hangs below the bed floor off of 4 threaded rods. Once the 4 nuts are on the threaded rods, I could take the tape off, but it is nice to have it there when it comes time to replace the batteries in 7 years time.
11-30-2014, 06:00 PM
#38
Registered User
Join Date: Feb 2010
Location: Medford Oregon
Posts: 205
Likes: 0
Received 0 Likes
on
0 Posts
haha I was just kidding around about the tape. I really like the idea. with two batteries on that rack do you have to use a jack to lower them down after unbolting the rack? seems like a pretty heavy situation when there is two batteries above your head when removing.
11-30-2014, 08:09 PM
#39
Batteries are 26lbs./ea. so about 60 lbs. total with the frame. I use a floor jack and block of wood to raise the battery module up until I can engage a nut or two. Just replaced the batteries about a year ago for the 2nd time in 15 years. Aside from that, I never touch the batteries between when I put them up there new and take them down when time to replace.


