Rusted out rear Axle Housing PICS


 05-12-2011, 11:10 AM
#23
Registered User
Join Date: Aug 2010
Posts: 242
Likes: 0
Received 0 Likes
on
0 Posts
I used the JB putty on my axle, but was planning on using the 2 part epoxy on my friend's that I'm doing this weekend. Anyone have any thoughts as to which will last longer? My gut says the 2-part.
05-12-2011, 11:27 AM
#24

The 2-part is more liquid, so it has much better bonding strength, as it needs to go into all the tiny crevices to hold. As long as the prep work is there, it should last much longer than 8 or 14 months.
And that means draining the differential, degreasing the whole area, removing rust to shiny metal, then roughing it up with something sharp like a utility knife blade, making deep gouges in the metal for JB weld to hold onto.
And that means draining the differential, degreasing the whole area, removing rust to shiny metal, then roughing it up with something sharp like a utility knife blade, making deep gouges in the metal for JB weld to hold onto.
05-12-2011, 11:55 AM
#25
Registered User
Thread Starter

Join Date: Mar 2011
Posts: 32
Likes: 0
Received 0 Likes
on
0 Posts
I found a Rear Axle assembly for $900 shipped.. has 85,000 miles and comes with a 90 day warranty. $900 shipped was the cheapest I could find, and luckily it also happened to be the one with the least amount of miles.
What is a fair price I should expect to pay for a swap out?
What is a fair price I should expect to pay for a swap out?
05-12-2011, 02:22 PM
#26
Registered User
Join Date: Mar 2010
Location: Fresno, California
Posts: 594
Likes: 0
Received 0 Likes
on
0 Posts
just cut the back off and weld in a marlin diff cover no more rust issues. 900 is not bad if its complete with an elocker. if so how much for the old elocker?? just checkin. i need one for my rear. i dont think the rest of the housing will be much of an issue, its just that thin diff cover. you should be able to swap that complete rear in no time, not that hard to do!
05-12-2011, 02:38 PM
#27
Registered User
just cut the back off and weld in a marlin diff cover no more rust issues. 900 is not bad if its complete with an elocker. if so how much for the old elocker?? just checkin. i need one for my rear. i dont think the rest of the housing will be much of an issue, its just that thin diff cover. you should be able to swap that complete rear in no time, not that hard to do!
That's what I was thinking when I read through this. Just weld a patch on there...
05-14-2011, 06:05 AM
#29
Come to think of it, something as simple as cleaning the whole area and putting a good layer of high quality silicone caulk should hold very well. We are not dealing with pressurized oil. It will do great to seal pinhole leaks, hold well to a rough surface, and deals well with temperature changes.
Doesn't make sense to throw good money at something half rusted with 145k miles, if you can make it drivable for a few $.
Doesn't make sense to throw good money at something half rusted with 145k miles, if you can make it drivable for a few $.
05-14-2011, 07:30 AM
#30
Registered User
Thread Starter
Join Date: Mar 2011
Posts: 32
Likes: 0
Received 0 Likes
on
0 Posts
I wanted to go with something like JB weld, but I would have had to pay someone to take the rear end off so that I could clean it well enough to be sure the JB would stick, plus, I still needed to pay someone to repair my differential, which is probably just bearings, but it could possibly be worse (ring and pinion gears as well). I will be selling my old 3rd member which will recoup some of the cost.
I purchased the rear axle assembly yesterday, it will be in next week.. The guy said he was going to charge $250 or so to do the swap. Does that sound like a fair price?
Do you guys recommend me changing anything else out while I've got all that stuff tore apart?
I purchased the rear axle assembly yesterday, it will be in next week.. The guy said he was going to charge $250 or so to do the swap. Does that sound like a fair price?
Do you guys recommend me changing anything else out while I've got all that stuff tore apart?
05-14-2011, 06:50 PM
#31
Registered User
Join Date: Aug 2010
Posts: 242
Likes: 0
Received 0 Likes
on
0 Posts
I wanted to go with something like JB weld, but I would have had to pay someone to take the rear end off so that I could clean it well enough to be sure the JB would stick, plus, I still needed to pay someone to repair my differential, which is probably just bearings, but it could possibly be worse (ring and pinion gears as well). I will be selling my old 3rd member which will recoup some of the cost.
I purchased the rear axle assembly yesterday, it will be in next week.. The guy said he was going to charge $250 or so to do the swap. Does that sound like a fair price?
Do you guys recommend me changing anything else out while I've got all that stuff tore apart?
I purchased the rear axle assembly yesterday, it will be in next week.. The guy said he was going to charge $250 or so to do the swap. Does that sound like a fair price?
Do you guys recommend me changing anything else out while I've got all that stuff tore apart?
If all the parts and tools are in place, then the swap with a full axle assembly really shouldn't take that long, though if you include adjusting the brakes, bleeding the brakes, etc, then I think $250 is pretty reasonable
08-18-2012, 08:20 PM
#32
Registered User

Join Date: Aug 2012
Location: Davis, WV
Posts: 2
Likes: 0
Received 0 Likes
on
0 Posts
bumping an old thread after trolling the forums about the rusted out rear end problems. i had no idea this was so common. my first two 4runners were southern and had very little rust. my current '97 came from ohio, and it didn't look too bad when i picked it up. but it has sprung a leak and now i realize that the aft part of the rear axle housing is junk. i took a grinder and cleaned it up the best i could without removing the assembly and gooped some JB weld on it. it's holding for now. i've found a few housings that are in good shape, but still out of my budget at the moment. (it's race$$$$ season) i want to hang onto this runner for a while tho, so i will make plans to replace the entire assembly sooner than later. here's a few crappy iphone pics of the mess i have under there. obviously a lot of work needs to be done. i haven't had this ride very long, so flame on if you must, but the grinder, wire wheel, and some POR-15 is about to get busy underneath.
after grinding i found two nice holes in the center of the pumpkin about an inch lower than the fill hole:
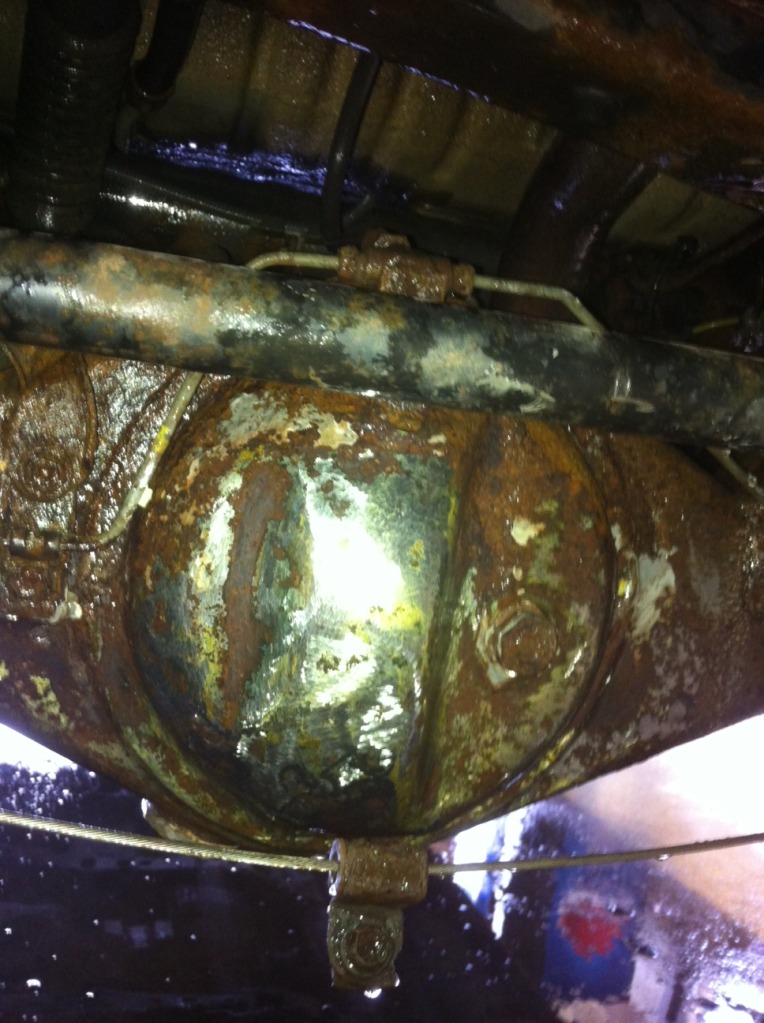
after some JB:
what i'm most concerned about is just to the left of the pumpkin under the bracket is still wet after the JB weld treatment. the leak was a fast drip and now it's just wet, but i know it's only a matter of time. i can't really get behind the bracket with the grinder or epoxy. FML
my main reason for the bump: has anyone had a new cover welded on? i would much rather go that route than replace the entire assembly if possible. mainly because i never go off road, i really don't need to upgrade to a locker, so i just need something dependable. thanks
after grinding i found two nice holes in the center of the pumpkin about an inch lower than the fill hole:
after some JB:
what i'm most concerned about is just to the left of the pumpkin under the bracket is still wet after the JB weld treatment. the leak was a fast drip and now it's just wet, but i know it's only a matter of time. i can't really get behind the bracket with the grinder or epoxy. FML
my main reason for the bump: has anyone had a new cover welded on? i would much rather go that route than replace the entire assembly if possible. mainly because i never go off road, i really don't need to upgrade to a locker, so i just need something dependable. thanks
Last edited by darkfader; 08-18-2012 at 08:26 PM.
08-19-2012, 04:32 AM
#33
Registered User
iTrader: (3)
Join Date: Apr 2007
Location: Cheshire county, NH
Posts: 509
Likes: 0
Received 0 Likes
on
0 Posts
Not for a Taco, on my 94...I had a pair of pinholes, similar location. I wire wheeled everything to bare metal and had it brazed. My father is an old time welder/fabricator, and it came out great-not beautiful, mind you.
Look into brazing, as it is done at a much lower heat than welding and won't burn through. I cut two small patches out of a dented hood, heated and shaped them and on they went.
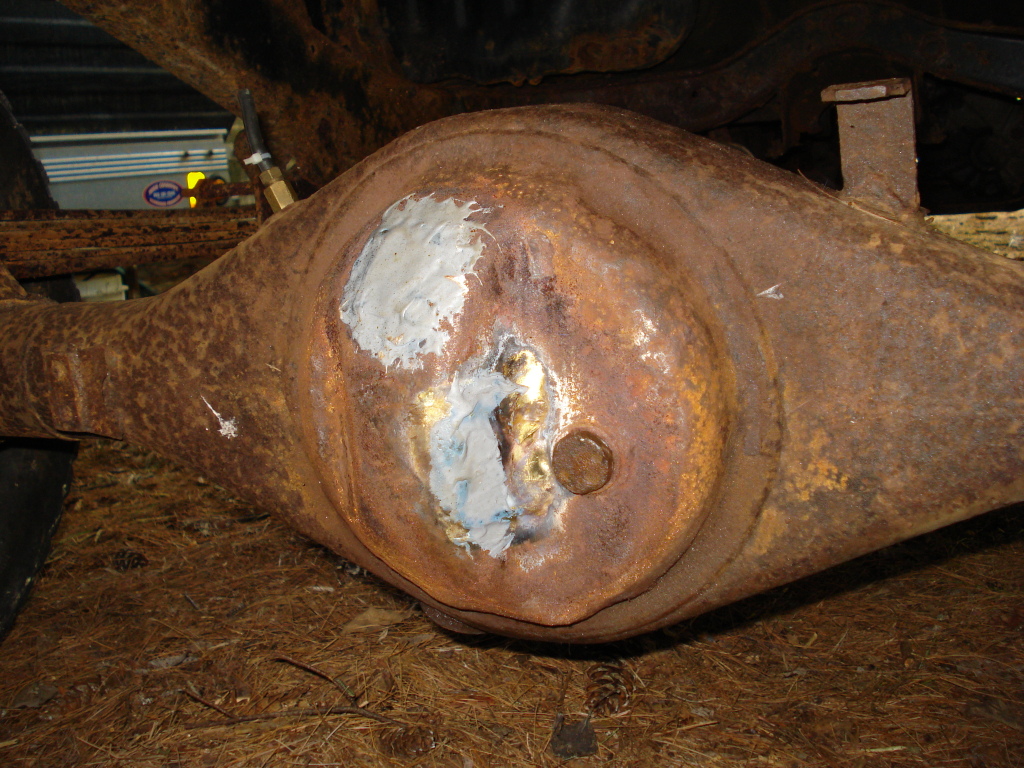
I also laid down a fair amount of JB weld afterwards because I had it and didn't want to revisit this repair. It looks like unfinished crap because it's my plow truck and will never leave my driveway.
Look into brazing, as it is done at a much lower heat than welding and won't burn through. I cut two small patches out of a dented hood, heated and shaped them and on they went.
I also laid down a fair amount of JB weld afterwards because I had it and didn't want to revisit this repair. It looks like unfinished crap because it's my plow truck and will never leave my driveway.
Last edited by Resto-noob; 08-19-2012 at 04:33 AM.
08-19-2012, 11:56 PM
#34
When I made my first comment I was unaware that this part of the housing was made so much thinner to cut down on weight so EPA fuel mileage guide lines could be meet.
Now of course they are rusting out.
Then the lack of used parts in this area due to the crushed trucks from the frame failure buy back.
It would be labor intensive to repair these just the pulling of the axles and gears and the prep work if you had to pay someone.
I did look at this it seems a pipe cap of the correct size and a filler plug installed would be the easy part of the whole job.
Just in case I need to do mine or some one else`s.
08-21-2012, 03:46 AM
#35
Registered User

Join Date: Oct 2008
Posts: 6
Likes: 0
Received 0 Likes
on
0 Posts
I just picked up a '00 4Runner from Delaware and it has the same issue. Pinhole leak at the bottom of the welded cover. Last night I made sure I could get through the rust to open the drain and fill holes, and remove the breather to make sure it's not blocked. My plan is to drain the fluid, sand the area down, JB Weld the leaking area, and then POR-15 the axle. If I see it's too far gone then I'll weld a patch over. Last resort is the Marlin cover, but I really don't want to tear the whole axle down. It's a good option at only $59, though... http://www.marlincrawler.com/armor/a...erential-armor
08-29-2012, 04:36 AM
#36
Contributing Member

I fail to see how the Marlin cover will help. It's a cover, with a large hole for the fill plug. At best, it would contain the leaking until the gear oil finally flows from the fill plug cutout. Not to mention, the space between the Marlin cover and the original, rusted cover, would be a lovely place for rust to continue its work...
I've 'repaired' my neighbor's leaking axle housing (2002 4Runner) using the JB Weld method. We both know it's only a matter of time before another pinhole develops.
Not one of Toyota's finest moments.
Andreas
I've 'repaired' my neighbor's leaking axle housing (2002 4Runner) using the JB Weld method. We both know it's only a matter of time before another pinhole develops.
Not one of Toyota's finest moments.
Andreas
08-29-2012, 08:35 AM
#37
Registered User
Join Date: Oct 2008
Posts: 6
Likes: 0
Received 0 Likes
on
0 Posts
You're right. I was thinking you would cut off the old cover and then weld the Marlin one in its place but I see now that's not how it's intended to be used. I suppose you can make some modifications (weld in a bung for the fill plug and space it enough to clear the gears) and use it as a replacement, though. Beats paying for even a used axle, let alone a new one from Toyota.
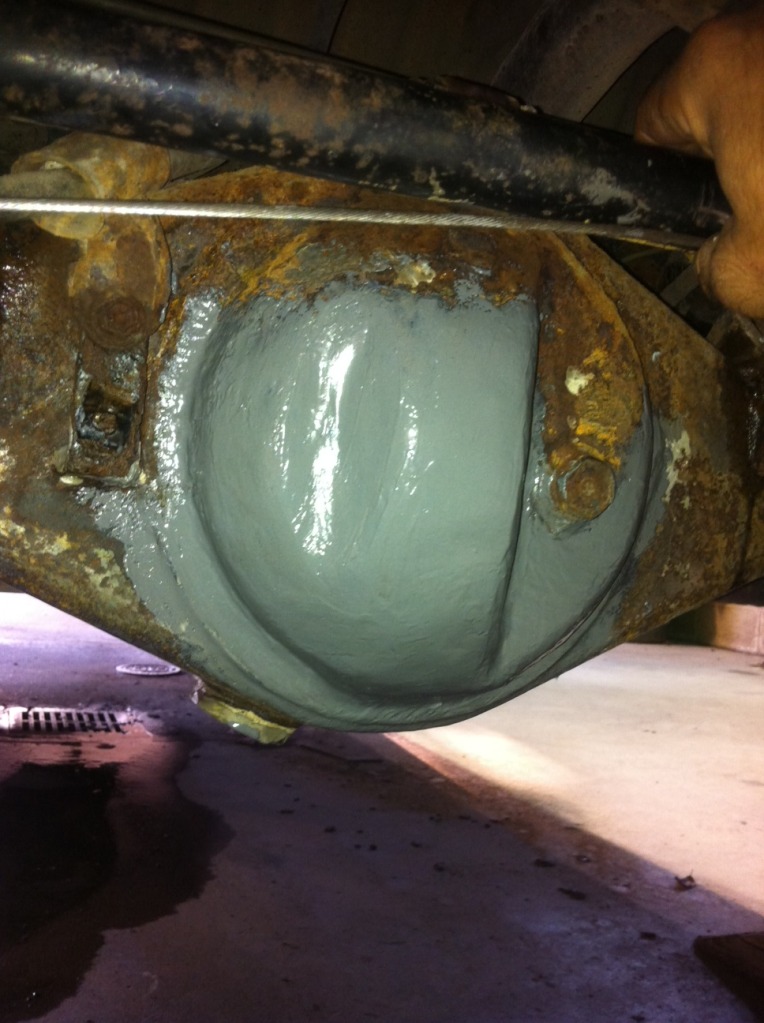
I ended up just epoxying mine and then coating with POR-15. It seemed like there was still good steel under the rust. We'll see how it holds up. I POR-15'd the hitch too, and it came out looking decent. Nice glossy black instead of the rust/faded paint that was there. Just makes the rusty bumper look worse over it...
I ended up just epoxying mine and then coating with POR-15. It seemed like there was still good steel under the rust. We'll see how it holds up. I POR-15'd the hitch too, and it came out looking decent. Nice glossy black instead of the rust/faded paint that was there. Just makes the rusty bumper look worse over it...
10-07-2012, 07:50 PM
#38
Registered User

Join Date: Sep 2012
Posts: 2
Likes: 0
Received 0 Likes
on
0 Posts
Im also bumping up this thread, picked up a '95 runner from a buddy and found the rear diff leaking, figured it would be ok for a few miles but I was wrong. Last time i drove it the rear diff was smoking and oil was bubbling out through the holes in the cover.
Anyone know if the axle housing and the pumpkin that goes inside will be enough? I shouldnt have to replace everything from the hubs inwards should I?
Anyone know if the axle housing and the pumpkin that goes inside will be enough? I shouldnt have to replace everything from the hubs inwards should I?
08-08-2016, 10:20 AM
#39
Registered User

Join Date: Aug 2016
Posts: 5
Likes: 0
Received 0 Likes
on
0 Posts
02 taco rear locker
I know this is an old thread but, I'm sure others are still looking for a solution. Here's my solution to a rusted pig cover. Barnes 4wd has an after market cover that works just fine. You will need access to a grinder, die grinder(s), welder and various other hand tools if you are doing this on the vehicle. Be prepared to replace the brake lines if they are old. I recommend removing the 3rd member. I didn't do this so I had some extra flushing to do when I was done. You will need the 3rd member in place when trying to fit the new cover. There are a couple of clearance issues. Nothing bad, just something to be aware of. Coat the inside of the cover with Diechem blue so you can see where the bolts contact the cover. A couple of options for the clearance problem. Grind the two bolt heads a little to clear or heat the cover in those spots and pound a couple of dents in the cover. I found the worst part of this project was all the grinding to remove the old cover and prep the pig and new cover. Before welding the new cover on be sure to check the factory welds for any pinhole leaks first. Mine had one tiny leak. While the pig is open, now is a good time to flush the bottom of the pig out. After welding mine in place and filling with gear lube I drove it a few miles and brought it back and drained it again for a final flush before refilling it the last time. Hope this helps with your project or deciding if it something you want to tackle. Make friends with someone who has the right equipment.


