How to: Replace steering rack guide- Pictures
 10-10-2010, 02:37 PM
#21
Registered User

Join Date: Feb 2009
Location: Maine
Posts: 134
Likes: 0
Received 0 Likes
on
0 Posts
It's technically called a coupler/threaded rod connector/tube nut, it's threaded in the middle. The 5/8" is the thread diameter and the 11 is threads per inch or something like that.
The outside diameter of the coupler happens to be around 24mm or whatever the hex size is.
So, no dude at Home Depot answered your question correctly.

The outside diameter of the coupler happens to be around 24mm or whatever the hex size is.
So, no dude at Home Depot answered your question correctly.
Last edited by LifeOnABoard; 10-10-2010 at 04:16 PM.
 10-11-2010, 01:45 PM
#22
Registered User

Join Date: Jan 2010
Location: Baltimore
Posts: 30
Likes: 0
Received 0 Likes
on
0 Posts
JR,
I read that thread late last night and was thoroughly convinced that the modification to the steering column slip-joint made perfect sense.
So today, instead of doing the things I originally set out to do around the house, I dove into this project. From start to finish, it took all of 1.5 hours and was a complete & utter success! I am very pleased. The slight click/knock that I would hear backing out of my driveway as I turned is gone. A short test drive revealed that the steering simply feels more planted & solid.
I did the entire procedure on the fly, as reading the TTORA write-up made so much sense to me. The only deviation I made was to give each 'flat' of the slip joint a pretty little tack weld. If two are good, six must be better.
I think I've convinced my buddy with a '98 that this is required for his as well.
Andreas
I had a tiny bit of play in the steering. Not enough that it really bugged me about town but on the highway for hours on end it was a matter of getting sick of the constant steering correction that you do at high speed. After checking out the before and after on aowRS' I said "Let's do it".
It took about 90 minutes in total if you factor out the cleaning up of wiring harnesses, reenforcing of the air ducts and vacuuming up dozens of these Asian Stinkbugs that are all over the place. Of course that is 90 minutes when you have access to any tool that you want and having a welder up and ready to go at a moments notice.
The result... All is well in the steering department. No play whatsoever and I couldn't be happier with the repair/mod.
Last edited by avalonracing; 10-11-2010 at 03:53 PM.
10-11-2010, 02:40 PM
#23
Registered User
If you read THIS thread, you know whats going on here, but if you haven't its a good read, but here is a basic rundown
Inside your steering rack, there is a guide that keeps everything moving the right way, over time it can loosen, and lead to sloppy steering, or a mysterious front end clunk. The original part was a roller on bearings, this was replaced with a sold piece in later model years.
This video shows what happens when one gets really worn out, and this is the one that I am replacing.
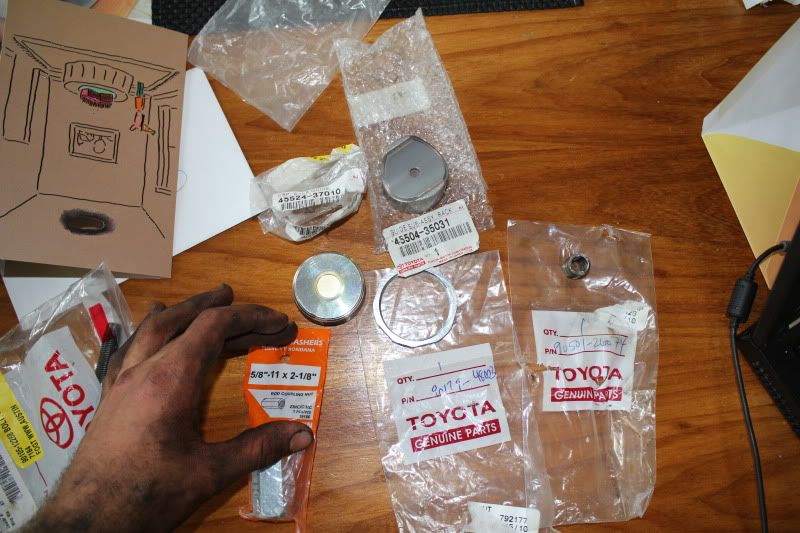
Its pretty simple to do, all you need is:
The parts from Toyota (read before ordering)
End sub-assembly, steering rack no. 2/ Guide sub/assembly
45504-35031-
Spring(for steering rack guide)/Spring, compression
90501-26074-
cap, Steering rack guide spring/ Cap, rack guide spring
45524-37010-
Nut(for steering rack guide spring cap/ nut
90179-48003-
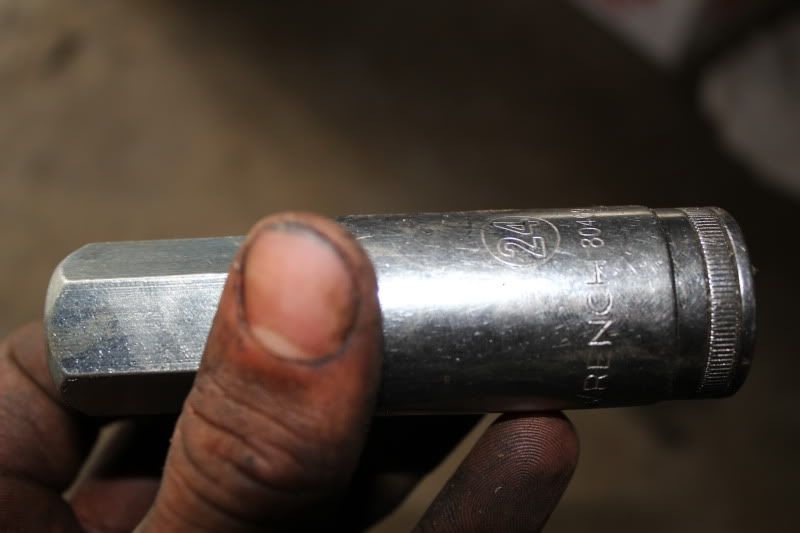
Then you'll need a 5/8th inch threaded rod connector (Mine was $1.24 at home depot)
And a 24mm socket and ratchet
Also, a magnet
A dollop of grease
And lastly a big wrench
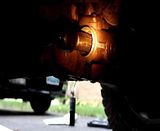
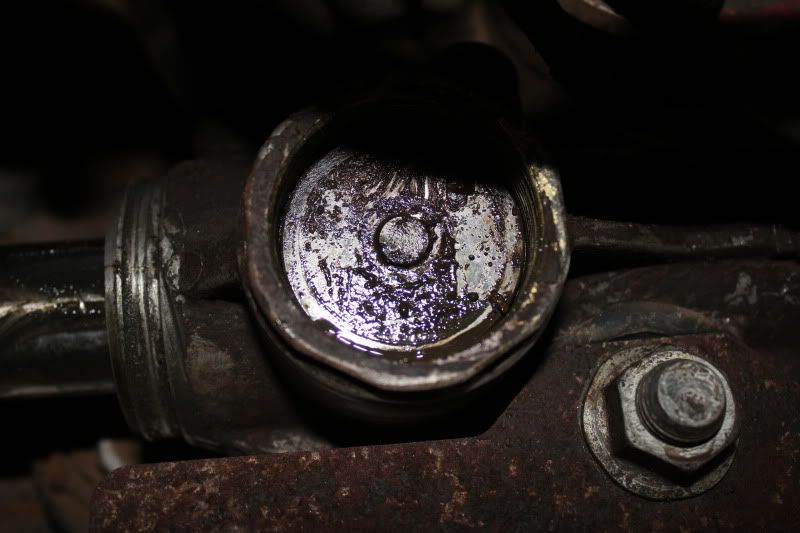
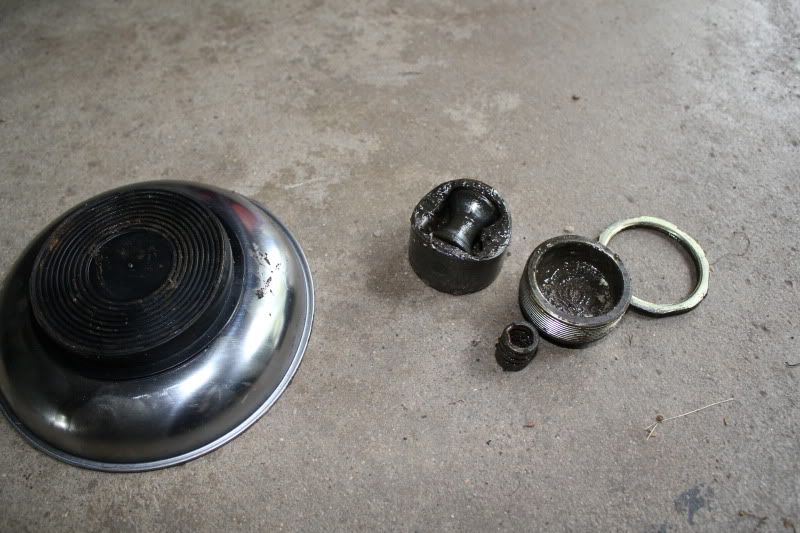
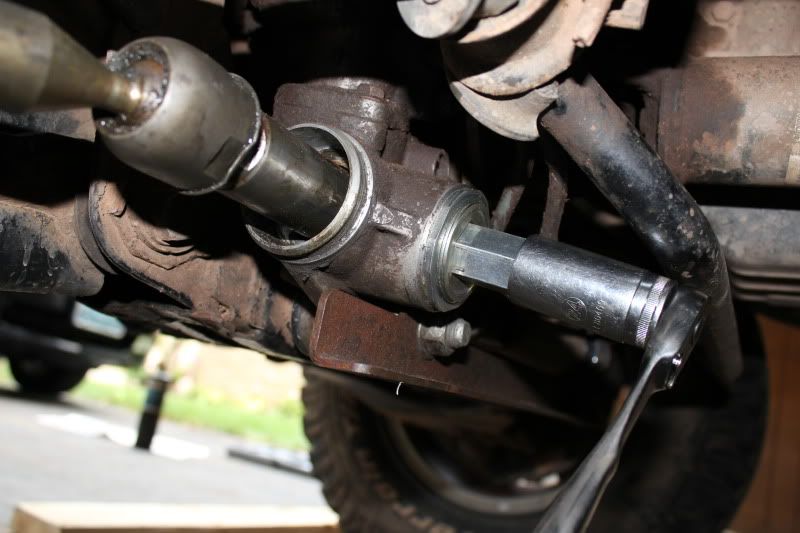
Here is the item we will be replacing, that large nut you can see on the rack.
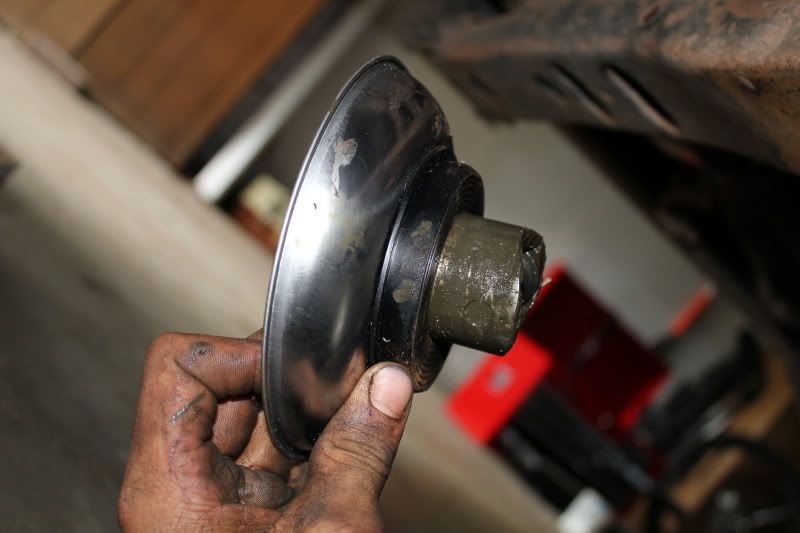
Then your left with this, the guide itself
I used the magnet on my parts holder to pull this out, you may have a better way, but I couldn't get any pliers on it.
Then your left with a pile of old parts
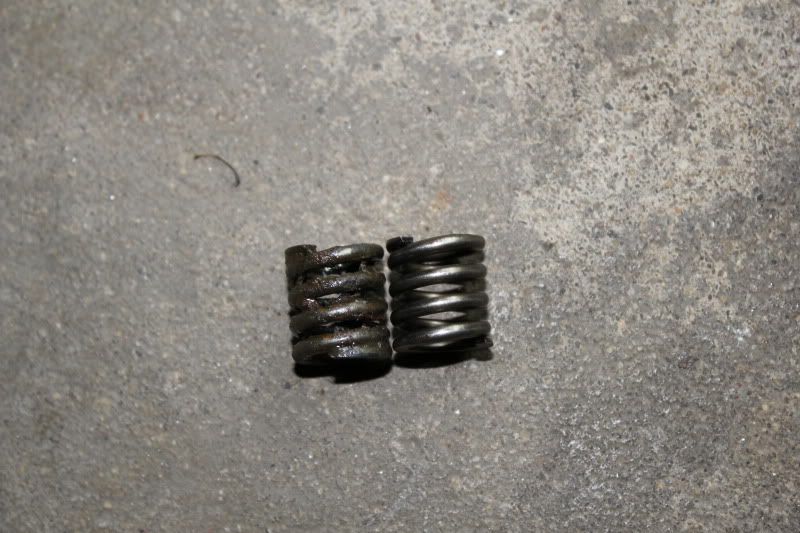
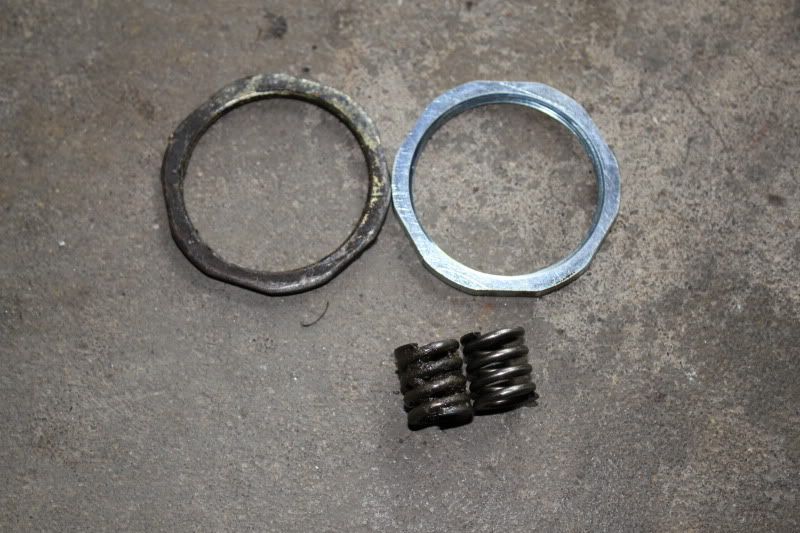
Money savers listen up here, I found the old spring, and new spring, and the old guide bolt were the same sizes as the new stuff. If you want to save a bit you could probably re-use them
Then its time to put the new stuff in
Slide in the new guide

Then take the guide nut (the big ring thing) and spin it onto the new guide cap.
Then take the gude cap, and put a dollop of grease into the indent for the spring, this will help hold the spring on there while you put it in and tighten the cap
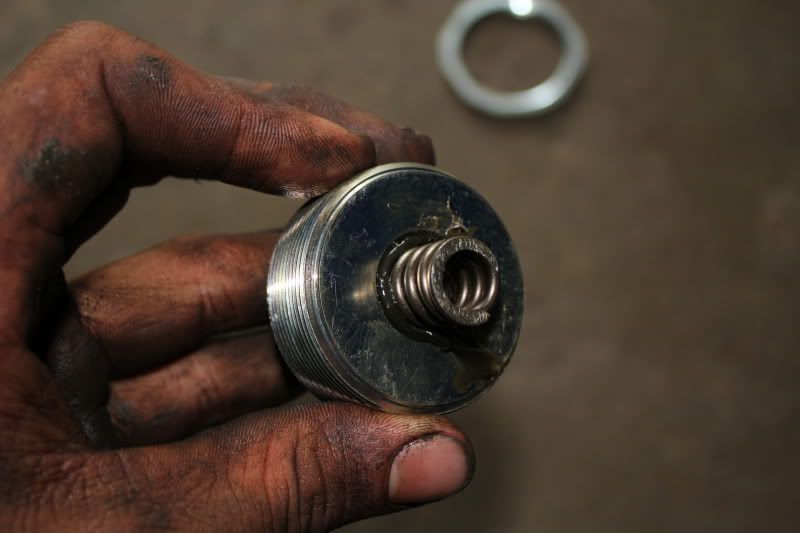
Thread the guide in by hand, it will tighten for a bit then you'll need to use your 24mm and the rod connector
I tightened it up until it was 'tight' then backed it off a quarter turn. The torque spec is (18ft.lbs then back it off 19deg), but I don't have a wrench here that will measure that low, so basically if its too lose, you will notice that the slop is still there, and too tight, you will feel it in the steering wheel. I had 1 or 2 threads left showing when it was all done.
Hopefully this helps some people! If you have any questions or I left something out feel free to PM me!
Inside your steering rack, there is a guide that keeps everything moving the right way, over time it can loosen, and lead to sloppy steering, or a mysterious front end clunk. The original part was a roller on bearings, this was replaced with a sold piece in later model years.
This video shows what happens when one gets really worn out, and this is the one that I am replacing.
Its pretty simple to do, all you need is:
The parts from Toyota (read before ordering)
End sub-assembly, steering rack no. 2/ Guide sub/assembly
45504-35031-
Spring(for steering rack guide)/Spring, compression
90501-26074-
cap, Steering rack guide spring/ Cap, rack guide spring
45524-37010-
Nut(for steering rack guide spring cap/ nut
90179-48003-
Then you'll need a 5/8th inch threaded rod connector (Mine was $1.24 at home depot)
And a 24mm socket and ratchet
Also, a magnet
A dollop of grease
And lastly a big wrench
Here is the item we will be replacing, that large nut you can see on the rack.
Then your left with this, the guide itself
I used the magnet on my parts holder to pull this out, you may have a better way, but I couldn't get any pliers on it.
Then your left with a pile of old parts
Money savers listen up here, I found the old spring, and new spring, and the old guide bolt were the same sizes as the new stuff. If you want to save a bit you could probably re-use them
Then its time to put the new stuff in
Slide in the new guide
Then take the guide nut (the big ring thing) and spin it onto the new guide cap.
Then take the gude cap, and put a dollop of grease into the indent for the spring, this will help hold the spring on there while you put it in and tighten the cap
Thread the guide in by hand, it will tighten for a bit then you'll need to use your 24mm and the rod connector
I tightened it up until it was 'tight' then backed it off a quarter turn. The torque spec is (18ft.lbs then back it off 19deg), but I don't have a wrench here that will measure that low, so basically if its too lose, you will notice that the slop is still there, and too tight, you will feel it in the steering wheel. I had 1 or 2 threads left showing when it was all done.
Hopefully this helps some people! If you have any questions or I left something out feel free to PM me!
James
10-11-2010, 03:03 PM
#24
Contributing Member

Yup he convinced me. As well as two 8 hour (each way) trips to New England in the last 30 days.
I had a tiny bit of play in the steering. Not enough that it really bugged me about town but on the highway for hours on end it was a matter of getting sick of the constant steering correction that you do at high speed. After checking out the before and after on aowRS' I said "Let's do it".
It took about 90 minutes in total if you factor out the cleaning up of wiring harnesses, reenforcing of the air ducts and vacuuming up dozens of these Asian Stinkbugs that are all over the place. Of course that is 90 minutes when you have access to any told that you want and having a welder up and ready to go at a moments notice.
The result... All is well in the steering department. No play whatsoever and I couldn't be happier with the repair/mod.
Andreas
10-11-2010, 03:17 PM
#25
Contributing Member
Just out of curiosity did you do allot of hard off roading or mostly highway driving. My 01 is at 300K and I the only thing I've done on the front end is ball joints and an alignment. My steering rack does weep a VERY small amount of fluid but its still really tight steering.
I'm very sensitive to changes in a car's behavior over time, rattles, knocks, etc. I purchased the truck new with 2 miles on the clock, so I've been with it through all of these changes. It's been a wonderful vehicle that I intend to keep for many years. Believe it or not, I'm jealous of your 300k mile status.
Andreas
11-15-2010, 12:25 PM
#26
Registered User
Join Date: Sep 2008
Posts: 78
Likes: 0
Received 0 Likes
on
0 Posts

jreask has a 2001, and said earlier in this thread that this fixed his issues, but that he already had the new guide, so he didn't have to replace it, but isn't this fix replacing these parts the cause of the problem?
I am asking because I feel vertical slop in my front end when going over bumps, as well as when slowing down to a stop, and moving forward from a stop at times. I attempted to do this fix last weekend, but didn't have the tool to remove the cap (Which is the newer style indented cap you need to use the threaded rod to remove) Does that mean that I have the new guide as well?
Last edited by Whiplash Willy; 11-15-2010 at 12:27 PM.
11-15-2010, 03:24 PM
#27
Registered User
Thread Starter
Join Date: Apr 2008
Location: Marquette, MI
Posts: 484
Likes: 0
Received 0 Likes
on
0 Posts
Well hypothetically the new version can wear out too, it makes sense, but really I don't know. Its worth a look, and you can check with the boot off in the same manner i showed in the video to see if you have slop.
01-16-2011, 04:01 AM
#28
Registered User
iTrader: (1)

Join Date: Jan 2005
Location: Spokane, WA
Posts: 199
Likes: 0
Received 0 Likes
on
0 Posts
Just finished replacing my rack guide. What a quick fix. The only sort of tricky part was getting the nut and binder nut tightened to the right torque. We tried three times before getting it right. I helps to have a friend hold one wrech while tightening the other.
I still have leaking seals somewhere in the rack, but otherwise the performance is good as new. Thanks for the writeup. It makes a noticable difference. I can't wait to try it out off road where I really used to have the slop.
I still have leaking seals somewhere in the rack, but otherwise the performance is good as new. Thanks for the writeup. It makes a noticable difference. I can't wait to try it out off road where I really used to have the slop.
03-25-2011, 03:03 PM
#29
Registered User
Join Date: Jul 2009
Location: California City, CA
Posts: 198
Likes: 0
Received 0 Likes
on
0 Posts
Ok, These info. is what I needed to hear. But I do have a question; Since my 4Runner is a 1997 SR5, The part numbers posted above are for a trucks 00-up. Will this guide fit the rack & pinion on my truck? I'm aware of the old/new design of the guide. Thanks!!!
03-25-2011, 07:37 PM
#30
Registered User
Thread Starter
Join Date: Apr 2008
Location: Marquette, MI
Posts: 484
Likes: 0
Received 0 Likes
on
0 Posts
Then let us know what you find!
04-03-2011, 11:26 AM
#32
Registered User

Join Date: Apr 2011
Posts: 1
Likes: 0
Received 0 Likes
on
0 Posts
2000 tacoma rack adjustment
Yukon no offense but that rack is shot. I cannot believe the dirt and grime in that rack. It is not supposed to look like mud. Your wasting your time and money with this rack. Water and mud got inside that rack and it will only cause you more problems down the road.
James
James
04-07-2011, 07:38 AM
#33
Registered User

Join Date: Nov 2010
Location: CO
Posts: 18
Likes: 0
Received 0 Likes
on
0 Posts
I just had my '97 apart a couple weekend ago after seeing this thread and experiencing some binding in the steering. My '97 has the old roller style guide and it was in great shape but there was some slop as described in this thread. I marked everything before taking it apart and once back together, with the slop minimized and the steering feeling great, my adjustment [mark] was maybe 10� tighter than it was originally.
The binding, as it turned out, was due to an oversight on my part when making a steering shaft spacer for the body lift. I made the clearance holes for the rag joint pins too tight, effectively rendering the rag joint useless.

The only thing useful I'd add to this thread is that the giant lock nut should be loosened before trying to back out the giant adjustment cap/plug. I used large channellock's to loosen the nut. Also, the magnetic parts tray was an excellent tip for removing the guide from the rack.
07-27-2011, 12:01 PM
#34
Registered User
Join Date: Jul 2008
Location: Laporte CO
Posts: 54
Likes: 0
Received 0 Likes
on
0 Posts
I will be doing this soon so I have a few questions..
1) Is the threaded rod connector just for using as a large hex bit for sticking on the new cap which is concave not convex? Since I have a 24mm hex I should not need this at all right?
2) It should be evident how to install/adjust the ring thing based on how it comes out right? I am not sure on this part based on the pics.
3) All this stuff should cost about $70 something at the dealer?
Last edited by Swampwalker; 07-27-2011 at 12:04 PM.
07-27-2011, 06:42 PM
#35
Registered User
Thread Starter
Join Date: Apr 2008
Location: Marquette, MI
Posts: 484
Likes: 0
Received 0 Likes
on
0 Posts
1. Correct.
2. yes, it is a locknut to keep the guide adjusted correct.
3. I forget prices, I think I posted them, but It wasn't bery much and you could re-use the spring and lock run I believe, but its been a while.
2. yes, it is a locknut to keep the guide adjusted correct.
3. I forget prices, I think I posted them, but It wasn't bery much and you could re-use the spring and lock run I believe, but its been a while.
08-05-2011, 09:04 AM
#36
Registered User
Join Date: Jul 2008
Location: Laporte CO
Posts: 54
Likes: 0
Received 0 Likes
on
0 Posts
Thanks, it was about $78 for everything... the spring and locking thing were so cheep I got new ones.
Going to do this this weekend, hope it won't take long since I shouldn't have to jack it up.
Going to do this this weekend, hope it won't take long since I shouldn't have to jack it up.
08-08-2011, 03:04 PM
#38
Registered User

Join Date: Apr 2008
Posts: 16
Likes: 0
Received 0 Likes
on
0 Posts
I also possibly have this issue in a 99 diesel surf. I definitely have the old style of bush - is it enough just to tighten it or is the bearing itself actually shot in general?
Matt
Matt
09-20-2011, 06:56 AM
#39
Contributing Member
I'm getting a small amount of play over un-even surfaces, so I intend to get the truck on stands, feel for any play local to the left end of the rack, and then snug the adjuster slightly...
Andreas
Andreas
09-21-2011, 06:27 AM
#40
Registered User
Join Date: Nov 2005
Location: SouthWest Littleton, Colorado
Posts: 1,205
Likes: 0
Received 1 Like
on
1 Post
It might be worth giving it a try first.


