yotagoon's 1986 4runner Build
 02-19-2013, 06:42 PM
#1
Registered User
Thread Starter
Join Date: Dec 2012
Location: Pittsboro, NC
Posts: 59
Likes: 0
Received 0 Likes
on
0 Posts
yotagoon's 1986 4runner Build
Sorry but lots of pictures
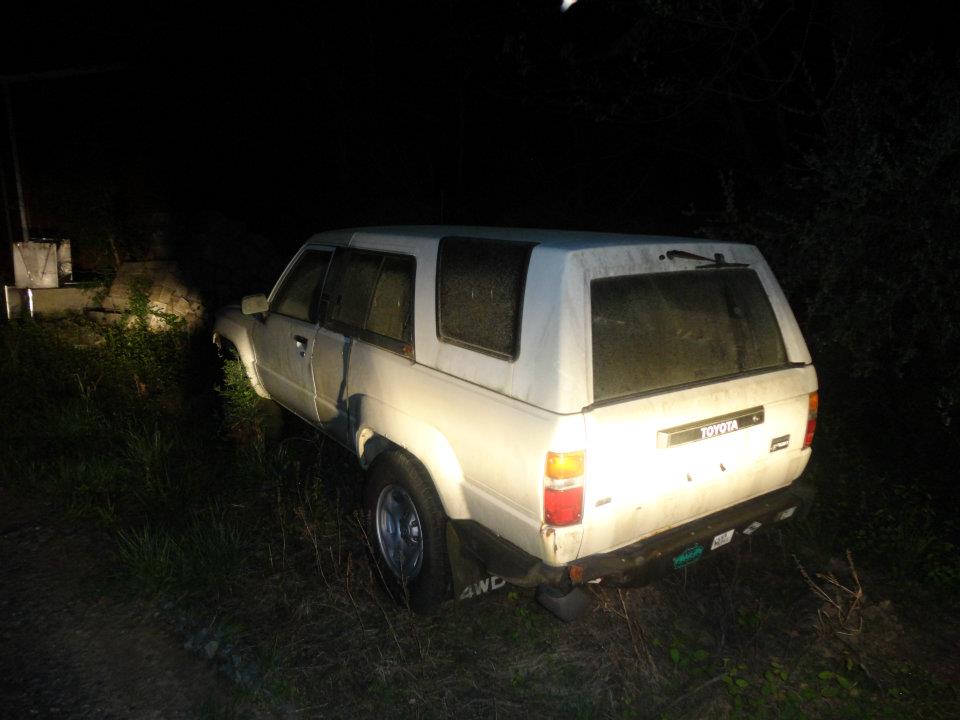
Pulled out of the woods a few months ago and have been busting knuckles on it here and there but here lately iv'e been busting but on it. Body has been sitting in the woods for around around 15 years and the motor has been sitting in it for the last 7 or 8.
The night i randomly decided i was going to rescue it from its resting place
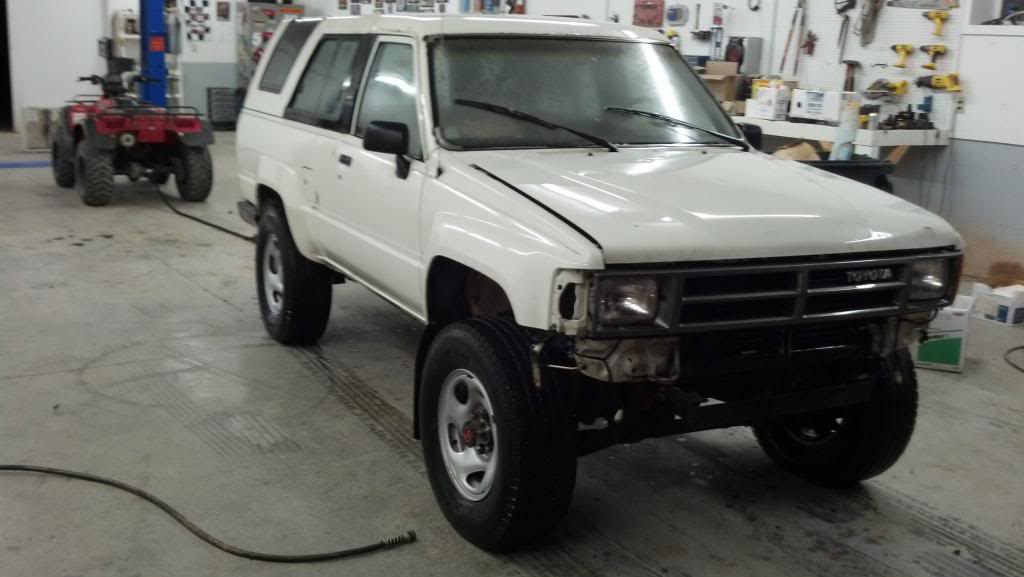
After a purple power bath:
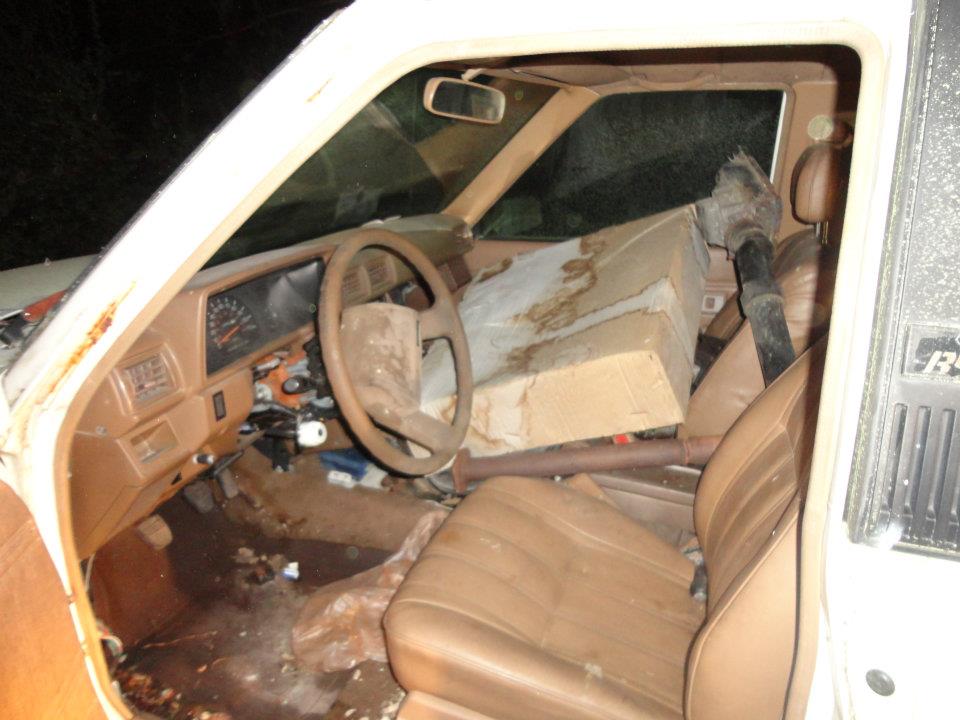
Carpet delete mod, well actually the whole interior since the weather stripping was bad and mother nature had made here way inside. (there was literally an ants nest in this truck)

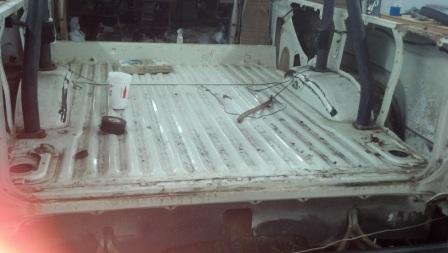
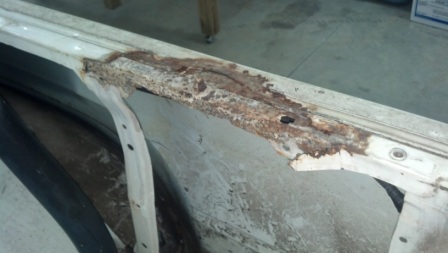
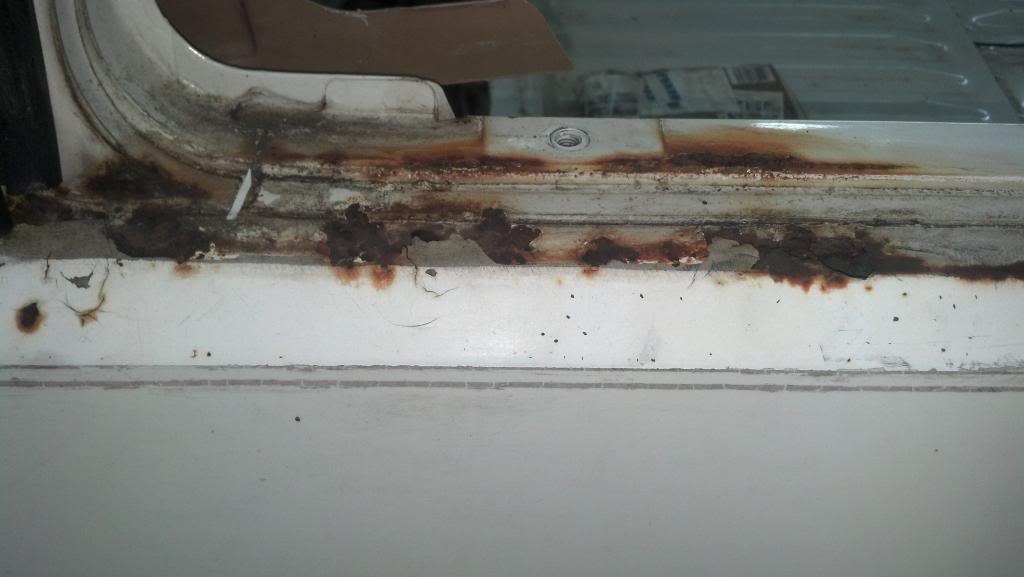
Surprisingly no rust on holes in the floor pan but here's where she has the cancer. My buddy's dad is super good at body work and says he will guide me through it and help out here and there.

I've always wanted to learn how to do body work so i guess i have the perfect project to learn on I guess...
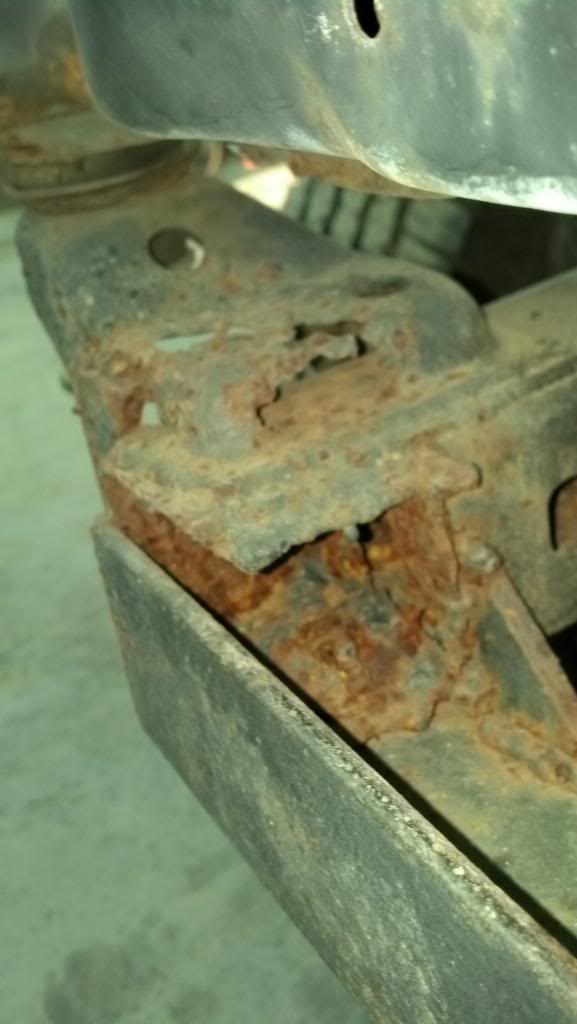
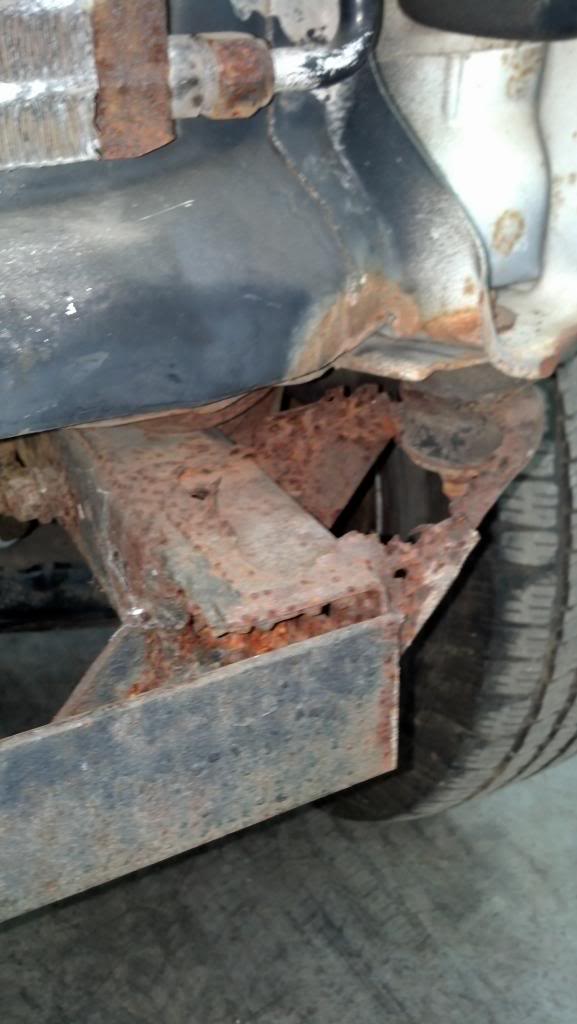
The frame is solid except for the front, i'm not sure what i'm going to do about this since i have no fab skills
So here's the progress i've made
Swapped the ECU, gas tank, and fuel line from my parts truck that was running not long ago (It has a more rust that this truck so don't ask)
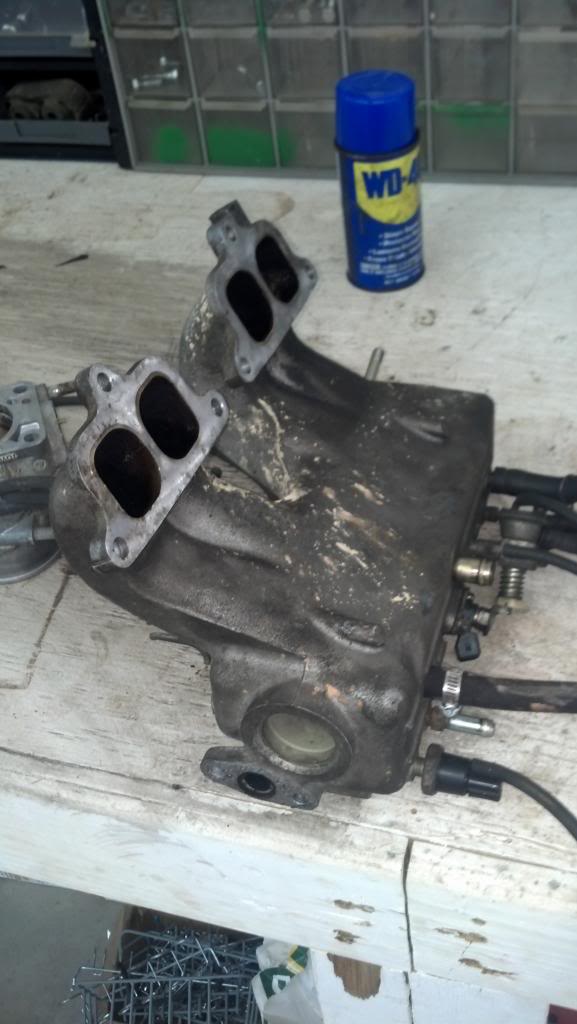
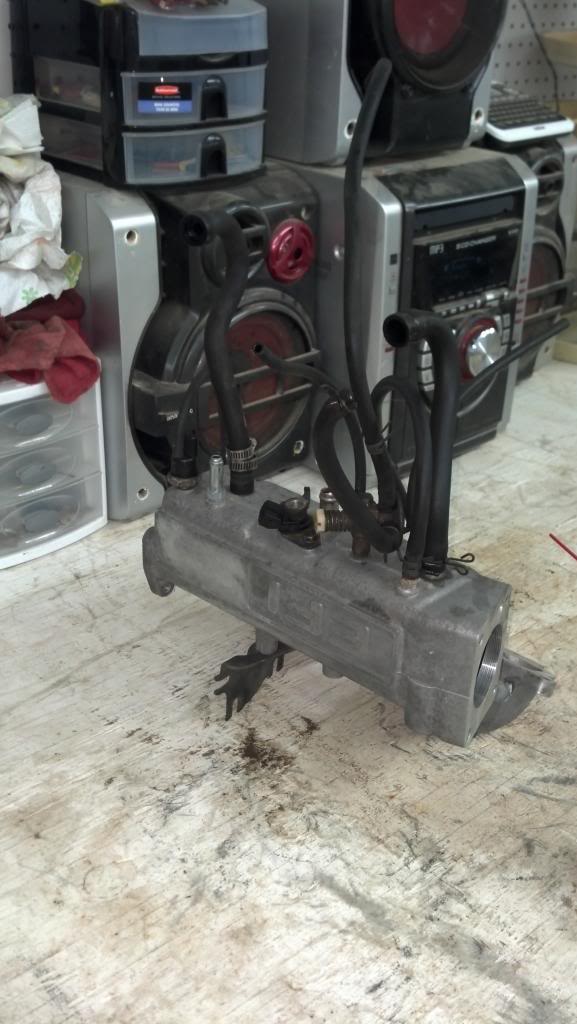
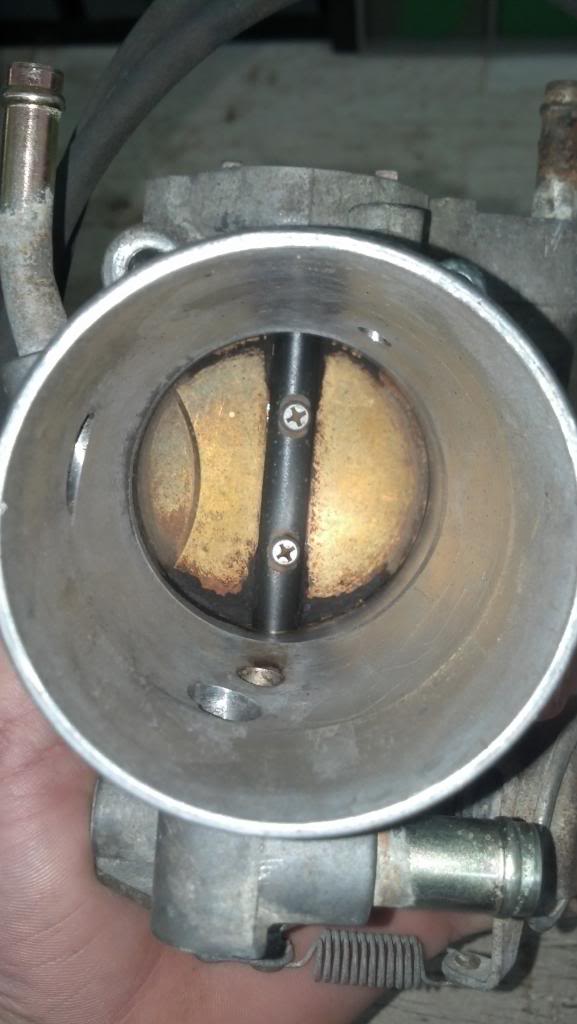
Cleaned up the upper intake that came with the truck, the throttle body, and lower intake from parts truck.
Now in the process of hooking up everything to the motor, check the valve clearances, check the compression, if it's acceptable then set the timing. (is that the right order of things?)
Tomorrow i'll start plugging in the wiring harness and all that fun stuff
Pulled out of the woods a few months ago and have been busting knuckles on it here and there but here lately iv'e been busting but on it. Body has been sitting in the woods for around around 15 years and the motor has been sitting in it for the last 7 or 8.
The night i randomly decided i was going to rescue it from its resting place
After a purple power bath:
Carpet delete mod, well actually the whole interior since the weather stripping was bad and mother nature had made here way inside. (there was literally an ants nest in this truck)
Surprisingly no rust on holes in the floor pan but here's where she has the cancer. My buddy's dad is super good at body work and says he will guide me through it and help out here and there.
I've always wanted to learn how to do body work so i guess i have the perfect project to learn on I guess...
The frame is solid except for the front, i'm not sure what i'm going to do about this since i have no fab skills
So here's the progress i've made
Swapped the ECU, gas tank, and fuel line from my parts truck that was running not long ago (It has a more rust that this truck so don't ask)
Cleaned up the upper intake that came with the truck, the throttle body, and lower intake from parts truck.
Now in the process of hooking up everything to the motor, check the valve clearances, check the compression, if it's acceptable then set the timing. (is that the right order of things?)
Tomorrow i'll start plugging in the wiring harness and all that fun stuff
 02-19-2013, 06:59 PM
#3
Registered User
Thread Starter
Join Date: Dec 2012
Location: Pittsboro, NC
Posts: 59
Likes: 0
Received 0 Likes
on
0 Posts
A long sometimes very frustrating road but its gonna be worth it! These 1st gen 4runner's have the sexiest body lines, and there just cool! It's a suv, but then its like a truck and a jeep at the same time 
02-19-2013, 07:06 PM
#4

Thought that rust monster lurking in the woods looked familar.
Here is the beginning/original-thread. If you ask one of the moderators they'll probably combine that one into here for you. Just remeber to book mark it in case we bump it off the front page again
I know you have direct access to a body guy already but here is some second opinions and stuff.
Your passenger side front body mount looks salvagable, just clean off the rust and treat it. The drivers side is borderline unsafe, if you can't salvage the mounts from the parts truck you can use some plate to firm it up.
The cap support, quarter panel upper, It's had to say from the pictures but hopefully that is just surface rust. I'd tackle that second. Do the tailgate area first since it's pretty much straight it'll be a good warm up and you'll be familar with the sheet metal break when you do the quarter panel. The A-pillar, window mounts should be lots of fun, if you have someone do this for you pay close attention and ask lots of questions it'll be a gold mine of a learning experience.
I really like how you arranged those rust pictures, "Oh thats not to bad.. Ew.. Oh thats gonna be fun.. Ouch.. HOLY CRAP!"
02-19-2013, 07:16 PM
#6
Registered User
Thread Starter
Join Date: Dec 2012
Location: Pittsboro, NC
Posts: 59
Likes: 0
Received 0 Likes
on
0 Posts
4x4 station wagon with removable top, i like that.  I'm going to get my buddies dad over sometime soon to get a look at it and his opinion. He's been doing this kinda stuff longer than i've been alive so i'm really wanting to hear his thoughts on it.
As for the original thread i'll just ask a administrator to delete the original thread.
I'm going to get my buddies dad over sometime soon to get a look at it and his opinion. He's been doing this kinda stuff longer than i've been alive so i'm really wanting to hear his thoughts on it.As for the original thread i'll just ask a administrator to delete the original thread.
02-19-2013, 07:59 PM
#7
Super Moderator
Staff
iTrader: (1)
Join Date: Aug 2008
Location: Anderson Missouri
Posts: 11,788
Likes: 0
Received 22 Likes
on
20 Posts
Your runner cleaned up nicely. Doing body work just takes a little patience and time and having someone to show you some things will help you out. I have a white 88 Runner and right now it is my all time favorite truck. On the link below for my 88 Runner I tried to add alot o the common problems I have found when working on these. Most is posted on page one and I am always adding more to it. Welcome to Yotatech and looking forward to your build.
Trending Topics
02-20-2013, 06:16 PM
#9
Registered User
Thread Starter
Join Date: Dec 2012
Location: Pittsboro, NC
Posts: 59
Likes: 0
Received 0 Likes
on
0 Posts
Was planning on getting a lot done this afternoon but it looks like i'm going to need to get a tap and die set. All the bolt holes in the block where stopped up from dirt-dobbers. I chipped that stuff out a while ago and and cleaned out with WD but the threads need to be cleaned up.  Hopefully i can get on that tomorrow.
Hopefully i can get on that tomorrow.
02-20-2013, 07:25 PM
#10
Oh I don't imagine you could do me a favor and take a few measurments, since you have your interior stripped, maybe?
I need to triangulate the location for the seatbelt mounts on the tranny bulge. So I can drill the holes for the bucket seat type seat belts.
Measure center to center between the inner rear seat mount hole to the seat belt hole. Down the body, from center to center. Across the body from center to center. (Hope that make sense). A roofing/builders square and tape measure, or even a good photo would get me close enough.
I actually took the measurements at the salvage yard but didn't write them down, and of course forgot by the time i was back in the truck. My cab wasn't pre drilled, and I'd like to get them in somewhere near the right area incase I ever order a new carpet I don't want extra holes if it can be avoided.
02-20-2013, 08:12 PM
#11
[QUOTE=yotagoon;52044409]...i was going to rescue it from its resting place...[QUOTE]
Kudos to you! It wud be shame to let it rot /go to a landfill. Best wishes with the build.
I applied sound-deadener on my floor, and my carpet is still in good condition so I put it back.
Just an idea that you might consider ... if my carpet needed replacement, I would simply strip floor, bedliner it, and instead of re-installing carpet, just use anti-fatigue mat trimmed to shape so they'd be easy to remove- they'll provide good sound and heat-proofing, and if interiro gets flooded or something spills, mats are easily-removed to hose down, and since there's nothing to retain moisture (like carpet) insides will dry quickly and less chances for rusting.
Amen to that!
If only we had rear doors...
Kudos to you! It wud be shame to let it rot /go to a landfill. Best wishes with the build.
...Carpet delete mod...
Just an idea that you might consider ... if my carpet needed replacement, I would simply strip floor, bedliner it, and instead of re-installing carpet, just use anti-fatigue mat trimmed to shape so they'd be easy to remove- they'll provide good sound and heat-proofing, and if interiro gets flooded or something spills, mats are easily-removed to hose down, and since there's nothing to retain moisture (like carpet) insides will dry quickly and less chances for rusting.
Amen to that!
If only we had rear doors...
02-21-2013, 05:07 PM
#12
Registered User
Thread Starter
Join Date: Dec 2012
Location: Pittsboro, NC
Posts: 59
Likes: 0
Received 0 Likes
on
0 Posts
Oh I don't imagine you could do me a favor and take a few measurments, since you have your interior stripped, maybe?
I need to triangulate the location for the seatbelt mounts on the tranny bulge. So I can drill the holes for the bucket seat type seat belts.
Measure center to center between the inner rear seat mount hole to the seat belt hole. Down the body, from center to center. Across the body from center to center. (Hope that make sense). A roofing/builders square and tape measure, or even a good photo would get me close enough.
I actually took the measurements at the salvage yard but didn't write them down, and of course forgot by the time i was back in the truck. My cab wasn't pre drilled, and I'd like to get them in somewhere near the right area incase I ever order a new carpet I don't want extra holes if it can be avoided.
I need to triangulate the location for the seatbelt mounts on the tranny bulge. So I can drill the holes for the bucket seat type seat belts.
Measure center to center between the inner rear seat mount hole to the seat belt hole. Down the body, from center to center. Across the body from center to center. (Hope that make sense). A roofing/builders square and tape measure, or even a good photo would get me close enough.
I actually took the measurements at the salvage yard but didn't write them down, and of course forgot by the time i was back in the truck. My cab wasn't pre drilled, and I'd like to get them in somewhere near the right area incase I ever order a new carpet I don't want extra holes if it can be avoided.
02-22-2013, 08:40 AM
#14
BTW, if you'd like additional heat insulation (floor above exhaust run), Thermo-Shield from pep Boys (or equivalent) works really well for Chefyota4x4 and me (see my sound-proofing post).
02-26-2013, 01:01 AM
#15
Super Moderator
Staff
iTrader: (1)
Join Date: Aug 2008
Location: Anderson Missouri
Posts: 11,788
Likes: 0
Received 22 Likes
on
20 Posts
Just checking in on you and seeing how things are going. The sound deadner makes a world of difference in these runners. It quietens them down alot. I didnt realize at how loud it was with no sound deadner in until I got it installed.
02-26-2013, 06:25 PM
#16
Registered User
Thread Starter
Join Date: Dec 2012
Location: Pittsboro, NC
Posts: 59
Likes: 0
Received 0 Likes
on
0 Posts
Thanks for checking in terry, i've been looking through your builds a lot lately. Hit a snag a few days ago. The PO had cross threaded the vacume switch in the lower intake manifold and when i took it out so did the aluminum threads. Probably didn't help it was really oxidized. Had my buddy take it to there race shop and his dad said there wasn't enough thread left to tap it so it looks like i will be heading to the junk yard this weekend.
Progress has been made lately, i've gotten some other parts cleaned up and painted and the new wire wheel on the bench grinder has been my best friend the past few days. I'll get some pics posted soon.
Probably didn't help it was really oxidized. Had my buddy take it to there race shop and his dad said there wasn't enough thread left to tap it so it looks like i will be heading to the junk yard this weekend.Progress has been made lately, i've gotten some other parts cleaned up and painted and the new wire wheel on the bench grinder has been my best friend the past few days. I'll get some pics posted soon.
02-27-2013, 10:01 AM
#17
Super Moderator
Staff
iTrader: (1)
Join Date: Aug 2008
Location: Anderson Missouri
Posts: 11,788
Likes: 0
Received 22 Likes
on
20 Posts
If they want to much for an intake, you can always try the helicoil. A machine shop usually doesnt charge much to do this. Usually about what a helicoil kit cost in my area. You cant just buy one coil, you have to buy the whole kit. Hope the boneyard will give you a good deal. I have been trying to update them in the fix it sections or add other information that I have found/find.
04-08-2013, 04:59 PM
#18
Registered User
Thread Starter
Join Date: Dec 2012
Location: Pittsboro, NC
Posts: 59
Likes: 0
Received 0 Likes
on
0 Posts
i know everyone thought this project was dead; just took a break because i've been busy with racing but now i have fractured and dislocated my wrist  so its back to working on the yota. I can only do so much with one hand but luckily i have some good buddies helping me out.
We have taken the dash out and i plan to paint it black and grey tomorrow. Any color recommendations?
Just got the manifold back from the machine shop today so the motor should be running in the next week or so. Cross your fingers!
so its back to working on the yota. I can only do so much with one hand but luckily i have some good buddies helping me out.We have taken the dash out and i plan to paint it black and grey tomorrow. Any color recommendations?
Just got the manifold back from the machine shop today so the motor should be running in the next week or so. Cross your fingers!
04-08-2013, 05:11 PM
#19
Sorry to hear about the hand. But glad to hear your working on the runner again. I've had my fair share of wrist issues. Shattered my scaphoid bone and broke all the other wrist bones and dislocated it at the same time. Surgery was a blast. Haha.
I like all grey for the dash accept the gauge surround.
I like all grey for the dash accept the gauge surround.
04-08-2013, 06:12 PM
#20
Registered User
Thread Starter
Join Date: Dec 2012
Location: Pittsboro, NC
Posts: 59
Likes: 0
Received 0 Likes
on
0 Posts
Yea its all part of racing/riding. Its not if your gonna crash but when. They put 3 wires and a pin to hold it together for now.
I'm thinking grey dash pad, black vents, and black dash or vice-versa. I like contrast and not to have 2 parts with the same color touching. At least thats what i did when i had my bike powder-coated.
I'm thinking grey dash pad, black vents, and black dash or vice-versa. I like contrast and not to have 2 parts with the same color touching. At least thats what i did when i had my bike powder-coated.


