Truckstarr's Build Up thread
 03-31-2013, 10:13 AM
#61
Registered User
Thread Starter
Join Date: Feb 2012
Location: Boulder, CO
Posts: 72
Likes: 0
Received 0 Likes
on
0 Posts
Well the last few things I've done are the t-case output seal and a new clutch (see earlier in thread), but the noise was happening before that. I double checked the staked nut torque and it was good. My exhaust system is definitely shot, so it could be sympathetic vibrations. Also the tail gate is in pretty poor shape, so it could be that. Both good suggestions, Thanks!
It's just worrisome that it happens only when the torque is taken off the drive train at decent road speeds. It leads me to think that something is loose in the rear end, and when the tension is removed from the drive train, the spinning shaft/diff get loose.
I guess the next thing to do is drive around in Front Wheel Drive mode with the rear drive shaft removed.
It is a good sign that it doesn't affect the handling or performance, but I'd hate to have a bearing blow out on me and cause worse problems.
 03-31-2013, 11:49 AM
#62
Sure, I hear ya on " I'd hate that "....My prob is that mine only seems to happen under load, mostly at 55-65.. not really wanting to drive like that in 4hi w/shaft removed.... BUT IN YOUR situation....should be revealing. Best to ya on this... Sorry I cant read back and refresh buddy,... just no time right now. Keep the updates coming though.... Our gen rigs seem to to mostly be around 250k, many with original equipment, .....so its likely that ur process of elimination will help many others 
Last edited by ChefYota4x4; 03-31-2013 at 11:50 AM.

 I need to do my clutch sometime too...
06-19-2013, 07:20 PM
I need to do my clutch sometime too...
06-19-2013, 07:20 PM
#67
Registered User
That last picture looked like a lot of fun! Reminds me of the river that we crossed in the last Big Bear trip. It was intimidating but I still did it lol not sure how deep it was all I know is that the river reached the bottom of our trucks and sliders. Haha but seeing the look on my moms face was priceless when we crossed the river with the big splash lol
08-04-2013, 10:51 AM
#69
Registered User
Thread Starter
Join Date: Feb 2012
Location: Boulder, CO
Posts: 72
Likes: 0
Received 0 Likes
on
0 Posts
OK! It took much longer than I thought (wedding planning took up much of my recent weekends!) but the roll bar project is near completion. Here's the story:
I found the bar on craigslist for $40. It had been cut out of some guy's truck and was sitting in his yard. It fit pretty well but I needed to build it to the frame. So after some afternoon and weekend work at my buddy's garage, we finally get it built. I still need to throw a gusset on the back mount but he ran out of welding gas. This weekend I painted it up all nice and got a few things mounted.
Here's how we did it.....
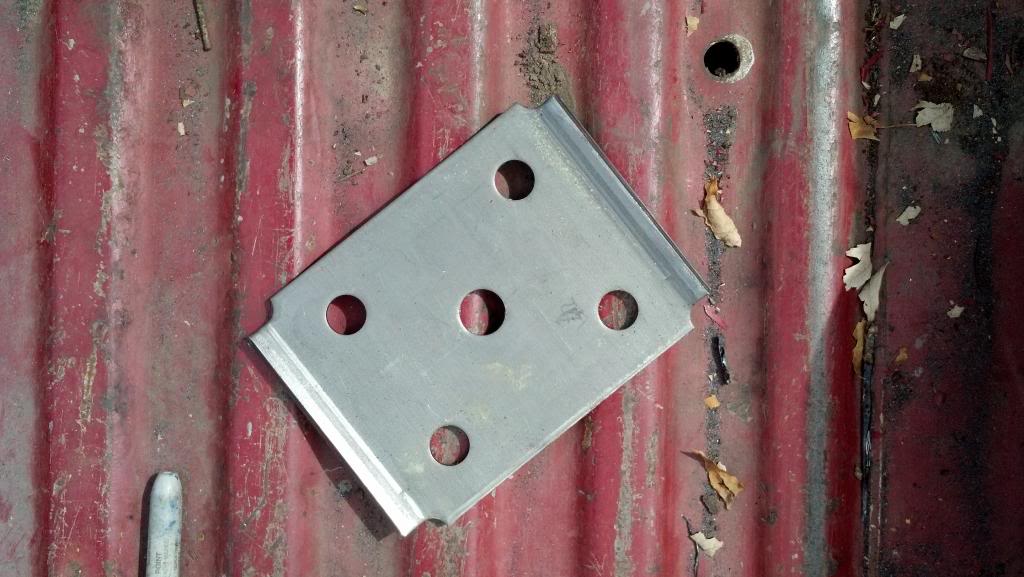
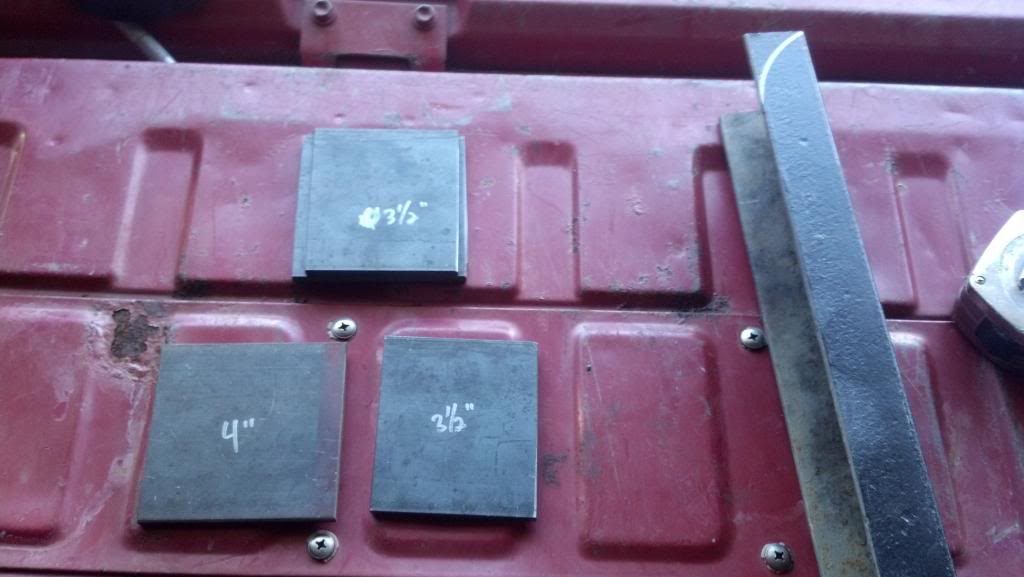
I found some steel plates that already had holes in them. They are originally designed to be spring mount plates for a trailer. I found them for $10 a pair at a ranch/farm goods store.
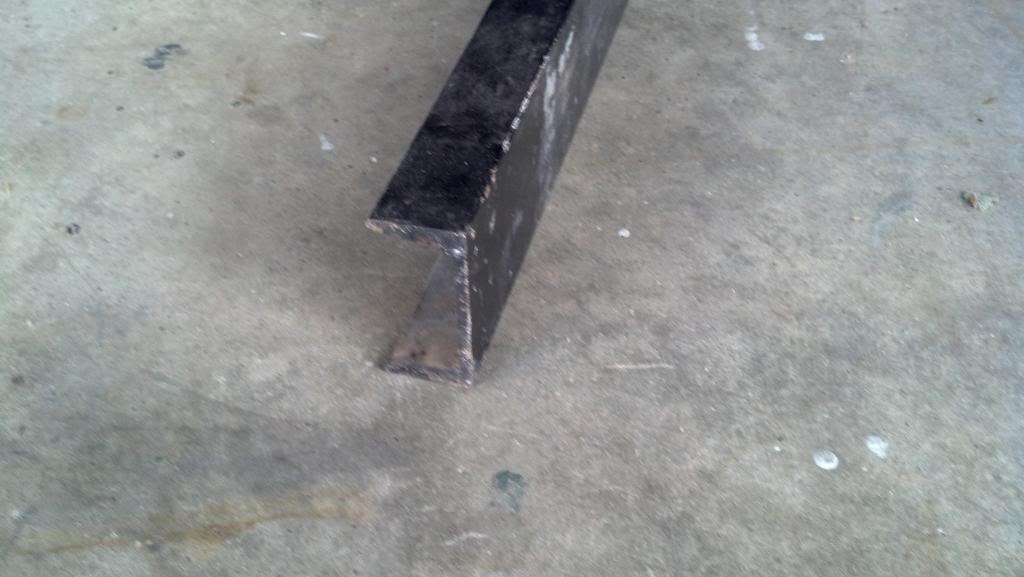
I also found this bar of steel in a friend's garage attic (long story).
Everything seemed to size up just right. The roll bar's tubing is 2.5" diameter fits perfectly in the center of the plates without interfering with the bolt heads. The length of steel fits between the holes for the other side. Plus it looked like I'd have just enough of that steel. In fact I used every inch of it!
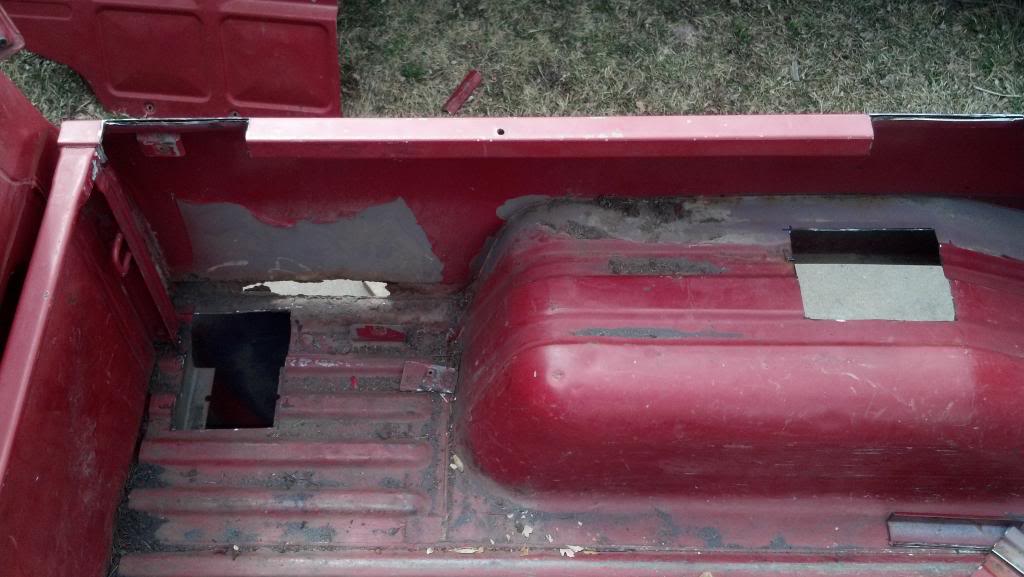
I removed the inside panels of the bed sides, which ended up breaking off many of the bolt heads. They were so rusted in there! I had already decided I would need to re-tap the holes and put some new hardware in so I drilled out all the broken bolts while I had it open.
I started with the 4 holes through the bed. Now, I never had really used an angle grinder before but I jumped right in. Turns out it's really not that hard to use! I also found that I would have to cut away parts of the bed rail to accommodate the width of the plates.
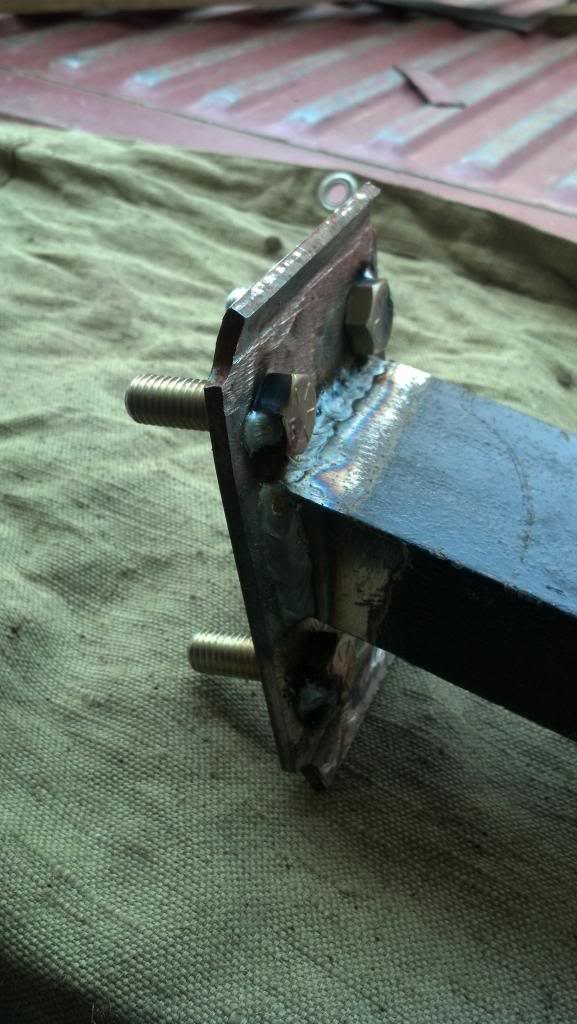
The next part took most of the time. I spent alot of time cleaning up the steel to prep it for welding. I also stood around alot and eyeballed how everything might line up. I had a rough idea in my head. So I cleaned up the ends of the roll bar that had been sloppily cut by the previous owner. A chop saw with a cutoff wheel was really useful here. Then we welded the plates to the bar. Important here was to bolt the two paired plates together tightly prior to welding since the plates will warp a bit and it would blow if the bolt holes didn't line up.
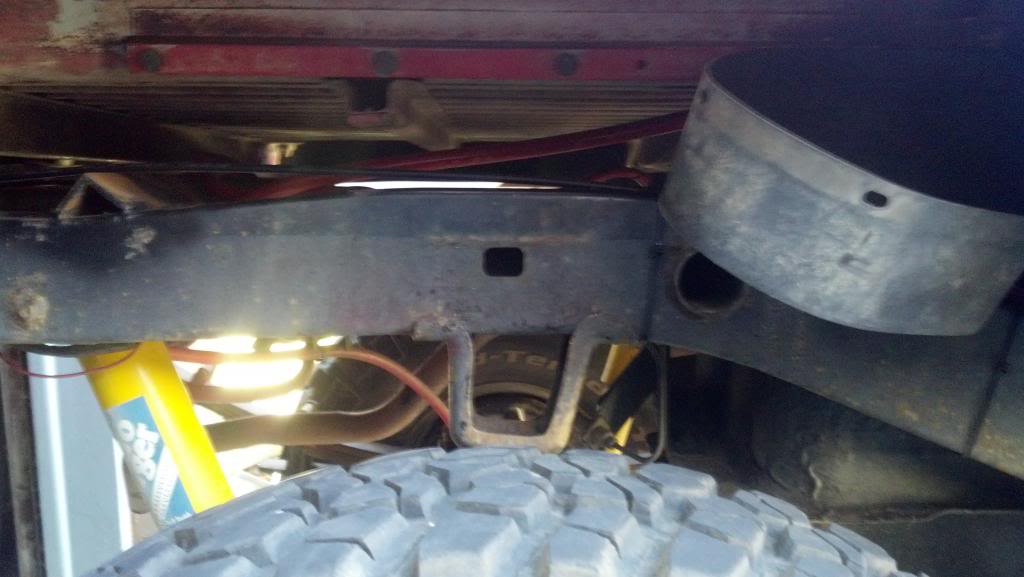
The rear mounts could come straight up from the front of the frame under the wheel well. Then weld a horizontal piece that would weld to the plates. And a gusset for strength. The only concern was to make sure the tire couldn't crush up high enough to hit the mount. I found there is plenty of clearance with the OME HD springs!
Here's the rough mock up:
I needed to shim out from the frame a bit to clear the body at the wheel well, so we welded some 1/4" plates together. To get nice and neat up in the top of the wheel well, I cut a curve in the bar. That was a bit tricky. I cut a piece for the horizontal part and dry fit everything to see if it lined up, and surprisingly, it looked like it would work without much jimmying.
It seemed logical to weld the parts from the top down since the location on the frame wasn't critical, but the location on the plates at the roll bar was VERY critical due to the bolt holes. So we welded the plate to the horizontal piece while bolted to the plates on the bar.
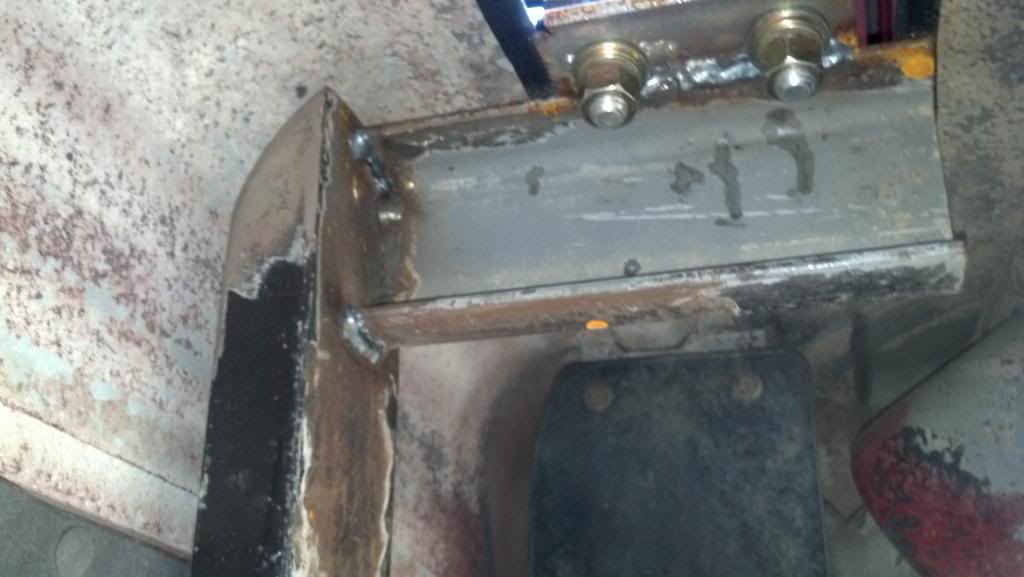
Then put the bar in place and welded the vertical piece to the horizontal piece and finally to the frame (we had already welded the shim plates to the back of the vertical pieces).
Not too Bad!
To be continued........
I found the bar on craigslist for $40. It had been cut out of some guy's truck and was sitting in his yard. It fit pretty well but I needed to build it to the frame. So after some afternoon and weekend work at my buddy's garage, we finally get it built. I still need to throw a gusset on the back mount but he ran out of welding gas. This weekend I painted it up all nice and got a few things mounted.
Here's how we did it.....
I found some steel plates that already had holes in them. They are originally designed to be spring mount plates for a trailer. I found them for $10 a pair at a ranch/farm goods store.

I also found this bar of steel in a friend's garage attic (long story).

Everything seemed to size up just right. The roll bar's tubing is 2.5" diameter fits perfectly in the center of the plates without interfering with the bolt heads. The length of steel fits between the holes for the other side. Plus it looked like I'd have just enough of that steel. In fact I used every inch of it!
I removed the inside panels of the bed sides, which ended up breaking off many of the bolt heads. They were so rusted in there! I had already decided I would need to re-tap the holes and put some new hardware in so I drilled out all the broken bolts while I had it open.
I started with the 4 holes through the bed. Now, I never had really used an angle grinder before but I jumped right in. Turns out it's really not that hard to use! I also found that I would have to cut away parts of the bed rail to accommodate the width of the plates.

The next part took most of the time. I spent alot of time cleaning up the steel to prep it for welding. I also stood around alot and eyeballed how everything might line up. I had a rough idea in my head. So I cleaned up the ends of the roll bar that had been sloppily cut by the previous owner. A chop saw with a cutoff wheel was really useful here. Then we welded the plates to the bar. Important here was to bolt the two paired plates together tightly prior to welding since the plates will warp a bit and it would blow if the bolt holes didn't line up.
The rear mounts could come straight up from the front of the frame under the wheel well. Then weld a horizontal piece that would weld to the plates. And a gusset for strength. The only concern was to make sure the tire couldn't crush up high enough to hit the mount. I found there is plenty of clearance with the OME HD springs!

Here's the rough mock up:

I needed to shim out from the frame a bit to clear the body at the wheel well, so we welded some 1/4" plates together. To get nice and neat up in the top of the wheel well, I cut a curve in the bar. That was a bit tricky. I cut a piece for the horizontal part and dry fit everything to see if it lined up, and surprisingly, it looked like it would work without much jimmying.
It seemed logical to weld the parts from the top down since the location on the frame wasn't critical, but the location on the plates at the roll bar was VERY critical due to the bolt holes. So we welded the plate to the horizontal piece while bolted to the plates on the bar.

Then put the bar in place and welded the vertical piece to the horizontal piece and finally to the frame (we had already welded the shim plates to the back of the vertical pieces).

Not too Bad!
To be continued........
08-04-2013, 11:18 AM
#71
Registered User
Thread Starter
Join Date: Feb 2012
Location: Boulder, CO
Posts: 72
Likes: 0
Received 0 Likes
on
0 Posts
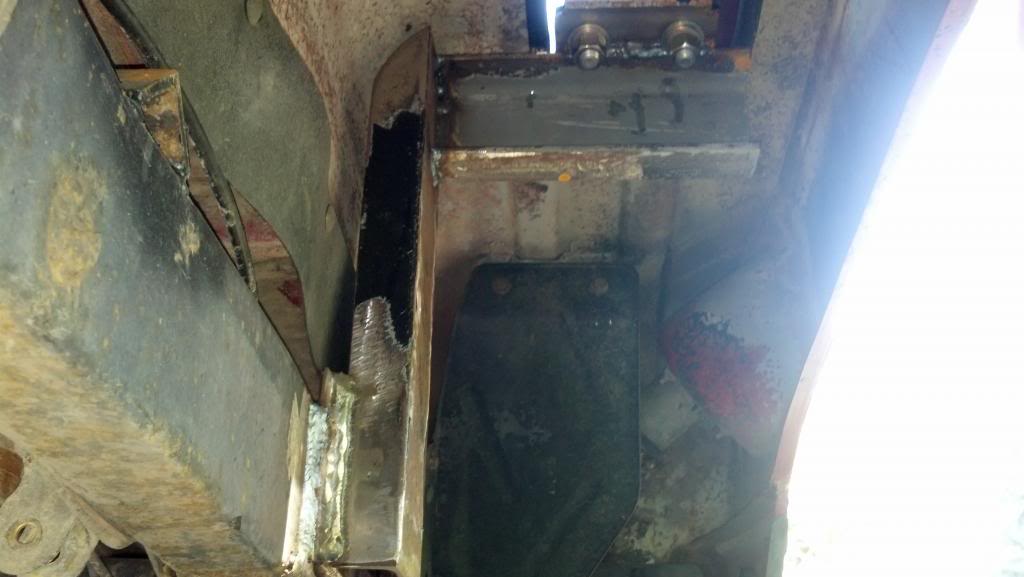
Now for the front mounts. These were going to be much trickier since the frame mount location happens to be precisely where the body mount is for the bed. Actually it was good that it located where it did since an inch in either direction would have made it impossible.
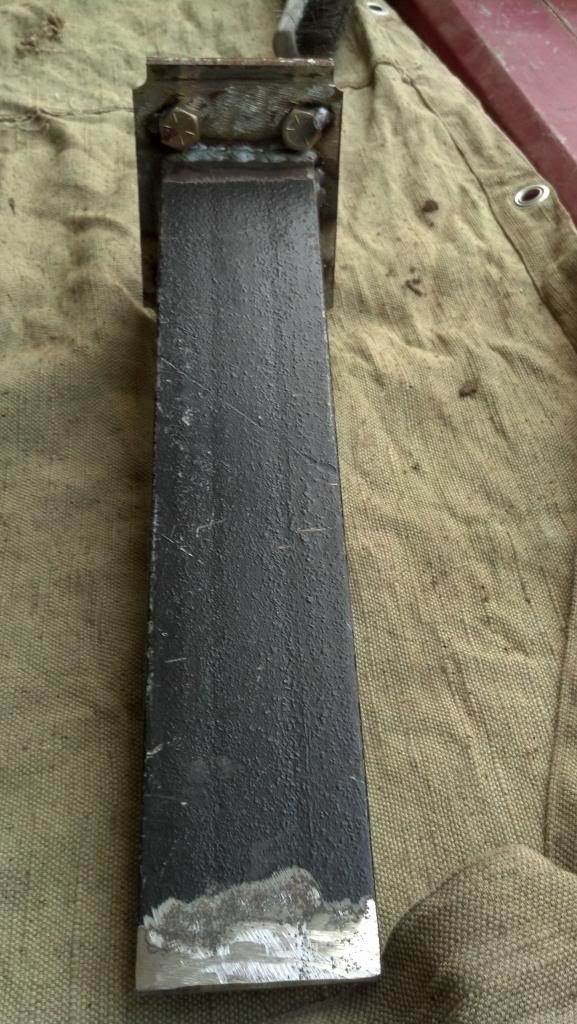
In any case I needed to angle this piece to keep it away from the body mount. This took some time for sure. Firstly, I had only about 31" of the steel bar left, so I cut it in half, which happened to be just about the perfect length for each! I used a plastic protractor thing to get a pretty close guess and then made several cardboard cutouts of the piece to mount. Basic geometry says that the top and bottom angle of the piece would be complementary (minus the 90 degree angle). And since I only had a fixed length of steel, It didn't take too much time to get it right. Once I got a cardboard template to fit just so, I traced the angles onto the steel piece and hit it with the grinder. Dry fitting it found it to be close enough!
Since it would be nearly impossible to weld this bar to the plate while it was on the truck, we did the weld in the vice and even spot welded the bolt heads to the back of the plate since installing them was a booger way up in the bed cavity.
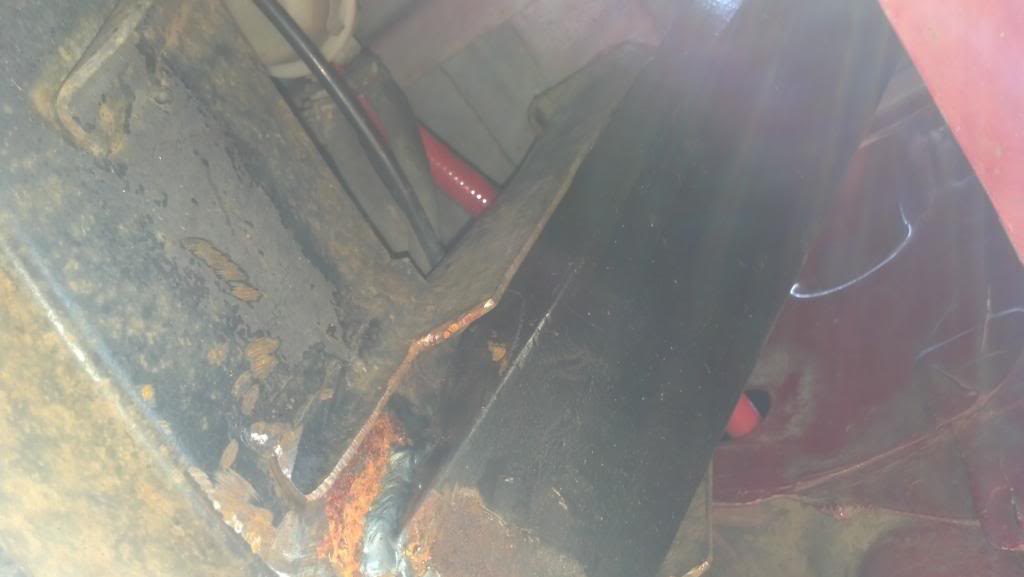
Despite the centered location at the body mount, I found there was no way to weld so I had to cut away some of the bottom of the body mount. I think there is still plenty of frame contact with the body mount but I'll keep an eye on it.
(Obviously this work was all done a week or two ago and these pics were taken today, note the rust)
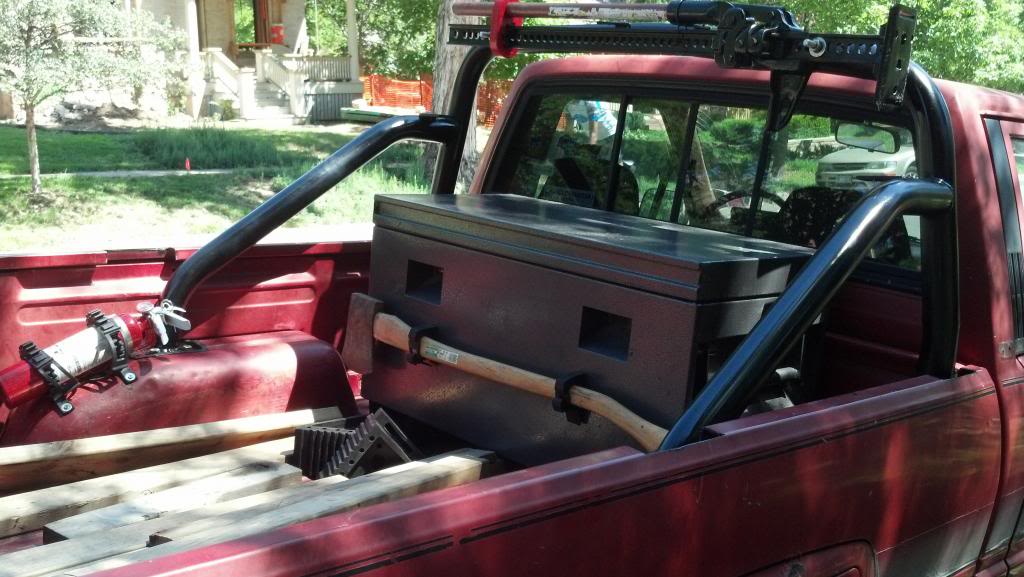
Wow, it takes alot less time to tell you how it went down than it does to actually do it! Long time coming but look at her now!
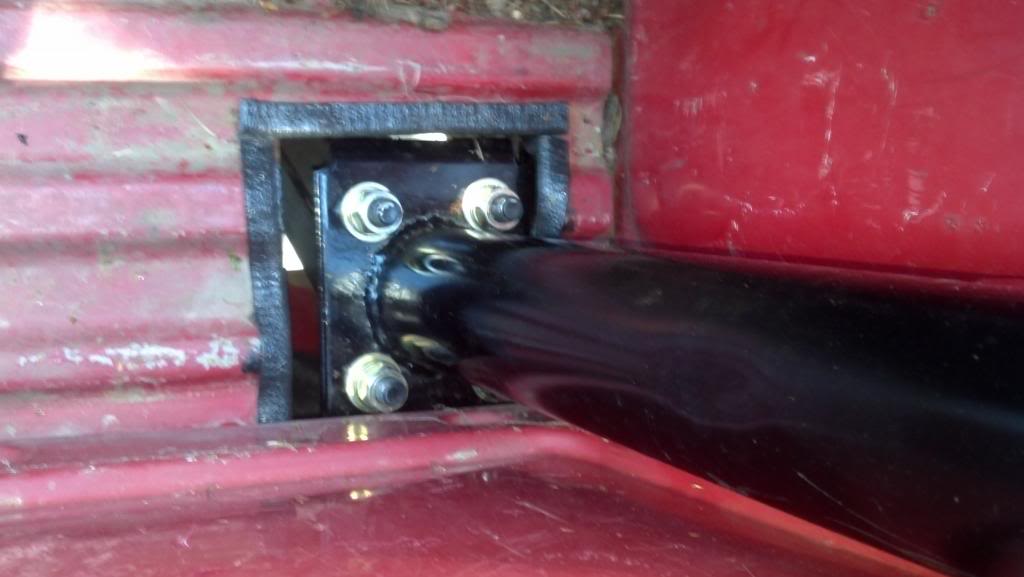
Yesterday I took it off and hit it with another coat of paint to touch up scratches and to cover the welds and plates. I found this rubber and metal edging stuff at the local hardware store (McGuckins shout out!) to cover the sharp edges of the bed holes and installed that.
I also reinstalled the inner bed sides though I still haven't tapped the holes for the new hardware. Lastly I mounted some "Quick Fists" things (Highly recommended!) to hold a fire extinguisher and my ax.
Next is to install a bunch of lights on the thing. 6 or 8 lights were mounted on the bar when I bought it. (BONUS!) Some weren't in great shape but two big round ones and some small rectangular ones will do nicely.
The project never ends! Until next time...........
In any case I needed to angle this piece to keep it away from the body mount. This took some time for sure. Firstly, I had only about 31" of the steel bar left, so I cut it in half, which happened to be just about the perfect length for each! I used a plastic protractor thing to get a pretty close guess and then made several cardboard cutouts of the piece to mount. Basic geometry says that the top and bottom angle of the piece would be complementary (minus the 90 degree angle). And since I only had a fixed length of steel, It didn't take too much time to get it right. Once I got a cardboard template to fit just so, I traced the angles onto the steel piece and hit it with the grinder. Dry fitting it found it to be close enough!
Since it would be nearly impossible to weld this bar to the plate while it was on the truck, we did the weld in the vice and even spot welded the bolt heads to the back of the plate since installing them was a booger way up in the bed cavity.


Despite the centered location at the body mount, I found there was no way to weld so I had to cut away some of the bottom of the body mount. I think there is still plenty of frame contact with the body mount but I'll keep an eye on it.

(Obviously this work was all done a week or two ago and these pics were taken today, note the rust)
Wow, it takes alot less time to tell you how it went down than it does to actually do it! Long time coming but look at her now!

Yesterday I took it off and hit it with another coat of paint to touch up scratches and to cover the welds and plates. I found this rubber and metal edging stuff at the local hardware store (McGuckins shout out!) to cover the sharp edges of the bed holes and installed that.

I also reinstalled the inner bed sides though I still haven't tapped the holes for the new hardware. Lastly I mounted some "Quick Fists" things (Highly recommended!) to hold a fire extinguisher and my ax.
Next is to install a bunch of lights on the thing. 6 or 8 lights were mounted on the bar when I bought it. (BONUS!) Some weren't in great shape but two big round ones and some small rectangular ones will do nicely.
The project never ends! Until next time...........
08-04-2013, 12:15 PM
#72
QuickFists you say? HMmmm... Sounds like you're happy with them are they very secure? I am definitely going to be mounting a fire extinguisher up front and in back... But I think mountain one outside is an excellent idea especially for 4runners... That way if God forbid something like that happens people outside can grab it, hopefully, and put something out before you wake up on fire!
Nice work! I'm curious if you were going to put a flexible grommet with a square base around the roll bar passed through area... I know it's not super critical with a pickup... But just to keep mud and such from flying up there? I figure since you want to allow for some body roll that you wouldn't be sealing it up tight/ metal to metal... But just curious on what you might do. Again nice work man!
Nice work! I'm curious if you were going to put a flexible grommet with a square base around the roll bar passed through area... I know it's not super critical with a pickup... But just to keep mud and such from flying up there? I figure since you want to allow for some body roll that you wouldn't be sealing it up tight/ metal to metal... But just curious on what you might do. Again nice work man!
08-04-2013, 12:23 PM
#73
Registered User
Thread Starter
Join Date: Feb 2012
Location: Boulder, CO
Posts: 72
Likes: 0
Received 0 Likes
on
0 Posts
Yeah these Quick Fist things seem pretty sweet. We'll see how well they hold when slamming around on the trail! They seem like strong rubber and the fastening mechanism seems pretty stout. I used screws to fix them to the bed and tool box, but you can also use hose clamps on tubes, though it seems they aren't oriented right for what I wanted to use them for. This is what I got:
I hear you about mud flying up through those holes. Like you said, I didn't want any metal on metal contact, but a rubber plate or something is a good idea. Some kind of splash guard. Hate to get mud all over my gear!
I hear you about mud flying up through those holes. Like you said, I didn't want any metal on metal contact, but a rubber plate or something is a good idea. Some kind of splash guard. Hate to get mud all over my gear!


Thread
Thread Starter
Forum
Replies
Last Post
RedRunner_87
95.5-2004 Tacomas & 96-2002 4Runners (Build-Up Section)
84
06-01-2021 01:51 PM
94ofCanada
86-95 Trucks & 4Runners (Build-Up Section)
3
08-14-2015 06:37 AM
priest16
84-85 Trucks & 4Runners (Build-Up Section)
15
08-06-2015 07:43 AM


