Truckstarr's Build Up thread
 07-12-2012, 05:53 PM
#41
Ahhh, ok... Well, thanks, man! Looking forward to seeing. Yeah, my problem is getting them to stuff more.. But then, with 31's and t-bars... there is only so much you can stuff without having the springs so loose that they BOUNCE LIKE A LOWRIDER! hahaha. (that was funny when adjusting them, I got too loose and WOW, it was like a spring ride in front of the stores? hahaha).
 07-12-2012, 08:25 PM
#42
Registered User
Thread Starter
Join Date: Feb 2012
Location: Boulder, CO
Posts: 72
Likes: 0
Received 0 Likes
on
0 Posts
mall bounce!
I think about the flex problem alot. I feel like IFS has a hard time "stuffing". The T-bars are just too strong. The balance is between too soft (spring ride!) with easy flex and leveling/lifting with hard flex. So I leveled out the truck and ended up stiff as hell. Rough on the road, and moderate flex off road. I feel like the IFS tends to push the wheels down, which is good for keeping the tires on the road in regular conditions. But when articulation is needed the system doesn't really allow for either side to independently react to the rocks. For safety and grip it works great on normal roads, but it's not designed for big rocks. This may be because of the (anti) sway bar. ASAP (this weekend?) I am hitting the trail and will run with disco sway bars. I am hoping it separates the front wheels a bit.
I will let y'all know!
07-12-2012, 08:37 PM
#43
Those pics and more that I have are "NO SWAY"... I deleted it long ago... Hasn't made for any unsafe situations.... YET, lol. And I think it did add a lil bit of flex. Yep, that sucker is always pushing down, lol. I know the bigger ones allow it to stuff more I guess because it has to be under less 'tension'??? Anyway, have fun! This was at Havasu a few weeks ago.......

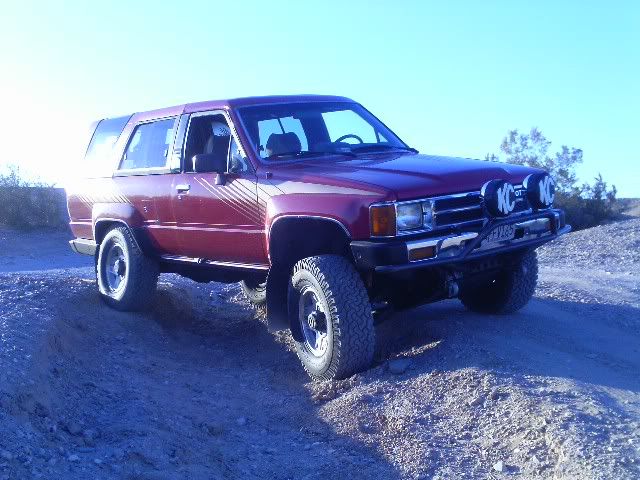
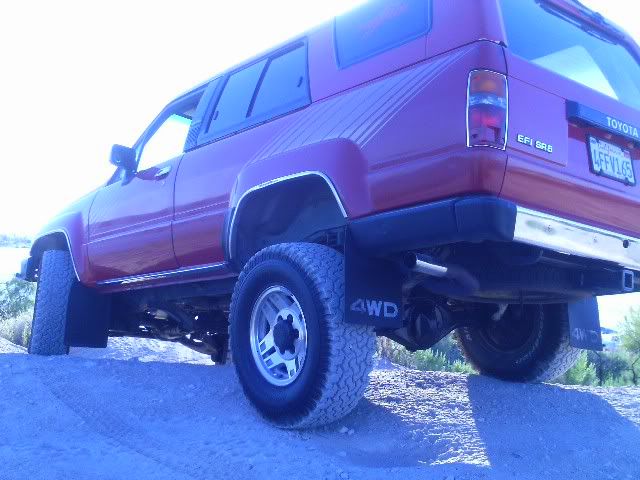
In this one, it was actually pretty close, around 1.5" Max from what would touch the wheel well trim... (on the pass. front tire in this pic)....

And I have the mega travel downey BJoints up top, too.. .So when I get it just right, it has a bit more travel than when I was stock/before restoring/upgrading a bit. And WOW, the ride with all new suspension bushings, etc.? WOW, s'all I can say. PLUS, with the set up I have, it really stays level more often when rolling through staggered terrain....
Anyway, last one, hahaha...

GET LOT'S OF PICS, YOTA-HOMIE! lol.
In this one, it was actually pretty close, around 1.5" Max from what would touch the wheel well trim... (on the pass. front tire in this pic)....
And I have the mega travel downey BJoints up top, too.. .So when I get it just right, it has a bit more travel than when I was stock/before restoring/upgrading a bit. And WOW, the ride with all new suspension bushings, etc.? WOW, s'all I can say. PLUS, with the set up I have, it really stays level more often when rolling through staggered terrain....
Anyway, last one, hahaha...
GET LOT'S OF PICS, YOTA-HOMIE! lol.
07-26-2012, 04:02 PM
#44
Registered User
Thread Starter
Join Date: Feb 2012
Location: Boulder, CO
Posts: 72
Likes: 0
Received 0 Likes
on
0 Posts
So I took the rig out for a test run with my sway bar disconnected. About half way through the trail (moderate rubble rocks) a very loud bang was followed by my driver side front end collapsing. Somehow the t-bar lost all tension. I limped her out of the woods through some terrifying off camber stuff that probably should have killed me.
I finally got around to looking at it today and it appears that nothing broke! How is that possible? Essentially what seems to have happened was the t-bar un-sprung somehow. The adjuster bracket was loose in the rear mount basically just floating. The bolt was still intact with the nuts tight together. But the bar (still splined in the mount) had turned the bracket all the way into the frame mount. That's a bit hard to explain, but it was in the same place as if the adjusting bolt had been tightened all the way, like ALL the way, down, but it wasn't seated in the mount right. The bolt of course wasn't this tight before and so now the bolt was just hanging loose and I could move the T-bar around with my hand with no problem. Obviously no torque was being applied.
I had to loosen the front mount to get enough play to remove the T-bar since the bracket couldn't clear the rear mount. Everything looked fine disassembled, though I think the bolt is bent a bit. I half reassembled and the splines all feel fine and it looks like I could just re-install as normal.
So, the question is......what the F*** happened? Did the front splines slip? Is that even possible? The rear splines are keyed and can only go in one way so there's no way it could have sprung around and reset back into the key. Did the front splines somehow disengage, lose the torque and reset itself? That seems crazy.
For the record, I have the HD OME torsion bars and they were cranked up pretty good. I have been running them for more than a year, though this was the first time I had disconnected my sway bar. I wasn't even doing any crazy stuff, just small rocks.
Thanks for any help!
07-26-2012, 11:01 PM
#45
Wow, holy crapula! That musta freaked you out, man!
I'm not familiar enough to offer any thoughts on what happened, other than the front splines snapped the yolk(Is that possible? hahaha)... I mean, you've swapped in OME's... so you already know far more than I. I did notice, however, after installing my BJ spacers... I had to loosen the T-bars a tad, bout .5" or so, just to take off the newly added tension. Anyway, as I was torquing on the bolt to lower it, it seemed to get bound, only on the driver side. It looks as if it's bent now.. but I slapped the lock nut back in place and it's not moved since, thank goodness!
WOW, I'm still tripping on that visual you gave me of that occurrence and the ride thereafter!!!!!!!!! DAYUM!
08-03-2012, 07:02 PM
#46
Registered User
Thread Starter
Join Date: Feb 2012
Location: Boulder, CO
Posts: 72
Likes: 0
Received 0 Likes
on
0 Posts
I finally got around to looking at the truck. It's been sitting all sad in front of the house all week. Turns out the front torsion bar mount on the upper A-arm stripped out. The splines got flattened:

I can't believe it! The splines on the bar look fine. I suppose a few factors may have contributed: original part, HD bars, bars were pretty cranked.
In any case it failed and in a terrible place. I'm going to get a backup mount in case it happens again. Toyota wants over $50 a pop, but I'll find one at my yota man junk yard.
I also discovered a puddle under my shock on that side so I must have blown that up when it collapsed. I learned the hard way that low profile bump stops are NOT a good idea. The truck is sitting on the bottom stop, but it must have been just barely too long of a drop for the shock.
I'm now considering the ball joint spacers, relax the t-bars, and go back to my OEM bump stops. I'll get better flex and make the truck level. Another project!
08-03-2012, 11:34 PM
#48
Sup Truckstar? 
Yeah, I think the 1.5" BJ Spacers and relaxing my t-bars really made the ride NICE up front, compared to how it was, even stock. OF COURSE,... I can't leave out that I replaced all the ball joints including adding the Downey Mega Travel Upper BJ's and OEM Lowers, all new Control Arm Bushings and new shocks... BUT STILL, hahaha... No, really, all that stuff made the ride much nicer... But riding on those BJ spacers without relaxing the t-bars...???? >>>> Wasn't so nice! lol. It wasn't terrible... especially off road... but in town? BLECH! haha. Like a Flintstone Rig in comparison! haha.
Best wishes... I was thinking of doing low pro bump stops for STUFF, ... but not droop... Droop even with stock Bump Stops gave me a 'BOOT TEAR' on the trail! hehe... Soon to be fixed though
  Also adding Aisin Man. Locking hubs... Although my Warns have done me NO HARM in 150K miles. they turn like they're brand new, lock fine, not one instance of not doing their job... But hey, I have the Aisins,...so might as well go OEM, right?
Yeah, I think the 1.5" BJ Spacers and relaxing my t-bars really made the ride NICE up front, compared to how it was, even stock. OF COURSE,... I can't leave out that I replaced all the ball joints including adding the Downey Mega Travel Upper BJ's and OEM Lowers, all new Control Arm Bushings and new shocks... BUT STILL, hahaha... No, really, all that stuff made the ride much nicer... But riding on those BJ spacers without relaxing the t-bars...???? >>>> Wasn't so nice! lol. It wasn't terrible... especially off road... but in town? BLECH! haha. Like a Flintstone Rig in comparison! haha.
Best wishes... I was thinking of doing low pro bump stops for STUFF, ... but not droop... Droop even with stock Bump Stops gave me a 'BOOT TEAR' on the trail!
hehe... Soon to be fixed though Also adding Aisin Man. Locking hubs... Although my Warns have done me NO HARM in 150K miles. they turn like they're brand new, lock fine, not one instance of not doing their job... But hey, I have the Aisins,...so might as well go OEM, right?
08-05-2012, 02:01 PM
#49
Registered User
Thread Starter
Join Date: Feb 2012
Location: Boulder, CO
Posts: 72
Likes: 0
Received 0 Likes
on
0 Posts
vang: i have never heard of it either! definitely easy swap. 2 bolts (though there's a heat shield in the way). The sucky part is the time it takes to even the torsion bar tension out. trial and error.
Chef: Flinstones! lol. I like the idea of low pro stops for stuffing. I'm def going back to stock bottom stops to protect my shocks (new one in the mail from Sierra Expeditions) in case this happens again. Plus you are right about CV boot wear.
I love my Aisin hubs. They are tuff, but man, I have had those things apart so many times to clean! My star gasket was crap and I got all sorts of junk inside. Then the new gasket tore during install and I got more crap in them. Round three seemed to work fine, but i got some seepage of grease around the hub. Probably need to snug the bolts down.
Anyway, at least the T-bar is ok. And I'm glad I didn't die on the trail! I now know my truck can lean like crazy and I will freak out well before the thing tips over!
Next step: 4 crawler's BJ spacers and new ball joints (mine are shot!).
08-18-2012, 07:02 PM
#50
Registered User
Thread Starter
Join Date: Feb 2012
Location: Boulder, CO
Posts: 72
Likes: 0
Received 0 Likes
on
0 Posts
I FINALLY (stupid long story) got around to fixing the front suspension. I got two (one extra in case it happens again) front t-bar mounts for $5 a piece from Yota Man Jim! sure beats the $50 the stealership wanted. Cleaned it up, re-installed the t-bar, reset the torque on the bar. I went a bit softer than I had it and then adjusted the passenger side to even it out. I then replaced my lower low pro bump stops with the original stops. Don't want to break another shock.
Man, it was nice to get her back on the road! It had been 3 weeks. I was suffering withdrawal.
I also looked into this new rattle sound from the rear end. Before I broke the suspension, I was hearing a vibration in the rear end when I would let off the gas at 40 mph or faster. I had just replaced the transfer case seal and wondered if I hadn't tightened the nut enough. Triple checked it and it's 90 ft lbs. checked the U-joints and they are tight. zero play in the drive shaft. I drove the truck around town a bit, never got going very fast, but I didn't hear the noise. There are so many things in the rear of the truck that rattle, it's hard to tell whats what. Bed sides, tool box, tail gate, hi lift jack. Feels more like a drive line issue though since it seems to happen only engine breaking over 40. I'll take her out tomorrow to the highway and listen.
Also helped a neighbor's kid out fixing a few things on his '72 FJ40. It's the truck style and a right side driver. So cool. Body is in pretty good shape and he just did a ton of engine rebuild stuff. We replaced his clutch master cylinder and looked into a charging issue.
Despite being a bit hung over, I ended up having a productive day!
10-10-2012, 02:38 PM
#52
Registered User
Thread Starter
Join Date: Feb 2012
Location: Boulder, CO
Posts: 72
Likes: 0
Received 0 Likes
on
0 Posts
Heading home from work one day on the freeway and I was listening to that noise that's been coming from somewhere. I had been ignoring it since the whole truck is a rattle wagon, but I was doing about 60 and had the clutch in to hear the noise. I started cycling through the gears (all while holding the clutch in) and all was smooth until I heard a bit of a louder grind as I was trying to get into 3rd. Then DINK. No clutch. I actually had a little bit of clutch but not enough to keep my momentum going. I happened to be near a huge paved shoulder so I pulled over and gave her a look. Engine running fine, could move the truck by hand with the drive shafts, both front and rear. And the pedal felt like it wasn't releasing all the way. I could easily shift gears so I put it in gear and let off the clutch and the thing didn't stall. So I must have blown the clutch. Didn't make a very loud noise and I did have a tiny bit of pressure, enough to back up slowly while revving it. Actually the lighter I was on the gas the better grab it had.
A similar thing happened in my Subaru Daily Driver but it was way more gradual, and I could still drive it somewhat.
Anyway, called my J**P buddy (to his credit his DD is a lightly modified 97 Runner) and he towed me to his place which was closer than my house (and he has a great driveway for truck work - BONUS!).
There has been a funny squealing noise at the clutch too for a long while now. Only when the clutch was being released upon acceleration, just as the clutch was grabbing. I bet that was my first clue to a clutch going out. Then the noise, then stranded. Luckily I was not on a trail.
I ordered a new Super HD clutch kit from Marlin Crawler and it should be here tomorrow. I got a new flywheel and rear main seal as well since I'll be in there. The swap doesn't look very hard and since I'm replacing everything inside there, it should be even easier than trying to get out the bearings and having things machined and whatnot. I bet they are original parts so good for Toyota for getting me 251k! I will take many pictures of the swap (hopefully this weekend if the weather cooperates).
Last edited by Truckstarr; 10-10-2012 at 02:41 PM.
10-17-2012, 04:26 PM
#53
Registered User
Thread Starter
Join Date: Feb 2012
Location: Boulder, CO
Posts: 72
Likes: 0
Received 0 Likes
on
0 Posts
OK so I successfully swapped the clutch out this weekend and I thought I'd do a nice write-up, with pictures, of my experience.
As previously posted, I was towed back to a buddy's house. I had to get the thing in the driveway which was a bit uphill and over a small curb. Luckily I had a tiny bit of grab left in the clutch and with a bit of pushing I got her backed up into the driveway.
Chocked the wheels and opened the toolbox. I basically followed the FSM step by step, but I found a few things they didn't mention. Here goes:
Disco Battery and remove air cleaner cover.

This made it (a tiny bit) easier to get at the starter bolts.

I removed part of the splash guard in the passenger side wheel well and removed the top nut on the started as instructed in the FSM. Turns out you need to remove the bottom bolt too.
Then I removed the clutch slave cylinder from the transmission. DO NOT disco the clutch lines, just push the thing out of the way. This will also give you some more room to get at the starter bolts.

The front and rear drive shafts were next. I marked the position in the flange so I could get them lined up again. I don't know if this matters if you aren't taking both sides of the shaft off the truck, but whatever. 4 bolts and nuts (14 mm) each. I have a 2" body lift so access was a bit easier. I had to remove this "housing" for the double u-joint, which was kind of pain to figure out which bolts to remove, but in retrospect, I could have removed the 4 bolts holding the bottom half of the housing to the top half and had access. Putting the transfer case in neutral helped so I could just rotate the shaft for better access. Push them aside. I used a bungee cord to hold the front shaft out of the way.

Then unplug the reverse light, 4WD light, and speedo cable. Unclip, unclip, twist.


Put the transmission in neutral and remove stick shifts. There are good write-ups about this (including further back in my build thread), but in short, remove cover plate in cab, unscrew shifter knobs, slide boots and cover off shifters. Pull up oil seal boots below. Tranny shifter has a spring deal that you have to push down and turn a 1/8 of a turn and the thing pops out. T-case just has a snap ring. Remove and lay shifters aside. (of course this would be a good time to replace the shifter seats and socket, as I did earlier in the season (thanks Marlin Crawler!) I stuffed some rags in the holes for protection against contaminants.

I realized the sway bar will be in the way so that was the next disco. I actually had it mostly disco anyway after the t-bar mount disaster (see previous posts). In the end I just deleted it altogether since I don't really notice much of a change. (I'm pretty gentle in corners anyway). 4 bolts at the bushing mounts and the 2 nuts at the lower A-Arms.

Next, per FSM, I removed the 4 bolts holding the t-case to the cross member.

They are up inside these holes and look like this:

Surprisingly short bolts too. Then I put a jack under the t-case just enough to take the weight. With my suspension lift I had to use a 2x4 as a shim on my jack to get enough height. Then remove the 8 bolts that mount the cross member to the frame. I definitely needed an impact tool for this. These guys were STUCK!

After a double check to make sure nothing else was connected (remember to remove both starter mounts), I removed the bottom 4 bolts on the tranny. My tranny diverged a bit from the FSM here, and I had a few more things to remove. There were four 14 mm bolts on the bottom, but then there was a 17 mm bolt on the driver's side through the exhaust pipe mount (also loosen this mount bolt and slide away. I did not need to remove any exhaust parts). Also there was a 17mm bolt just below the starter behind the clutch lever. Tuff to get to.
Then with a jack stand supporting the bottom of the engine on the oil pan, a jack under the bell housing and a jack under the t-case. I removed the top 2 bolts. Not easy. I used about 24" of extension on my socket, and stuck the ratchet handle up through the open hole where the shifters go. I used a short breaker bar extension for more torque and out they came. Pretty smooth actually, but the bolts in the tranny are awfully long!

At this point in the day it started to rain pretty good, but I was determined. We had a pretty hard time disengaging the tranny from the block while adequately supporting the tranny on the 2 fully extended jacks. We used a strap to hold the weight at the bell housing and keep it from rotating (which it will want to do). My buddy held that in the cab while I pulled the jacks back away from the block and once the input shaft was clear, I lowered the jacks slowly. Eventually it looked like the whole thing was going to come crashing to the ground, but after a time of some panic and getting thoroughly soaked from the rain, the tranny set down safely. We put it on a creeper and wheeled it to a dry area. It was time for lunch, beer, and a clothes dryer cycle.

The rain let up in a bit and I was anxious to get that clutch apart so out I went. This is the inside of the bell housing:

Lots of blackness. I'll get to cleaning later. Here's what it looked like at the clutch housing:

I removed the 5 bolts that hold the housing to the flywheel. Some folks say to somehow clamp the harmonic balancer on the front of the engine to keep the crank shaft from turning, but I had no problems getting the bolts out without doing this. The cover slid off the alignment pegs and I found a disaster:

My clutch was GONE. Literally no pad material left. The final clunk I heard must have been the last remnants of the pad blowing apart and jamming itself into every nook of the clutch housing. Little bits of it was packed everywhere, and the clutch plate itself was shiny metal and nothing else.

Also you'll notice the diaphragm springs on the clutch cover are worn greatly where the throw-out bearing rubs on it.

As for the throw-out bearing, it didn't feel too bad, and only had minimal wear on the contact surface, but the Marlin Crawler kit comes with new bearings so why not put them in.

Next came the flywheel. 5 bolts + impact wrench= easy removal. Both the flywheel and the pressure plate were worn and scored and generally Gnar, so I'm glad I bought a new set. The flywheel I got from NAPA for $80 and the pressure plate came in the kit. Both shiny new!
Behind the flywheel there is a steel plate. 2 easy screws and off it came. It was grimey and behind it was where I found all the clutch material.


I could now get a good look at the pilot bearing, which looked ok, and felt pretty smooth. Plus I could not get that SOB out. I tried the grease packing trick with no luck, and no amount of prying or banging was making a lick of difference. So I decided i'd think about not replacing it while i cleaned all the mess up.
I figured, while in there, I'd replace the rear main oil seal. Mine wasn't leaking but I figured I never wanted to take the thing apart again, so for $15 it was worth it. I know some people just pull the seal with the housing on the truck, but I took out the 5 bolts (and 2 from the oil pan) and with some effort, was able to break the housing free of the oil pan and block. The old gasket was totally fused to the block so I just left it. I took the housing to the bench and pulled the seal with a screwdriver with some tape over the end to prevent scraping the metal. As it turns out, the seal was brittle and cracked and broke while I was doing this, and the little spring wire thing inside the seal fell out. I am glad I am replacing it! A few solid raps with a rubber mallet and the seal was in.

All cleaned up and put back on the block.

Rather than double up the gasket behind the housing (since I didn't want to scrape the old one out), I just used a load of Ultra Black. It's required to make the seal at the oil pan, but I figured It couldn't hurt to have it all around so I goobered it around the seal and squished the housing in place. 5 bolts snug it to the block, 2 more underneath to fasten it to the oil pan. Done.
By now I had decided to leave the pilot bearing in (don't judge me just yet....read on). I cleaned the steel plate and reinstalled: 2 screws. Cleaned off any machine oil from the new flywheel and reinstalled the 5 bolts. These were a bit tougher since I was hand tightening the bolts. The crank shaft kept spinning. I jammed a block of wood between the teeth of the flywheel and the u-joint of the front drive shaft to hold it in place. Didn't work awesomely, but got the job done. I didn't find any torque specs for these, so I turned them as hard as my arms could.

So shiny!
Then I pulled out the new clutch and, using the included alignment tool, set it into place. It sits there kind of precariously until you get the pressure plate assembly on.

I cleaned the new pressure plate of any oils from the factory and set it in place on the pegs on the flywheel. The holes were just a touch small for the pegs, but with a few raps of a rubber mallet they set in just enough to get a few bolts in (I got new hardware from Marlin Crawler too, but the old bolts looked fine. I used the new ones anyway!). Once all the bolts were threaded in hand tight, I went around with the wrench and IN A STAR PATTERN slowly tightened each bolt. I would tighten each until I couldn't turn it easily without any leverage. Once they all set in with minimal leverage, I got the torque wrench out and set it to 13 foot pounds. Spec said 11-17. I turned until a click and gave it a touch more. Once more around to verify and I called it good.
Then I went back to the FSM to make sure I didn't forget anything and read about making sure the clutch plate is centered by being very certain the alignment tool is fully seated and straight. This made me want to take the pressure plate back off and be double dog sure I did it right. Only a few minutes more for peace of mind.

Ta da!
Day one was over. Pretty good progress for a novice.
As previously posted, I was towed back to a buddy's house. I had to get the thing in the driveway which was a bit uphill and over a small curb. Luckily I had a tiny bit of grab left in the clutch and with a bit of pushing I got her backed up into the driveway.
Chocked the wheels and opened the toolbox. I basically followed the FSM step by step, but I found a few things they didn't mention. Here goes:
Disco Battery and remove air cleaner cover.
This made it (a tiny bit) easier to get at the starter bolts.
I removed part of the splash guard in the passenger side wheel well and removed the top nut on the started as instructed in the FSM. Turns out you need to remove the bottom bolt too.
Then I removed the clutch slave cylinder from the transmission. DO NOT disco the clutch lines, just push the thing out of the way. This will also give you some more room to get at the starter bolts.
The front and rear drive shafts were next. I marked the position in the flange so I could get them lined up again. I don't know if this matters if you aren't taking both sides of the shaft off the truck, but whatever. 4 bolts and nuts (14 mm) each. I have a 2" body lift so access was a bit easier. I had to remove this "housing" for the double u-joint, which was kind of pain to figure out which bolts to remove, but in retrospect, I could have removed the 4 bolts holding the bottom half of the housing to the top half and had access. Putting the transfer case in neutral helped so I could just rotate the shaft for better access. Push them aside. I used a bungee cord to hold the front shaft out of the way.
Then unplug the reverse light, 4WD light, and speedo cable. Unclip, unclip, twist.
Put the transmission in neutral and remove stick shifts. There are good write-ups about this (including further back in my build thread), but in short, remove cover plate in cab, unscrew shifter knobs, slide boots and cover off shifters. Pull up oil seal boots below. Tranny shifter has a spring deal that you have to push down and turn a 1/8 of a turn and the thing pops out. T-case just has a snap ring. Remove and lay shifters aside. (of course this would be a good time to replace the shifter seats and socket, as I did earlier in the season (thanks Marlin Crawler!) I stuffed some rags in the holes for protection against contaminants.
I realized the sway bar will be in the way so that was the next disco. I actually had it mostly disco anyway after the t-bar mount disaster (see previous posts). In the end I just deleted it altogether since I don't really notice much of a change. (I'm pretty gentle in corners anyway). 4 bolts at the bushing mounts and the 2 nuts at the lower A-Arms.
Next, per FSM, I removed the 4 bolts holding the t-case to the cross member.
They are up inside these holes and look like this:
Surprisingly short bolts too. Then I put a jack under the t-case just enough to take the weight. With my suspension lift I had to use a 2x4 as a shim on my jack to get enough height. Then remove the 8 bolts that mount the cross member to the frame. I definitely needed an impact tool for this. These guys were STUCK!
After a double check to make sure nothing else was connected (remember to remove both starter mounts), I removed the bottom 4 bolts on the tranny. My tranny diverged a bit from the FSM here, and I had a few more things to remove. There were four 14 mm bolts on the bottom, but then there was a 17 mm bolt on the driver's side through the exhaust pipe mount (also loosen this mount bolt and slide away. I did not need to remove any exhaust parts). Also there was a 17mm bolt just below the starter behind the clutch lever. Tuff to get to.
Then with a jack stand supporting the bottom of the engine on the oil pan, a jack under the bell housing and a jack under the t-case. I removed the top 2 bolts. Not easy. I used about 24" of extension on my socket, and stuck the ratchet handle up through the open hole where the shifters go. I used a short breaker bar extension for more torque and out they came. Pretty smooth actually, but the bolts in the tranny are awfully long!
At this point in the day it started to rain pretty good, but I was determined. We had a pretty hard time disengaging the tranny from the block while adequately supporting the tranny on the 2 fully extended jacks. We used a strap to hold the weight at the bell housing and keep it from rotating (which it will want to do). My buddy held that in the cab while I pulled the jacks back away from the block and once the input shaft was clear, I lowered the jacks slowly. Eventually it looked like the whole thing was going to come crashing to the ground, but after a time of some panic and getting thoroughly soaked from the rain, the tranny set down safely. We put it on a creeper and wheeled it to a dry area. It was time for lunch, beer, and a clothes dryer cycle.
The rain let up in a bit and I was anxious to get that clutch apart so out I went. This is the inside of the bell housing:
Lots of blackness. I'll get to cleaning later. Here's what it looked like at the clutch housing:
I removed the 5 bolts that hold the housing to the flywheel. Some folks say to somehow clamp the harmonic balancer on the front of the engine to keep the crank shaft from turning, but I had no problems getting the bolts out without doing this. The cover slid off the alignment pegs and I found a disaster:
My clutch was GONE. Literally no pad material left. The final clunk I heard must have been the last remnants of the pad blowing apart and jamming itself into every nook of the clutch housing. Little bits of it was packed everywhere, and the clutch plate itself was shiny metal and nothing else.
Also you'll notice the diaphragm springs on the clutch cover are worn greatly where the throw-out bearing rubs on it.
As for the throw-out bearing, it didn't feel too bad, and only had minimal wear on the contact surface, but the Marlin Crawler kit comes with new bearings so why not put them in.
Next came the flywheel. 5 bolts + impact wrench= easy removal. Both the flywheel and the pressure plate were worn and scored and generally Gnar, so I'm glad I bought a new set. The flywheel I got from NAPA for $80 and the pressure plate came in the kit. Both shiny new!
Behind the flywheel there is a steel plate. 2 easy screws and off it came. It was grimey and behind it was where I found all the clutch material.
I could now get a good look at the pilot bearing, which looked ok, and felt pretty smooth. Plus I could not get that SOB out. I tried the grease packing trick with no luck, and no amount of prying or banging was making a lick of difference. So I decided i'd think about not replacing it while i cleaned all the mess up.
I figured, while in there, I'd replace the rear main oil seal. Mine wasn't leaking but I figured I never wanted to take the thing apart again, so for $15 it was worth it. I know some people just pull the seal with the housing on the truck, but I took out the 5 bolts (and 2 from the oil pan) and with some effort, was able to break the housing free of the oil pan and block. The old gasket was totally fused to the block so I just left it. I took the housing to the bench and pulled the seal with a screwdriver with some tape over the end to prevent scraping the metal. As it turns out, the seal was brittle and cracked and broke while I was doing this, and the little spring wire thing inside the seal fell out. I am glad I am replacing it! A few solid raps with a rubber mallet and the seal was in.
All cleaned up and put back on the block.
Rather than double up the gasket behind the housing (since I didn't want to scrape the old one out), I just used a load of Ultra Black. It's required to make the seal at the oil pan, but I figured It couldn't hurt to have it all around so I goobered it around the seal and squished the housing in place. 5 bolts snug it to the block, 2 more underneath to fasten it to the oil pan. Done.
By now I had decided to leave the pilot bearing in (don't judge me just yet....read on). I cleaned the steel plate and reinstalled: 2 screws. Cleaned off any machine oil from the new flywheel and reinstalled the 5 bolts. These were a bit tougher since I was hand tightening the bolts. The crank shaft kept spinning. I jammed a block of wood between the teeth of the flywheel and the u-joint of the front drive shaft to hold it in place. Didn't work awesomely, but got the job done. I didn't find any torque specs for these, so I turned them as hard as my arms could.
So shiny!
Then I pulled out the new clutch and, using the included alignment tool, set it into place. It sits there kind of precariously until you get the pressure plate assembly on.
I cleaned the new pressure plate of any oils from the factory and set it in place on the pegs on the flywheel. The holes were just a touch small for the pegs, but with a few raps of a rubber mallet they set in just enough to get a few bolts in (I got new hardware from Marlin Crawler too, but the old bolts looked fine. I used the new ones anyway!). Once all the bolts were threaded in hand tight, I went around with the wrench and IN A STAR PATTERN slowly tightened each bolt. I would tighten each until I couldn't turn it easily without any leverage. Once they all set in with minimal leverage, I got the torque wrench out and set it to 13 foot pounds. Spec said 11-17. I turned until a click and gave it a touch more. Once more around to verify and I called it good.
Then I went back to the FSM to make sure I didn't forget anything and read about making sure the clutch plate is centered by being very certain the alignment tool is fully seated and straight. This made me want to take the pressure plate back off and be double dog sure I did it right. Only a few minutes more for peace of mind.
Ta da!
Day one was over. Pretty good progress for a novice.
10-17-2012, 05:01 PM
#54
Registered User
Thread Starter
Join Date: Feb 2012
Location: Boulder, CO
Posts: 72
Likes: 0
Received 0 Likes
on
0 Posts
Day 2 began much sunnier than day 1. Excellent.
After mulling over the pilot bearing problem over night, I decided it would be stupid to not replace the thing. I went to Auto Zone and borrowed a slide hammer and a pilot bearing puller tool. I pulled the pressure plate cover off (again!) and removed the clutch plate. I got the pilot bearing puller out and realized that it was too big to fit in the little hole! Must be a pilot bearing puller for an American truck or something. WTF? So we got out the grinder and modified it with a half dozen trial and error grinds. Finally got it to work. (I ended up just buying the puller since it was seriously modified. Now I have a Toyota specific pilot bearing puller! What's another $15?) I cleaned the grease I had packed into it and installed the new bearing with a few good raps of a mallet and using a deep socket as an SST.
I felt better having done this. And looking at the old bearing, I think it was starting to come apart, and I think this is why the grease packing trick didn't work. Air pressure kept passing through the bearing where the seal was degraded. Phew. I reinstalled the clutch assembly again ensuring to center the clutch plate.
I spent a few minutes cleaning out the crap from the bell housing, cleaning up the clutch fork and swapped in a new throw-out bearing. I set the bearing assembly in the bench vice (loosely) with the bearing resting on the vice top. I used my 30 mm impact socket (purchased to replace the output shaft seal on the t-case) to knock out the throw-out bearing holder thing through the bottom of the vice. I reassembled the fork and bearing and replaced the rubber boot. Don't forget these little clips that hold the fork to the bearing assembly.
Then we had to devise a much safer and easier way to get the tranny back up into place. We got a ratcheting strap and a piece of steel and rigged up a hoist through the stick shift hole. We put the cross member back on too so we would have better lateral control of the thing, and then found the balance point. With a jack under that, and the strap around the bell housing, I manned the rear jack while stabilizing the lateral movement. My buddy used the ratcheting strap to hoist the front. It went pretty smoothly. Once we were high enough, we put a jack under the bell housing and loosened the strap so we could slide the tranny forward. It took a few tries to get the splines lined up, but most of the difficulty was getting the jacks to roll in the right direction and everything level. I used a few bolts to pull the tranny the last 1/2" into place and started reassembly.
This part is, as usual, basically the reverse of disassembly. I cleaned things as I went and wished I had labeled all the bolts and such as I removed them. There weren't that many, but some better organization would have helped avoid a few moments of "where's this one go?" I didn't have any left over so that's good!
Before I connected the drive shafts, I nervously fired her up to test the clutch. All was well and WAY better than it ever was. good strong feel to the pedal, easy shifting, quiet, both output shafts turn when they should. Boom.
Finished assembly and took her for a short drive. Squealed the tires at every stop sign, and loved the punch I got when getting off the clutch. It will take a bunch of getting used to as it feels like it throws my left leg back! It felt like the clutch wasn't quite fully disengaging when the pedal was fully depressed so I spun the clutch master cylinder pedal assembly out a bit and it fixed the problem. Feels adjusted about right.
Cleaned up my mess in the driveway and headed home, all while listening and feeling for any issues. The rattle is still there but now I'm confident it's from something in the bed. I definitely got more zip from this thing, which I should since i went from, as my buddy said, "100% s**t to 100% awesome". Plus the upgrade to a super heavy duty clutch means that much more grabbing power and I'll never have to get in there again.
The next morning I looked for any drips of oil or signs of badness, but all was well. Drove it to work and loved it. All in all a successful weekend. Another project under my belt. And I think my J**p buddy wants to do his clutch now!
Last edited by Truckstarr; 10-17-2012 at 05:06 PM.
10-17-2012, 05:15 PM
#55
Registered User
Wow that old clutch was toast! Nice job on the fix. Glad you did the pilot bearing. Don't sweat the taking on/off of pressure plate...best to make sure your good rather than wrestle a darn trans back out. Try one alone sometime!! lol.
 03-30-2013, 02:23 PM
#58
Registered User
Thread Starter
Join Date: Feb 2012
Location: Boulder, CO
Posts: 72
Likes: 0
Received 0 Likes
on
0 Posts
Rear End Rattle
I've had this rattle for a bit now and I can't really figure out what it is. It only happens above 30 MPH AND either when the clutch is in (pedal to the floor) or when the engine speed and road speed are the same (that sweet spot on the throttle where there is no acceleration or engine braking). It sure seems like it's coming from the rear end, so I'm thinking rear diff, drive shaft, u-joints. But I've been under there yanking on things and there seems to be no play in anything. It's not a squeaky kind of rattle, more like ball bearings in a can kind of rattle.
Is my diff about to blow?
Is my diff about to blow?
03-30-2013, 02:34 PM
#59
I have that rattle ONLY SOMETIMES, like when putting her through it, off road, for hours.... ONLY idle do I hear it, clutch in or out... In my case, I think its trans input shaft bearings.... sounds to be right under me. Having a vibration after an OMEmu CS009R leaf lift as well.... new u joints, better now.... but still hear something I dont like. Most of me says tcase output shaft bearing.... Restaked a new nut at 95#.... dshaft angle isnt much worse, only 1.5" up from zuk..... but something became unhappy under load at 55-65 or so, 4th or 5th gear.... Did u change anyyyyything lately? Check the trans fluid and tcase?
03-30-2013, 02:57 PM
#60

Usually the catalytic converter heat shield, rubbing, poped one of the welds, or just a rock between the two.
Don't overlook the tailgate keepers. Chef did a video on DIY fix for those broken clips.
If it was driveline or suspension you'd feel it aswell as hear it, I assume.
Don't overlook the tailgate keepers. Chef did a video on DIY fix for those broken clips.
If it was driveline or suspension you'd feel it aswell as hear it, I assume.


