sactodreamer's 1991 4Runner Build-Up Thread


 12-15-2010, 09:11 AM
#22
Registered User
Thread Starter

Join Date: Jun 2010
Location: Sacramento, CA
Posts: 38
Likes: 0
Received 0 Likes
on
0 Posts
Progress last week. The floor pan is for the most part set where it needs to be. We are not going to weld it in place until we have the dash and steering column in place due to the rest of the stuff needing to line up with everything. We cut the driver's side dash support bar off from the 91 and the mounting plate from the 97 (the passengers side lined up bolt wise). And then welded the 91 end onto the 97 bar so it bolts right in place.


Last edited by sactodreamer; 12-15-2010 at 12:48 PM. Reason: fix picture link
12-15-2010, 12:49 PM
#24
Registered User
Thread Starter
Join Date: Jun 2010
Location: Sacramento, CA
Posts: 38
Likes: 0
Received 0 Likes
on
0 Posts
So we have a delema which someone with experience with body lifts might be able to help with. As you can see in the second picture above, the 4wd shifter needs to be extended so it will not interfear with the body. Is there a fix for this? Thanks
12-15-2010, 10:07 PM
#29
Registered User
It's also a body stiffener.
Did you just cut and butt weld them together or did you sleeve it any for extra strength? I'd sleeve it a few inches on each side of that weld. Just in case.
But that's just me.
http://www.4crawler.com/4x4/ForSale/...lTransmissions
Nice build so far. I'm not a fan of that 3" body lift but it ain't my truck
Your friend will be a lot happier with the 3rd gen suspension. Not only for comfort and flex, but also for ease of modification compared to the second gens.
EDIT: Also, heres an 87--00 4Runner swap.
http://www.irbisoffroad.com/project4.asp
(click that main pic there for more pics).

Last edited by scuba; 12-15-2010 at 10:11 PM.
12-16-2010, 05:09 AM
#30
...4Crawler sells shifter extensions.
http://www.4crawler.com/4x4/ForSale/...lTransmissions...
http://www.4crawler.com/4x4/ForSale/...lTransmissions...
02-14-2011, 02:48 PM
#31
Registered User
Thread Starter
Join Date: Jun 2010
Location: Sacramento, CA
Posts: 38
Likes: 0
Received 0 Likes
on
0 Posts
I haven't posted updates for awhile. We ended up cutting the firewall off of the 97 floorpan and just using the original 91 firewall with some mods. There is a seem at the bottom of the firewall where the firewall and floorpan meet on both bodies. We just lined up the seem from the 91 and the 97 and the shift linkage and everything there lined up without needing any extentions or moding. So the floorpan is almost all the way in (we ran out of welding wire).
 02-14-2011, 03:22 PM
#32
Registered User
Thread Starter
Join Date: Jun 2010
Location: Sacramento, CA
Posts: 38
Likes: 0
Received 0 Likes
on
0 Posts
We actually had to move the hole for the fresh air intake beneath the windshield wiper tunnel. That was accomplished by transplanting the 97 section of that area over to the 91 body.
1st picture is the hole cut out.

2nd 97 sheetmetal attached to the airbox.

3rd sheetmetal tacked into place.

1st picture is the hole cut out.
2nd 97 sheetmetal attached to the airbox.
3rd sheetmetal tacked into place.
03-28-2011, 12:46 PM
#33
Registered User
Thread Starter
Join Date: Jun 2010
Location: Sacramento, CA
Posts: 38
Likes: 0
Received 0 Likes
on
0 Posts
A little more progress last week. The inner area of the floorpan is finished. We are going to lift the body back off and weld in some additional supports on the under side. It's part of the "over build it" plan.

03-28-2011, 08:11 PM
#34
Registered User
Thread Starter
Join Date: Jun 2010
Location: Sacramento, CA
Posts: 38
Likes: 0
Received 0 Likes
on
0 Posts
The firewall is almost complete, we just need to drill and open up the hole for the condensation and A/C lines. After welding everything in place we put an extra sealant over the welds.

06-14-2011, 09:37 PM
#36
Registered User
Thread Starter
Join Date: Jun 2010
Location: Sacramento, CA
Posts: 38
Likes: 0
Received 0 Likes
on
0 Posts
Well it's been a little while since I posted any updates but we have been making progress. The floorpan and firewall were very time consuming, remember the entire dash and HVAC system from the 97 is going in.
The floorpan was sealed and painted with epoxy paint to get it all protected.
Floorpan finished:


The floorpan was sealed and painted with epoxy paint to get it all protected.
Floorpan finished:


 08-03-2011, 07:13 PM
#39
Registered User
Thread Starter
Join Date: Jun 2010
Location: Sacramento, CA
Posts: 38
Likes: 0
Received 0 Likes
on
0 Posts
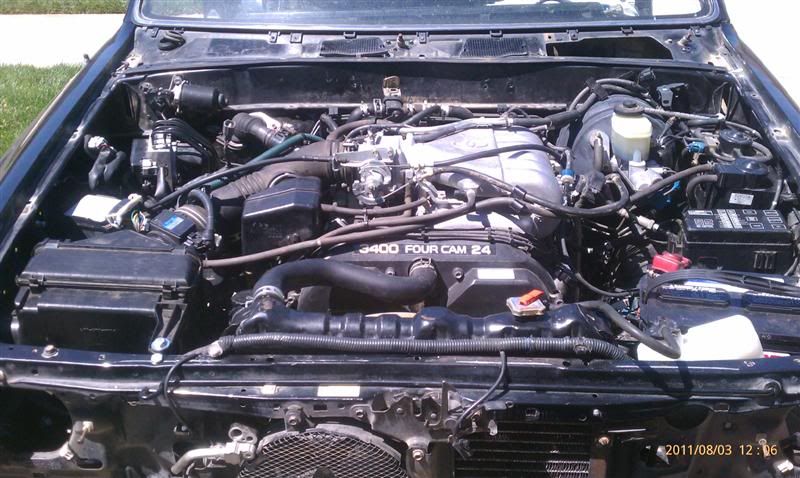
Well today was a great milestone in the build. We started it and it ran great!
And we finished the install of the dashboard.
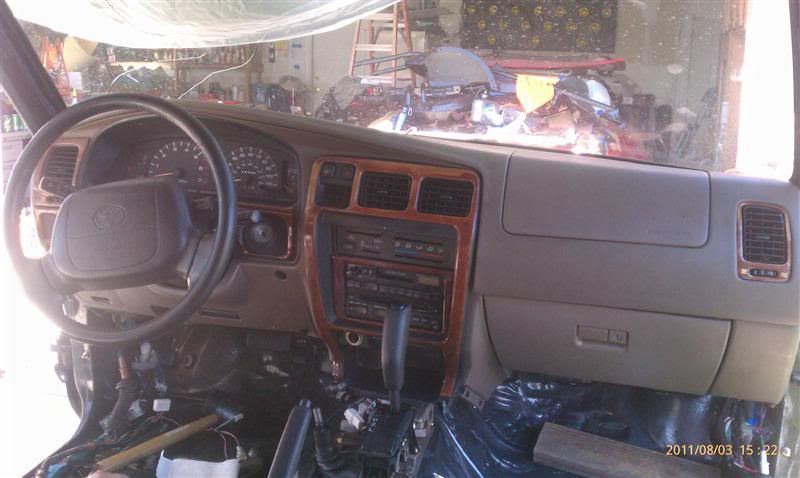
Here is the video:
http://www.youtube.com/watch?v=gNZOskFgQ48
And we finished the install of the dashboard.
Here is the video:
http://www.youtube.com/watch?v=gNZOskFgQ48


