Locked_SR5 1987 4Runner Build-Up Thread
 12-02-2011, 09:52 PM
#81
Registered User
Thread Starter
Hey all,
I started to fabricate my parking brake bracket for my Runner.
This is just a prototype, as I still need to make a couple of adjustments.
Parts I'm using for this are:
Front range off road cross member
Wilwood spot caliper
All pro parking brake disc
2"x1" cold rolled C-channel
After mounting the parking brake disc, cross member, and placing the spot caliper in the desired position, the distance measured between the edge on caliper and cross member is 2", which is why I used the mentioned C-channel.
Here are a few pics. I'm in the process of designing the bracket system that will allow me to use the factory parking brake lever, parking brake cable, and be able to activate the spot caliper.


Hopefully, I'll be able to install this soon!!
I started to fabricate my parking brake bracket for my Runner.
This is just a prototype, as I still need to make a couple of adjustments.
Parts I'm using for this are:
Front range off road cross member
Wilwood spot caliper
All pro parking brake disc
2"x1" cold rolled C-channel
After mounting the parking brake disc, cross member, and placing the spot caliper in the desired position, the distance measured between the edge on caliper and cross member is 2", which is why I used the mentioned C-channel.
Here are a few pics. I'm in the process of designing the bracket system that will allow me to use the factory parking brake lever, parking brake cable, and be able to activate the spot caliper.
Hopefully, I'll be able to install this soon!!
 12-09-2011, 05:10 PM
#83
Registered User
Thread Starter
Quick update...
I was able to locate 3 of the 5 plugs needed for the 3.4 swap... I'm still scouring CL for 2 plugs from a Tacoma or 4Runner (The E5 and IK2 plug). Need help locating these plugs, so if you know of a online store. Please help.. So I can start wiring the adapter up.
Thanks
I was able to locate 3 of the 5 plugs needed for the 3.4 swap... I'm still scouring CL for 2 plugs from a Tacoma or 4Runner (The E5 and IK2 plug). Need help locating these plugs, so if you know of a online store. Please help.. So I can start wiring the adapter up.
Thanks
12-22-2011, 05:05 PM
#84
Registered User
Thread Starter
I digressed a little bit from working on the 4runner and decided I needed another toy....

Well as of today, I'm back on the wagon and working on the runner. Since I last posted I was able to locate the N5, N7 from a runner that was being parted out a couple of weeks ago and was able to locate the IK2 plug (big white plug) from a auto Tacoma.. Thus far, I have all the plugs I need with the exception of the E5 plug that goes from the dash harness to the ECU.. I'll post something in the 3.4 swap section and see if they can help me source an E5 plug and look over my wiring schematics and see if everything looks good.
Happy Holidays..
01-08-2012, 08:29 PM
#85
Registered User
Thread Starter
Wanted to share the link for my 22re to 3.4 motor swap thread. I'm just finalizing the pin outs for all the plugs needed for the 3.4 harness adapter.
https://www.yotatech.com/forums/f160.../#post51848747
Thanks.
https://www.yotatech.com/forums/f160.../#post51848747
Thanks.
01-08-2012, 09:26 PM
#86

Wow going from a 22R series to a 3.4 is cool, Subscribed
When doing the wiring are you going to be posting the stock wiring color attaching into the newer connector wiring plugs that connect to the 3.4 you got for others who want to do same thing, How to start to finish? :}
.
When doing the wiring are you going to be posting the stock wiring color attaching into the newer connector wiring plugs that connect to the 3.4 you got for others who want to do same thing, How to start to finish? :}
.
01-17-2012, 09:45 PM
#87
Registered User
Thread Starter
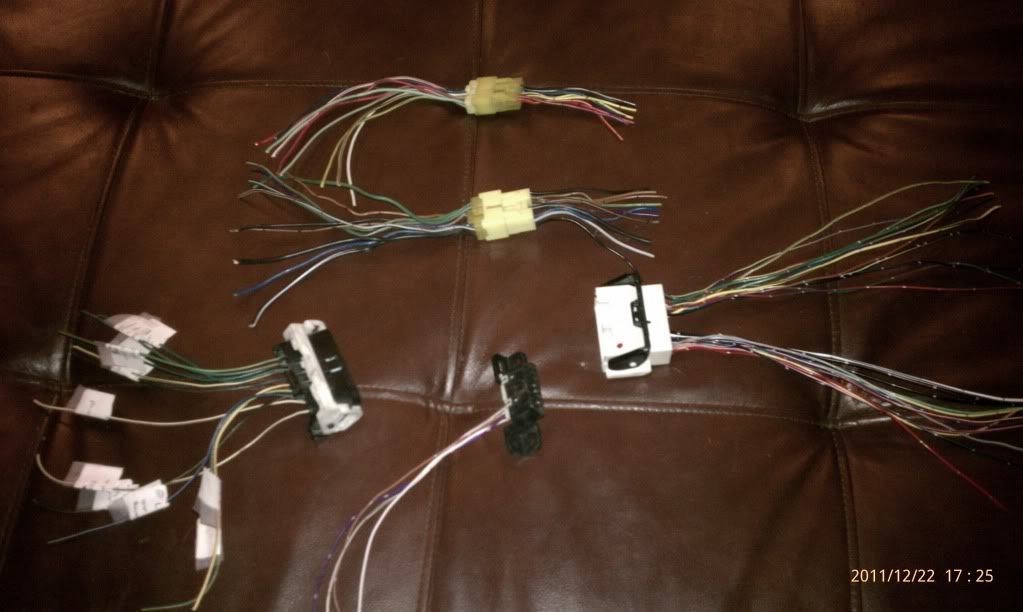
I was finally able to source a 99 Tacoma E5 plug and the associated pins needed for the empty plug. The information is posted on my thread in the 3.4 swap section (Jasond, who has a 22re to 3.4 swap, was a big help with giving me the correct part number for the plug).
Included in that thread are my wiring schematics and pin outs on the plugs needed to do the swap. I may be able to help If there are any questions.
In the mean time, I created this:

My 99 Tacoma 3.4 engine harness to 87 4runner 22re body harness. I still need to solder in the power supply lines into the E5 plug, but wont do that until I start the swap. If anyone here knows about the AC in the 3.4 swap, I'm going to need help with the wiring. I also plan on using the 3.4 cruise control too. Let me know if that is possible.
I'm not sure what I'll be able to do in the near future, as the California storm door is finally going to open. I might just have to wait til mid-feb. Have plans on purchasing the Millermatic Passport Plus with my tax returns, so I can finish fabricating my parking brake bracket. I also like the idea of having a portable welder for trail use, as its pretty portable..
Cheers and stay warm!!
Included in that thread are my wiring schematics and pin outs on the plugs needed to do the swap. I may be able to help If there are any questions.
In the mean time, I created this:
My 99 Tacoma 3.4 engine harness to 87 4runner 22re body harness. I still need to solder in the power supply lines into the E5 plug, but wont do that until I start the swap. If anyone here knows about the AC in the 3.4 swap, I'm going to need help with the wiring. I also plan on using the 3.4 cruise control too. Let me know if that is possible.
I'm not sure what I'll be able to do in the near future, as the California storm door is finally going to open. I might just have to wait til mid-feb. Have plans on purchasing the Millermatic Passport Plus with my tax returns, so I can finish fabricating my parking brake bracket. I also like the idea of having a portable welder for trail use, as its pretty portable..
Cheers and stay warm!!
03-01-2012, 11:22 AM
#88
Registered User
Thread Starter
Update..
I was able to finish fabricating my transfer case crossmember and parking brake.. Pics to follow.. I plan on installing within the next couple of weeks; weather permitting.
Looking for a reputable vender in the Sacramento area that can do drivelines.. Also, as anyone used the new trail gear long slip drive line. what do you think of it?
Thanks
03-09-2012, 10:02 PM
#89
Registered User
Thread Starter
Following up about what I previously posted.
I was able to get my taxes done and was able to purchase one of these:

And with that purchase I'll be able to continue with my parking brake fabrication to the crossmember:


With the parking brake fabbed up, its time to move on to fabbing the triple-sticks. Wanted to avoid having mismatching dual case shifters ( round stock toyota shifter and two flat shifters), so fabricated the middle shifter to match the other two.


With the triple-sticks ready on the dual cases its time to prep the truck for the install sometime this weekend. After the install, I'll be getting ready for new front and rear drive shafts.


With the transfer case out, I was able to clean up the under-carage, remove exhaust and prep area where crossmember to the frame.
I was able to get my taxes done and was able to purchase one of these:
And with that purchase I'll be able to continue with my parking brake fabrication to the crossmember:
With the parking brake fabbed up, its time to move on to fabbing the triple-sticks. Wanted to avoid having mismatching dual case shifters ( round stock toyota shifter and two flat shifters), so fabricated the middle shifter to match the other two.
With the triple-sticks ready on the dual cases its time to prep the truck for the install sometime this weekend. After the install, I'll be getting ready for new front and rear drive shafts.
With the transfer case out, I was able to clean up the under-carage, remove exhaust and prep area where crossmember to the frame.
04-07-2012, 10:03 AM
#91
Registered User
Thread Starter
Quick update guys..
Had a change in directions with the transfer case crossmember. As previously mentioned, I was planning on using an FROR crossmember modified to accept a spot caliper.. I mentioned I completed it and went to install.. An that is when I found out the crossmember is clocked 10* and my dual case adapter is not, so its pretty much incompatible.. So I plan on grinding off the spot caliper bracket and now have a clocked 10* FROR crossmber for sale for those interested in making a flat belly rig.. I do not..
Ok, new direction..took off the FROR crossmember and purchased a TG dual case member.. I slapped in the cases and crossmember before I went to Hawaii for my birthday.. Still thinking about what I should do for parking brake.. should I just buy the parkiung brake kit that is compatible with the TG crossmember or try and make my own again.. hmm..
Anyways, I ended up with this..

When I returned from Hawaii, I started on installing the Triple sticks and putting the interior back together.
The 1.5 inch body lift really helped with the install.. I only need to do a small amount of trimming on the floorboard for for the right portion of the triple stick.

Here it is with the interior put back together.


Things I still need:
one more stock geared transfer case mount
and front and rear drive lines. I do not want a square front. Any reputable places to get one built in the Sacramento area? I heard Dave's Off road.. The front measurement from flange to flange is 36.5 and the rear is 40.75.. Is there anything else I need to account for? I know I don't want vibrations when I drive below 45 mph.. Eventually I might have to cut and rotate the front pinion angle..
Thats all for now
Had a change in directions with the transfer case crossmember. As previously mentioned, I was planning on using an FROR crossmember modified to accept a spot caliper.. I mentioned I completed it and went to install.. An that is when I found out the crossmember is clocked 10* and my dual case adapter is not, so its pretty much incompatible.. So I plan on grinding off the spot caliper bracket and now have a clocked 10* FROR crossmber for sale for those interested in making a flat belly rig.. I do not..
Ok, new direction..took off the FROR crossmember and purchased a TG dual case member.. I slapped in the cases and crossmember before I went to Hawaii for my birthday.. Still thinking about what I should do for parking brake.. should I just buy the parkiung brake kit that is compatible with the TG crossmember or try and make my own again.. hmm..
Anyways, I ended up with this..
When I returned from Hawaii, I started on installing the Triple sticks and putting the interior back together.
The 1.5 inch body lift really helped with the install.. I only need to do a small amount of trimming on the floorboard for for the right portion of the triple stick.
Here it is with the interior put back together.
Things I still need:
one more stock geared transfer case mount
and front and rear drive lines. I do not want a square front. Any reputable places to get one built in the Sacramento area? I heard Dave's Off road.. The front measurement from flange to flange is 36.5 and the rear is 40.75.. Is there anything else I need to account for? I know I don't want vibrations when I drive below 45 mph.. Eventually I might have to cut and rotate the front pinion angle..
Thats all for now
04-07-2012, 06:29 PM
#92
Registered User
Join Date: Mar 2009
Location: (LSD) Lower Slower Delaware
Posts: 1,169
Likes: 0
Received 0 Likes
on
0 Posts
nice job finishing the interior, I'm put in a manual in place of the automatic and I was concerned about the shifter, but looking at your work makes it ez to picture what I need to do...Thanks...Bill
04-22-2012, 06:51 PM
#94
Registered User
Thread Starter
Ok, update time.. After so research I decided to go with Davez off-road long travel front and rear drivelines. Dave is going to add the CV to the rear drive line and have a double U-joint for the front.. I should be getting these back sometime this week, so I will post pics when I get them installed..
In the mean time, I'm going to to be making a custom bikini hardtop out of an old 4runner shell. I plan on integrating a low profile roof rack onto it.. The plan is to have the front portion bolt into the stock location and have the rear secured to the stock roll bar with u-bolts..
Anyways, here are a couple of pics.. I'll post some more when i finish with the fiber glassing, but you get the idea.. I'll post measurements too if anyone likes what I came up with..

Bottom.. I plan on using the stock trim again to make it look factory again. Also planning on using minimal expanding foam to fill in the voids and fiber glassing over... Pretty much make it clean like the rest of the build..

That's all for now..
In the mean time, I'm going to to be making a custom bikini hardtop out of an old 4runner shell. I plan on integrating a low profile roof rack onto it.. The plan is to have the front portion bolt into the stock location and have the rear secured to the stock roll bar with u-bolts..
Anyways, here are a couple of pics.. I'll post some more when i finish with the fiber glassing, but you get the idea.. I'll post measurements too if anyone likes what I came up with..
Bottom.. I plan on using the stock trim again to make it look factory again. Also planning on using minimal expanding foam to fill in the voids and fiber glassing over... Pretty much make it clean like the rest of the build..
That's all for now..
05-09-2012, 05:14 PM
#96
Registered User
Thread Starter
Ok..
Update and progress report.. First thing I want to update ya'll on was the custom top I'm making for when I want the full top off. I think its going to work out very well, especially when I run half doors too.
I was able to lay the fiberglass and start the bondo process.. Here are some of the pics thus far.. Once completed, I'll be able to use the trim pieces and fabric to give it that factory look on the underneath.. Has anyone seen someone do this before?

Started to bondo process (Under that pink stuff is fiberglassed reinforced cardboard. I was thinking about weight savings too).

Top part.. This is just the rough finish. I'll prep for primer once I get all the trimming done around the edges.

Second thing to report on...
Pics say it all....
Fully compressed

Long travel splines

Here are a few pics of them installed..


The drive lines look good and well, but the effort get them were a PAIN!..
I'm not one to bash a business owner but the communication between his business and customers is far below average. I had to drive to his shop a few times just to talk to someone there. A couple of the days no one was there.. Apparently when Dave is not there, he shuts the whole place down.
Additionally, he said it would be a several day turn around time, but ended up being a few weeks. He lost my measurements, even though he wrote them on the drive lines. To further illustrate his inability to communicate with customers, he forgot to have me pay first because they are one off peices. At this point, not sure if I could recommend him to other customers.. I will say this though, He did knock off 30 bucks off the rear, and made sure to get me the drive lines when the shop was closed..
Next up is the head gasket replacement.
Update and progress report.. First thing I want to update ya'll on was the custom top I'm making for when I want the full top off. I think its going to work out very well, especially when I run half doors too.
I was able to lay the fiberglass and start the bondo process.. Here are some of the pics thus far.. Once completed, I'll be able to use the trim pieces and fabric to give it that factory look on the underneath.. Has anyone seen someone do this before?
Started to bondo process (Under that pink stuff is fiberglassed reinforced cardboard. I was thinking about weight savings too).
Top part.. This is just the rough finish. I'll prep for primer once I get all the trimming done around the edges.
Second thing to report on...
Pics say it all....
Fully compressed
Long travel splines
Here are a few pics of them installed..
The drive lines look good and well, but the effort get them were a PAIN!..
I'm not one to bash a business owner but the communication between his business and customers is far below average. I had to drive to his shop a few times just to talk to someone there. A couple of the days no one was there.. Apparently when Dave is not there, he shuts the whole place down.
Additionally, he said it would be a several day turn around time, but ended up being a few weeks. He lost my measurements, even though he wrote them on the drive lines. To further illustrate his inability to communicate with customers, he forgot to have me pay first because they are one off peices. At this point, not sure if I could recommend him to other customers.. I will say this though, He did knock off 30 bucks off the rear, and made sure to get me the drive lines when the shop was closed..
Next up is the head gasket replacement.
05-09-2012, 06:55 PM
#97
driveline looks good. sucks about how long it took and the issues. now the top. the headliner comes off and on without any issues? im thinking of removing mine for when and if i decided to add a roof rack mount but want the bolts hidden and under the liner
05-09-2012, 07:28 PM
#98
Registered User
Thread Starter
The material is a foam backed vinyl that will tear once you try to remove it and couldn't think of a way to save it. Once I'm done I'll use some new automotive vinyl and recover.. BTW nice build.. who makes that rear bumper with tire carrier that was in your build?


