Locked_SR5 1987 4Runner Build-Up Thread
 08-06-2011, 06:40 PM
#21
Registered User
Thread Starter
Came home today from a round of gold and found out I received a box from Marlin Crawler which had my transfer case gaskets

So I started working on the Dual Ultimate Cases today. Got my Crawl box put together today. I'm going to run my 21 spline input shaft so I can mate it to my W56. Once I do my 3.4 Swap, I'll put the 23 spline in so I can mate it to the R150 tranny.

Tomorrow I'm going to hang my rock sliders and play catch up with the previous parts of the build.
So I started working on the Dual Ultimate Cases today. Got my Crawl box put together today. I'm going to run my 21 spline input shaft so I can mate it to my W56. Once I do my 3.4 Swap, I'll put the 23 spline in so I can mate it to the R150 tranny.
Tomorrow I'm going to hang my rock sliders and play catch up with the previous parts of the build.
 08-07-2011, 05:10 PM
#22
Registered User
Thread Starter
Well I didn't hang the rock sliders like I wanted to today, but I did get something accomplished.
I finished my Dual Ultimate Transfer cases today. Not sure when I'll be able to put it in the truck though.

When I get the chance, I'll show my SAS and rear spring swap, but in the mean time I'll explain my approach to new parking brake. Since I'm running 63" Chevy's and rear disc brakes, I lost the factory parking brake. A while back, I was able to score a FROR transfer case mount with all hardware for 80.00. I couldn't justify spending 439.00 for All Pros Skid plate/parking brake combo and decided to make my own using their transfer brake rotor and a Willwood spot caliper (not completed yet, but you get the idea)


I finished my Dual Ultimate Transfer cases today. Not sure when I'll be able to put it in the truck though.
When I get the chance, I'll show my SAS and rear spring swap, but in the mean time I'll explain my approach to new parking brake. Since I'm running 63" Chevy's and rear disc brakes, I lost the factory parking brake. A while back, I was able to score a FROR transfer case mount with all hardware for 80.00. I couldn't justify spending 439.00 for All Pros Skid plate/parking brake combo and decided to make my own using their transfer brake rotor and a Willwood spot caliper (not completed yet, but you get the idea)
08-09-2011, 07:13 PM
#24
Registered User
Thread Starter
I haven't started to think about the drive shafts yet. I want to get the duals installed so I can have a better angle to the Third member in the front axle. If anyone could help, I need to find the correct amount of slip needed and what is the correct way to measure for custom drivel ines,
08-09-2011, 07:41 PM
#25
Registered User
Thread Starter
I found some time to do some more updates. As mentioned before, I've been gathering parts for my build, searching CL daily, and going to Inchworm do place orders for various parts needed. The same day I picked up my thirds, I ordered the Trail Gear 3" eliminator kit. I went with this amount of lift because I knew I needed an BL for the 3.4 swap and didn't want to run any tires bigger than 35's. Jim at Inchworm is also building a first generation 4runner using TG 3" springs front and rear. He was also running 35, but did some fender trimming that looks really clean.
Anyways, while searching CL came across an ARB bumper for 200.... the problem was the bumper was for a Jeep Grand Cherokee. I figured I could make the bumper work. Came home and did a test fit and it looked good to me

When looking at the bumper to see how I could make a bracket, I noticed the front spring hanger was the same width.


That got me thinking and taking into account the body lift, I came up with a bracket that looked like this.

When mounted, the bumper looks like it belongs there.

also notice that I have black rubber bump stops on the bumper. Those came from a stock front TJ bumper that someone was throwing away at the dumps. I think makes the bumper look better because of the black. I plan on paint the bumper the same color as the truck, so the bump stops will be more noticeable. Also, I ordered the ARB surrounds for the fog lights recessed in the bumper from Central 4Wheel Drive (40.00 each). Ordered the surrounds for a FJ Cruiser and plan on cutting a whole in the bumpers to install them.
Anyways, while searching CL came across an ARB bumper for 200.... the problem was the bumper was for a Jeep Grand Cherokee. I figured I could make the bumper work. Came home and did a test fit and it looked good to me
When looking at the bumper to see how I could make a bracket, I noticed the front spring hanger was the same width.
That got me thinking and taking into account the body lift, I came up with a bracket that looked like this.
When mounted, the bumper looks like it belongs there.
also notice that I have black rubber bump stops on the bumper. Those came from a stock front TJ bumper that someone was throwing away at the dumps. I think makes the bumper look better because of the black. I plan on paint the bumper the same color as the truck, so the bump stops will be more noticeable. Also, I ordered the ARB surrounds for the fog lights recessed in the bumper from Central 4Wheel Drive (40.00 each). Ordered the surrounds for a FJ Cruiser and plan on cutting a whole in the bumpers to install them.
08-09-2011, 07:45 PM
#26
Registered User
Thread Starter
Also forgot to mention that I needed to do some additional fabrication to the bumper.
Notice the gap?

Made some metal Tabs

And welded in place (i think I did a good job for my first time welding).

Notice the gap?
Made some metal Tabs
And welded in place (i think I did a good job for my first time welding).
08-09-2011, 08:15 PM
#27
Registered User
Thread Starter
With the front axle built and ready to go, it is SAS time. I'm going to let the pictures speak for themselves, but if you have any questions feel free to ask.


The rear as the 3.5 inch rear lift blocks and you can see how much taller a TG 3" lift is.

When installing the SAS, I following TGs instructions step by step
i.e., spring hanger flush with frame.

Upper shackle tube in middle of body mount.

And I get a sprig shackle angle like this (instructions say they should be 15* and will get better once the spring settles). I was believing them!!!

Man, was I pissed. I thought I really screwed up my SAS. After doing some research, I learned that the 3" springs are 2 inches shorter than the 4 and 5 inch springs (42" vs 44" i think?). During that research and trying to find an alternative, I learned that the RUFs are the same lengths as the 4" and 5" springs. The problem was that the centerpin is an extra 1.5" forward (but had to do it). I made a spring using both packs. What I did was just use the top two leafs from the RUFs and replaced the top two leafs of TG. Has anyone done this? Is this safe? Once I switched it over, I ended with a shackle angle like this.. I was pleased . Just wished TG instructions mentioned that the 3 springs were shorter.

I didn't add the shock hoops until I rented a welder. Did those not too long ago.


The rear as the 3.5 inch rear lift blocks and you can see how much taller a TG 3" lift is.
When installing the SAS, I following TGs instructions step by step
i.e., spring hanger flush with frame.
Upper shackle tube in middle of body mount.
And I get a sprig shackle angle like this (instructions say they should be 15* and will get better once the spring settles). I was believing them!!!
Man, was I pissed. I thought I really screwed up my SAS. After doing some research, I learned that the 3" springs are 2 inches shorter than the 4 and 5 inch springs (42" vs 44" i think?). During that research and trying to find an alternative, I learned that the RUFs are the same lengths as the 4" and 5" springs. The problem was that the centerpin is an extra 1.5" forward (but had to do it). I made a spring using both packs. What I did was just use the top two leafs from the RUFs and replaced the top two leafs of TG. Has anyone done this? Is this safe? Once I switched it over, I ended with a shackle angle like this.. I was pleased
. Just wished TG instructions mentioned that the 3 springs were shorter.I didn't add the shock hoops until I rented a welder. Did those not too long ago.
08-09-2011, 08:24 PM
#28
Registered User
That truck is looking great! You should be fine with that leaf combo as long as you are happy with the ride/flex. It looks stable enough, not sure about about that 4x4 running across the two jackstands supporting the crossmember though. 
08-09-2011, 08:48 PM
#29
Registered User
Thread Starter
Ha! i know... it was more for stability than support. I've heard stories about cars falling on people and I didn't want to go out like that.. The front jacks held all the weight..
08-09-2011, 08:57 PM
#31
Registered User
Thread Starter
When I went the TG/RUF hybrid route, it moved the front axle forward 2.5" and interfered with the pitman arm and tierod.

moved the steering box forward


and extended the steering shaft.

moved the steering box forward
and extended the steering shaft.
08-09-2011, 09:19 PM
#32
Registered User
Thread Starter
With bigger tires, I knew I wanted to upgrade the brake system.
I did the following: upgraded to V6 front calipers, rear disc conversion, remove load positioning valve, installed porportioning and residual vavle, upgraded brake booster and master brake cylinder, and installed braided steel line.


Stock brake booster

Double diaphram booster with 1" master cylinder


Rear Disc
The best and cheapest way I found for the rear disc swap was using the solid axle front calipers on the rear using brackets I found listed on ebay for 30.00 (the holes were water jetted, so I suggest reaming the holes). Calipers are leftovers from the SAS.
Pre rotor

Pre bracket and caliper


With bracket and caliper


Finished product (I was able to use the factory rear brake hardline and hardware for this swap).


Still working on the ebrake and I already mentioned spot caliper and transfer case parking brake.
I did the following: upgraded to V6 front calipers, rear disc conversion, remove load positioning valve, installed porportioning and residual vavle, upgraded brake booster and master brake cylinder, and installed braided steel line.
Stock brake booster
Double diaphram booster with 1" master cylinder
Rear Disc
The best and cheapest way I found for the rear disc swap was using the solid axle front calipers on the rear using brackets I found listed on ebay for 30.00 (the holes were water jetted, so I suggest reaming the holes). Calipers are leftovers from the SAS.
Pre rotor
Pre bracket and caliper
With bracket and caliper
Finished product (I was able to use the factory rear brake hardline and hardware for this swap).
Still working on the ebrake and I already mentioned spot caliper and transfer case parking brake.
08-10-2011, 07:03 AM
#33
Registered User
Join Date: Sep 2009
Posts: 64
Likes: 0
Received 0 Likes
on
0 Posts
I haven't started to think about the drive shafts yet. I want to get the duals installed so I can have a better angle to the Third member in the front axle. If anyone could help, I need to find the correct amount of slip needed and what is the correct way to measure for custom drivel ines,
08-13-2011, 02:07 PM
#34
Registered User
Thread Starter
i used this method from pirate when i made my square driveshaft and it worked out good. should be the same idea if you use a round driveshaft. 'use a Tape Measure and you measure the distance between the T-case flange and the diff flange while it is sitting level on all four wheels. Subtract the length of the CV and the U-Joint. give it about 3-4 inches of compression and 10-12 inches of slip'
08-13-2011, 02:20 PM
#35
Registered User
Thread Starter
I was able to get a little bit more done the last few days..
I was able to pic up a set of TG rocksliders (new in box) and gusset supports for 100.00 CL about 2 months ago and was finally able to put them on. Here are some pics.
Tacked them in to place
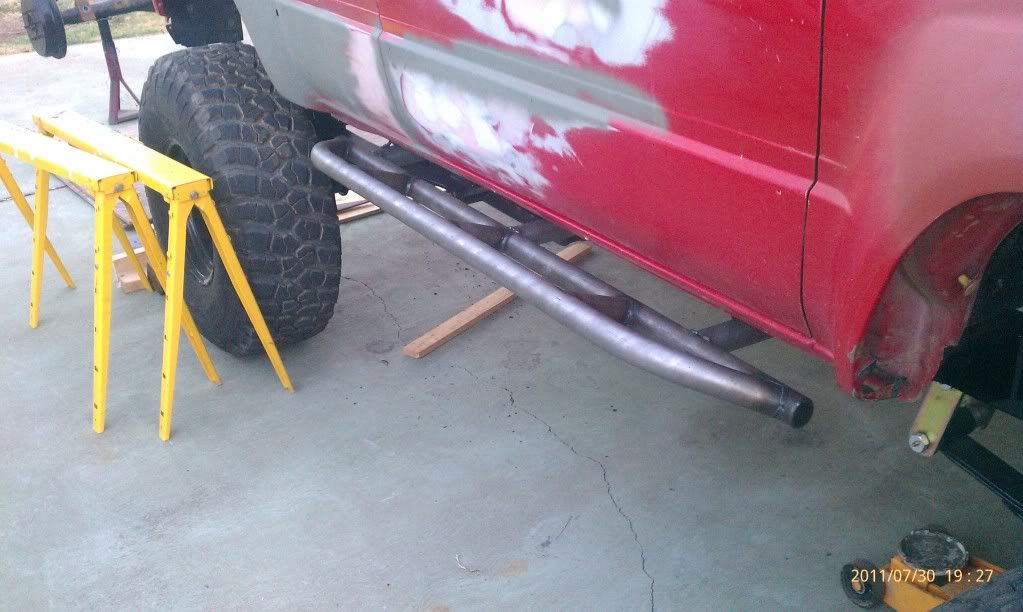

Door clearance

Ready to be welded

Showing my rookie welding skills

Painted and welded into place


In the future, I plan on adding removable wheel well tubing, using TG interlocking tube clamps. I also plan on painting all bumpers/tubing same color as the truck..
I was able to pic up a set of TG rocksliders (new in box) and gusset supports for 100.00 CL about 2 months ago and was finally able to put them on. Here are some pics.
Tacked them in to place
Door clearance
Ready to be welded
Showing my rookie welding skills
Painted and welded into place
In the future, I plan on adding removable wheel well tubing, using TG interlocking tube clamps. I also plan on painting all bumpers/tubing same color as the truck..
08-27-2011, 07:13 PM
#36
Registered User
Thread Starter
ARB Bumper Surrounds
Wanted to give a quick update:
For those familiar with the FJ Cruiser ARB bumpers. They have molded inserts that are placed in the bumper for the turn signals and 4 inch fog lights. I liked them so much, I was on a quest to have them fabricated into my "custom" ARB bumper. There isn't a lot information on the internet regarding these. I placed an inquiry to Central 4Wheel Drive in Sacramento and said they would be able to order them.
I guess there are two types of surrounds. One for the IPF lights and one for the ARB lights. I ordered the ones for the IPF lights.
Here are the part #
AR 3162467L
AR 3162467R

Here they are

For those of you that want to do the same thing as me; here are the deminsions of the surround.


I made a cardboard template and transfered to ARB bumper. Used a cutting wheel for the straight edges and a cutting torch for the curves.


Here's what it looks like with it installed. It will really look good once I paint the bumper the same color as the truck (the surrounds and bumper guards will really stand out from the red).

For those familiar with the FJ Cruiser ARB bumpers. They have molded inserts that are placed in the bumper for the turn signals and 4 inch fog lights. I liked them so much, I was on a quest to have them fabricated into my "custom" ARB bumper. There isn't a lot information on the internet regarding these. I placed an inquiry to Central 4Wheel Drive in Sacramento and said they would be able to order them.
I guess there are two types of surrounds. One for the IPF lights and one for the ARB lights. I ordered the ones for the IPF lights.
Here are the part #
AR 3162467L
AR 3162467R
Here they are
For those of you that want to do the same thing as me; here are the deminsions of the surround.
I made a cardboard template and transfered to ARB bumper. Used a cutting wheel for the straight edges and a cutting torch for the curves.
Here's what it looks like with it installed. It will really look good once I paint the bumper the same color as the truck (the surrounds and bumper guards will really stand out from the red).
08-27-2011, 07:19 PM
#37
Registered User
Thread Starter
E-Locker Wiring
I didn't post any pictures yet, but I'm currently in the process of wiring my front and rear e-lockers. Is 18 GA wire thick enough to carry the current to the e-locker computer? I'm using the factory computer for both E-lockers. Once I get everything put together, I will post pics. I just need the female plugs from the e-locker harness to the body harness, then I can solder everything together.
08-27-2011, 09:19 PM
#38
Locked, ....I'm not kidding, this is one of the best SAS/Restore build threads I've read on here! GREAT WORK, man! And seriously?>>>> LOVE seeing your pops hard at work on it.... and HIS TRUCK, OMGOSH!!!!! lol.
Great thread, great detail, and after only 2 pages???? WOW! lol. Next time I'm in Auburn/North American Fork,....I'll let you know, ...YOU GOTTA LET ME GET A 'CRAWL' IN THAT THING! lol.
SCRIBED/SICK!
Great thread, great detail, and after only 2 pages???? WOW! lol. Next time I'm in Auburn/North American Fork,....I'll let you know, ...YOU GOTTA LET ME GET A 'CRAWL' IN THAT THING! lol.
SCRIBED/SICK!
08-28-2011, 12:32 PM
#39
Registered User
Thread Starter
E-locker Wiring
I was able to take some pictures today of what I'm planning on doing for the e-locker wiring.
After reading some of the wiring write ups regarding E-lockers, I was able to source some 18 GA 10 strand wire from Home Depot (hopefully this is thick enough to carry the load). I tried running the wire as clean as possible, using factory grommets when entering the body of the truck.
Front

Rear

I'm using the factory e-locker computers and mounting them in passenger side quarter panel.

The switches I plan on using to enganged the lockers is the rear window lock switch on 4runners (does anyone know if these will work? I'm assuming they would). I also plan on using LED lights letting me know when they are or are not enganged and making a custom bracket for the switches.

When looking at other rigs wring for e-lockers, they're typically just laying around and that is something I didn't like so I made some wiring support brackets for the front and rear.
Front

Rear

I'm also taking into consideration for the drop in the thirds and have the wiring harness coiled to allow for the drop.
Front

Rear

I will post more pictures once I get everything wired up.
After reading some of the wiring write ups regarding E-lockers, I was able to source some 18 GA 10 strand wire from Home Depot (hopefully this is thick enough to carry the load). I tried running the wire as clean as possible, using factory grommets when entering the body of the truck.
Front
Rear
I'm using the factory e-locker computers and mounting them in passenger side quarter panel.
The switches I plan on using to enganged the lockers is the rear window lock switch on 4runners (does anyone know if these will work? I'm assuming they would). I also plan on using LED lights letting me know when they are or are not enganged and making a custom bracket for the switches.
When looking at other rigs wring for e-lockers, they're typically just laying around and that is something I didn't like so I made some wiring support brackets for the front and rear.
Front
Rear
I'm also taking into consideration for the drop in the thirds and have the wiring harness coiled to allow for the drop.
Front
Rear
I will post more pictures once I get everything wired up.
09-09-2011, 11:55 PM
#40
Registered User
Thread Starter
More E-locker Wiring
Hopefully by the end of this weekend I'll have the wiring harnesses that I made for the front and rear e-lockers installed. I still have to solder the wires I previously ran to the factory e-locker harnesses off of the thirds.
Anyways, here are a few pictures of the harness I made that run from the factory e-locker computers to the locker push buttons that will be located under the stock radio.
Started soldering

Used heat shrink on all soldering points

Harness getting close

e-locker buttons LED lights wired in (have a new tab that I'm going to redrill to center them.. Anal like that)

all taped up

ready for install

Additionally, when running the power supply to the harnesses, I need to connect to a 15A fuse and a 20 amp fuse. My question. Is it better just to run two wires to the fuse block on the drivers side or would I be able to splice into either a 15A and 20A line located near the center console?
Anyways, here are a few pictures of the harness I made that run from the factory e-locker computers to the locker push buttons that will be located under the stock radio.
Started soldering
Used heat shrink on all soldering points
Harness getting close
e-locker buttons LED lights wired in (have a new tab that I'm going to redrill to center them.. Anal like that)
all taped up
ready for install
Additionally, when running the power supply to the harnesses, I need to connect to a 15A fuse and a 20 amp fuse. My question. Is it better just to run two wires to the fuse block on the drivers side or would I be able to splice into either a 15A and 20A line located near the center console?


