John4wd's 1993 DLX Pickup Build-Up Thread
 09-12-2011, 09:13 PM
#21
Registered User
Thread Starter

Oh yea on the tailgate there is a local sign place call pyramid Design and owner said he'll put Toyota on it in any color for 30 bucks, getting it done before putting it on the toy;}
The Toyota parts number for a replacement plug-in for the wire going to the oil pressure sender for the 92-95 22RE or 3.0 V-6 oil pressure gauge on a full SR-5 cluster on the newer style first pic above is...
90980-11363 $6.87<that's just for the white plastic female connector. It is a 2 part/piece setup.
82998-12440 $6.75<The metal contact that's already attached to the wire that slips into the rear of the connector that you need to get with the plug-in...
Last edited by john4wd; 09-13-2011 at 07:31 PM.
 09-16-2011, 09:10 AM
#22
Registered User
Thread Starter
UPDATE: I ended up selling (At a loss) the vent visors, they said they would work with pop out windows but they didn't so sold them for 10 bucks and ordered from AutoZone a set of in-channel mounting and stops and goes down the vertical pop out vent window support for a better look and cleaner install. And did research on the foam 3M outdoor tape you need a minumum 60 degrees and low humidity for it to successfully attach, so I'll be waitng till spring to install :}
The new king of CL out, got a set of smoke door vent visors locally, There never used for my generation truck for 15 bucks. Scored!!!!
Guy bought it for his 94 and never used them and said they have been on shelf for a few years, he got rid of his 94 because of a rusted out frame and in his words the frame quickly went to crap.
Last edited by john4wd; 12-18-2011 at 10:43 AM.
09-16-2011, 09:30 AM
#23
ok, i got a quick question (more of a request): is your dash is out still? if so, would you mind seeing what the indicator lights are on the left side are? (ie: blank, water temp, cruise, battery, high beams). i'm trying to mount some indicator lights of my own
thanks.
also, good looking build. glad to see that you're taking your time to do it right. you'll be pleased with the end result, i'm sure

thanks.
also, good looking build. glad to see that you're taking your time to do it right. you'll be pleased with the end result, i'm sure
09-16-2011, 09:47 AM
#24
Registered User
Thread Starter
The cluster is still out, I'll get it and let you know in order across the bottom and let you know tonight around 9pm my time which ones are what on the bottom small indicator lights, that is a cool awesome idea to just use the blank spaces and non used ones for things you don't have on your model, take pics of how you do it, I might do same thing in the future, and be sure you take pics and put it on mod page!!!!
09-16-2011, 10:10 AM
#26
Registered User
Thread Starter
I'm just doing what I need to do right now to get it up and running, The truck and the cluster is at my aunts house, have no internet there, going there now to work on the motor, I will have to let you know when I get home tonight around 9 after it gets dark...I know there are many on my dlx truck don't use, I'll let you know and you can decide what one to use based on you truck was equipped that's on the left side in order what they are...
09-16-2011, 07:12 PM
#28
Registered User
Thread Starter
Here you go irab88, I hope this is what you needed, sorry took so long was having trouble with photobucket downloading the pics, if they don't come up on your end let me know....
Looking at the face of the gauge cluster and at the bottom from left to right the first 2 are empty and the third opening has a bulb but nothing on the face so I bet for something my truck doesn't have...

The 5 under the tach are, Seatbelt, Breaks, 4WD, Bright Lights, Battery.

The 4 under speedometer is first 3 are blank and the last one is back door which I assume it's for a 4-Runner.

Under fuel gauge there are 4, cruise, check light, ECT POWER and an empty spot.

Looking at the face of the gauge cluster and at the bottom from left to right the first 2 are empty and the third opening has a bulb but nothing on the face so I bet for something my truck doesn't have...
The 5 under the tach are, Seatbelt, Breaks, 4WD, Bright Lights, Battery.
The 4 under speedometer is first 3 are blank and the last one is back door which I assume it's for a 4-Runner.
Under fuel gauge there are 4, cruise, check light, ECT POWER and an empty spot.
09-16-2011, 09:07 PM
#29
Registered User
Thread Starter
Here is my engine done and ready to go in tomorrow, even though it doesn't show it in these pics, but I got it off engine stand on a HF 2 ton chain lift and got the flywheel and Aisin clutch kit, couldn't pit it back on stand because clutch pressure plate sticks out to far and it was dark and couldn't install it, so I got some boards and put the engine on them on back trans mounting plate and on engine mounts on the ground so not to put weight on oil pan, I used the hooks on head to hold it up in the air and wondered if that would damage the head gasket or other items.
I remembered that another guy on here had his new engine held up not by the head hooks but by bolts in the side of the engine block with wood keeping the cables from hitting the head, but then I thought if the head and block connection (Head bolts) can withstand thousands of explosions/combustion that it can stand to hold the weight of block pulling on
the head bolts, and not letting the HG get damaged, for a short time. I know it sounds nuts, but I do think of things like that. need to change name to crazyjohn4wd :}LOL
Well here is the game plan, I don't have a engine shop crane, I have a over head 2--2x10 header on a pole barn and a HF chain lift to do like I did on engine removal, but reversed...
1st-Back my B2300 in front of toy and hook up pull stap and hook it to toy tow hooks.
2nd-I have to attach the HF adjustable HD load leveler and got to lift engine into the air high enough so to go over the radiator support.
3rd-Use my B2300 to pull the toy under raised engine and put chawks under tires and then lower engine and get it hooked up.
4th- Roll toy back into barn to finish up and get it running, woo hoo!!!!
Comment on good or bad idea let me know :}
Oh yea before I do all that I have to use some por-15 on frame and body parts now that it's easy to get too, put some on today and dumb butt me forgot to put on the rubber gloves and now I have it all over my hands, It'll wear off in a few weeks!!!! :}LOL
Last edited by john4wd; 09-16-2011 at 09:22 PM.
09-17-2011, 10:33 PM
#31
Registered User
Thread Starter
Today was the day, WOO HOO!!!  I got motor back in the truck, I was lucky and my cousin from Texas visiting and also did his first engine install by helping me with mine, I got under the truck and and was helping to bring them together while he did the same above and tried to get it in with engine mounts on and that didn't work, so took the right side engine mount off and with that it went right in after moving the crank a little bit to align the spines and it slid right in the splines and one more wiggle and went into the pilot bearing, put engine mount back on and put put trans to engine bolts and got them together hoping forever, Yea right! not with my luck!!!! :}LOL
Ignore the tow straps on the ground, couisin showed up out of the blue and if I did it by myself I would have used it to pull truck under engine, he said hell well just push it! So we did, easy enough :}


So there you have it, got it in and the HF load leveler worked great having the motor at an adjustable angle which helped slide the input shaft into the clutch and pilot bearing, once we got that engine mount off that really did the trick and also the HF chain lift also worked great, you can hold the chain in on hand and while guiding in the engine while adjusting the height, it moves very slowly and making tiny adjustments easy. I'll use the same set up if I ever do another engine.
Oh I bet everybody on the edge of there seats waiting to hear we got ignition and lift off, well me too also I can't wait too!!!!
Oh yea going to have to wait on exhaust manifold being tighten down, I have the new studs, but the nuts are on back order and so not sure when there coming in, got fingers crossed for Monday, they've been able to get items the next day if ordered by noon from warehouse in Chicago and this is the first time this has happened at my dealership in 15 years! Sucks!!!!
I got motor back in the truck, I was lucky and my cousin from Texas visiting and also did his first engine install by helping me with mine, I got under the truck and and was helping to bring them together while he did the same above and tried to get it in with engine mounts on and that didn't work, so took the right side engine mount off and with that it went right in after moving the crank a little bit to align the spines and it slid right in the splines and one more wiggle and went into the pilot bearing, put engine mount back on and put put trans to engine bolts and got them together hoping forever, Yea right! not with my luck!!!! :}LOLIgnore the tow straps on the ground, couisin showed up out of the blue and if I did it by myself I would have used it to pull truck under engine, he said hell well just push it! So we did, easy enough :}
So there you have it, got it in and the HF load leveler worked great having the motor at an adjustable angle which helped slide the input shaft into the clutch and pilot bearing, once we got that engine mount off that really did the trick and also the HF chain lift also worked great, you can hold the chain in on hand and while guiding in the engine while adjusting the height, it moves very slowly and making tiny adjustments easy. I'll use the same set up if I ever do another engine.
Oh I bet everybody on the edge of there seats waiting to hear we got ignition and lift off, well me too also I can't wait too!!!!
Oh yea going to have to wait on exhaust manifold being tighten down, I have the new studs, but the nuts are on back order and so not sure when there coming in, got fingers crossed for Monday, they've been able to get items the next day if ordered by noon from warehouse in Chicago and this is the first time this has happened at my dealership in 15 years! Sucks!!!!
Last edited by john4wd; 09-18-2011 at 11:53 AM.
09-19-2011, 05:19 AM
#33
Registered User
Thread Starter
I worked on toy till midnight last night, I got all the nasty stuff underneath like the rest of the engine to tranny bolts, slave cylinder, starter, put back on steering stabilizer, attached the wires back on alternator, and while I was under there wiped off lots of gunk from all the fluids that's been leaking over the years, so thick in places I had to use a wire brush to beak up the thick area's, it was nasty!!!! Some area's around tranny near the top my big hands can't reach!!!! I tried rubber gloves but they ripped like nothing flat. My hands when done were nasty oily greasy black and sticky from coolant too, I like the Peramatex orange SMOOTH hand cleaner, the Permatex orange pumice hand cleaner is like using sand paper and not as good as the other Permatex smooth orange hand cleaner. Just my 2 cents!!!!
My 94 B2300 has 258k on it and I got it at 235K and it was clean underneath. Never got my hands dirty changing the clutch in it< I know I'm exaggeration just a little bit!!!!
On today's agenda is to install my awesomely painted red valve cover that I know will get a nasty scratch in it, so I'll just get it over with right now, dang it to heck! I knew that was going to happen!!!! :}LOL
Going to do the intake and egr and all the vac lines and coolant thermostat and housing and the other side items like exhaust manifold, still waiting on the nuts but I'll install the new studs with blue thread locker and the gasket and the manifold and attach the exhaust gas recirculation's tube and attach the bottom 3 bolts on the flange below with new oem exhaust gaskets and the clamp to the bell housing bracket and then the fan and the radiator and coolant tank and windshield washer tank and the MAFM and new air filter, boy am I going to be busy again till midnight, wow but I'll be almost done, then next is all the fluids, I'm going to stick with the green 50/50 antifreeze since I've never had a problem with it and like a previous yotatecher stated in another tread that it is easily available anywhere and everywhere!!!!
Have a glorious day folks!!!!
Tater!!!!
Ps. Sorry no pics, but who wants pics of an installed starter or slave cylinder, I'll take pics when all done with everything...
Last edited by john4wd; 09-19-2011 at 05:23 AM.
09-19-2011, 04:10 PM
#35
Registered User

Join Date: Mar 2007
Location: South Jersey!
Posts: 63
Likes: 0
Received 0 Likes
on
0 Posts
09-19-2011, 06:49 PM
#36
Registered User
Thread Starter
Nevermind on the dealer having my nuts, I went to go get them and they were nuts for the intake studs, and as soon as I saw them, I said these are not my nuts I need and he was like are you sure, yep!!!! There just 8 regular nuts and not the locking nuts for the exhaust manifold and since it was after 12 o'clock they won't be in till Wednesday now, it sucks!!!! Oh well!!!!
I did put the studs in with blue thread locker and the gaskets on the head and downpipe, with the manifold, but keeping it all loose till I can get my 8 nuts!!!!
I've been feeling bad all day and only was working on it for an hour and came home. Everytime I plan ahead something seems to happen, so I'll just give after things installed updates, Oh I soly wanted to get all those items done I stated in the previous post above from this morning.
09-20-2011, 09:05 PM
#37
Registered User
Thread Starter
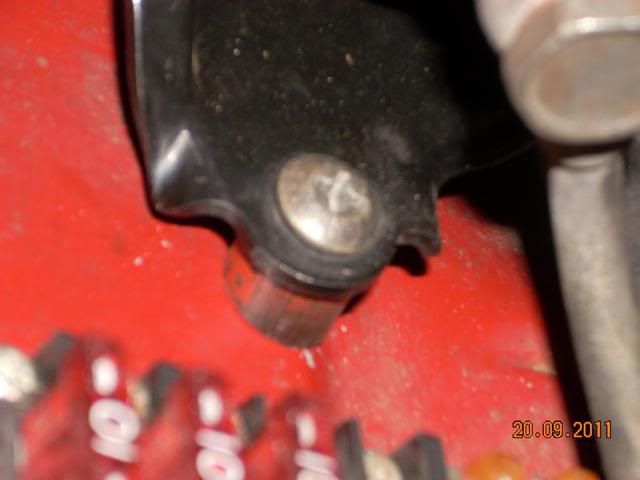
Today I did the Fuel Filter relocation and made some risers to lift it up a touch. Did this before doing the 2 piece intake to make it easier, I like how it looks, looks OEM factory like it should have been done in 93 :}LOL
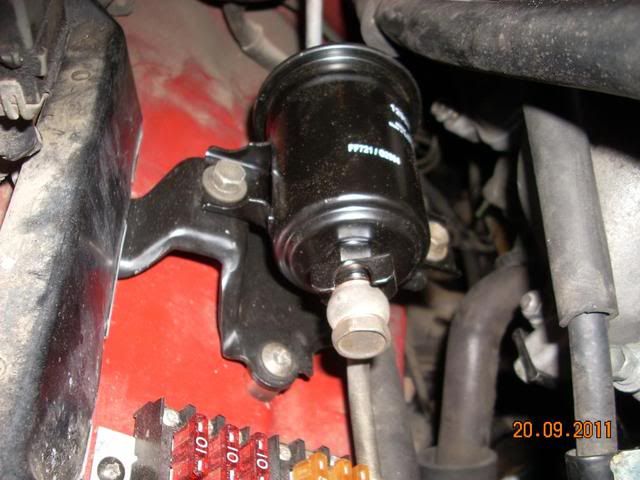
Close-up pic of the risers...
I got the 2 piece intake done...
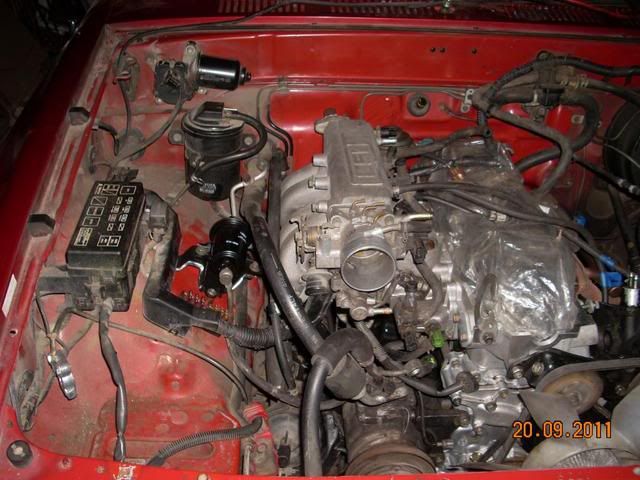

And the fan and belts, I should have waited till rad. and shroud, but thought I'll slide the fan shroud over the fan and let it lay there then put rad. in and then slide the fan shroud over and then bolt to rad. or is that's how it's supposed to be done? The truck didn't have shroud when I bought it and got a shroud from a salvaged truck in a bone yard...
I'll do another update tomorrow night, Tater all!!!!
Close-up pic of the risers...
I got the 2 piece intake done...
And the fan and belts, I should have waited till rad. and shroud, but thought I'll slide the fan shroud over the fan and let it lay there then put rad. in and then slide the fan shroud over and then bolt to rad. or is that's how it's supposed to be done? The truck didn't have shroud when I bought it and got a shroud from a salvaged truck in a bone yard...
I'll do another update tomorrow night, Tater all!!!!
Last edited by john4wd; 01-01-2012 at 11:16 AM.
09-20-2011, 11:19 PM
#38
Registered User
Thread Starter
I just got this on ebay, gonna looks sweet on my new acquisition off of craigslist I got almost a month ago, can't wait to get both of them mounted, and show them both!!!!
I looked at a bunch of flag holders, and this looked good and with free shipping, saved me the hassle of making one, I'll keep it updated how it lasts.

Word of caution, don't put a flag on a magnet mount CB antenna, I had one on my Wilson 1000 and a 1/2 mile down the trail we all stopped and I was in my 97 XJ and I was the end vehicle, and I looked up and my whole antenna was gone, ripped off the coax, I went walking looking for it and it was still hanging in the air from a tree, flag got stuck in the limbs, it was funny and of course I forgot my camera :}LOL
I looked at a bunch of flag holders, and this looked good and with free shipping, saved me the hassle of making one, I'll keep it updated how it lasts.
Word of caution, don't put a flag on a magnet mount CB antenna, I had one on my Wilson 1000 and a 1/2 mile down the trail we all stopped and I was in my 97 XJ and I was the end vehicle, and I looked up and my whole antenna was gone, ripped off the coax, I went walking looking for it and it was still hanging in the air from a tree, flag got stuck in the limbs, it was funny and of course I forgot my camera :}LOL
09-21-2011, 05:06 AM
#39
you don't need no shroud. i was planning on the e-fan swap, so i didn't bother putting the shroud back on when i did the repair. i went through the whole summer, using a/c and all, with no issues at all. though, now i have an e-fan, and it works ten times better.
just a thought
just a thought
09-21-2011, 09:40 PM
#40
Registered User
Thread Starter
I finally got my nuts today...

Got some more items done. Did some por15 painting, Exhaust and valve cover and ALL the vac lines and the big fuel line done, I did replace all gaskets and seals and hopefully no leaks. I will update tomorrow night...
Ps. Does anybody have part numbers for TRD radiator caps and the TRD aluminum valve cover oil fill cap if they will work on my truck. I still have factory radiator...
Last edited by john4wd; 09-21-2011 at 09:53 PM.


