John4wd's 1993 DLX Pickup Build-Up Thread
 08-26-2011, 05:43 PM
#1
Registered User
Thread Starter

John4wd's 1993 DLX Pickup Build-Up Thread
Hello fellow YotaTech'rs,
This is my Build-Up Thread, I have a 1993 DLX Pickup I bought in Louisville, Ky, but live all it's life further down south so compared to my area of Lafayette, IN where toys up in my area are rusting out badly, Frame is rust free in every place I checked, still has factory writing on the outer frame rails. There is some body surface rust like under where the bed liner went over the bed rail but I have not seeing no holes as of yet!!!! Whew!!!! Took off bed liner and saw the surface rust after I bought the truck, but wouldn't have stopped me from buying it, I would have put on a flatbed.
I bought it and my sister who took me to get it was right behind me in her HHR going north on I-65 and going 60mph since I knew nothing about truck but it was running fairly good, had an exhaust leak, one of the studs came out of head so it was loud so that was no biggie, well it got to MM 56 and it sputtered but didn't die, got to MM 58.5 and just died and pulled over. I tried and tried but it would not fire, sister like 10 miles back because I was going slow and couldn't wait and passed me, so she had to go to next exit go back south to next exit then back north to where I was. LOL.
PO replaced fuel pump and it wouldn't come on, couldn't hear it priming via turning on ignition so we figured it was fuel pump bad. Had it AAA rollback wreaker back to W. Lafayette to Aunts barn.
Took down tank fuel pump I then jumped wired it and it came on and so it was working, put it all back together and the relay clicks so it's working, got a suggestion from a Yotatech'r to push in flapper in MAFM and wham the fuel pump primes put it down with screw driver still there and turned ignition and it starts right up, bad MAFM I suspect, I have to get another one, found one at a salvage yard for 20 bucks, That wreaked truck was running when it was wreaked so it was working at that time, so I bought it. Next entry I'll be going through engine put back together...
 08-27-2011, 08:16 AM
#2
Registered User
Thread Starter
Items I found on engine
I found reman badge on block and emailed the company PROformance Power train Products in Springfield, MO, The engine was installed in 2003 from what they said the truck mileage unknown when installed, So it's was not original motor, during tear down discovered a 0.20 shim gasket, a lot of water stains on block, was going to redo head and had it pressure tested was a crack in between the intake and exhaust on the #2 cylinder and was previously welded (not very good) it deformed the area so both valves wouldn't seat and so head is a boat anchor now (bought new head with 268 cam from engnbldr) and I can't say for sure if the rebuild in 03 from that place in MO but if it was and they put a shim in it and welded the head I don't think I would buy engine from them, so all in all it was time for a partial rebuild.
The guy I bought it from drove it for a few months and had new used timing cover and new timing kit installed, but bolts on tensioner ""were not"" tighten and loose as a goose and would have failed if I kept driving it as it was and would have ruined a lot and with the removal of oil pan was full of broken guild pieces and oil strainer was completely cover in crap. guy I bought it from got pissed I decided to tare it apart, but glad I did!!!!


The guy I bought it from drove it for a few months and had new used timing cover and new timing kit installed, but bolts on tensioner ""were not"" tighten and loose as a goose and would have failed if I kept driving it as it was and would have ruined a lot and with the removal of oil pan was full of broken guild pieces and oil strainer was completely cover in crap. guy I bought it from got pissed I decided to tare it apart, but glad I did!!!!
Last edited by john4wd; 08-27-2011 at 08:18 AM.
08-27-2011, 05:29 PM
#3
Registered User
Thread Starter
Nasty stuff
Here is what I found once motor was out and during tore down.
Engine was leaking everywhere, both sides and front and back.
When done I want a leak free motor, Here's hoping!!!!
Silicone Snakes, check out the oil pump, was sealed with the ring and with black silicone

Broken Guides

Nasty Bottom Gunk

Inside Belhousing

Outside Transmission

Engine was leaking everywhere, both sides and front and back.
When done I want a leak free motor, Here's hoping!!!!
Silicone Snakes, check out the oil pump, was sealed with the ring and with black silicone
Broken Guides
Nasty Bottom Gunk
Inside Belhousing
Outside Transmission
Last edited by john4wd; 09-01-2011 at 04:41 PM.
08-28-2011, 06:00 AM
#4
Super Moderator
Staff
iTrader: (1)
Join Date: Aug 2008
Location: Anderson Missouri
Posts: 11,788
Likes: 0
Received 22 Likes
on
20 Posts
Solid looking little truck. That is one of the first things I get rid of is those plastic bed liners. Might would be okay to have if hauling something temporarily and then take back out. That is jsut a rust magnet.
I dont live to far from Springfield Mo and havent heard of them PRO formance so cant really help you out there. Just better off doing it your self to get it done right.
Good luck and looking forward to your build.
I dont live to far from Springfield Mo and havent heard of them PRO formance so cant really help you out there. Just better off doing it your self to get it done right.
Good luck and looking forward to your build.
08-28-2011, 08:55 AM
#5
Registered User
Thread Starter
Bed Surface Rust & Engine Info
YEPPER!!!! I did remove the bed liner to put it in back of barn for storage and found the surface rust, No holes! Whew! I found the rust after I sold the matching color topper, it didn't have any hardware on the rear gate and the hydro struts were shot and I didn't want to be crawling in and out to get items, now if I can get a contractors topper for same model toy bed with the side lift doors, but the inside bed would have to be Rhino lined before hand!!!!
Question? When I get it Rhino lined and I'll have it go over the top edge about an inch or so to more than cover the surface rusted area caused by the bed liner and will it be like por15 and encapsulate the area so rust under doesn't keep going? I will be removing the surface rust down to bare metal and while clean clear of rust I'll be getting that done, I'm thinking if those areas are primed and or touch up painted it will leave those area up for adhesion failure if the primer and touch up paint don't adhere very good to the bed themselves???? Hummmmm????
Passenger side of bed, worst one!

Drivers side of the bed, 2nd worst area!

----------------------------------------------------------------------
The PROFormance engines can be bought at Auto Zone.
PROFormance Powertrain Products
2720 N. Airport Commerce Avenue
Springfield, MO 65803
Price $1628.00
Core $450.00
Total $2079.00 + Tax
Tag on engine said Springfield, MO. After what I found I don't think I would get one from them ever, not worth taking a chance!!!! But they been is business since at least 2003 when engine was bought!!!!
Question? When I get it Rhino lined and I'll have it go over the top edge about an inch or so to more than cover the surface rusted area caused by the bed liner and will it be like por15 and encapsulate the area so rust under doesn't keep going? I will be removing the surface rust down to bare metal and while clean clear of rust I'll be getting that done, I'm thinking if those areas are primed and or touch up painted it will leave those area up for adhesion failure if the primer and touch up paint don't adhere very good to the bed themselves???? Hummmmm????
Passenger side of bed, worst one!
Drivers side of the bed, 2nd worst area!
----------------------------------------------------------------------
The PROFormance engines can be bought at Auto Zone.
PROFormance Powertrain Products
2720 N. Airport Commerce Avenue
Springfield, MO 65803
Price $1628.00
Core $450.00
Total $2079.00 + Tax
Tag on engine said Springfield, MO. After what I found I don't think I would get one from them ever, not worth taking a chance!!!! But they been is business since at least 2003 when engine was bought!!!!
08-29-2011, 07:09 PM
#6
Registered User
Thread Starter
BIGGER UPDATE 11/14/2011
I did the adjustment I described, but after I took truck out for a spin after I got engine all done the ODOMETER and TRIP ODOMETER didn't work, but the speedometer worked, I removed the cluster and everything move nothing binding. there is a tiny motor the runs the ODO's and it could be bad, all I did was what I described and it was done by another Yotatecher and he didn't have a problem, So I got another cluster and just left odometer alone :}LOL
--------------------------------------------------------------------------
Do at your own risk, mine didn't work out, yours might...
I'm going to do a full gauge cluster swap and get rid of the idiot gauge cluster in it now, but 1st I did the readjust on the odometer, Same wreaked truck I got the MAFM I also got the gauge cluster for $20bucks too, but it had almost 70 thousand more miles than current cluster odometer, Cluster was damaged more than I thought, bottom right mounting tab was broken off and bottom black cover on the cluster was damaged, and I pressed to hard when I was putting the 2 back together after the odometer adjustment and broke the clear cover :{ The pic will be at the bottom of all others at the end. Thinking I can just take off clear cover without the gauge back ground off idiot cluster and take off broken clear cover and just swap the outer clear covers? anybody done that for broken or really scratched up clear ones?
The broken mounting tab.

The broken/damaged black part of the housing.

Front part taken off.

Inner part revealled.

Remove the 4 red circled screws.

Speedometer gone.

Empty hole.

Here it is, I found it.

Remove this plastic finger thingy, be care full, just pops right off.

Now I tried pushing rod out from the left side hole where it is, but wouldn't budge, wasn't pressing to hard afraid I would slip and break something important. so got an idea to use straight needle nose and grab rod and pull, but that didn't work, thought for a bit and went and got a 90 degree needle nose and that gave just enough pulling to my right to work rod out and away so not to damage anything. grab ahold in blank area of rod where arrow is.

Next is to remove the gears one at a time as you slide the rod right, after all gears are out and then turn the numbers one by one in the direction they normally turn while driving till your current mileage is showing and then reassemble everything backwards and then reinstall the black plastic finger thingy and put speedometer back into housing and wala all done!!!! Woo Hoo!!!! Piece of cake!!!! Except me braking clear cover :{
Now here is the pic of the broken clear cover, see what pressing to hard gets you ;}LOL

--------------------------------------------------------------------------------------------
Edit: Again what I described above didn't work and the reg odo and trip odo didn't work, so I got another cluster and other besides the busted speedo is for parts...
I did the adjustment I described, but after I took truck out for a spin after I got engine all done the ODOMETER and TRIP ODOMETER didn't work, but the speedometer worked, I removed the cluster and everything move nothing binding. there is a tiny motor the runs the ODO's and it could be bad, all I did was what I described and it was done by another Yotatecher and he didn't have a problem, So I got another cluster and just left odometer alone :}LOL
--------------------------------------------------------------------------
Do at your own risk, mine didn't work out, yours might...
I'm going to do a full gauge cluster swap and get rid of the idiot gauge cluster in it now, but 1st I did the readjust on the odometer, Same wreaked truck I got the MAFM I also got the gauge cluster for $20bucks too, but it had almost 70 thousand more miles than current cluster odometer, Cluster was damaged more than I thought, bottom right mounting tab was broken off and bottom black cover on the cluster was damaged, and I pressed to hard when I was putting the 2 back together after the odometer adjustment and broke the clear cover :{ The pic will be at the bottom of all others at the end. Thinking I can just take off clear cover without the gauge back ground off idiot cluster and take off broken clear cover and just swap the outer clear covers? anybody done that for broken or really scratched up clear ones?
The broken mounting tab.
The broken/damaged black part of the housing.
Front part taken off.
Inner part revealled.
Remove the 4 red circled screws.
Speedometer gone.
Empty hole.
Here it is, I found it.
Remove this plastic finger thingy, be care full, just pops right off.
Now I tried pushing rod out from the left side hole where it is, but wouldn't budge, wasn't pressing to hard afraid I would slip and break something important. so got an idea to use straight needle nose and grab rod and pull, but that didn't work, thought for a bit and went and got a 90 degree needle nose and that gave just enough pulling to my right to work rod out and away so not to damage anything. grab ahold in blank area of rod where arrow is.
Next is to remove the gears one at a time as you slide the rod right, after all gears are out and then turn the numbers one by one in the direction they normally turn while driving till your current mileage is showing and then reassemble everything backwards and then reinstall the black plastic finger thingy and put speedometer back into housing and wala all done!!!! Woo Hoo!!!! Piece of cake!!!! Except me braking clear cover :{
Now here is the pic of the broken clear cover, see what pressing to hard gets you ;}LOL
--------------------------------------------------------------------------------------------
Edit: Again what I described above didn't work and the reg odo and trip odo didn't work, so I got another cluster and other besides the busted speedo is for parts...
Last edited by john4wd; 12-18-2011 at 10:19 AM.

Trending Topics
08-31-2011, 09:09 PM
#8
Registered User
Thread Starter
I bought something in Chicago last week that is awesome for my toy off craigslist, but not going to reveal it till later on when it's about to be installed I still can't believe I snagged it, going to say after I get engine put together and installed and up and running, I think it's awesome.

Last edited by john4wd; 09-02-2011 at 10:07 PM.

 09-03-2011, 09:36 AM
#11
Registered User
Thread Starter
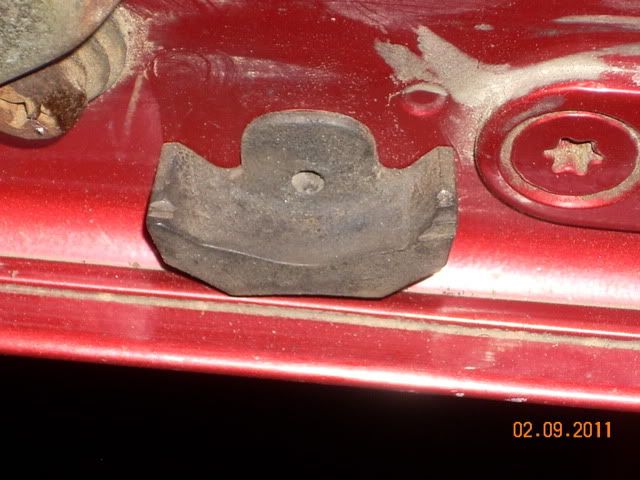
My mod to fix a rattling truck tailgate, used spring I had laying around...
Instead of doing a repeat from another Yotatech thread, click on link below to show my fix, I did same mod on my 87 toy in 97 so I thought I put it on here after I did it on my just acquired 93 with pics and description. Enjoy:}
https://www.yotatech.com/forums/f128....-truck-240446
Instead of doing a repeat from another Yotatech thread, click on link below to show my fix, I did same mod on my 87 toy in 97 so I thought I put it on here after I did it on my just acquired 93 with pics and description. Enjoy:}
https://www.yotatech.com/forums/f128....-truck-240446
09-03-2011, 09:57 AM
#12
Registered User
Thread Starter
On the tailgate itself and below the latch on the bed itself there are plastic clips on there to hold tailgate flat 2 piece support rods from rattling when closed, after a while the plastic clips break and are useless pretty much, I did this fix to my 87 in middle 90's by putting in these rubber ones that does the same job, but for the life of me I can't remember what year, make, and model of truck they came off of at salvage yard, had these extra ones since the middle 90's, I took the plastic ones off that were all broken and put these on and they pop right in the hole, Good luck finding some, Have fun doing it :}
09-05-2011, 09:32 PM
#13
Registered User
Thread Starter
I've Gotten Started, Please No Leaks When Done :}
Packed seal full of marine grease and lubbed the seal riding area on the Trans W-56 input shaft seal/bearing retainer and used Toyota Orange FIPG sealer to seal it up and installed the slave cylinder and fork and the sealing according boot, I got the aisin clutch kit and I have a concern, the old throw out bearing that was on there the clip was tight and thicker gauge then the new one and the new clip seams weaker holding it on the fork, loose as a goose! I'm just concerned it might rattle from vibration and be anoying...But we'll see!!!! Got fingers crossed!!!!


Ok, I was going to install the rear seal retainer on the back of the engine with gasket with permatex hylomar universal blue racing formula as gasket dressing and put the stuff on they way it was shown on the web site and after the solvant dried and I did not like the look of the gasket and wasted over 10bucks plus what ever the new gasket cost, so changed my plans and decided to go with toyota black FIPG on the housing to seal it up after packing back of seal with marine grease and lube up the seal riding area and then put on the FIPG on the housing and slipped in ever the crank end and bolted it on, next up it the front tomorrow!!!!
Going to use permatex aviation sealer on the timing cover gaskets and on the water pump gasket...
Last edited by john4wd; 09-13-2011 at 09:12 AM.
09-05-2011, 10:14 PM
#14
Registered User
Thread Starter
I think I messed up the install or rear seal retainer housing, I used fogging oil to coat the engine all over inside and out to protect against mosture and I remember on the work bench cleaning the seal housing but I don't remember cleaning off the block sealing area before the applying of the sealant to the housing before walking it to the block and I slipped it on without cleaning the block area, so tomorrow taking it back off and redoing everything, I thought I did it step by step, by forgot an important one!!!! Darn it!!!!
09-07-2011, 11:00 PM
#16
Registered User
Thread Starter
Just found this pic of a timing chain cover with copper RTV sealant on the top area that goes against head gasket, Good or bad? I know about putting sealant in the area of timing cover and head gasket with black FIPG, but not all the way around like this one has it...
After a lot of investigating the many ways of doing the front end, from fellow yotatechers and the online instructions and the Haynes and this is the first I've seen of it this way. I'm going to use aviation sealer on gaskets, but didn't plan on doing the head gasket area like this one was done just the before mentioned FIPG sealant in the cover meeting block then the oem head gasket then head on top of that. Should I put a 1 to 2mm bead around that area too? The TC is a new EB one...
Comments/pics and or links would be welcomed on this subject.
Thanks...
Last edited by john4wd; 09-08-2011 at 06:54 PM.
09-08-2011, 07:54 PM
#17
Registered User
Thread Starter
Update:
Well today I got more parts in to really get started, head gasket/head location dowel for the front of the engine and also a hollow bolt pass through dowel for rear crank seal housing so the seal will be centered on the crank.
And I also got a gauge oil pressure sender so I can install the SR-5 full gauge cluster, it takes the female white plastic plug-in plug but wire had no connector on it when I bought it, dealer could not find a connector in all there parts books, I bet I'll have to rig it up with a different type home made connector, also got the dual water temp. thermostat too.
And related to the entry above I opened and looked at the oem factory gasket I've had for a couple months sitting in the cab and the area where they put the copper sealant on the above picture there is no need for that, there is a thin silicone already applied around the area where the timing cover goes, now I also have a felpro head gasket and it doesn't have the silicone in that area that surround the timing chain area so maybe the person doing the above pic had a felpro head gasket.
What is the suggested way to install the oil pressure sender, Teflon tape, loc-tite thread sealer and or blue loc-tite?
Last edited by john4wd; 09-12-2011 at 08:48 PM.
09-08-2011, 10:08 PM
#18
Registered User
Thread Starter
I got today a toyota dealer oil pressure sender or gauge (Part#83520-34010) the unit fits 4cyl and 6 cyl so I can install the SR-5 full gauge cluster, it takes the female white plastic plug-in plug but wire had no connector on it when I bought it so I can add any connector, dealer could not find a connector for that unit in all there parts books, I bet I'll have to rig it up with a different type home made connector.
First pic is of my oil pressure sender for 92-95 4cyl and 6 cyl for full cluster gauge.
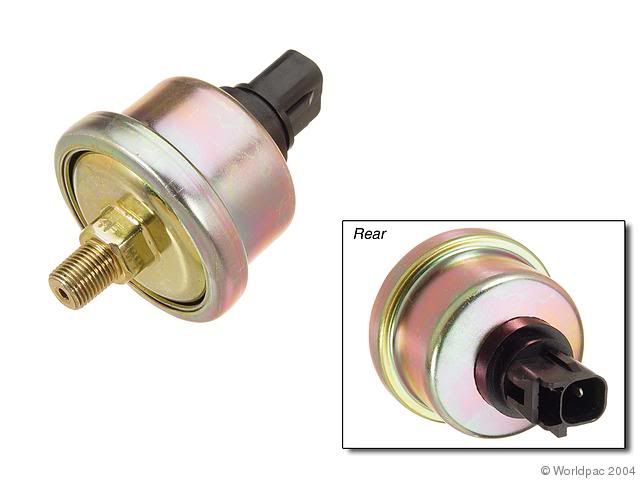
Second pic is of a oil presure sender for a 88-92 4cyl and 6cyl for full cluster gauge.

Third pic is of a oil pressure sender for a 88-95 4cyl and 6cyl warning light for idiot gauge cluster.

UPDATE:
The Toyota parts number for a replacement plug-in for the wire going to the oil pressure sender for the 92-95 22RE or 3.0 V-6 oil pressure gauge on a full SR-5 cluster on the newer style 1st pic above is...
90980-11363 $6.87<that's just for the white plastic female connector. It is a 2 part/piece setup.
82998-12440 $6.75<The metal contact that's already attached to the wire that slips into the rear of the connector that you need to get with the plug-in...
First pic is of my oil pressure sender for 92-95 4cyl and 6 cyl for full cluster gauge.
Second pic is of a oil presure sender for a 88-92 4cyl and 6cyl for full cluster gauge.
Third pic is of a oil pressure sender for a 88-95 4cyl and 6cyl warning light for idiot gauge cluster.
UPDATE:
The Toyota parts number for a replacement plug-in for the wire going to the oil pressure sender for the 92-95 22RE or 3.0 V-6 oil pressure gauge on a full SR-5 cluster on the newer style 1st pic above is...
90980-11363 $6.87<that's just for the white plastic female connector. It is a 2 part/piece setup.
82998-12440 $6.75<The metal contact that's already attached to the wire that slips into the rear of the connector that you need to get with the plug-in...
Last edited by john4wd; 12-18-2011 at 10:30 AM.
09-10-2011, 07:56 PM
#19
Registered User
Thread Starter
I finally took the new EB pro head out of the box yesterday and got the intake and egr stud on it, not going to put exhaust studs on so not to hamper getting the exhaust manifold on and or the manifold air by-pass tube attached then use red loc-tite them on the aluminum head so they don't back out later and damage the head and put on the rocker assembly and backed off all the valve adjustment studs to make torquing all the head bolts without restrictions from the rockers hitting any cam lobes, before head is installed I will lube up the rockers and lobes with CRC assembly lube, I also I put rock oil pump with rubber seal on the rock cover last night and also rock water pump and using paper gasket and aviation sealer, it was late and decided to wait to do the next step in daylight,
Today I got the rock steel backed timing chain on and the cover and both water in and by-pass pipes on both sides, I took my time and made sure the timing chain didn't move and was on where it was supposed to be with shinny link on the dimple on the crank sprocket and zip tied the big sprocket to hold it on and didn't rush it and made sure everything was shinny clean and used gaskets and again aviation sealer on the timing cover. I had the brackets ready that uses cover bolt for mounting (AC and alternator). And made sure everything was torque right. No broken or stripped bolts!!!!
Tomorrow and or Monday I'll get the new EB pro head with the 268 cam using EB head bolts on and get valves adjusted cold and the rear cover on head with the around the back tubes and if time the oil pan and get ready to install engine this week and put it all together and hopefully get it fired up by next weekend, we'll see...
Sorry no pics I spent my time making sure I didn't screw up again, I'll take pics tomorrow and put them up tomorrow night...
Ps.The new EB pro head is almost I say almost to pretty to get all dirty on the engine but gotta use it!!!! :}LOL
09-10-2011, 08:03 PM
#20
Registered User
Thread Starter
Looking forward to tomorrow and getting head on and it'll finally start looking like an engine!!!! Woo Hoo!!!!
Update: I forgot today was NFL opening sunday football, so stayed home and watched all the televised games, I'll get re-busy on motor tomorrow :} And also watched 9-11 tributes and still heart renching seeing what happened 10 yeas ago!!!!
Update: I forgot today was NFL opening sunday football, so stayed home and watched all the televised games, I'll get re-busy on motor tomorrow :} And also watched 9-11 tributes and still heart renching seeing what happened 10 yeas ago!!!!
Last edited by john4wd; 09-11-2011 at 06:45 PM.


