Ford 302 into '86 Toyota Pickup 4x4 regular cab base model
 11-02-2013, 12:18 PM
#21
Couldn't hurt to replace that ground wire, also the bolt looks corroded, make sure it's getting good contact to fenderwell. Have you tried jumping the starter directly from the battery. Mine would engage every time directly from the battery, but once installed it would only click. That's when I check with a voltmeter and found I was only getting like 10v to the starter solenoid. You might also want to check your clutch safety switch and make sure it engages with the clutch pedal. I think your probably having the same issue that I was, between the ignition switch, clutch safety switch, and all the wiring In between there could be corrosion in the contacts etc to where your not getting 12v to your starter solenoid...
Here's Rad4runner's write up to fixing the starter relay without having to buy the Hot Shot starter relay...(post#42) this is the write up that I meant to refer you to the first time, sorry about that, lol. https://www.yotatech.com/forums/f199...00/index3.html
I wish I had seen this before I did mine ,LOL, hope you figure it out!!!
Ed.
Last edited by rustED; 11-02-2013 at 12:51 PM.
 11-04-2013, 01:26 PM
#22
Registered User
Thread Starter
Couldn't hurt to replace that ground wire, also the bolt looks corroded, make sure it's getting good contact to fenderwell. Have you tried jumping the starter directly from the battery. Mine would engage every time directly from the battery, but once installed it would only click. That's when I check with a voltmeter and found I was only getting like 10v to the starter solenoid. You might also want to check your clutch safety switch and make sure it engages with the clutch pedal. I think your probably having the same issue that I was, between the ignition switch, clutch safety switch, and all the wiring In between there could be corrosion in the contacts etc to where your not getting 12v to your starter solenoid...
Here's Rad4runner's write up to fixing the starter relay without having to buy the Hot Shot starter relay...(post#42) this is the write up that I meant to refer you to the first time, sorry about that, lol. https://www.yotatech.com/forums/f199...00/index3.html
I wish I had seen this before I did mine ,LOL, hope you figure it out!!!
Ed.
Here's Rad4runner's write up to fixing the starter relay without having to buy the Hot Shot starter relay...(post#42) this is the write up that I meant to refer you to the first time, sorry about that, lol. https://www.yotatech.com/forums/f199...00/index3.html
I wish I had seen this before I did mine ,LOL, hope you figure it out!!!
Ed.
I was trying to make sense of the first one that you posted. That makes so much more sense! haha.
I took the starter back to have it tested and it was bad� I'm sure that didn't help the problem. Anyways, I have a starter with a lifetime warranty now, and I should be able to solve the problem with that simple fix.
Thanks again!
Tim
11-05-2013, 09:29 AM
#23
Registered User
Thread Starter
Quick update,
I rewired according to the thread that Ed posted. It didn't work. The solenoid isn't clicking anymore either... I think I may have the new wire connected to the wrong pin on the fuse box. I will investigate later today.
I wired a kill switch in as well. If switching the pins doesn't work I will try to remove the switch and wire the relay directly. If that doesn't work, I'm thinking it's the clutch safety switch... does anyone out there have a wiring diagram on that?
Thanks!
Tim
11-11-2013, 11:45 AM
#24
Registered User
Thread Starter
So I found that all the problem was, was that the starter solenoid was bad. I got a replacement and that one blew as well. Any ideas as to what would be causing that would be great!
11-11-2013, 08:09 PM
#25
Dang that sucks! So you replaced the solenoid and tried starting it and it just smoked it? Did it turn over at all?... I'm stumped.... how do you currently have it wired up, with the kill switch, and the starter relay modified as in RADrunner's thread?
11-12-2013, 06:16 AM
#26
Registered User
Thread Starter
I replaced the solenoid.
I have it wired identically to RADrunner's thread (besides the kill switch.) I used 12 gauge wire and now it doesn't burn up.
It will turn over when the solenoid is powered directly from the battery, but not when I turn the key.
Do you think putting power to the solenoid directly to from the battery burnt out any of the wiring up stream? It doesn't seem like it would.
I also tried to set the timing and fire it up but when I pulled the distributor, I pulled the oil pump drive shaft out as well. It's still sitting in its little hole but it's leaning against the block wall. I read online that I need to pull it out, and replace the shaft with a new one. I also read that you don't even have to pull it at all if it's engaged (which I don't think it is...) I think I may just pull it out and look at it anyways.
Any insight to these problems would be much appreciated.
Tim
11-12-2013, 05:03 PM
#27
Ok, here's what I've done since that post.
I replaced the solenoid.
I have it wired identically to RADrunner's thread (besides the kill switch.) I used 12 gauge wire and now it doesn't burn up.
It will turn over when the solenoid is powered directly from the battery, but not when I turn the key.
Do you think putting power to the solenoid directly to from the battery burnt out any of the wiring up stream? It doesn't seem like it would.
I also tried to set the timing and fire it up but when I pulled the distributor, I pulled the oil pump drive shaft out as well. It's still sitting in its little hole but it's leaning against the block wall. I read online that I need to pull it out, and replace the shaft with a new one. I also read that you don't even have to pull it at all if it's engaged (which I don't think it is...) I think I may just pull it out and look at it anyways.
Any insight to these problems would be much appreciated.
Tim
On your distributor, I had the same exact thing happen when I pulled mine out. It was still engaged with the oil pump, but it was leaning against the side of the block inside the hole. I think I used a glob of vaseline to keep it centered and was finally able to reinstall the distributor, it was a pain though, lol. If the shaft isn't still engaged with the oil pump, Ive heard you can turn the engine over by hand, or bump the starter and it will drop into place. Hope you get it figured out, I know you got to be getting anxious to fire the beast up!
Ed
03-21-2014, 06:30 AM
#28
I'm giving your thread a bump, you need to update now that its running, lol 
I was wondering if you coud post some pics of your engine installed, id like to see how it turned out! I was curious about what sort of pulley setup you're running, is it the v-belt or serpintine style? Also what radiator did you go with? You mentioned using a V6 radaitor from a like year pickup...that's what I'm using, and it doesn't quite do the job. If you do a lot of city driving, or slow trails, its going to start running hot on you, I can drive mine back and forth to work no problem, but definately want to upgrade. Did you have to trim your core support to get the radiator to fit? Look forward to seeing an update!
I was wondering if you coud post some pics of your engine installed, id like to see how it turned out! I was curious about what sort of pulley setup you're running, is it the v-belt or serpintine style? Also what radiator did you go with? You mentioned using a V6 radaitor from a like year pickup...that's what I'm using, and it doesn't quite do the job. If you do a lot of city driving, or slow trails, its going to start running hot on you, I can drive mine back and forth to work no problem, but definately want to upgrade. Did you have to trim your core support to get the radiator to fit? Look forward to seeing an update!
Last edited by rustED; 03-21-2014 at 06:32 AM.
03-22-2014, 07:37 PM
#29
Registered User
Thread Starter
I'm giving your thread a bump, you need to update now that its running, lol
I was wondering if you coud post some pics of your engine installed, id like to see how it turned out! I was curious about what sort of pulley setup you're running, is it the v-belt or serpintine style? Also what radiator did you go with? You mentioned using a V6 radaitor from a like year pickup...that's what I'm using, and it doesn't quite do the job. If you do a lot of city driving, or slow trails, its going to start running hot on you, I can drive mine back and forth to work no problem, but definately want to upgrade. Did you have to trim your core support to get the radiator to fit? Look forward to seeing an update!
I was wondering if you coud post some pics of your engine installed, id like to see how it turned out! I was curious about what sort of pulley setup you're running, is it the v-belt or serpintine style? Also what radiator did you go with? You mentioned using a V6 radaitor from a like year pickup...that's what I'm using, and it doesn't quite do the job. If you do a lot of city driving, or slow trails, its going to start running hot on you, I can drive mine back and forth to work no problem, but definately want to upgrade. Did you have to trim your core support to get the radiator to fit? Look forward to seeing an update!
I'm up in north Florida with some friends for the weekend, but I will post pictures as soon as I can.
I'm running a serpentine style belt. It's got the smog pump, a/c compressor, power steering pump, water pump, and alternator that it runs around.
I was looking online at some radiators made specifically for the swap and it seems that they will be too wide for my application. ( it sounds strange I know)... I looked at Ford 302 radiators and they are 1. Much cheaper and 2. About half the width! I will look into it when I get the time.
I also need to extend the drive shaft somehow. It's not quite long enough to reach the tranny... Are there any drive shaft extenders out there? I really don't want to go searching for one that's the right length/width/bolt pattern.
Thanks!
Tim
03-23-2014, 06:38 PM
#30
Registered User
Thread Starter
Pictures
I did this the way I did because it seemed it was the easiest way:
https://www.yotatech.com/members/cev...st-header.html
This is the driver side exhaust header. I'm not sure what kind of headers these are but they fit nicely.
https://www.yotatech.com/members/cev...abilizers.html
Here are the dual steering stabilizers that came with my 4.5" Rough Country suspension lift.
https://www.yotatech.com/members/cev...-cylinder.html
Here's a picture of the NWOR bell housing with the supplied NWOR slave cylinder. I had to run a different clutch line because the slave is on the opposite side as the stock one.
https://www.yotatech.com/members/cev...-radiator.html
Ed, this is the radiator I'm planning to use. It's freaking massive but I know it will keep the motor cool. It's for a 1987 Ford F250 with a 302 motor in it. The best thing is that the core depth is 1" which will fit perfectly in the 1 7/8" gap between the core support and water pump pulley. It also has a built in transmission cooler.
https://www.yotatech.com/members/cev...ive-shaft.html
Here's the dilemma right now. The stock rear drive shaft is just barely to short (about 1.5" too short). Does anyone know if they make extenders for drive shafts? I thought I found one by searching google but I don't think it will work on a Toyota.
https://www.yotatech.com/members/cev...rrel-carb.html
Here's my beautiful junk yard gem. I pulled this off of a late 70's F150 for $20 when they list for well over $100. I've heard these carbs produce amazing low end power when they are tuned correctly.
https://www.yotatech.com/members/cev...el-intake.html
The engine was built with performance in mind. Holley 4 barrel intake into GT40 heads.
https://www.yotatech.com/members/cev...ey-system.html
Ed, here's what I did with the pulley system (minus the a/c compressor because that's where I mounted the coil for the time being lol). It's serpentine style. Everything came off of a mid to late 80's F150 (I think) besides the alternator which I got from the parts store and is simpler to wire.
https://www.yotatech.com/members/cev...g-bracket.html
Speaking of the coil, here it is mounted (temporarily) where the a/c compressor should be. I rigged that bracket up with some old pieces of steel that should be used to hold brick walls to other surfaces lol. Thank you Ed for the advice on the coil! I probably would have never guessed that was the way it was supposed to work in a million years. Here's the link to the thread (post #836): https://www.yotatech.com/forums/f199...3/index42.html
https://www.yotatech.com/members/cev...relocator.html
This little beast took me three weeks to track down. The guys at my local Pep Boys sold me, the Chevy 350 version of the re-locator, not once, but twice! I literally had to draw them a picture! They finally got me the correct one and I was happy.
https://www.yotatech.com/members/cev...ter-relay.html
Here we have the electric fuel pump and starter solenoid. I need to trouble shoot wiring on the solenoid though.
It's still got a long way to go but at least it's running now! Please comment with any advice or info.
Thanks for looking!
Tim
03-24-2014, 08:50 AM
#31
Hey Tim, thanks for the pics, nice work! You scored good on the 4 barrel carb, Im still just running a 2 barrel, but want to upgrade to a 4 barrel eventually. On your rear driveline, you can't slid the slip end of the driveline out any further? It seems weird that it would be that short, I have approx 5" of lift in the rear of my 4 runner, and didn't have any problems bolting up the rear driveline. The only driveline spacer/extension I remember ever seeing was for a Suzuki samurai, it was through Rocky Road Outfitters. They do Toyota stuff as well, might check them out.
http://www.rocky-road.com/samurai-dr...e-spacers.html
I like the push rod on your clutch slave cylinder, looks like it has alot of adjustability. I had a lot of problems trying to eliminate a squealing clutch, and made my own adjustable push rod, but my clutch fork is NWOR older version, it looks different than yours. I never could eliminate the squealing clutch, and ended up replacing the NWOR throwout bearing with a standard Ford bearing to finally eliminate the squealing sound.
Is your new radiator going to fit without cutting the core support? That was my biggest obstacle, I really wanted to keep mine as factory looking in appearance as possible without cutting it, but in the end I had to trim it some anyway. Now I'm looking to upgrade to a better radiator, and I will probably end up cutting more, unless I can find one that fits good. You said that your radiator has a built in tranny cooler, since you have a manuel trans, are you going to use the built in cooler for the power steering?
I was wondering if maybe you could do me a favor and take a measurement for me when you got the time. I was thinking of going with a serpentine pulley setup back when I did my swap, I'm just wondering if I can gain some more clearance with the radiator by doing so, I'm not sure if the water pumps on the serpentine setup is any shorter or not? I measured off the flat surface area on front of the cylinder head on the driverside.
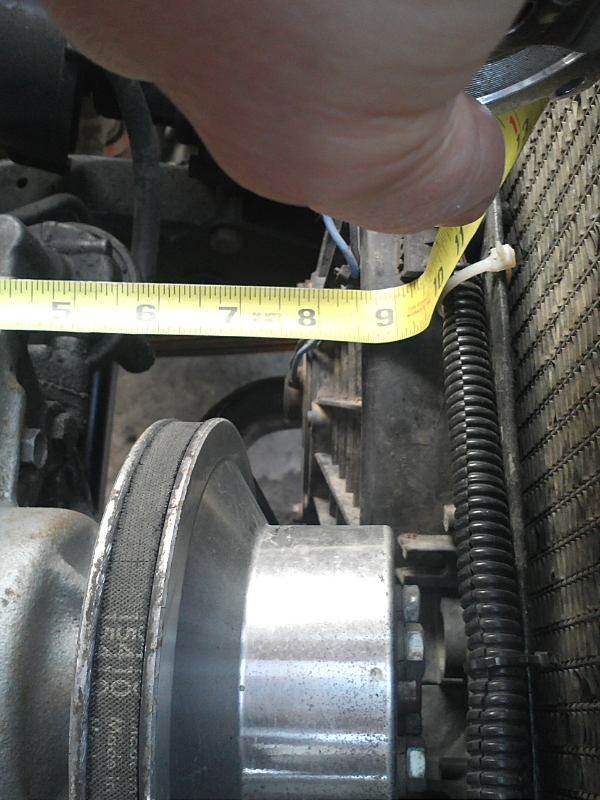
I have about 9" measuring from cylinder head to the outer edge of the water pump pulley. (I had to word that sentence very carefully or it could have sounded really bad, lol.)
Sorry about all the questions, its just nice to see a similiar build on the forum lol! Keep up the good work!
Thanks Tim !
Last edited by rustED; 03-24-2014 at 10:50 AM.
03-24-2014, 12:43 PM
#32
Registered User
Thread Starter
Hey Tim, thanks for the pics, nice work! You scored good on the 4 barrel carb, Im still just running a 2 barrel, but want to upgrade to a 4 barrel eventually. On your rear driveline, you can't slid the slip end of the driveline out any further? It seems weird that it would be that short, I have approx 5" of lift in the rear of my 4 runner, and didn't have any problems bolting up the rear driveline. The only driveline spacer/extension I remember ever seeing was for a Suzuki samurai, it was through Rocky Road Outfitters. They do Toyota stuff as well, might check them out.
http://www.rocky-road.com/samurai-dr...e-spacers.html
I like the push rod on your clutch slave cylinder, looks like it has alot of adjustability. I had a lot of problems trying to eliminate a squealing clutch, and made my own adjustable push rod, but my clutch fork is NWOR older version, it looks different than yours. I never could eliminate the squealing clutch, and ended up replacing the NWOR throwout bearing with a standard Ford bearing to finally eliminate the squealing sound.
Is your new radiator going to fit without cutting the core support? That was my biggest obstacle, I really wanted to keep mine as factory looking in appearance as possible without cutting it, but in the end I had to trim it some anyway. Now I'm looking to upgrade to a better radiator, and I will probably end up cutting more, unless I can find one that fits good. You said that your radiator has a built in tranny cooler, since you have a manuel trans, are you going to use the built in cooler for the power steering?
I was wondering if maybe you could do me a favor and take a measurement for me when you got the time. I was thinking of going with a serpentine pulley setup back when I did my swap, I'm just wondering if I can gain some more clearance with the radiator by doing so, I'm not sure if the water pumps on the serpentine setup is any shorter or not? I measured off the flat surface area on front of the cylinder head on the driverside.

I have about 9" measuring from cylinder head to the outer edge of the water pump pulley. (I had to word that sentence very carefully or it could have sounded really bad, lol.)
Sorry about all the questions, its just nice to see a similiar build on the forum lol! Keep up the good work!
Thanks Tim !
http://www.rocky-road.com/samurai-dr...e-spacers.html
I like the push rod on your clutch slave cylinder, looks like it has alot of adjustability. I had a lot of problems trying to eliminate a squealing clutch, and made my own adjustable push rod, but my clutch fork is NWOR older version, it looks different than yours. I never could eliminate the squealing clutch, and ended up replacing the NWOR throwout bearing with a standard Ford bearing to finally eliminate the squealing sound.
Is your new radiator going to fit without cutting the core support? That was my biggest obstacle, I really wanted to keep mine as factory looking in appearance as possible without cutting it, but in the end I had to trim it some anyway. Now I'm looking to upgrade to a better radiator, and I will probably end up cutting more, unless I can find one that fits good. You said that your radiator has a built in tranny cooler, since you have a manuel trans, are you going to use the built in cooler for the power steering?
I was wondering if maybe you could do me a favor and take a measurement for me when you got the time. I was thinking of going with a serpentine pulley setup back when I did my swap, I'm just wondering if I can gain some more clearance with the radiator by doing so, I'm not sure if the water pumps on the serpentine setup is any shorter or not? I measured off the flat surface area on front of the cylinder head on the driverside.
I have about 9" measuring from cylinder head to the outer edge of the water pump pulley. (I had to word that sentence very carefully or it could have sounded really bad, lol.)
Sorry about all the questions, its just nice to see a similiar build on the forum lol! Keep up the good work!
Thanks Tim !
Thanks for the link! The drive shaft spacers they have on there may work for me. I'm going to try to extend the drive shaft a little before buying though. I didn't know they extended like that. Looking back on it, it makes sense because my front drive shaft came apart on me when I took it off.
That's actually not a 4 barrel carb. It's a motocraft 2 barrel... The 4 barrels produce barely any low end power. It's mounted on a conversion plate so it can feed into the 4 barrel intake.
The stuff that NWOR produces these days is amazing. That slave cylinder was so easy to install and make right. When I fired it up I didn't hear any squeaking that I know of. My adrenaline was pumping pretty hard though so it may squeak.
I haven't checked the fitment of the radiator yet. I know I'm gonna have to hack something up to get it to fit. I may put it in the bed of the truck and run all the hoses along the top of the transmission tunnel.
I'm probably gonna plug the tranny cooler for right now since the truck doesn't have power steering at the moment. Hopefully I can throw something together.
Lol that could have been bad! It's a very bad pic but I have a few minutes before dinner to post… it measures 9 3/8" from the flat part of the cylinder head to the end of the water pump pulley. So I don't think you'll create clearance with the serpentine style belt pattern.
https://www.yotatech.com/members/cev...clearance.html
Here's what happened when I tried to fit the radiator in just a minute ago lol.
https://www.yotatech.com/members/cev...-she-goes.html
This is what is holding it back from sliding down farther.
Passanger side. The black stock bracket is hanging up on the inner fender just forward of the battery.
https://www.yotatech.com/members/cev...-radiator.html
The same thing that's happening to the passenger side is happening to the drivers side.
https://www.yotatech.com/members/cev...-radiator.html
To top it all off I will have to cut the core support at least a little… It's just barely touching.
https://www.yotatech.com/members/cev...-radiator.html
My job is help desk support so I'm used to answering questions. Plus trucks are my passion so I don't mind questions at all!
If there's anything else I can help you with, let me know!
Tim
Last edited by Ceveland; 03-24-2014 at 02:13 PM.
03-24-2014, 09:21 PM
#33
Thanks for the measurement on the water pump Tim, I was always curious if the newer serpentine water pumps were shorter than the older V-belt style. I know that you can get a short water pump through Summit Racing, for around $120, it gains you about 1-1/2" of clearance, but by the time you buy the rest of the pullies that they "suggest" to go with it, and it ends up running up over $500. Wow that radiator looks huge! Are you sure it will fit height wise? It looks like even if you trimmed the drivers and passenger side inner fender were it was hitting, it would still hit your frame rails and be sticking out of the hood! Maybe it's an optical illusion, lol. I already have that problem with my toyota V6 radiator. because of the width of the front spring hanger that I built out of 2x3" rectangular tubing, it sticks out past the factory crossmember, so I can't drop the radiator down between the frame rails because it hits it, something I didn't consider when doing my SAS.
I think I might have found a aluminum radiator through summit that might work though, I got to find it again. What kind of electric fan setup are you planning, push or pull? You"ve seen my two 10" pull fans, they BARELY fit with the water pump pulley right between them. I don't know if the two 10" fans would work with a new aluminum radiator or not, they really only draw air through the middle portion of the radiator.
I also still need to get my power steering hooked up. I'm planning to just run the stock Toyota steering pump, but fab up my own brackets to adapt to the ford engine. I have a new 2 v-belt style water pump pulley, so I can run a separate belt off to the steering pump, but I need spacers to get it to align it with the crank pulley.
I hope you get the rear driveline figured out, thanks for your help and input, one of these days I'll have the bugs worked out of mine, it's nice to have someone doing the same swap to bounce ideas off of!
Last edited by rustED; 03-24-2014 at 09:40 PM.
03-25-2014, 07:39 AM
#34
Registered User
Thread Starter
Thanks for the measurement on the water pump Tim, I was always curious if the newer serpentine water pumps were shorter than the older V-belt style. I know that you can get a short water pump through Summit Racing, for around $120, it gains you about 1-1/2" of clearance, but by the time you buy the rest of the pullies that they "suggest" to go with it, and it ends up running up over $500. Wow that radiator looks huge! Are you sure it will fit height wise? It looks like even if you trimmed the drivers and passenger side inner fender were it was hitting, it would still hit your frame rails and be sticking out of the hood! Maybe it's an optical illusion, lol. I already have that problem with my toyota V6 radiator. because of the width of the front spring hanger that I built out of 2x3" rectangular tubing, it sticks out past the factory crossmember, so I can't drop the radiator down between the frame rails because it hits it, something I didn't consider when doing my SAS.
I think I might have found a aluminum radiator through summit that might work though, I got to find it again. What kind of electric fan setup are you planning, push or pull? You"ve seen my two 10" pull fans, they BARELY fit with the water pump pulley right between them. I don't know if the two 10" fans would work with a new aluminum radiator or not, they really only draw air through the middle portion of the radiator.
I also still need to get my power steering hooked up. I'm planning to just run the stock Toyota steering pump, but fab up my own brackets to adapt to the ford engine. I have a new 2 v-belt style water pump pulley, so I can run a separate belt off to the steering pump, but I need spacers to get it to align it with the crank pulley.
I hope you get the rear driveline figured out, thanks for your help and input, one of these days I'll have the bugs worked out of mine, it's nice to have someone doing the same swap to bounce ideas off of!
I think I might have found a aluminum radiator through summit that might work though, I got to find it again. What kind of electric fan setup are you planning, push or pull? You"ve seen my two 10" pull fans, they BARELY fit with the water pump pulley right between them. I don't know if the two 10" fans would work with a new aluminum radiator or not, they really only draw air through the middle portion of the radiator.
I also still need to get my power steering hooked up. I'm planning to just run the stock Toyota steering pump, but fab up my own brackets to adapt to the ford engine. I have a new 2 v-belt style water pump pulley, so I can run a separate belt off to the steering pump, but I need spacers to get it to align it with the crank pulley.
I hope you get the rear driveline figured out, thanks for your help and input, one of these days I'll have the bugs worked out of mine, it's nice to have someone doing the same swap to bounce ideas off of!
Those fans are really close! Have you ever considered swapping them for push fans and moving them out front? Just a thought. If you find that radiator again send me the link please!
I don't think the radiator will sit all the way down with those frame rails in the way. I was thinking about mounting the radiator in the bed with an electric fan but then I got to thinking that if I put anything in the bed, the radiator would be in danger of taking damage from whatever is in the bed. I'm moving to Tennessee in August for school and I want to bring this truck. I have a topper for it so it will be perfect for taking my stuff up there. That's another reason why I don't want to put the radiator in the bed�
I also was thinking about cutting the radiator itself to make it fit. If I only cut the transmission cooling section and reseal it correctly I shouldn't lose any engine cooling capability. Then again it will look like a hack job when I put it all together. I actually have a solid chunk of time to work at it today so I can make some real progress.
Also, the drive shaft will extend out to reach the transmission! Thanks for the advice!
I still have many things to do besides this, but they're just buttoning things up. (bleeding the brakes, air filter for the carb, windshield wipers, hood, weather striping, etc.)
I like having someone to talk with about this build. It's been an uphill battle from the start. I'm gonna try to post everyday if I can. I'll list things accomplished, things to do and any impediments for the day.
If there is anything else you would like to know, let me know!
Tim
03-25-2014, 08:34 PM
#35
Ed,
Those fans are really close! Have you ever considered swapping them for push fans and moving them out front? Just a thought. If you find that radiator again send me the link please!
I don't think the radiator will sit all the way down with those frame rails in the way. I was thinking about mounting the radiator in the bed with an electric fan but then I got to thinking that if I put anything in the bed, the radiator would be in danger of taking damage from whatever is in the bed. I'm moving to Tennessee in August for school and I want to bring this truck. I have a topper for it so it will be perfect for taking my stuff up there. That's another reason why I don't want to put the radiator in the bed…
I also was thinking about cutting the radiator itself to make it fit. If I only cut the transmission cooling section and reseal it correctly I shouldn't lose any engine cooling capability. Then again it will look like a hack job when I put it all together. I actually have a solid chunk of time to work at it today so I can make some real progress.
Also, the drive shaft will extend out to reach the transmission! Thanks for the advice!
I still have many things to do besides this, but they're just buttoning things up. (bleeding the brakes, air filter for the carb, windshield wipers, hood, weather striping, etc.)
I like having someone to talk with about this build. It's been an uphill battle from the start. I'm gonna try to post everyday if I can. I'll list things accomplished, things to do and any impediments for the day.
If there is anything else you would like to know, let me know!
Tim
Hey Tim, glad you got the driveshaft figure out! Yeah I don't blame you for reconsidering mounting the radiator in the bed. I could see if it was a dedicated trail rig, but if your going to use to haul stuff, and use it to move you want all the usable space back there you can get! I found a couple radiators that I'm interested in. They are both 22" wide by 16" tall. I could probably go 24" wide without any more interference, but would like to keep it close to stock dimensions as possible. Here's the links. You could probably go with a little bit taller one, like 19-20" since yours doesn't have the added SAS cross member problem like mine.
I've thought about trying to run my fans in front of the radiator, but don't think I currently have room with the grill. I think I'm going to be changing that, probably going to cut more of the core support and try moving the radiator closer into the grill area, then I'll have more clearance for the fan. I'll probably try to find one larger fan to cover more surface area of the radiator.
The one thing that I'm struggling with is what to do about the hood latch, if I do all that cutting and move the radiator forward, I'd lose the latching mechanism. I could go with hood pins, that's what my 85' parts truck had, but would prefer to keep it stock. Oh well, I got time to figure something out, lol.
look forward to your next update!
http://www.cfrperformance.com/CFR_UL...p/hz-50020.htm
Last edited by rustED; 03-25-2014 at 11:26 PM.
03-27-2014, 06:27 PM
#36
Registered User
Thread Starter
Hey Tim, glad you got the driveshaft figure out! Yeah I don't blame you for reconsidering mounting the radiator in the bed. I could see if it was a dedicated trail rig, but if your going to use to haul stuff, and use it to move you want all the usable space back there you can get! I found a couple radiators that I'm interested in. They are both 22" wide by 16" tall. I could probably go 24" wide without any more interference, but would like to keep it close to stock dimensions as possible. Here's the links. You could probably go with a little bit taller one, like 19-20" since yours doesn't have the added SAS cross member problem like mine.
I've thought about trying to run my fans in front of the radiator, but don't think I currently have room with the grill. I think I'm going to be changing that, probably going to cut more of the core support and try moving the radiator closer into the grill area, then I'll have more clearance for the fan. I'll probably try to find one larger fan to cover more surface area of the radiator.
The one thing that I'm struggling with is what to do about the hood latch, if I do all that cutting and move the radiator forward, I'd lose the latching mechanism. I could go with hood pins, that's what my 85' parts truck had, but would prefer to keep it stock. Oh well, I got time to figure something out, lol.
look forward to your next update!
http://www.cfrperformance.com/CFR_UL...p/hz-50020.htm
Amazon.com: Griffin Radiator 1-25201-XS Universal ClassicCool 24" x 16" Aluminum Radiator with 2 Rows of 1" Tube: Automotive
Anyways, I got done with almost everything I wanted to get done over the last couple of days.
I wanted to:
Finish buttoning up the transmission. I did everything but put the shifter boot (the rubber thing that keeps crap out of the cab) on, and put the knobs back on the shifters.
Connect the throttle cable. It took me two hours to do this� It took me so long because I was trying to think of the best way to do it.
I cut the throttle cable down to the length that I needed then pulled it into the cab just far enough so I could cut the threaded tube where the nuts where off with my trusty bolt cutters. Then I ground the surface flat and drilled out the folded over metal. I pushed the cable back out then I cut a slot just big enough for the throttle cable in a flat part of the throttle control on the carb. I pushed the cable into the slot then fed it into the return spring mechanism. Then I found an old piece of metal, bent it, and crimped it on the end of the cable. I get almost full throttle without any binding!
I attached pictures of the finish product. I'm not gonna lie, I'm pretty proud of how it turned out lol.
I also wanted to get some down sizers for the fuel return line. I got most everything I need, just one more nipple and it'll be done. I'll post pictures of the finished product once I get it done.
Things still needing to be done:
I need to finish the fuel lines
Find and install a good radiator
Wire the alternator
Get an air filter
Get the front wheels somewhat aligned
Finish installing the steering stabilizers
Weather stripping
Shifter boot
I'm sure I'm forgetting something but that's all I can remember right now.
I have work tomorrow at 8:00pm so I should be able to get a good amount done before then.
Thanks for looking
-Tim
03-28-2014, 03:52 PM
#37
Registered User
Thread Starter
I got quite a bit done today.
I got the fuel lines in the engine compartment downsized correctly so everything fits snug and shouldn't leak. Here are some pictures:
https://www.yotatech.com/members/cev...-downsize.html
https://www.yotatech.com/members/cev...-downsize.html
I made a detailed drawing of the core support area with precise measurements and�. I found a radiator that fits!!! It's off of a late 80's Ford Ranger with the 4.0 liter V6 in it. Here are some pictures of it mocked up:
https://www.yotatech.com/members/cev...ly-clears.html
https://www.yotatech.com/members/cev...etty-good.html
Other things that I got done today:
I mounted the coil more securely, finished the steering stabilizers, and put the serpentine belt on.
I figured out that I put the gear selector stick on backwards so I will have to flip that around at some point.
That's about it right now.
-Tim
03-29-2014, 09:34 AM
#38
Nice work, look like you got a lot accomplished! Nice score on the radiator! Looks like you have about the same amount of clearance as I do. Are you going to run a pusher fan in front of the radiator? Your getting close, can't wait to se some pics of this thing in action!
04-11-2014, 10:30 AM
#39
Registered User
Thread Starter
Haven't updated in a while
Hi all,
Sorry I haven't updated in a while. I have had two weeks in a row with 11 hours at school, and 35 hours at work, plus homework. I did get a couple things done even though.
I put the top radiator hose on and mounted the radiator:
https://www.yotatech.com/members/cev...ator-hose.html
Flex hose is the best!
I'm still working on the lower radiator hose. I think I have the solution though. I just have to get out there and apply it!
I installed the shift boots. It turned out that the transfer case stick was in backwards. I still had to take all of the interior floor mat out on the drivers side to get it back in.
https://www.yotatech.com/members/cev...tallation.html
Before I drive it I only have to do a few more things!
Radiator fans
Bleed Brakes
Hood
Registration (don't tell on me for not having it already!)
Front turn signals (I want it to be legal!)
and exhaust collectors or something to quiet it down just a little bit so I don't get a ticket. Any ideas for exhaust?
Thanks for looking!
-Tim
04-11-2014, 11:30 AM
#40
Registered User
Thread Starter
I went out and tried the lower radiator hose theory I had. Here's what it looks like.
It goes from the water pump (1.75" O.D.) to the radiator (1.5" O.D.) It misses all of the belts and turning stuff that it could get snagged on but it hangs wayyyy too low. I know the first time I wheel with it, the hose will get snagged and I will be stranded. I think i need a shorter second piece. I will have to take some measurements and go back to the auto parts store (for the third time�)
While I have it sitting like this, I might as well put some water in it to make sure my junkyard radiator will hold. I won't try and start it until I have the right length of hose and everything is together nicely.
Another thing� Does anyone know what these three tubes do? They come off of the top of the water pump on the passenger side (gray in color� they kinda look galvanized). The other one comes out where the top radiator hose connects to the intake (chrome in color near the black hose). I think they are for the heater hoses, but I wan to make sure before I make a costly mistake.
Thanks for the input!
-Tim


