Dunkin's 1990 4Runner 2DR Build-Up Thread
 01-24-2011, 10:34 AM
#61
Registered User
Thread Starter
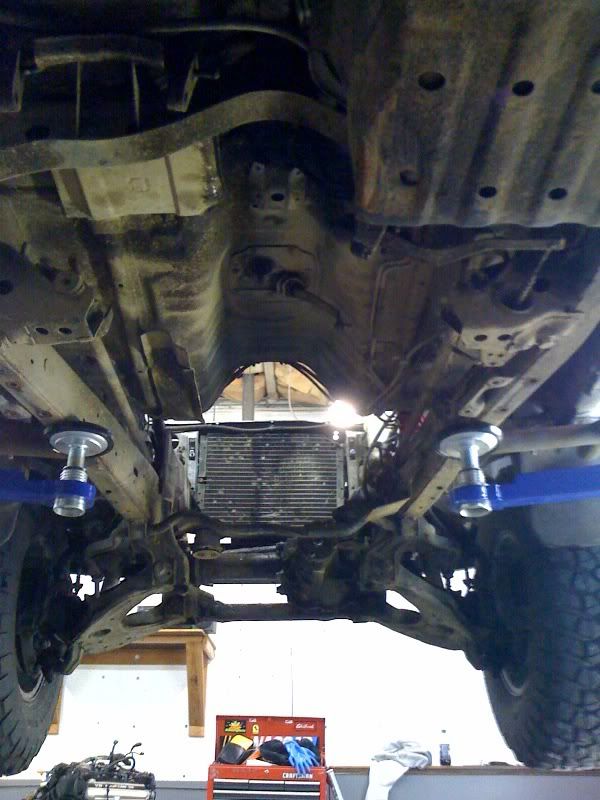
It looks like I can blend the factory PS pressure hoses together and make that work too. I did get the SC400 PS cooler and transmission cooler, so I might install them somewhere in the system too.
Sorry, the lighting is terrible back there right now, but here are the mounts. Gloveman on Lextreme in NZ made them for me. They are designed to be used with the original 22RE rubber mounts. We'll see how long they last.


 01-24-2011, 12:17 PM
#62
Banned

Ya im not to sure about the 22re motor mounts holding up to a v8!
You might look into a bomb proof mount, at least for the passenger side (i think thats the one that breaks most) to keep from blowing them up.
BigBluePile runs one bomb proof and one stock (at least he used to i think).
But if you run both, be prepared for massive vibrations! My buddies 22re with 2 bombproof mounts makes his legs go numb.
01-24-2011, 12:46 PM
#63
Registered User
Thread Starter
Ya im not to sure about the 22re motor mounts holding up to a v8!
You might look into a bomb proof mount, at least for the passenger side (i think thats the one that breaks most) to keep from blowing them up.
BigBluePile runs one bomb proof and one stock (at least he used to i think).
But if you run both, be prepared for massive vibrations! My buddies 22re with 2 bombproof mounts makes his legs go numb.
You might look into a bomb proof mount, at least for the passenger side (i think thats the one that breaks most) to keep from blowing them up.
BigBluePile runs one bomb proof and one stock (at least he used to i think).
But if you run both, be prepared for massive vibrations! My buddies 22re with 2 bombproof mounts makes his legs go numb.
Cool! Thanks for the info. Supposedly, these 1UZ's are known for their smoothness, but there will still be a ˟˟˟˟load of torque when in 4 low, and that's where I am worried about the mounts tearing. I have also heard of people welding in chain "limiting straps" to the mounts. Hmmmm
01-24-2011, 01:27 PM
#64
Banned
Can you weld?
If so, i like how this guy did his mounts.
http://www.pirate4x4.com/forum/showthread.php?t=905105
If so, i like how this guy did his mounts.
http://www.pirate4x4.com/forum/showthread.php?t=905105
Last edited by 2DoorRunner; 01-24-2011 at 01:29 PM.
01-24-2011, 02:14 PM
#65
Registered User
Thread Starter
Can you weld?
If so, i like how this guy did his mounts.
http://www.pirate4x4.com/forum/showthread.php?t=905105
If so, i like how this guy did his mounts.
http://www.pirate4x4.com/forum/showthread.php?t=905105
No, I have never welded before. I'm sure I could with a bunch of practice though.
I did come across that thread in my quest for knowledge on the 1UZ swap. It's a good read, and I love the way that 4Runner front end looks on his short box.
I am attempting this build with no welding, aside from the exhaust which I will contract someone to do for me.
When I end up doing the SAS I will inevitably have to learn to weld, or sweet talk my Uncle, who is a fabricator by trade, to work with me. Since the engine mounts are part of the upper control arm mount, I may end up doing something like that guy did then.
All in good time...

 01-29-2011, 01:47 PM
#68
Registered User
Thread Starter
Finally started on the swap. Got the 22RE and A/T yanked out and the 1UZ in for a test fit.


Once it was in, I decided to replace the rear main crank seal and install the flywheel. Turns out I didn't notice that the damn ring gear was missing.
At trip to my friend Steve's house fixed this. We ground off all the welds from the ring gear to the flex plate and removed the original ring gear.
The flywheel has a machined surface to accept the ring gear, so currently, the ring gear is in the oven, and the flywheel is in the freezer. Wish me luck.

The engine sits too low with these mounts, so I think I'll order up some engine lift mounts from 4Crawler and get it another inch and a half higher.
Currently, the Tundra manifold are hitting on the steering column and the fuel line. Plus, the O2's hit the torsion bar mounts at the upper control arm. The center steering link hits the oil pan too.
I also found out just how eff'd my radiator support is, since I have an inch or so less room between the engine and the radiator support on the right, than I do on the left.
One hurdle at a time... Still should have it running in a month. Hopefully...
Edit-
Just ordered the engine mount lift spacers from Roger. We'll see how long it takes him to fab them up and ship them out. That should give me time to work on the radiator support and figure out how to ditch the A/C all together.
Any of you know about an A/C pump delete idler?
Once it was in, I decided to replace the rear main crank seal and install the flywheel. Turns out I didn't notice that the damn ring gear was missing.
At trip to my friend Steve's house fixed this. We ground off all the welds from the ring gear to the flex plate and removed the original ring gear.
The flywheel has a machined surface to accept the ring gear, so currently, the ring gear is in the oven, and the flywheel is in the freezer. Wish me luck.
The engine sits too low with these mounts, so I think I'll order up some engine lift mounts from 4Crawler and get it another inch and a half higher.
Currently, the Tundra manifold are hitting on the steering column and the fuel line. Plus, the O2's hit the torsion bar mounts at the upper control arm. The center steering link hits the oil pan too.
I also found out just how eff'd my radiator support is, since I have an inch or so less room between the engine and the radiator support on the right, than I do on the left.
One hurdle at a time... Still should have it running in a month. Hopefully...
Edit-
Just ordered the engine mount lift spacers from Roger. We'll see how long it takes him to fab them up and ship them out. That should give me time to work on the radiator support and figure out how to ditch the A/C all together.
Any of you know about an A/C pump delete idler?
Last edited by Dunkin; 01-29-2011 at 02:08 PM.
01-29-2011, 04:48 PM
#69
Registered User
Join Date: Jan 2011
Location: Englewood, CO
Posts: 375
Likes: 0
Received 0 Likes
on
0 Posts
nice runner. i really like the 2 doors have always been a fan of the late 80s modles. i have had 3 different ones. 3.0 manuel a 3.0 auto and a 22re auto. now have a 95 3.0 manuel that i am starting a 1uz swap on. i have the ls half torn apart. next thursday im pulling the motor. i am going to use the manuel as well and was woundering about the ks racing kit. i know you can use a 3sgte flywheel an have the bolt holes modified a little. but as it sits the price is leaning more at the ks kit with a 22ret clutch. if the bolt holes for the pressure plate matck the ks flywheel.
02-17-2011, 08:22 AM
#70
Registered User
Thread Starter
I got a radiator for the truck yesterday. I called Performance Radiator with the dimensions of the OE V6 radiator and asked if the had anything in aluminum with the inlet and outlet neck's reversed.
They found p/n 6001
It's supposed to be a marine application for a tug boat with the 300 I6 Ford engine. I'm going to have my fab buddy Rob mod the upper neck by adding a 90 and fill where the other two necks were that I don't need.
I also picked up a shorter belt so I can ditch the A/C compressor for more steering box clearance. I could keep it, but I don't want to mess with the A/C system for now.
Last edited by Dunkin; 02-17-2011 at 08:23 AM.
02-17-2011, 07:16 PM
#74
Registered User
Thread Starter
I paid 279 for it, and hopefully the mods will be cheap. It looks easy enough anyway.
The cool thing about it, is that it came with mounting brackets that will essentially bolt up to the existing radiator support. I just have to drill new holes where I want to mount it.
edit: The engine mount spacers came in too. I really want to put in some hours on this truck, but I'm still pretty sore from the wreck. Plus, I have to move in less than two weeks.
Last edited by Dunkin; 02-17-2011 at 07:22 PM.
02-17-2011, 08:02 PM
#77
Contributing Member
dunkin whats the part number on the belt ,i used a shorter one also but the tensioner is really close to the end of its tensioning
and how thick is this radiator you got ?
and how thick is this radiator you got ?
Last edited by RMA; 02-17-2011 at 08:08 PM.
02-17-2011, 08:04 PM
#78
Registered User
Thread Starter
Yeah, it came with dual inlets and dual outlets. But it's close enough for me to work with. Plus, I'd rather have the aluminum instead of the brass one that I pulled out. Call me crazy, but I think it helps to quell electrolysis by keeping as many similar metals as possible.
02-17-2011, 08:08 PM
#79
Registered User
Thread Starter
I got a 6PK-1540, I haven't checked to see if it fits yet. I just measured the distance I wanted to remove, converted it to mm, the subtracted it from the part number. The original was a 6PK-2250 or something. 6 ribs, 2250 mm long. I'll let you know if it fits soon enough. Hopefully I can get some time to play with it a bit this weekend.


