D-Rock's 1989 4Runner build up thread
 10-05-2012, 01:41 PM
#21
Registered User
Thread Starter
iTrader: (1)
Join Date: May 2012
Location: GWS,Colorado
Posts: 299
Likes: 0
Received 0 Likes
on
0 Posts
2. Pull the engine and have it rebuilt (semi)locally. I've only gotten one quote back and that was $1800 and a 3 hour drive to deliver and then later pick up the engine. I thought I could save some money by not having to pay all the shipping but there are not many rebuilder shops around me. And I still have the problem of the bad work area.


 10-24-2012, 05:50 PM
#24
Registered User
Thread Starter
iTrader: (1)
Join Date: May 2012
Location: GWS,Colorado
Posts: 299
Likes: 0
Received 0 Likes
on
0 Posts
Engine is supposed to be back tomorrow. New crank and new cam. Engine had been rebuilt before, but had a broken compression ring on cylinders 2 & 4.
While waiting I:
Cleaned and painted exhaust manifold and pipe
New fuel injector seals and cleaned manifold
Cleaned throttle body and plenum
Ordered;
Motor mounts
Coolant hoses
T-stat
Temp and oil pressure senders
Belts
Front shocks
While waiting I:
Cleaned and painted exhaust manifold and pipe
New fuel injector seals and cleaned manifold
Cleaned throttle body and plenum
Ordered;
Motor mounts
Coolant hoses
T-stat
Temp and oil pressure senders
Belts
Front shocks
Last edited by derockus; 11-11-2012 at 07:33 AM.
11-09-2012, 01:10 PM
#27
Registered User
Thread Starter
iTrader: (1)
Join Date: May 2012
Location: GWS,Colorado
Posts: 299
Likes: 0
Received 0 Likes
on
0 Posts
The latest:
Engine was delivered to the house by the builder (whatta guy) on Tuesday Oct 30. Head was cracked so got a brand new head, only came in $20 over the initial quote Had it back into the truck Thursday night. Bolted most of the remaining parts on Fri and Sun. After dealing with a broken clutch slave bolt (got a little too ham-fisted) we were 5 minutes from starting up. Filled the oil, filled then coolant, then "DMAN, where's that coolant leaking from!?!" Turns out I snapped the bolts that attach the coolant pipe on the bottom of the intake manifold, fuhhhhhhhh.
Spent this week after work pulling the air chamber and intake manifold, extracting the broken bolts, and reinstalling all that crap. Tonight, reattach fuel lines, refill coolant, and START UP. Wish me luck, this puppy better fire up first try or I don't know what I'm gonna do
Engine was delivered to the house by the builder (whatta guy) on Tuesday Oct 30. Head was cracked so got a brand new head, only came in $20 over the initial quote
Had it back into the truck Thursday night. Bolted most of the remaining parts on Fri and Sun. After dealing with a broken clutch slave bolt (got a little too ham-fisted) we were 5 minutes from starting up. Filled the oil, filled then coolant, then "DMAN, where's that coolant leaking from!?!" Turns out I snapped the bolts that attach the coolant pipe on the bottom of the intake manifold, fuhhhhhhhh.Spent this week after work pulling the air chamber and intake manifold, extracting the broken bolts, and reinstalling all that crap. Tonight, reattach fuel lines, refill coolant, and START UP. Wish me luck, this puppy better fire up first try or I don't know what I'm gonna do
11-11-2012, 07:32 AM
#28
Registered User
Thread Starter
iTrader: (1)
Join Date: May 2012
Location: GWS,Colorado
Posts: 299
Likes: 0
Received 0 Likes
on
0 Posts
Truck started right up!!! What a day. No leaks, just sweet 22RE purr. Had an issue with the oil pressure gauge that got us a little freaked but it turns out the dash gauge is bad. I replaced the sender but it didn't fix the problem. Oh well, going to put in a mechanical gauge for peace of mind.
It runs! Took it for the 20mile break in drive and I can really tell the difference in power and pedal response. Took it up some city hills to really get the rings to seat well. Need to change the oil and filter before the next drive.
Hey cheers to me and my buddy. Two guys who know how to turn a wrench but haven't ever tried a project so involved as a full engine-pull and reinstall. We nailed it with just a few minor snafu's.
FYI, Builder is based out of Eagle, CO. PM me for contact info. Haven't driven the engine much but this guy is really dedicated, honest, and helpful. When we had the oil pressure gauge issue he was out here the next day with a mechanical gauge to make sure we were going to be all good. Hung out and helped do the cam break-in and adjust the idle settings.
11-21-2012, 10:32 AM
#31
Registered User
Thread Starter
iTrader: (1)
Join Date: May 2012
Location: GWS,Colorado
Posts: 299
Likes: 0
Received 0 Likes
on
0 Posts
Latest:
Had a leak in the one coolant hose we didn't replace, the timing cover to pipe hose. All good now I think.
Still working on figuring out my rear window problem.
Replaced transmission and transfer fluids with Valvoline 75W-90. Stuff was hard to find believe it or not. Had to buy it quart by quart because nowhere had a full gallon. Transmission fluid was pretty black, but no big chunks of metal or anything so that was a relief. Transfer fluid looked good but of course I still changed it. Shift into first and second a lot more smoothly now.
Upcoming:
Mechanical Oil Pressure gauge. Tried to get it on last night but it's a btich getting the fitting threaded into the oil port that's behind the motor mount. I attached the hose to the fitting before threading the fitting on and the stiff hose was giving me hell trying to get it to thread straight. I'm probably going to have to thread the fitting then thread the hose/ferrule on next. At first the 6' hose was too short to mount the gauge where I wanted (trying to go through the wire port on the far upper left of the firewall). The better spot is to push it through the port that the a/c condensation drain tube goes through. I'm mounting the gauge on the side of the center radio console just below the e-brake lever.
New shocks. Got budget ones but I know the old ones are clapped out so these will still be an improvement.
Need to sort out why the truck wanders so badly. Figuring ball joint or tie rod ends, just need to get the front end up and jerk around on it to find out.
12-04-2012, 09:29 AM
#32
Registered User
Thread Starter
iTrader: (1)
Join Date: May 2012
Location: GWS,Colorado
Posts: 299
Likes: 0
Received 0 Likes
on
0 Posts
Mechanical Oil Pressure Gauge Install - SunPro
I got the mechanical oil pressure gauge installed finally. I got a SunPro Part# 8216 from AutoZone for $18.
Install notes:
1. The nylon tube it comes with is really coiled up tight. Directions say to dip it in hot water to help it uncoil but this is a pain. You end up with water all inside the tube that doesn't want to come out and you sure don't want to leave it in there. Our house has radiators for heat so I stretch the tube out and taped it to one of the radiators and let it sit over night. It did a pretty decent job of taking out the coils. I also used the wife's hairdryer and that really did the trick.
2. I chose the oil port behind the motor mount for the install location. It is really a pita to get at. I finally figured out the best order to install is to thread in the fitting without the tube, then attached the ferrule/tube/cap afterwards. If you put the tube on first it makes getting your hands in there to finger thread the fitting on impossible. The hose twirls and moves everything around all crazy like.
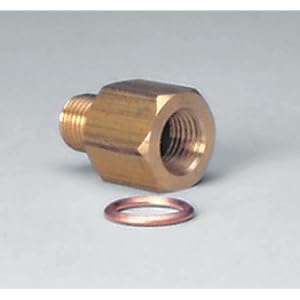
3. The fitting supplied with the SunPro gauge is 1/8" NPT. I was able to thread in the fitting just barely to the port. I probably only got 2-3 threads deep. I used blue rtv to seal it. This is temporary and I am constantly worried about it popping out. You need to get an adapter that is 1/8" NPT female and 1/8" BSPT (British Standard Pipe Taper thread). I got part from Amazon. There are others out there.
4. First I tried routing the nylon tube through the main wiring port in the upper left of the firewall (standing at front of truck). I wanted to mount the gauge on the side of the center console under the e-brake. This route was too short. Route the tube through the a/c condenser drip-box tube port.

It was hard to find a good spot for the gauge but this location is out of the way. It doesn't touch my leg or interfere with pulling the e-brake. You gotta glance kind of low to see it but it works.


Install notes:
1. The nylon tube it comes with is really coiled up tight. Directions say to dip it in hot water to help it uncoil but this is a pain. You end up with water all inside the tube that doesn't want to come out and you sure don't want to leave it in there. Our house has radiators for heat so I stretch the tube out and taped it to one of the radiators and let it sit over night. It did a pretty decent job of taking out the coils. I also used the wife's hairdryer and that really did the trick.
2. I chose the oil port behind the motor mount for the install location. It is really a pita to get at. I finally figured out the best order to install is to thread in the fitting without the tube, then attached the ferrule/tube/cap afterwards. If you put the tube on first it makes getting your hands in there to finger thread the fitting on impossible. The hose twirls and moves everything around all crazy like.
3. The fitting supplied with the SunPro gauge is 1/8" NPT. I was able to thread in the fitting just barely to the port. I probably only got 2-3 threads deep. I used blue rtv to seal it. This is temporary and I am constantly worried about it popping out. You need to get an adapter that is 1/8" NPT female and 1/8" BSPT (British Standard Pipe Taper thread). I got part from Amazon. There are others out there.
4. First I tried routing the nylon tube through the main wiring port in the upper left of the firewall (standing at front of truck). I wanted to mount the gauge on the side of the center console under the e-brake. This route was too short. Route the tube through the a/c condenser drip-box tube port.
It was hard to find a good spot for the gauge but this location is out of the way. It doesn't touch my leg or interfere with pulling the e-brake. You gotta glance kind of low to see it but it works.
12-15-2012, 06:21 PM
#34
Registered User

Nice 4runner. So, GWS, I guess that stands for Glenwood Springs. I lived in Glenwood for six years. I am in Wisconsin now. My '84 xtra cab had the Zuk spring mod. It was great! I have a '89 4runner now. Transfer Trail, Hubbard's Cave, whoo, hooo!
12-18-2012, 11:59 AM
#35
Registered User
Thread Starter
iTrader: (1)
Join Date: May 2012
Location: GWS,Colorado
Posts: 299
Likes: 0
Received 0 Likes
on
0 Posts
Yup, you got it. I moved her from FLA about 3 years ago. Really great town. Winter finally showed up so the local wheeling will have to wait. We've shuttled bikes up transfer then had some seriously fun biking down No Name trail from the top of the Flattops. Good fun.
01-19-2013, 07:31 PM
#36
Registered User
Thread Starter
iTrader: (1)
Join Date: May 2012
Location: GWS,Colorado
Posts: 299
Likes: 0
Received 0 Likes
on
0 Posts
Rewiring rear window direct to battery
My rear window stopped working. I spent some time, albeit not enough, trying to track down the problem. I decided to just wire it straight to the battery, fuse the circuit, and run a switch to the dash. Yes, I realize that this is kind of a hack way to do it but I don't care. I just want the window to work. I mounted the switch so it's easy to get to while standing at the door so you don't have to lean way over. The rear key is non-functional now. I fused the positive line in the engine compartment with 10A fuse. I used a double-pole, double-throw (dpdt) switch rated to carry way more volts and amps than I'm dealing with. I used 16ga lamp cord for the wiring. All butt joints were soldered and heat shrinked. Wire tips were soldered before being clamped in terminals.
Ran the wires through the fire wall on passenger side, then through the dash and up through this hole I cut in the panel under the trim panel that covers the cluster. I put the switch between the column and the clutch-start-cancel button.

Switch location

Installed

I think it works awesome. Motor sounds fine, no clunking or grinding. While I had the tailgate apart I greased every moving part I could find. I like that I can operate the window with or without the key. I guess it could be a drawback if you're worried someone might come along and break in to the back of your truck. Then again, they may not know where to look to find the window switch.
Switch:
Radioshack DPDT 20-Amp Momentary Flip Switch
Model: 275-709 | Catalog #: 275-709

Wiring diagram:

Ran the wires through the fire wall on passenger side, then through the dash and up through this hole I cut in the panel under the trim panel that covers the cluster. I put the switch between the column and the clutch-start-cancel button.
Switch location
Installed
I think it works awesome. Motor sounds fine, no clunking or grinding. While I had the tailgate apart I greased every moving part I could find. I like that I can operate the window with or without the key. I guess it could be a drawback if you're worried someone might come along and break in to the back of your truck. Then again, they may not know where to look to find the window switch.
Switch:
Radioshack DPDT 20-Amp Momentary Flip Switch
Model: 275-709 | Catalog #: 275-709
Wiring diagram:
01-22-2013, 07:17 PM
#37
Registered User
Thread Starter
iTrader: (1)
Join Date: May 2012
Location: GWS,Colorado
Posts: 299
Likes: 0
Received 0 Likes
on
0 Posts
Went to Yoda Jim's this weekend. Got a set of matching wheels, roll bar, mudflaps, and random plastic crap. It was my first time there. I thought it was gonna be a u-pick but they help you get stuff. A couple weeks ago I got these 235/75/15 Goodyear Workhorse studded tires for snow. Had them mounted today... not quite as much meat as the 31x10.5 m/t, still look OK tho.

03-11-2013, 09:51 AM
#38
Registered User
Thread Starter
iTrader: (1)
Join Date: May 2012
Location: GWS,Colorado
Posts: 299
Likes: 0
Received 0 Likes
on
0 Posts
Took the 4Runner on its first highway road trip shakedown. Drove from Glenwood Springs to Monarch mountain ski area. Truck did awesome even over the 10,000ft+ passes. Fully loaded with ski gear, roof box, tools, coolers, 250lbs of sand, and 3 people. I got 19.8mpg! That blew my mind.
03-11-2013, 08:03 PM
#39
Registered User
Went to Yoda Jim's this weekend. Got a set of matching wheels, roll bar, mudflaps, and random plastic crap. It was my first time there. I thought it was gonna be a u-pick but they help you get stuff. A couple weeks ago I got these 235/75/15 Goodyear Workhorse studded tires for snow. Had them mounted today... not quite as much meat as the 31x10.5 m/t, still look OK tho.
03-11-2013, 08:05 PM
#40
Registered User


