A2theK's 91' Pickup Buildup Thread
 07-22-2012, 07:35 PM
#61
Registered User
Thread Starter
iTrader: (4)
Join Date: Sep 2011
Location: Boise, Idaho
Posts: 275
Likes: 0
Received 0 Likes
on
0 Posts
Been shopping around and found some goodies. Got this awesome dome lighting out of a 4Runner. Unfortunately it had ugly red interior and had to buy some grey interior paint which turned out nicely. Finally found some 4.88's to regear too! Only $80 for each carrier can't go wrong. Also got a booster and 1" bore master cylinder off a 3.0 pickup. Hopefully will have a day off this week to get to work!
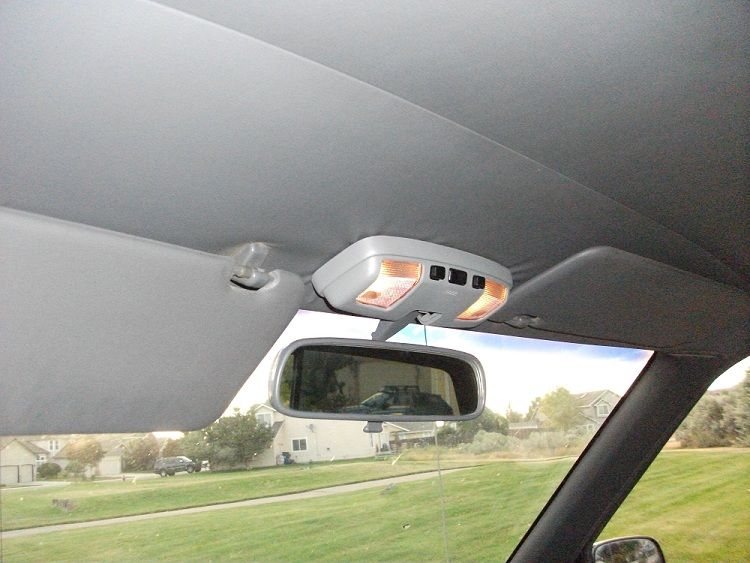
Old dome light with no cover.

And the new! Screws right in and lights even turn on when the doors open! Such a great upgrade, 2 extra lights make a big difference as well.
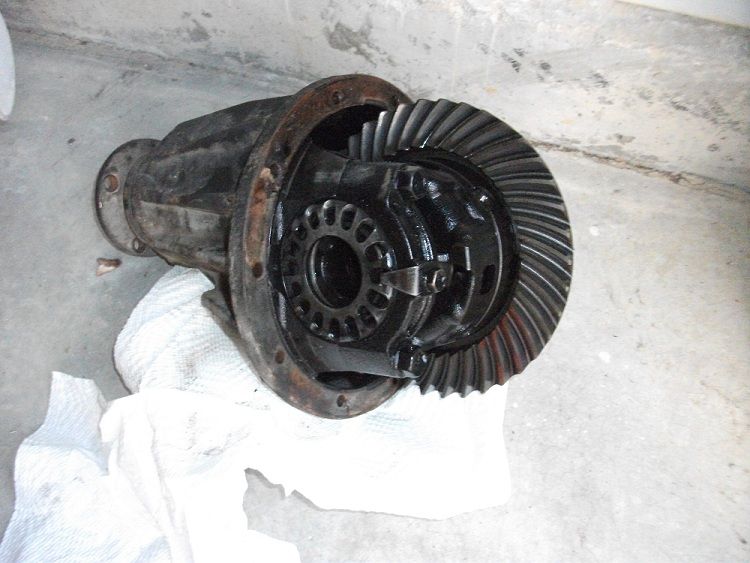
Only pulled the rear 4.88 since it was all I had time for. Can't wait to put it in and get some torque back. Got it out of a 94' auto 4runner which was the last one on my list to check for the code G144.
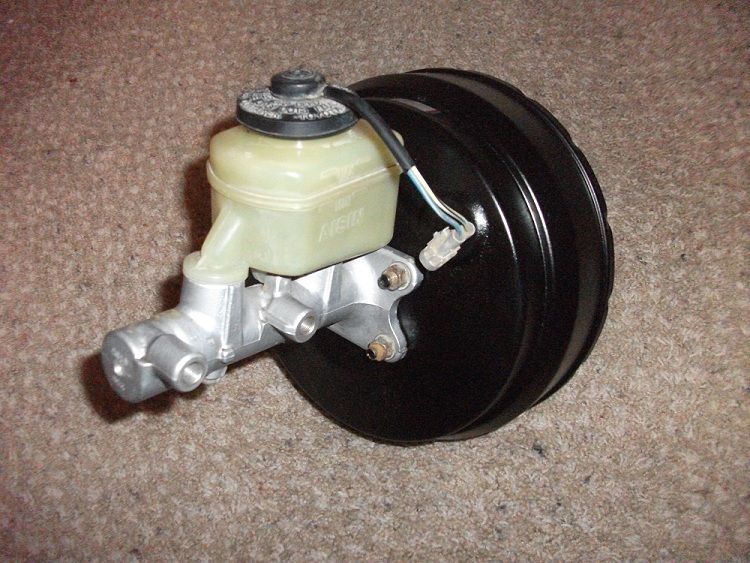
And the brake booster and 1" bore master cylinder off a 3.0 pickup. Master cylinder looked brand so I cleaned it up a bit, painted the brake booster and it looks good as new. I plan on putting in rear disc brakes sometime soon so figure I'd install this with my 4.88s first.
Old dome light with no cover.
And the new! Screws right in and lights even turn on when the doors open! Such a great upgrade, 2 extra lights make a big difference as well.
Only pulled the rear 4.88 since it was all I had time for. Can't wait to put it in and get some torque back. Got it out of a 94' auto 4runner which was the last one on my list to check for the code G144.
And the brake booster and 1" bore master cylinder off a 3.0 pickup. Master cylinder looked brand so I cleaned it up a bit, painted the brake booster and it looks good as new. I plan on putting in rear disc brakes sometime soon so figure I'd install this with my 4.88s first.
 07-24-2012, 03:25 PM
#62
Registered User
Thread Starter
iTrader: (4)
Join Date: Sep 2011
Location: Boise, Idaho
Posts: 275
Likes: 0
Received 0 Likes
on
0 Posts
Got the MC/Booster and 4.88 rear diff in today. Went smooth with no complications which is always good! Figure I'd do a small write-up with it as well if anyone wanted it.
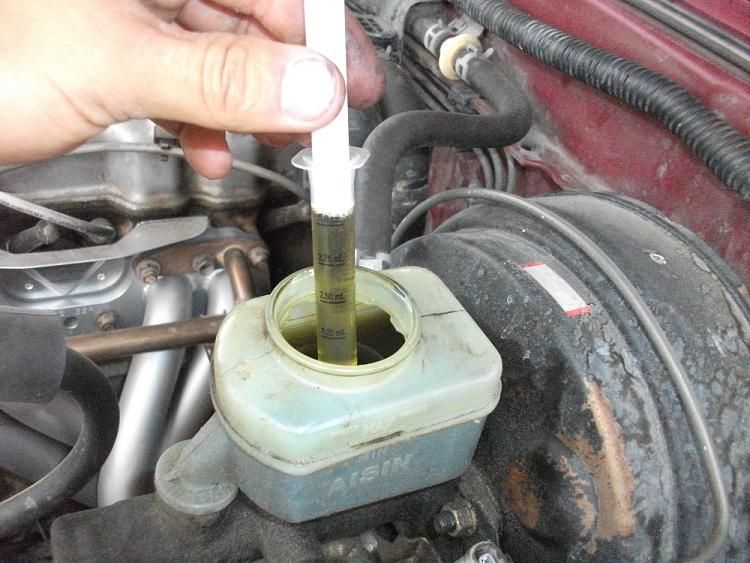
Drained the MC with a small medicine syringe.
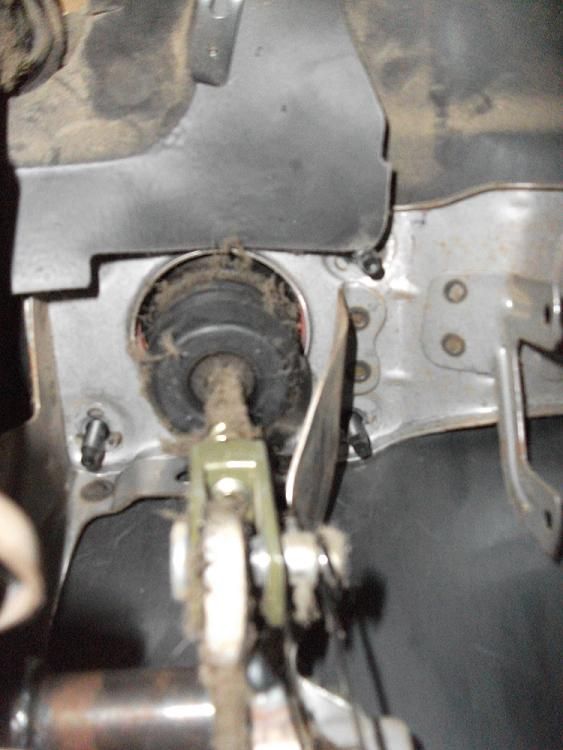
Pulling the booster out from underneath the dash. 4 bolts hold it on, a pin which slides out and a small spring with a hook which must come off as well.
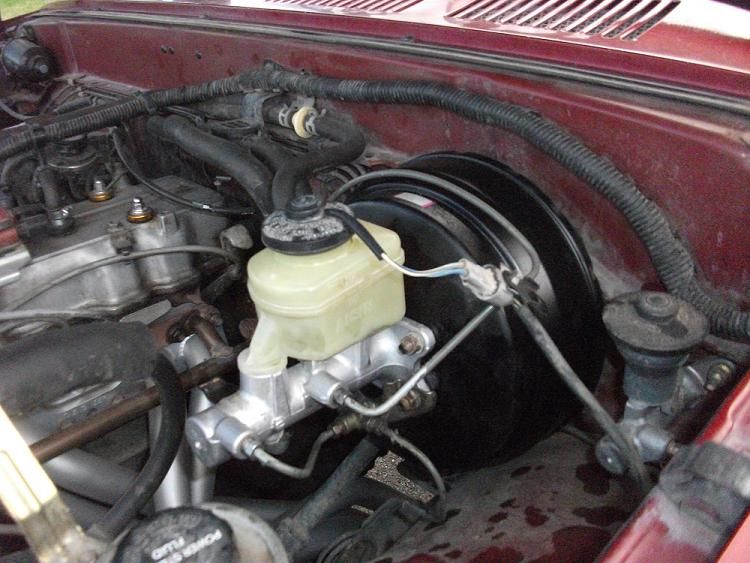
MC and booster installed, looks clean! My old master cylinder was actually leaking very very slowly and upgrading to the 1" bore MC from the v6 engines was not only an upgrade but a fix as well. Two birds with one stone, yeeeah. TIP: Remember to hook the vacuum line back up!
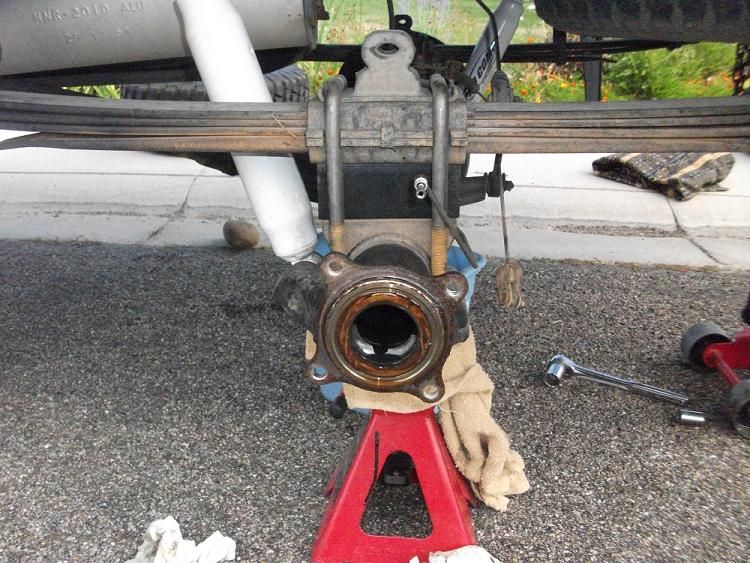
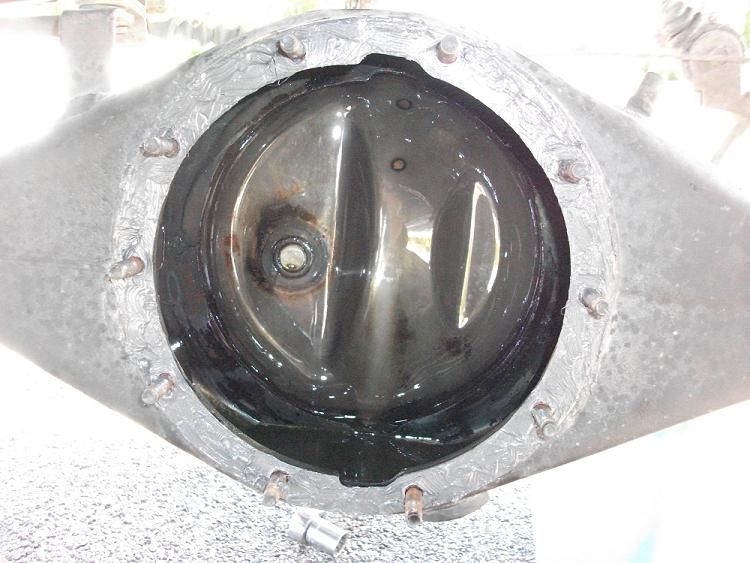
Before getting started; I advise to check to make sure your differential case filler plug is able to come off and is not already stripped. Nothing like taking everything apart and not able to put in new fluid. Drain the old fluid as well, makes less of a mess when pulling out the axles. My fluid was blacker than a black hole..
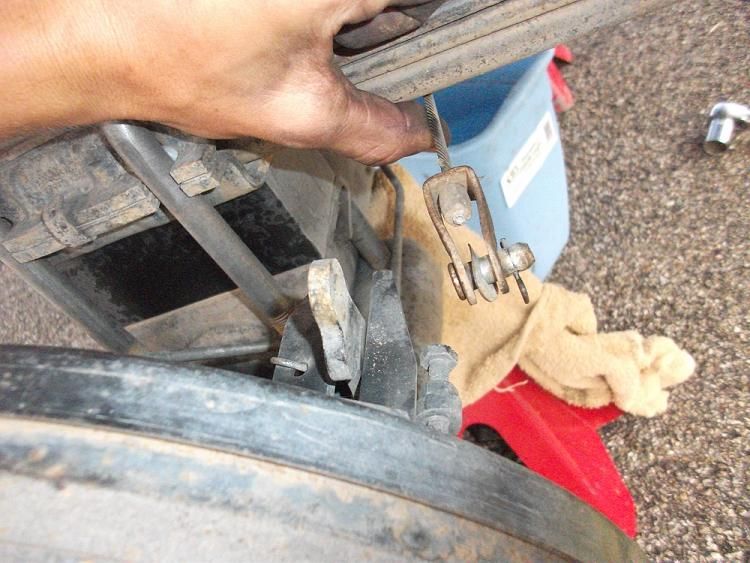
Jack the rear end up and place on two jack stands. Unhook the parking brake first to get the axles out. Just a pin holding it in place. The small pin that holds it in REALLY blends in with the road so be sure to but it back in haha.
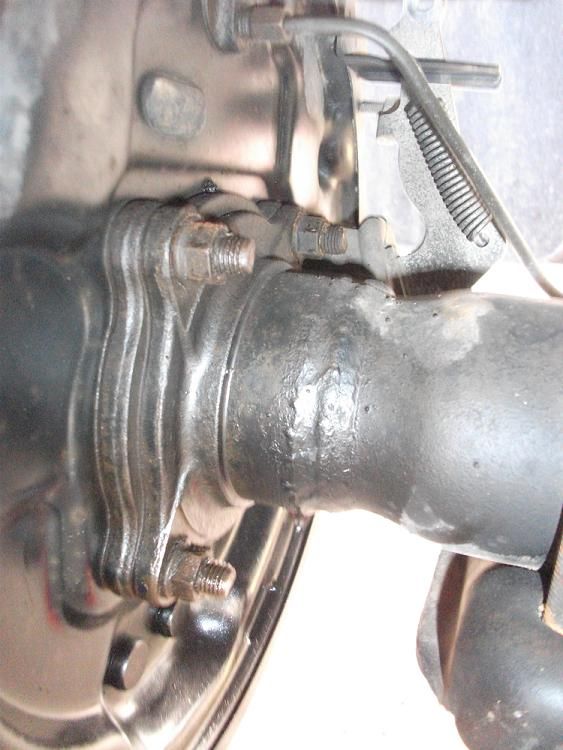
There are 4 14mm bolts that hold the axle in and can be relatively hard to break free. PB blaster helps a ton and a breaker bar was a must for me. Be careful with all nuts not to strip them. Unhook the brake line as well and be sure to have some rags laying around to catch all that extra fluid! All brake lines are 10mm.
Now yank those axles out and keep them clean, away from dirt. Rested both mine on some towels and rags. They're not insanely heavy and why people dont just pull them all the way out and rather have them rest on the seals beats me but I'd rather be safe than have to replace seals.
Now remove the 4 14mm bolts and nuts off the driveshaft/flange. Depending on the angle of the shaft makes getting the bolts off with a socket wrench somewhat difficult. I used a 10" extension to keep the wrench clear of the shaft and worked just fine.
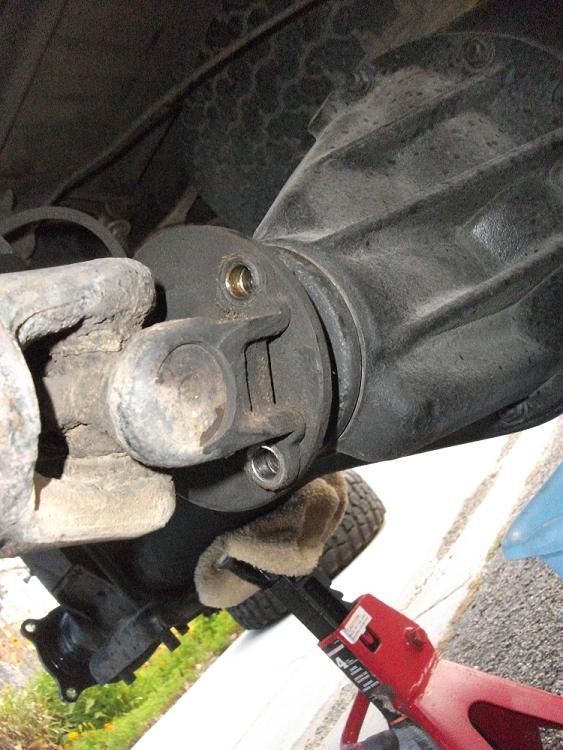
After removing all the bolts/nuts you're now able to slide the shaft towards the front of the truck about an inch or so to clear the diff and gently lower it to the ground for it to rest there.
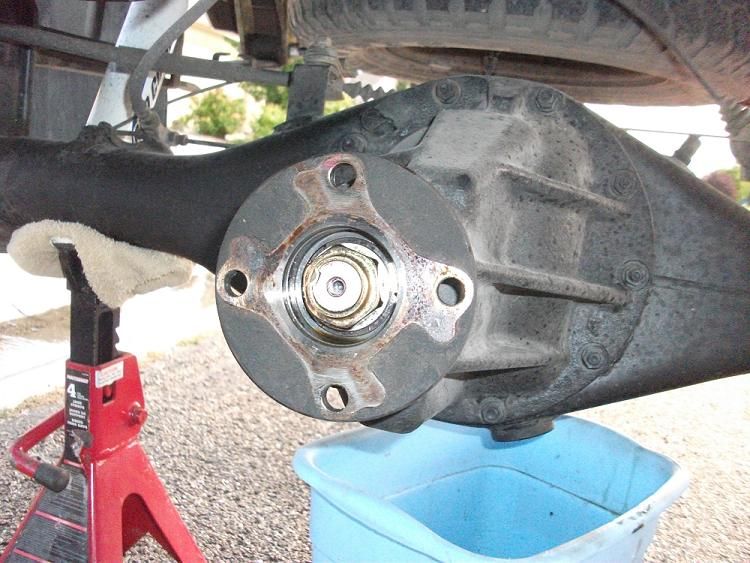
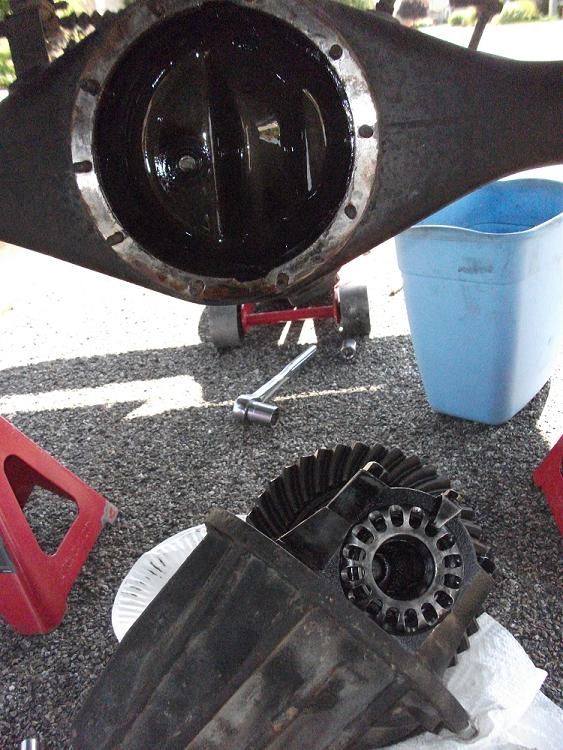
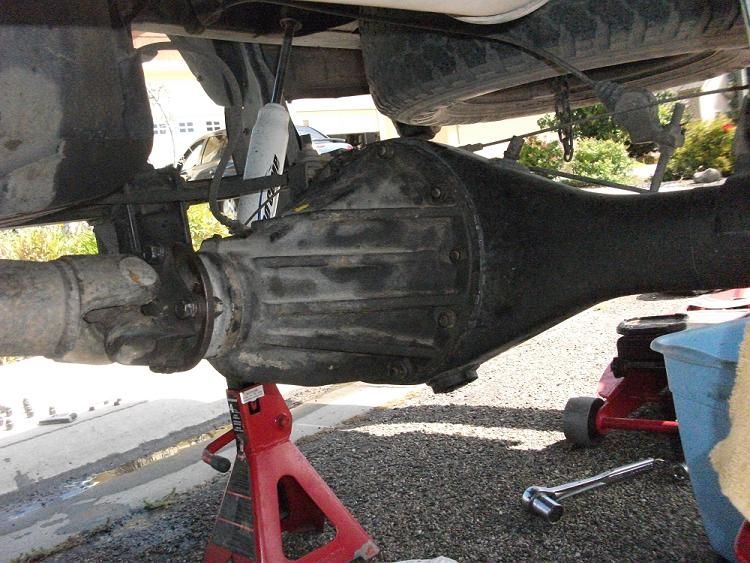
Now go ahead and unscrew the 10 12mm nuts holding the rear diff on. Easy to get them loose and now be ready to pull off a 50 pound hunk of metal in the most awkward way posible. Pull straight out and have a towel/cardboard right below to slowly drop the diff out onto. Now scrape off all the remaining gasket that remains on the axle housing.
Once you have a good clean flat surface, get your gasket covered on both sides by whichever rtv gasket sealer you want. Coat both sides for a good solid seal. Be sure to get the gasket on equally on all bolts to avoid tearing it.
And install the new diff back in the housing. Don't worry it feels like it weighs twice as much putting it back in than taking it out. Make sure you have a good solid mating with the gasket and torque all bolts to 21 lb/ft. I tightened the nuts as I would on a tire in the same manner. Just keep going across from nut to nut. Once the diff is installed, reattach the driveshaft/flange.
Now slide your axles back in, make sure it is angled correctly to get that perfect fit and twist until it sits all the way in. If you're having trouble just place your knees underneath the drum to support all the weight and get the angle correct. Tighten the 4 bolts to 35 lb/ft. Reattach both brake lines as well and parking brake. Now put in your new gear fluid. I think it was just a little of 2 quarts to fill her up. Take her for a test drive and make sure everything is working correctly.
Now whether you replaced your MC or not you must bleed your brakes. To make things easier I purchased a hand held vacuum bleeder pump which did not work at all and I highly recommend not to buy this product. I'll post what the brand maker was for it later once I go take it back. It did not create enough vacuum to even get the fluid moving through the lines.
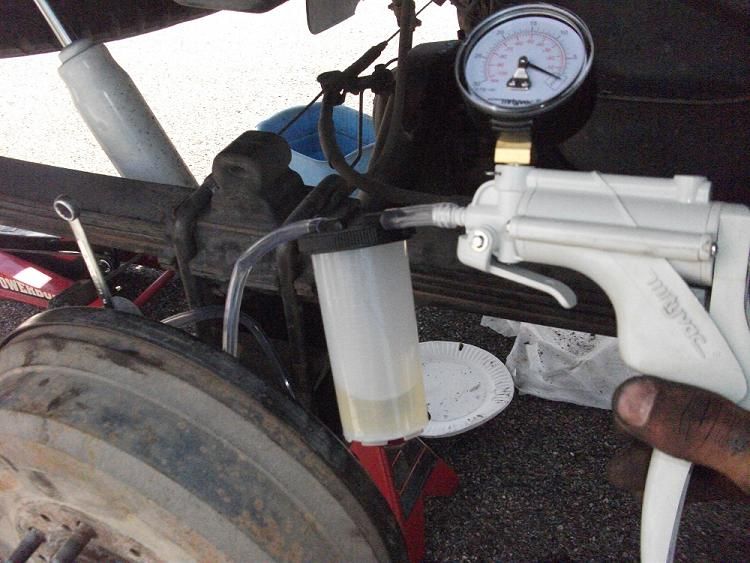
So got a buddy of mine over and just bled them the 2 person way. Starting with the DR, PR, FR, FL and lastly the LSPV. Biggest tip of all if you're replacing your booster and master cylinder at the same time to reattach the booster vacuum line haha. I bled my brakes twice wondering why I had no brake power whatsoever and why my truck was not running good until I finally figured it out and the brakes work great now!
Drained the MC with a small medicine syringe.
Pulling the booster out from underneath the dash. 4 bolts hold it on, a pin which slides out and a small spring with a hook which must come off as well.
MC and booster installed, looks clean! My old master cylinder was actually leaking very very slowly and upgrading to the 1" bore MC from the v6 engines was not only an upgrade but a fix as well. Two birds with one stone, yeeeah. TIP: Remember to hook the vacuum line back up!
Before getting started; I advise to check to make sure your differential case filler plug is able to come off and is not already stripped. Nothing like taking everything apart and not able to put in new fluid. Drain the old fluid as well, makes less of a mess when pulling out the axles. My fluid was blacker than a black hole..
Jack the rear end up and place on two jack stands. Unhook the parking brake first to get the axles out. Just a pin holding it in place. The small pin that holds it in REALLY blends in with the road so be sure to but it back in haha.
There are 4 14mm bolts that hold the axle in and can be relatively hard to break free. PB blaster helps a ton and a breaker bar was a must for me. Be careful with all nuts not to strip them. Unhook the brake line as well and be sure to have some rags laying around to catch all that extra fluid! All brake lines are 10mm.
Now yank those axles out and keep them clean, away from dirt. Rested both mine on some towels and rags. They're not insanely heavy and why people dont just pull them all the way out and rather have them rest on the seals beats me but I'd rather be safe than have to replace seals.
Now remove the 4 14mm bolts and nuts off the driveshaft/flange. Depending on the angle of the shaft makes getting the bolts off with a socket wrench somewhat difficult. I used a 10" extension to keep the wrench clear of the shaft and worked just fine.
After removing all the bolts/nuts you're now able to slide the shaft towards the front of the truck about an inch or so to clear the diff and gently lower it to the ground for it to rest there.
Now go ahead and unscrew the 10 12mm nuts holding the rear diff on. Easy to get them loose and now be ready to pull off a 50 pound hunk of metal in the most awkward way posible. Pull straight out and have a towel/cardboard right below to slowly drop the diff out onto. Now scrape off all the remaining gasket that remains on the axle housing.
Once you have a good clean flat surface, get your gasket covered on both sides by whichever rtv gasket sealer you want. Coat both sides for a good solid seal. Be sure to get the gasket on equally on all bolts to avoid tearing it.
And install the new diff back in the housing. Don't worry it feels like it weighs twice as much putting it back in than taking it out. Make sure you have a good solid mating with the gasket and torque all bolts to 21 lb/ft. I tightened the nuts as I would on a tire in the same manner. Just keep going across from nut to nut. Once the diff is installed, reattach the driveshaft/flange.
Now slide your axles back in, make sure it is angled correctly to get that perfect fit and twist until it sits all the way in. If you're having trouble just place your knees underneath the drum to support all the weight and get the angle correct. Tighten the 4 bolts to 35 lb/ft. Reattach both brake lines as well and parking brake. Now put in your new gear fluid. I think it was just a little of 2 quarts to fill her up. Take her for a test drive and make sure everything is working correctly.
Now whether you replaced your MC or not you must bleed your brakes. To make things easier I purchased a hand held vacuum bleeder pump which did not work at all and I highly recommend not to buy this product. I'll post what the brand maker was for it later once I go take it back. It did not create enough vacuum to even get the fluid moving through the lines.
So got a buddy of mine over and just bled them the 2 person way. Starting with the DR, PR, FR, FL and lastly the LSPV. Biggest tip of all if you're replacing your booster and master cylinder at the same time to reattach the booster vacuum line haha. I bled my brakes twice wondering why I had no brake power whatsoever and why my truck was not running good until I finally figured it out and the brakes work great now!
11-08-2012, 07:02 PM
#64
Registered User
Thread Starter
iTrader: (4)
Join Date: Sep 2011
Location: Boise, Idaho
Posts: 275
Likes: 0
Received 0 Likes
on
0 Posts
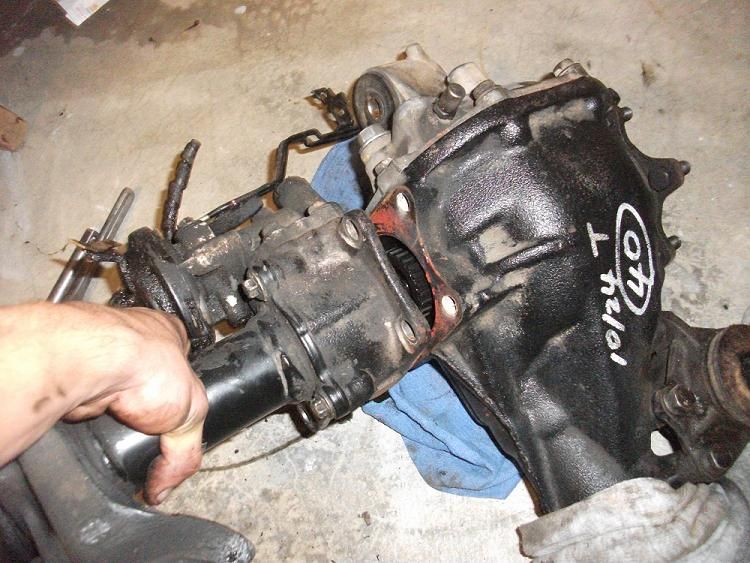
Well had a day off to hit up the local pick n pull to get the front 4.88 diff I had left in the auto 4runner I found previously. Someone had pulled the motor since the last time I was there which made getting the front diff out sooo much easier. Brought it home, cleaned all the grease and dirt off, which was completely covered in. Underneath I had found some previous writing which looked to be like junkyard sharpie. I somewhat had my doubts if this 4runner ended up in the yard with a front diff that was pulled from somewhere else.. Also had RTV covered in some spots so I know someone has been in here.
Anywho got to work and took the ADD side shaft off. There are 4 6 sided star bolts that hold it on, E14 is the size if anyone needs it. Costed like $15 bucks to get a small set of the special sockets.
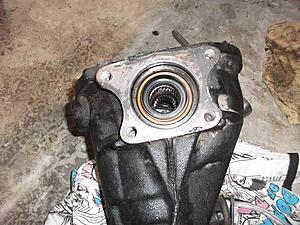
Next have to pull this gear stub axle out which comes out very easy.
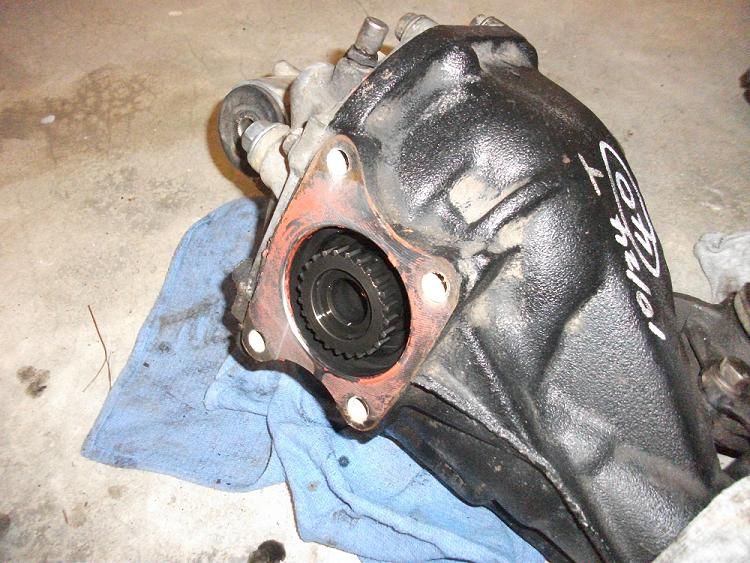
All you have to do is pull the aluminum cover off and stick a flathead screw driver in between the stub axle and the (pinion shaft)? Think that's what it's called haha. Tap it a few times with a hammer and pop it falls out.
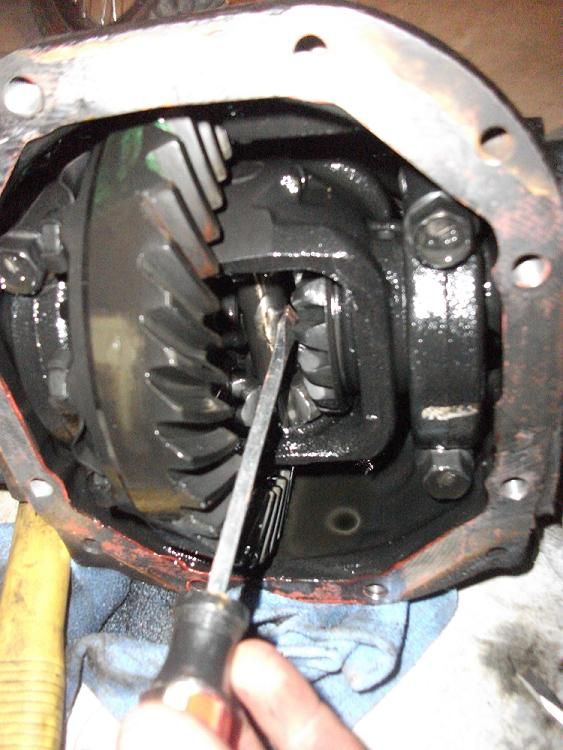
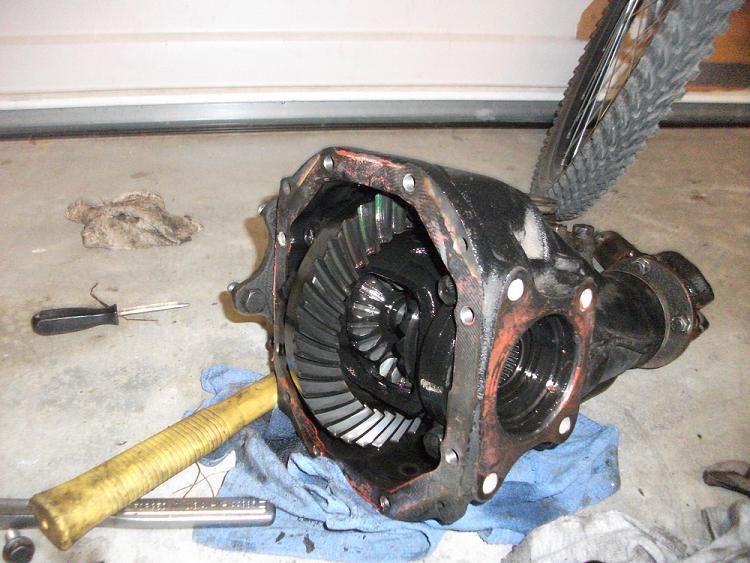
Axle shaft out.

Gears seemed to be in good shape and just to make sure I checked to see if they were 4.88's. Couldn't get my camera to focus in but on the actual ring gear there's a small engraving which says 4.9, which from what I hear is how they labeled it on stock gears. Everything else checked out good. Will have time this weekend to pull the 4.10's off the truck now and get everything swapped over.
Anywho got to work and took the ADD side shaft off. There are 4 6 sided star bolts that hold it on, E14 is the size if anyone needs it. Costed like $15 bucks to get a small set of the special sockets.
Next have to pull this gear stub axle out which comes out very easy.
All you have to do is pull the aluminum cover off and stick a flathead screw driver in between the stub axle and the (pinion shaft)? Think that's what it's called haha. Tap it a few times with a hammer and pop it falls out.
Axle shaft out.
Gears seemed to be in good shape and just to make sure I checked to see if they were 4.88's. Couldn't get my camera to focus in but on the actual ring gear there's a small engraving which says 4.9, which from what I hear is how they labeled it on stock gears. Everything else checked out good. Will have time this weekend to pull the 4.10's off the truck now and get everything swapped over.
11-09-2012, 07:10 PM
#68
Registered User
Thread Starter
iTrader: (4)
Join Date: Sep 2011
Location: Boise, Idaho
Posts: 275
Likes: 0
Received 0 Likes
on
0 Posts
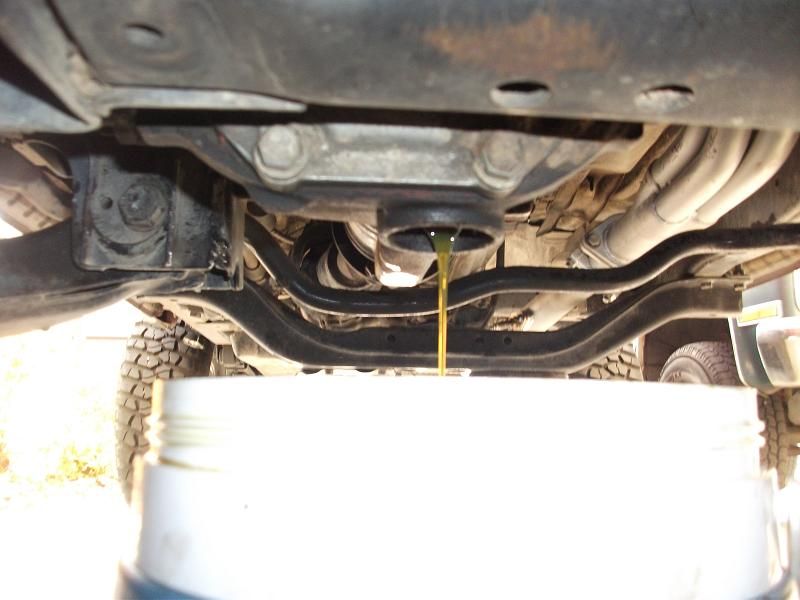
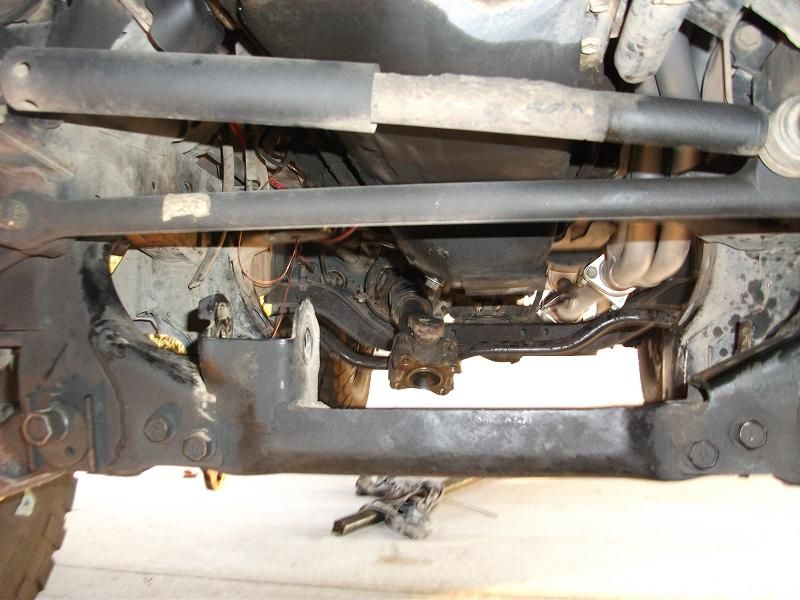
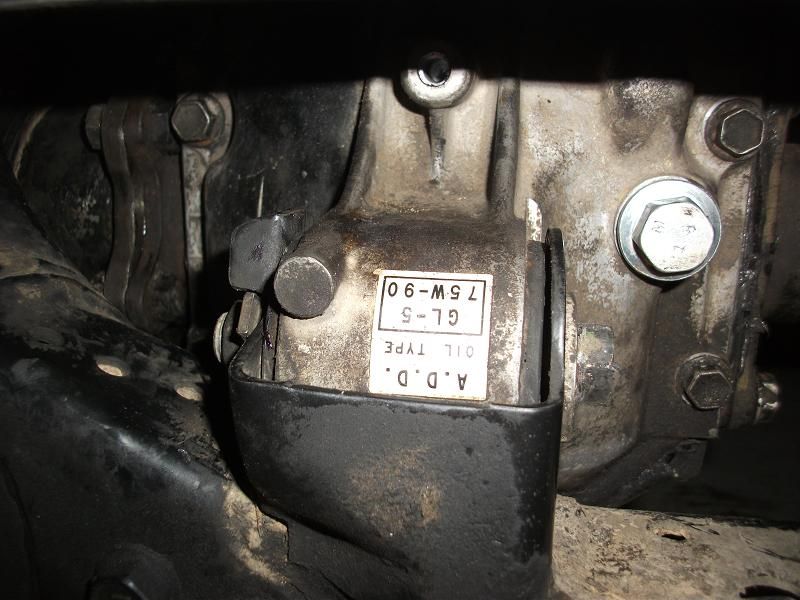
Got off work early! Stoked so I got started on the front regear. Drained all the oil, 15/16 socket. Came out pretty slow.. Not using 4WD for a few months and it getting cold was a little thick.
Unhooked the drive line, 4 14mm bolts. Kind of a pain to fit a socket around it.. Just got to find the right spot for it to fit.
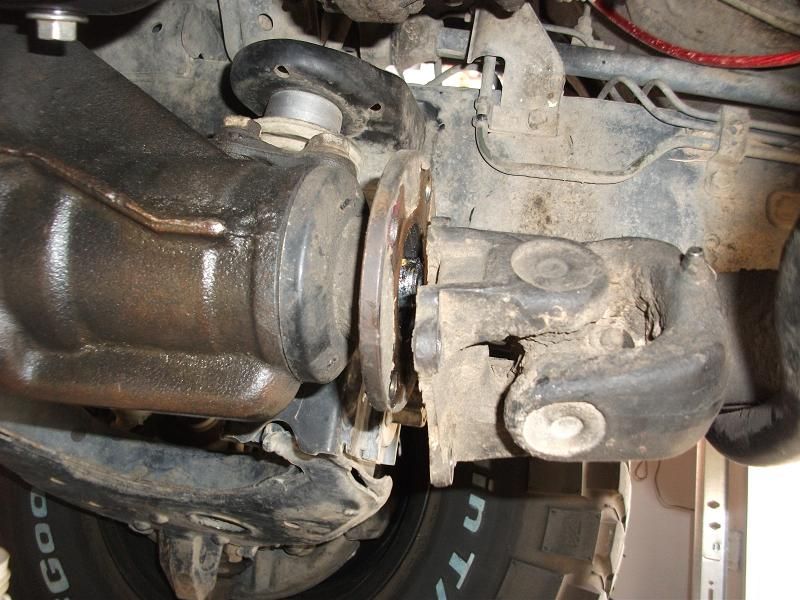
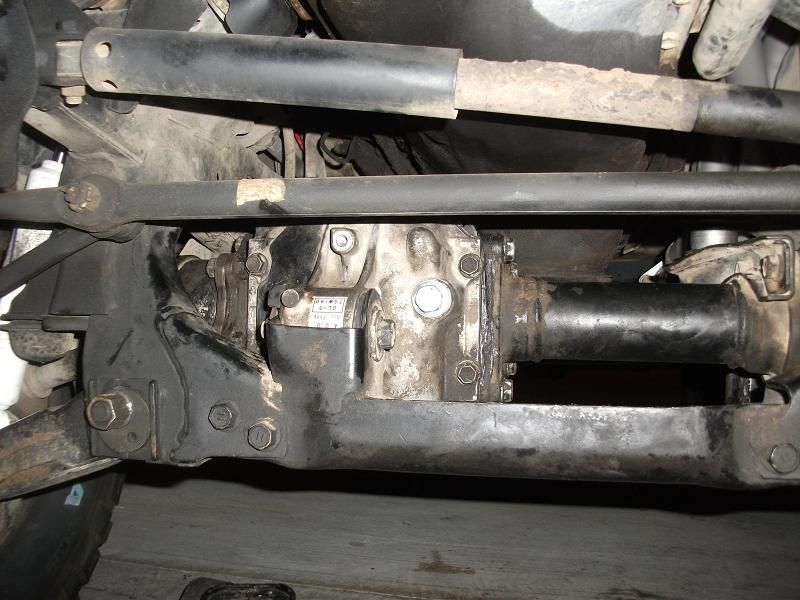
Then removed the 12, 17mm, nuts off both cv axle studs. These took alot more effort than I thought to get them off. Some take the studs out to pull the diff out but you can do it with them in as well.
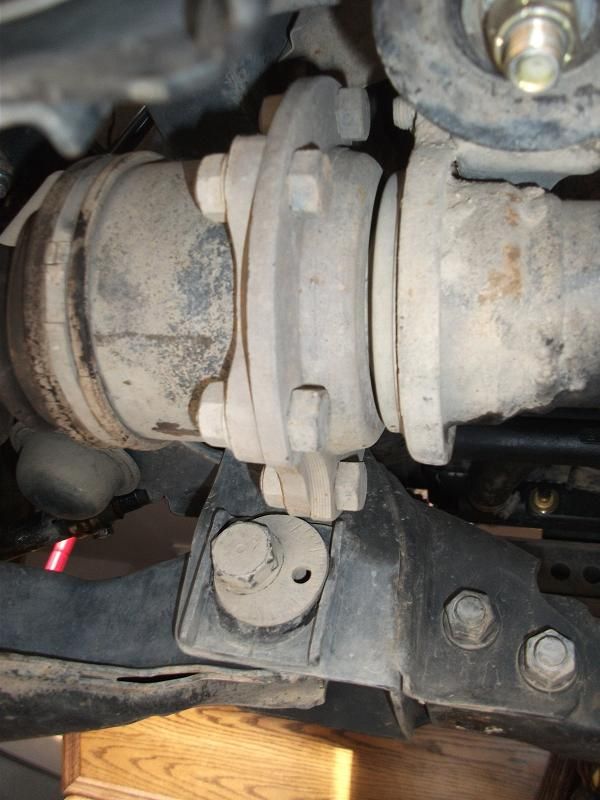
19mm bolt that holds the diff in place in the front crossbar. Actually had room to use a breaker bar which was nice.
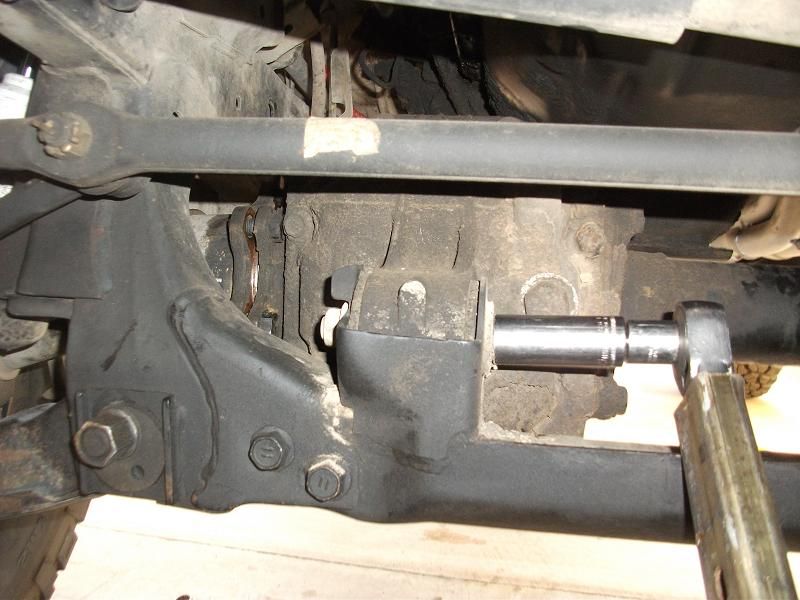
At this point I placed my floorjack underneath to get the remaining two 3/4 bolts which are the only things holding it up.
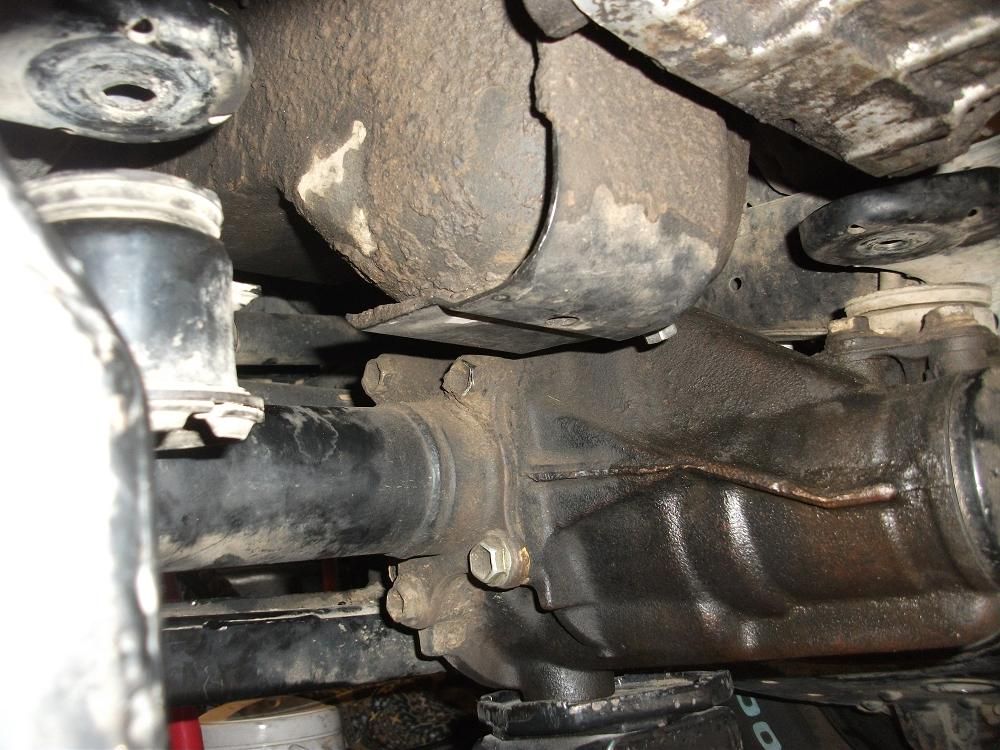
ALOT of wiggling, shaking, moving, cussing, to get the cv axles away from the studs. Ended up getting the diff pinned up against one of the cv axles which made the job even longer.. And then you'll have it out!
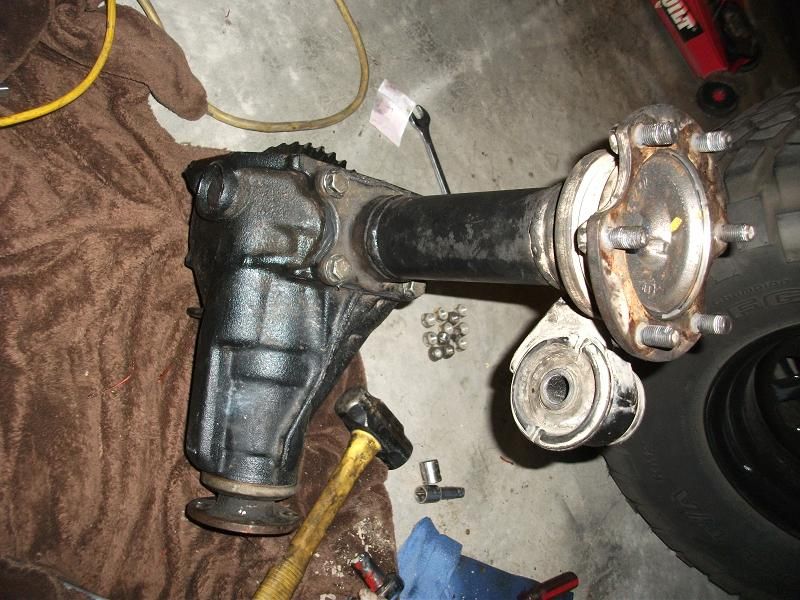
ADD vs non ADD
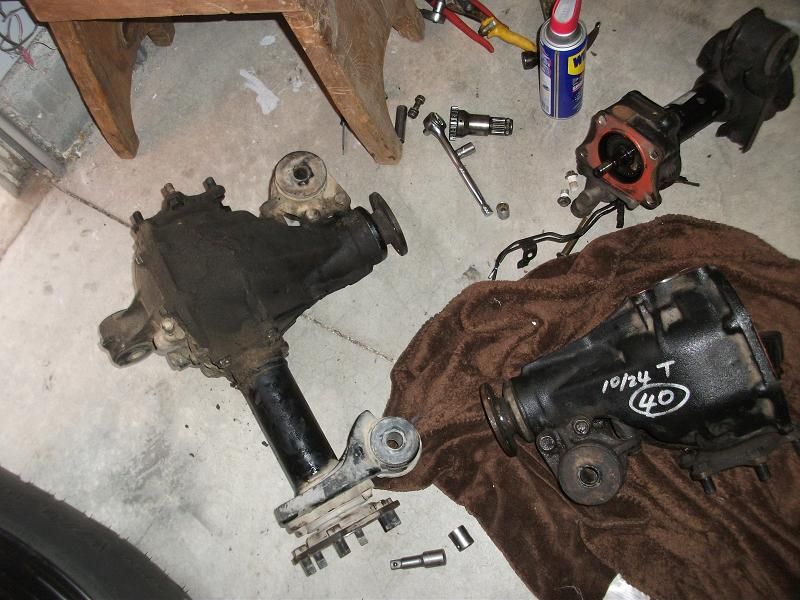
Removed the 4 bolts, 17mm I believe, off my old diff and began to pull the side axle out. Theres a small clip pin that holds it in place so a few hits with a mallet it pops out quite easy.
Do not forget to get an oil seal! The ADD diff does not have the seal directly in the housing. Instead it's in the axle shaft itself. I bought mine on amazon for $8 (Part #SKF13725).
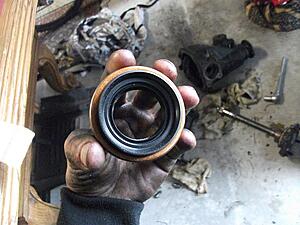
Installed.. As for putting it in; I placed it in the diff and used a pvc pipe and placed it around the rubber seal/directly on the metal edging and hammered it down in. Very easy just need to have the correct size pipe to fit!
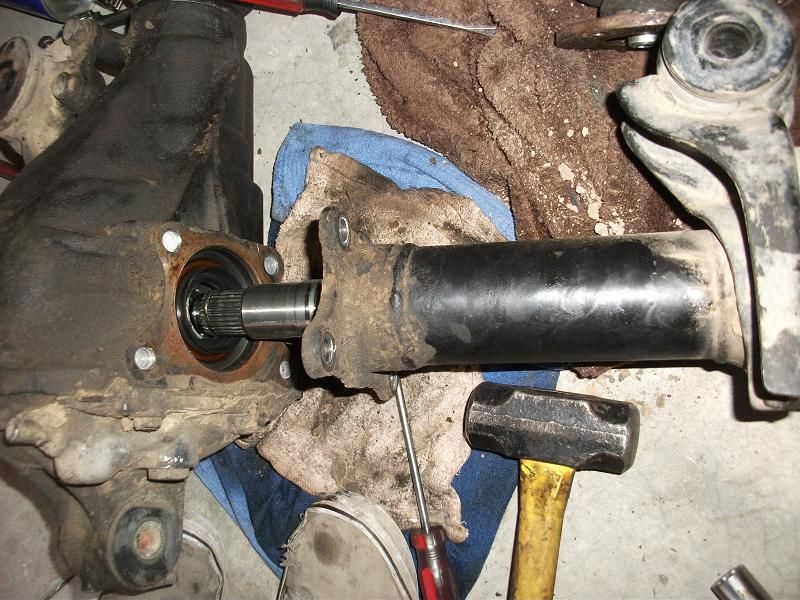
Non ADD side axle shaft into the 4.88 pod. Again the clip will get stuck when trying to slide it in. Another few hits with a mallet will get the job done. RTV inbetween both parts as well.
Install is the same as removing. For me it took 1/5 of the time to put it back in than taking it out. I held out on putting oil in because I wanted to make sure the RTV would dry. Probably would be a good idea to let it dry overnight, put in oil before putting it all back together but like I said, needed to drive to work in the morning and couldn't.
Left my ADD sicker on there just for fun : D I'll fill her up tomarrow and try out the good ol' 4WD I've been missing out on and let you guys know how everythings holding up!
Unhooked the drive line, 4 14mm bolts. Kind of a pain to fit a socket around it.. Just got to find the right spot for it to fit.
Then removed the 12, 17mm, nuts off both cv axle studs. These took alot more effort than I thought to get them off. Some take the studs out to pull the diff out but you can do it with them in as well.
19mm bolt that holds the diff in place in the front crossbar. Actually had room to use a breaker bar which was nice.
At this point I placed my floorjack underneath to get the remaining two 3/4 bolts which are the only things holding it up.
ALOT of wiggling, shaking, moving, cussing, to get the cv axles away from the studs. Ended up getting the diff pinned up against one of the cv axles which made the job even longer.. And then you'll have it out!
ADD vs non ADD
Removed the 4 bolts, 17mm I believe, off my old diff and began to pull the side axle out. Theres a small clip pin that holds it in place so a few hits with a mallet it pops out quite easy.
Do not forget to get an oil seal! The ADD diff does not have the seal directly in the housing. Instead it's in the axle shaft itself. I bought mine on amazon for $8 (Part #SKF13725).
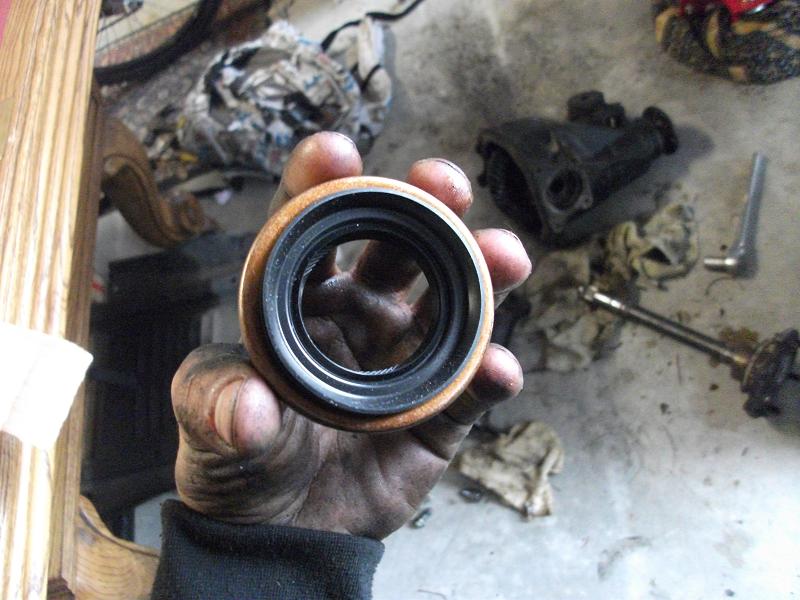
Installed.. As for putting it in; I placed it in the diff and used a pvc pipe and placed it around the rubber seal/directly on the metal edging and hammered it down in. Very easy just need to have the correct size pipe to fit!
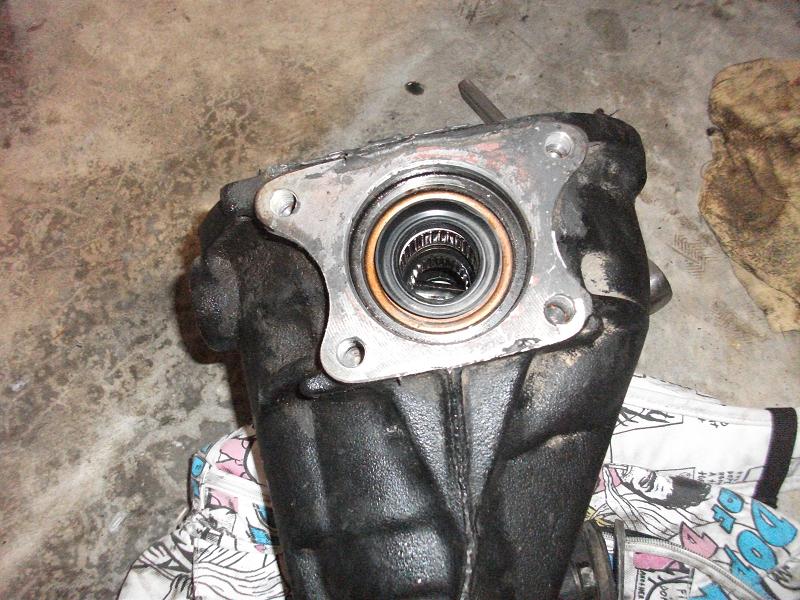
Non ADD side axle shaft into the 4.88 pod. Again the clip will get stuck when trying to slide it in. Another few hits with a mallet will get the job done. RTV inbetween both parts as well.
Install is the same as removing. For me it took 1/5 of the time to put it back in than taking it out. I held out on putting oil in because I wanted to make sure the RTV would dry. Probably would be a good idea to let it dry overnight, put in oil before putting it all back together but like I said, needed to drive to work in the morning and couldn't.
Left my ADD sicker on there just for fun : D I'll fill her up tomarrow and try out the good ol' 4WD I've been missing out on and let you guys know how everythings holding up!
Last edited by A2theK; 11-17-2012 at 08:05 PM.
11-11-2012, 09:21 AM
#69
Registered User
Thread Starter
iTrader: (4)
Join Date: Sep 2011
Location: Boise, Idaho
Posts: 275
Likes: 0
Received 0 Likes
on
0 Posts
Update! Filled up with lucas 75w-90 gl5 this morning and tested out 4wd. No leaks and 4wd worked great! First time feeling it out with my bj spacers and can definately feel that cv axle angle but overall happy!
11-11-2012, 09:59 AM
#70
Registered User
im looking to sell my big truck and get one of these little guys, cant seem to find one in nice shape for a decent price or someone who wants to trade a nice dd for a full blown built SAS monster truck, oh well! HAHA nice man, love the way the truck looks with the black steelies and red
11-11-2012, 10:02 AM
#72
Registered User
Thread Starter
iTrader: (4)
Join Date: Sep 2011
Location: Boise, Idaho
Posts: 275
Likes: 0
Received 0 Likes
on
0 Posts
im looking to sell my big truck and get one of these little guys, cant seem to find one in nice shape for a decent price or someone who wants to trade a nice dd for a full blown built SAS monster truck, oh well! HAHA nice man, love the way the truck looks with the black steelies and red
11-15-2012, 06:14 AM
#73
Registered User
Join Date: Nov 2011
Location: Boise Idaho
Posts: 71
Likes: 0
Received 0 Likes
on
0 Posts
Yeah I like the white they put on the 96 and up. We have a lot of paint fade on ours so painting is in my future too, except my wife wants black, I hate painting black...
11-20-2012, 08:38 PM
#76
Registered User
Thread Starter
iTrader: (4)
Join Date: Sep 2011
Location: Boise, Idaho
Posts: 275
Likes: 0
Received 0 Likes
on
0 Posts
Well, replaced all the fluids in the truck today. Redline MT90 in the tranny and Lucas 75w90 in the diffs and transfer case. Tranny feels amaaaaazing, super smooth. On the colder mornings here; I would have trouble getting into 2nd until the gear oil warmed up but now it flows in and out of each gear.
03-09-2013, 06:28 AM
#77
Registered User

Join Date: Sep 2010
Location: Hollister Ca
Posts: 6
Likes: 0
Received 0 Likes
on
0 Posts
Truck looks awesome I just bought almost the same truck. Did the header install go easily? Was it necessary to do any mods to the rest of the exhaust tubing. I'm not too mechanically inclined.
03-09-2013, 12:38 PM
#78
Registered User
Thread Starter
iTrader: (4)
Join Date: Sep 2011
Location: Boise, Idaho
Posts: 275
Likes: 0
Received 0 Likes
on
0 Posts
Header install is pretty straight forward. I think I had to remove the exhaust holder that bolts on to the bell housing but other than that it's really bolt on and you're good. Depending on what exhaust manifold you have you may have to relocate your O2 sensor. My kit came with longer wires and everything needed to do it. LC header comes with 2.25" piping so if you plan on opening up your exhaust you might as well do it all the way through but you don't need to if you don't want to.
03-09-2013, 12:44 PM
#79
Registered User
Thread Starter
iTrader: (4)
Join Date: Sep 2011
Location: Boise, Idaho
Posts: 275
Likes: 0
Received 0 Likes
on
0 Posts
Well.... No pics but had my throwout bearing/input shaft bearing take a dump on me. Talk about embarrassing to drive noise coming those jeez.. Besides the constant noise from the TB; I had noise in all gears but 4th which changing the input shaft bearing cleared up as well. Pulled the tranny and cleaned it up pretty good. New clutch, throwout bearing, input shaft bearing, pilot bearing and seal for the input shaft. Apparently it had been leaking from that seal and when the tranny pulled out from the motor, fluid just came right out with it.
Also ordered some new goodies. 1" body lift, Hi-lift jack, steering stablizer and going to change my fuel filter once I get that body lift installed to get an extra inch of room which is much needed haha.. Drawing up an offroad tube bumper as well!
Also ordered some new goodies. 1" body lift, Hi-lift jack, steering stablizer and going to change my fuel filter once I get that body lift installed to get an extra inch of room which is much needed haha.. Drawing up an offroad tube bumper as well!
03-09-2013, 12:44 PM
#80
Registered User

Join Date: Mar 2013
Posts: 1
Likes: 0
Received 0 Likes
on
0 Posts
I have a 87 toyota that is bone stock, I just put on a offenhouser dual port intake manifold on er and I was curious as to Weber Carb do I put on?
I priced one but it is for my stock manifold.
I priced one but it is for my stock manifold.


