87 pickup 22rte 5 speed 4x4, trail build and progress


 03-14-2013, 04:30 AM
#22
Registered User
Thread Starter
Join Date: Feb 2013
Location: eastern nc
Posts: 149
Likes: 0
Received 0 Likes
on
0 Posts
Lol! Yea, I'm not too sure what was going on with the wiring, cuz it's the same on the other side too, and when I got the truck the right rear blinker didn't work. Took a look back there and the wire was just dangling..... PO definitely wasn't mechanically/electrically inclined.
The cross members should be an easy fix, and then I'm gonna bob the frame, cuz the rust gets worse back there. Once I take the bed off, it should be real simple.
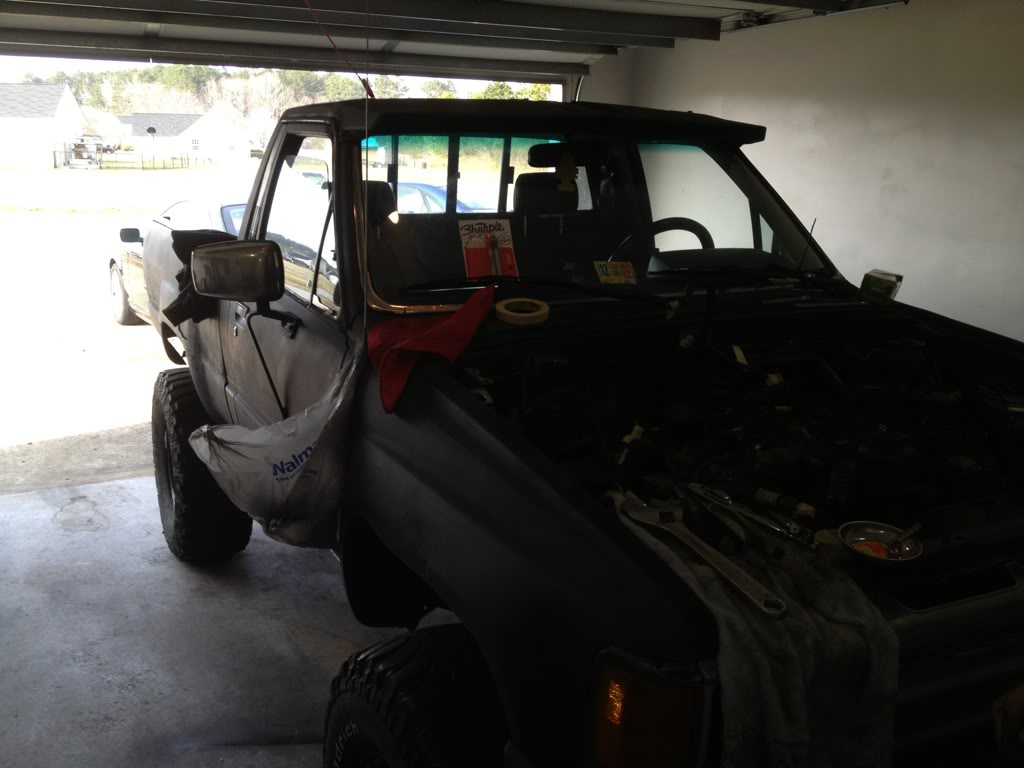
Cleaned the ole garage out so by this weekend the truck should be moved in there and the real fun begins
The cross members should be an easy fix, and then I'm gonna bob the frame, cuz the rust gets worse back there. Once I take the bed off, it should be real simple.
Cleaned the ole garage out so by this weekend the truck should be moved in there and the real fun begins
03-15-2013, 06:25 AM
#23
Registered User
Thread Starter
Join Date: Feb 2013
Location: eastern nc
Posts: 149
Likes: 0
Received 0 Likes
on
0 Posts
Goin to harbor freight today I pick up a stand and hoist. Buddy and I are goin halfsies.
I keep scouring for more and more info and parts, and ideas. I want this to be relentlessly reliable, but I also have the urge to get some real power out of it.
So far, in the cart:
LC performer head
LC dual row timing chain conv.
Arp head studs
LC pro head gasket
DOA c270 cam
Rock auto:
Motor mounts
Denso o2 sensor
Oil cooler/relocation kit
eBay:
Intake plumbing and intercooler kit
Aem wideband a/f gauge
170 amp alternator
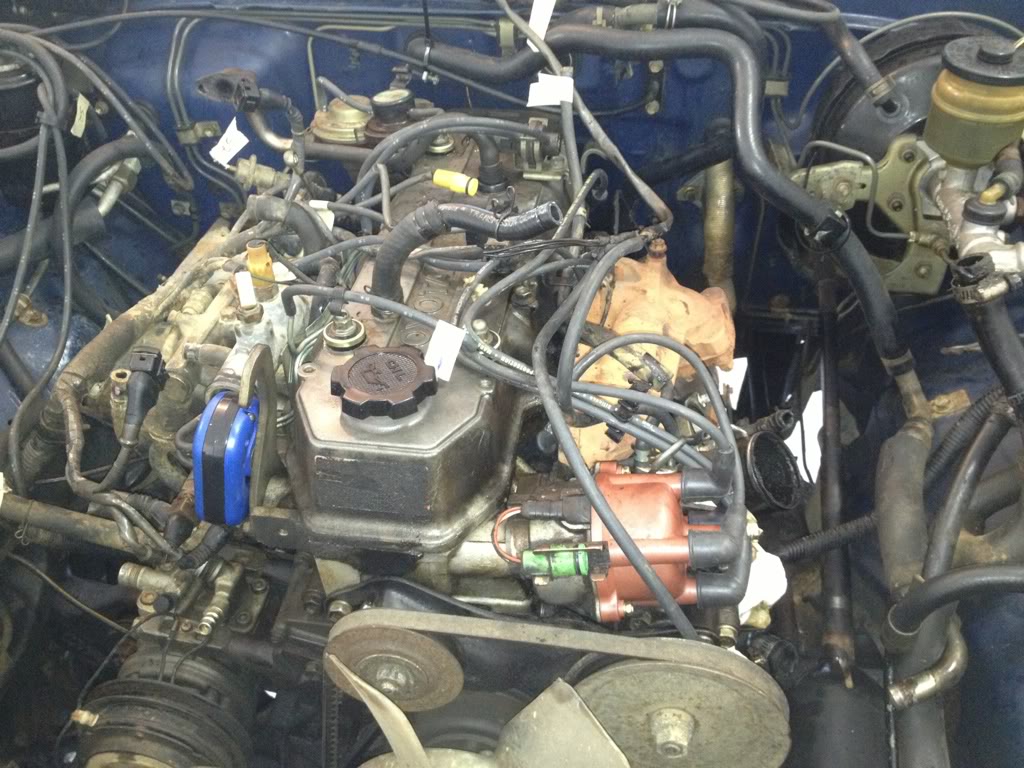
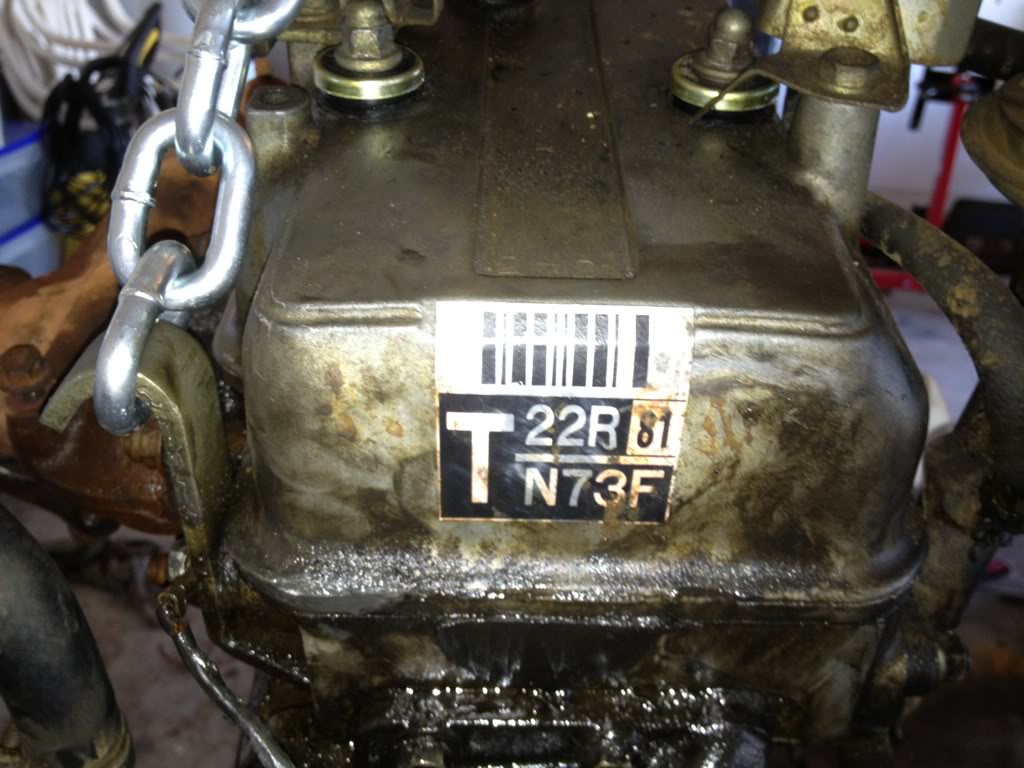
This is just the running plan for now, not ordering anything till I pull the engine apart and see what's going on inside. Really hoping that the cylinders are in good shape and I can just replace the bottom end bearings and continue with the top end. Btw the truck has 167,xxx miles on it, and I believe it to be original engine
As a side note, tested the 4x4 out(mostly because i think it has stock gears, and wanted to make sure front and rear gears were the same) I was on flat level ground but you can tell the difference. Definitely more so in 4lo. But in a weird way something didn't feel right about the 4x4. There wasn't any crazy sounds or anything, I guess it's more of the way the truck feels... Rigid. I'm going to relax the t-bars/remove sway bar, and I'm going to replace all fluids in the truck too.
I did notice some rtv on rear diff, I'm hoping to find that a PO put something nice in there for me. I guess we'll see.
More updates and pics to come !
I keep scouring for more and more info and parts, and ideas. I want this to be relentlessly reliable, but I also have the urge to get some real power out of it.
So far, in the cart:
LC performer head
LC dual row timing chain conv.
Arp head studs
LC pro head gasket
DOA c270 cam
Rock auto:
Motor mounts
Denso o2 sensor
Oil cooler/relocation kit
eBay:
Intake plumbing and intercooler kit
Aem wideband a/f gauge
170 amp alternator
This is just the running plan for now, not ordering anything till I pull the engine apart and see what's going on inside. Really hoping that the cylinders are in good shape and I can just replace the bottom end bearings and continue with the top end. Btw the truck has 167,xxx miles on it, and I believe it to be original engine
As a side note, tested the 4x4 out(mostly because i think it has stock gears, and wanted to make sure front and rear gears were the same) I was on flat level ground but you can tell the difference. Definitely more so in 4lo. But in a weird way something didn't feel right about the 4x4. There wasn't any crazy sounds or anything, I guess it's more of the way the truck feels... Rigid. I'm going to relax the t-bars/remove sway bar, and I'm going to replace all fluids in the truck too.
I did notice some rtv on rear diff, I'm hoping to find that a PO put something nice in there for me. I guess we'll see.
More updates and pics to come !
03-17-2013, 08:09 PM
#24
Registered User
Thread Starter
Join Date: Feb 2013
Location: eastern nc
Posts: 149
Likes: 0
Received 0 Likes
on
0 Posts
Well today was productive, got a few things done
Did a compression test:
Cyl 1- 137psi
Cyl 2- 135psi
Cyl 3- 138psi
Cyl 4- 150psi
When I pulled the plugs they all had gray deposits on them, and cyl 4 had oil on it. Guessing that there's oil in that cylinder and its bumping up compression.
Checked the high idle problem, I was thinking it was timing or a vac leak... Nope, just the dash pot..
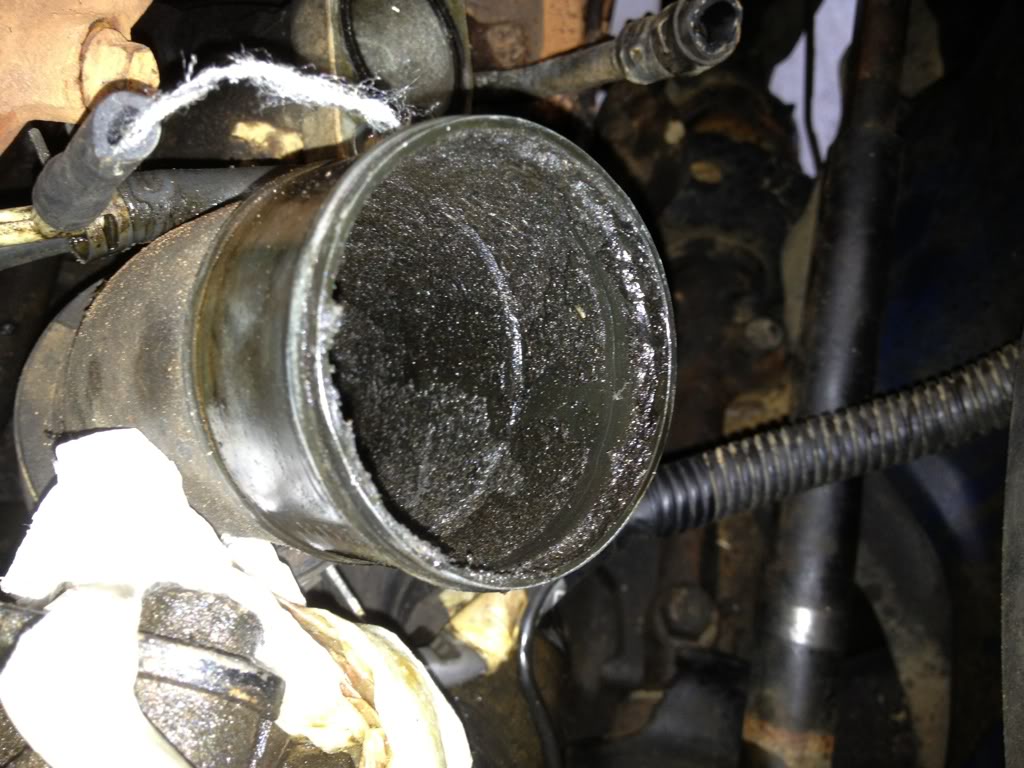
Ummm, ran some seafoam through a vac line, and watched the smoke show.. This is where I realized I had a significant exhaust leak... Lol, turns out there were NO exhaust bolts on the front, it was missing all 4....
Noticed that there was ALOT of dirt, and sludge in the intake(from where the pcv hose joined into the intake preturbo. I'm sure the turbo is gonna need to be replaced soon. Even though it performs how it should for now.
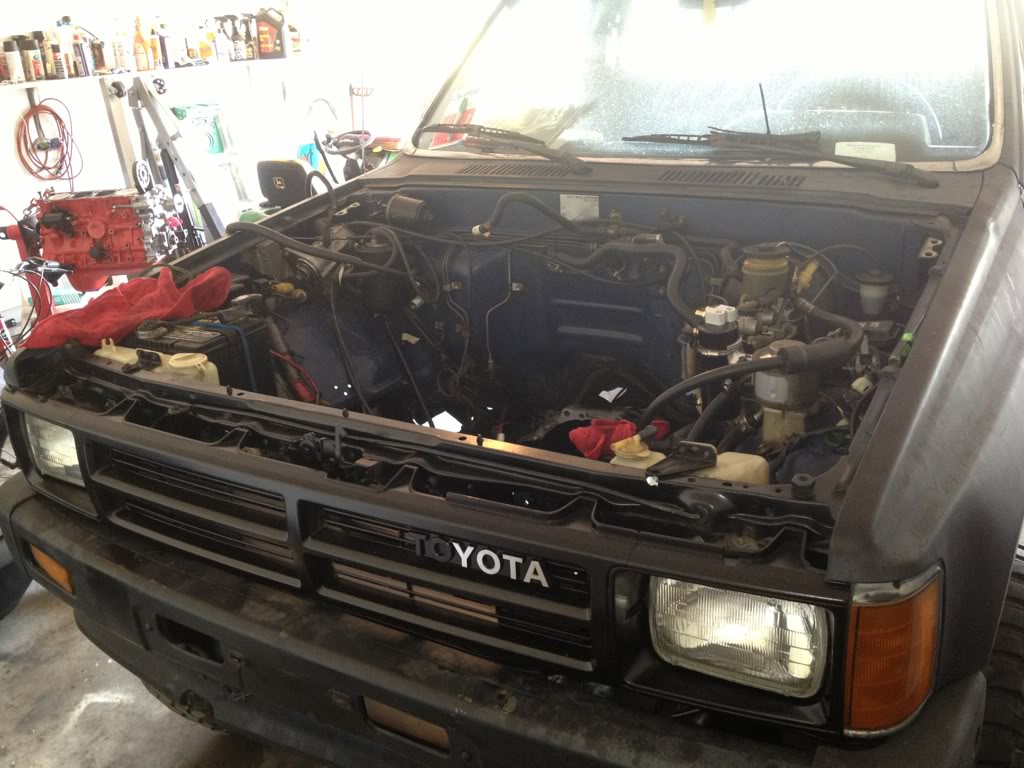
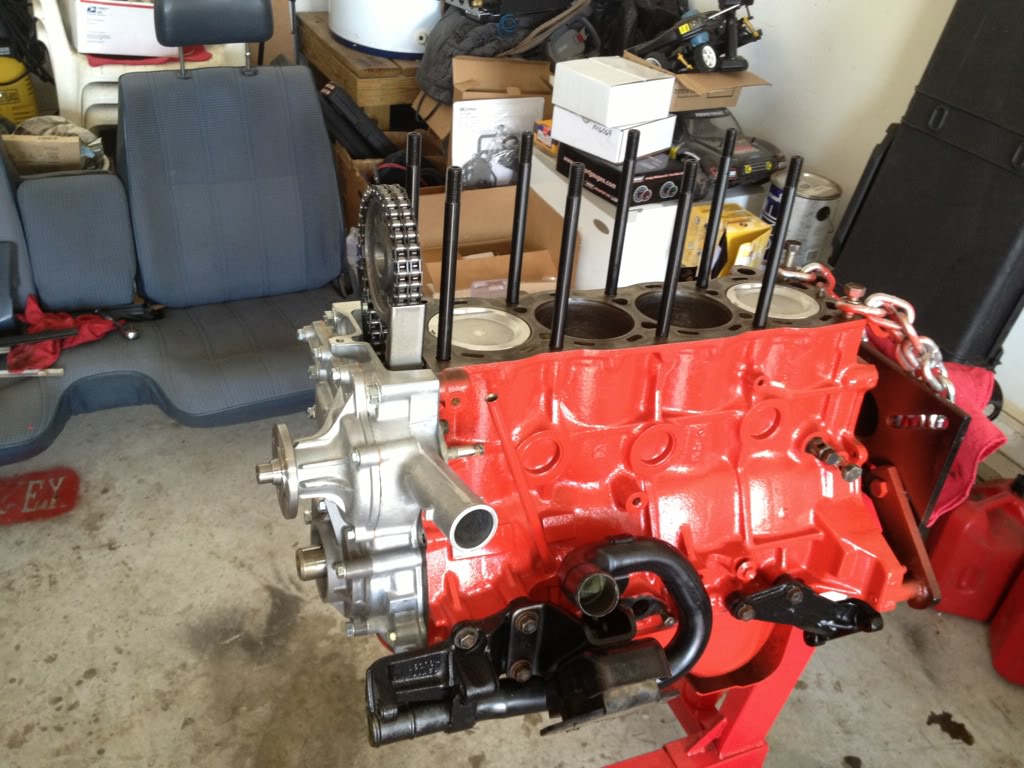
Got all the bolts holding the engine in, out. So I Need to get a short chain tomorrow, and then I'll have the engine on the stand. I can't wait to deep clean this thing.
I'm bad for taking pics after I do all the work lol. It's something I just don't think about while I'm "in the zone". Lol but I took a few about halfway through
And man that top drivers side bell housing bolt is a pita..
Did a compression test:
Cyl 1- 137psi
Cyl 2- 135psi
Cyl 3- 138psi
Cyl 4- 150psi
When I pulled the plugs they all had gray deposits on them, and cyl 4 had oil on it. Guessing that there's oil in that cylinder and its bumping up compression.
Checked the high idle problem, I was thinking it was timing or a vac leak... Nope, just the dash pot..
Ummm, ran some seafoam through a vac line, and watched the smoke show.. This is where I realized I had a significant exhaust leak... Lol, turns out there were NO exhaust bolts on the front, it was missing all 4....
Noticed that there was ALOT of dirt, and sludge in the intake(from where the pcv hose joined into the intake preturbo. I'm sure the turbo is gonna need to be replaced soon. Even though it performs how it should for now.
Got all the bolts holding the engine in, out. So I Need to get a short chain tomorrow, and then I'll have the engine on the stand. I can't wait to deep clean this thing.
I'm bad for taking pics after I do all the work lol. It's something I just don't think about while I'm "in the zone". Lol but I took a few about halfway through
And man that top drivers side bell housing bolt is a pita..
03-19-2013, 05:57 PM
#25
Registered User
Thread Starter
Join Date: Feb 2013
Location: eastern nc
Posts: 149
Likes: 0
Received 0 Likes
on
0 Posts
For alot done today! Can't believe how unlucky I am tho.
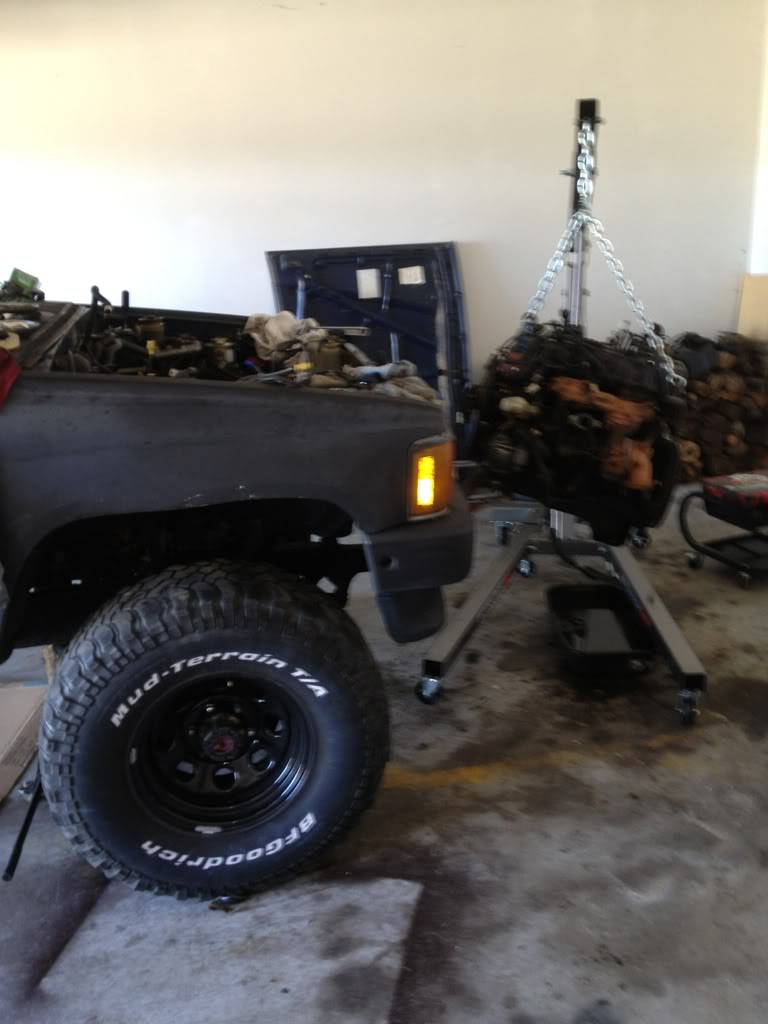
Got the engine out and started disassembly.
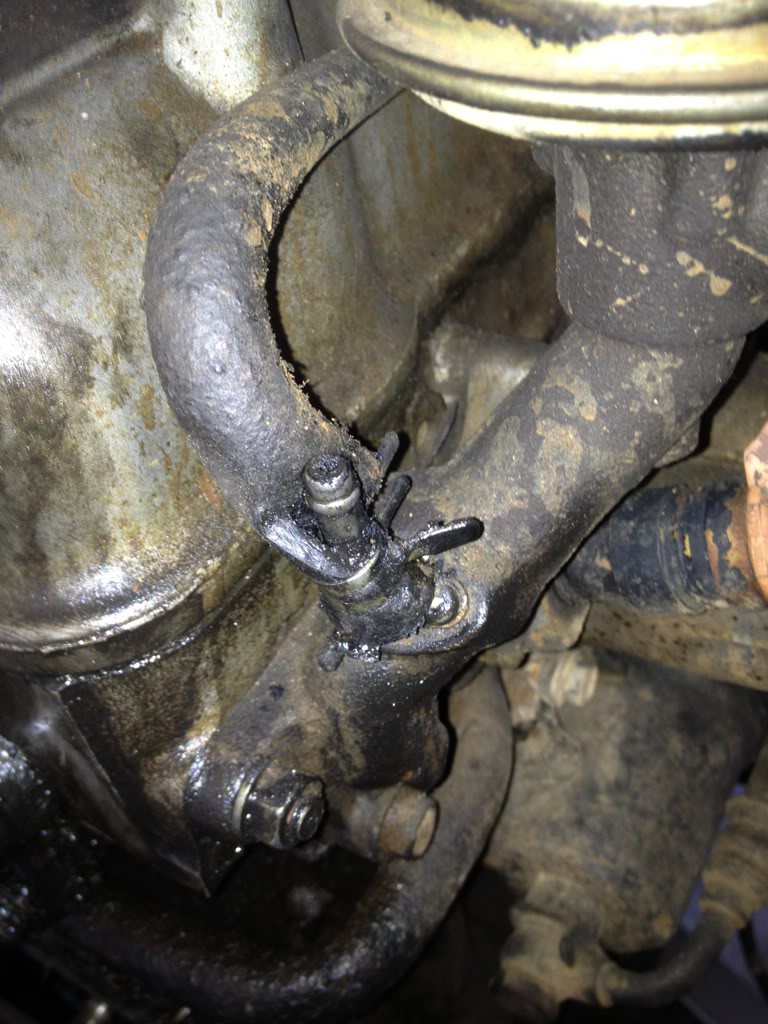
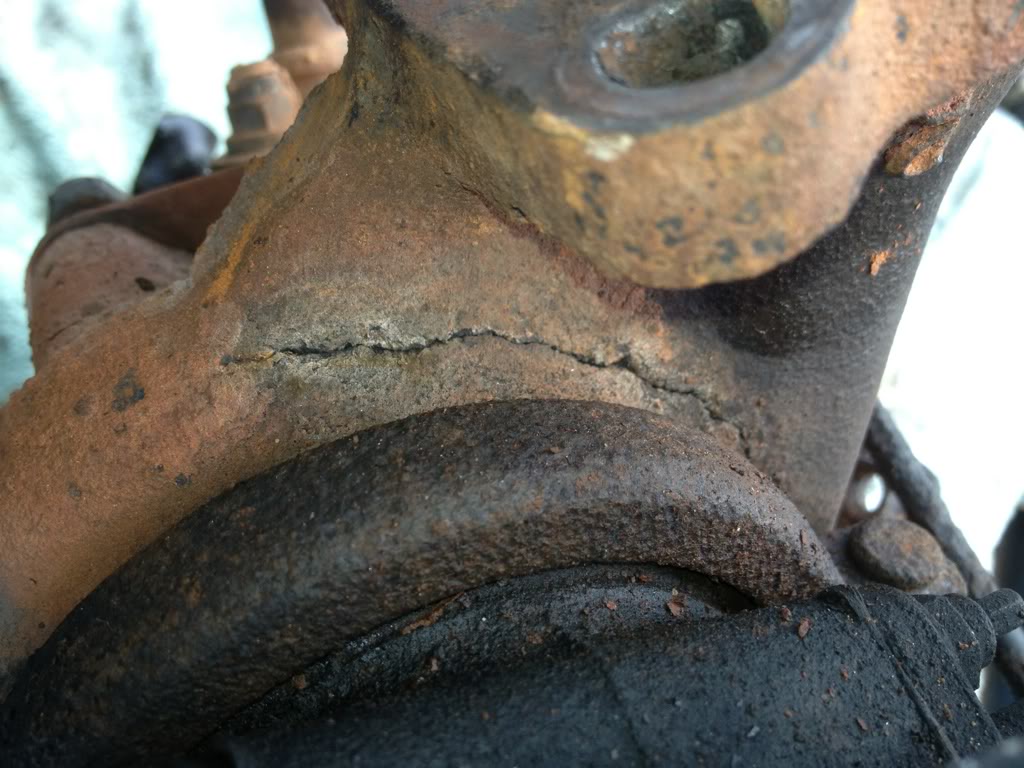
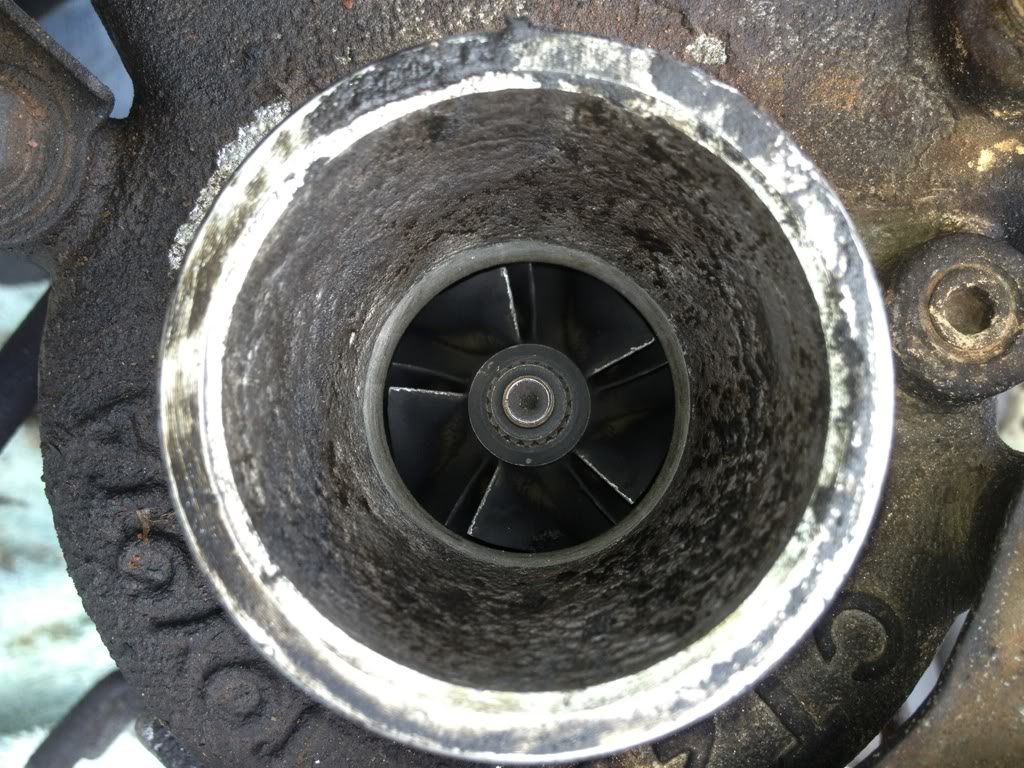
Found ALOT of bad with the exhaust.... There had been dirt and oil getting into the intake and thus into the turbo. And did some damage to the compressor wheel. As well as shaft play... Oh and the exhaust side of the turbo has a big crack in it. No pics of those yet, but here's some of the rest of the exhaust problems.
Missing all front exhaust studs...

Down pipe woes
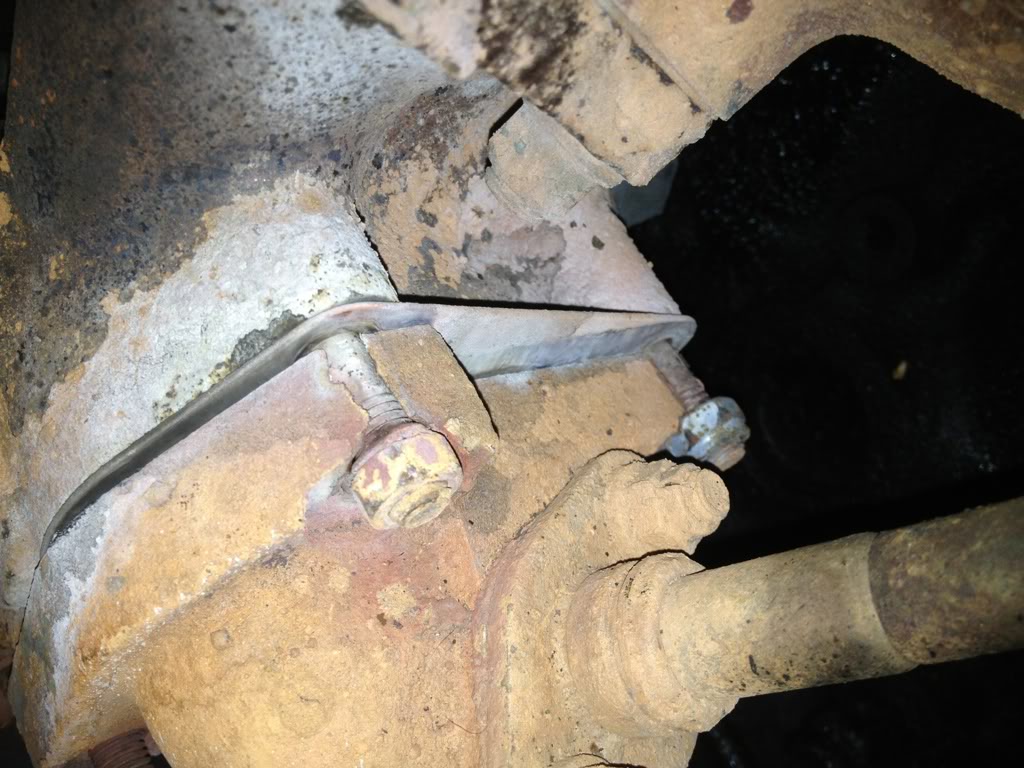
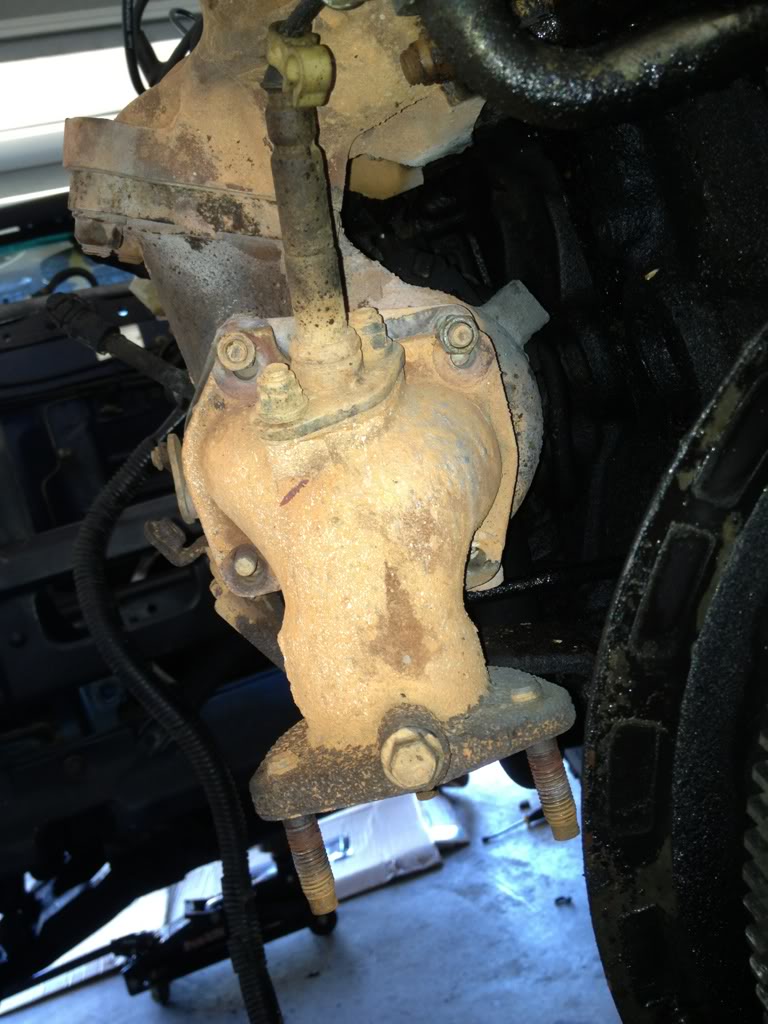
Oh and the actual exhaust manifold is cracked in the middle. I can't believe that it was a) building boost and b) making no abnormal noise or anything under the hood or driving it (no typical exhaust leak noises or anything!
Egr problems

The egr is totally gunked up.
Not sure what all this means.. If anything
I got the head off and everything. Broke 2 tools trying to take off the crank bolt. The cylinders seem ok, can still see cross hatching. I'm going to replace the rings with some new gapless rings and fresh bearings and seals.
Already ordered the LC dual timing conversion, next will be engbldr's street rv head and 268 torkr cam. Then I'll fish out 700 bones for LC's turbo exhaust and another 700 for a Garrett turbo. Then have the down pipe made.
Tomorrow is final engine disassembly and deep cleaning everything. Might get a few things painted even
Got the engine out and started disassembly.
Found ALOT of bad with the exhaust.... There had been dirt and oil getting into the intake and thus into the turbo. And did some damage to the compressor wheel. As well as shaft play... Oh and the exhaust side of the turbo has a big crack in it. No pics of those yet, but here's some of the rest of the exhaust problems.
Missing all front exhaust studs...
Down pipe woes
Oh and the actual exhaust manifold is cracked in the middle. I can't believe that it was a) building boost and b) making no abnormal noise or anything under the hood or driving it (no typical exhaust leak noises or anything!
Egr problems
The egr is totally gunked up.
Not sure what all this means.. If anything
I got the head off and everything. Broke 2 tools trying to take off the crank bolt. The cylinders seem ok, can still see cross hatching. I'm going to replace the rings with some new gapless rings and fresh bearings and seals.
Already ordered the LC dual timing conversion, next will be engbldr's street rv head and 268 torkr cam. Then I'll fish out 700 bones for LC's turbo exhaust and another 700 for a Garrett turbo. Then have the down pipe made.
Tomorrow is final engine disassembly and deep cleaning everything. Might get a few things painted even
 03-22-2013, 02:10 PM
#28
Registered User
Thread Starter
Join Date: Feb 2013
Location: eastern nc
Posts: 149
Likes: 0
Received 0 Likes
on
0 Posts
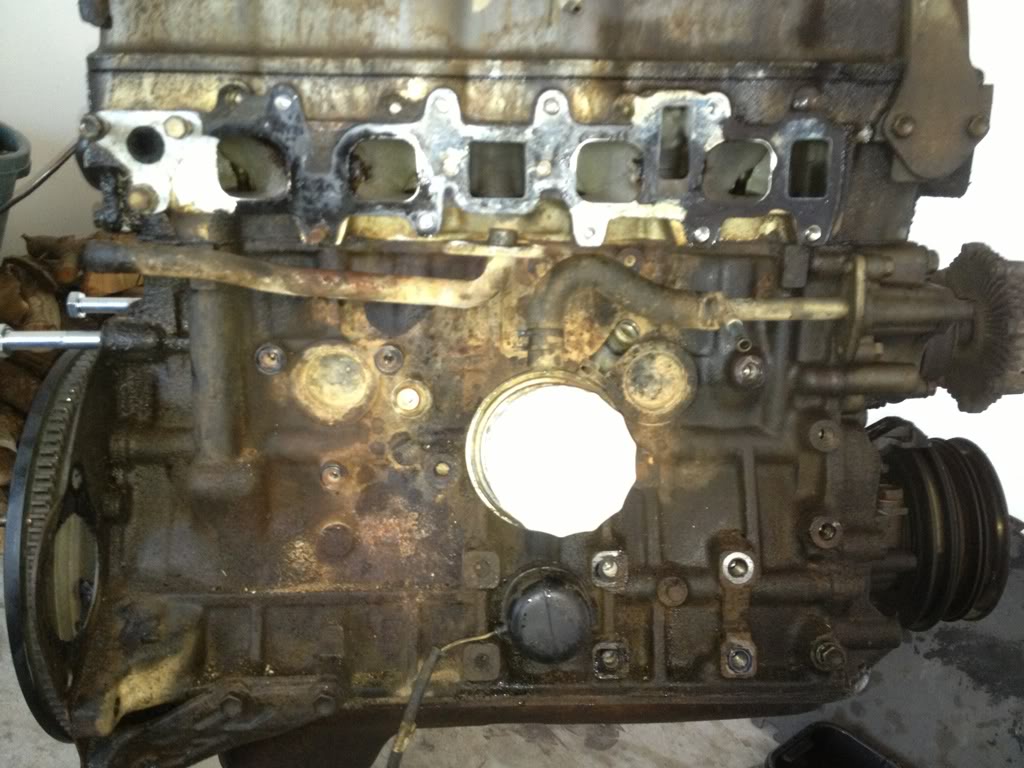
Cracked manifold:
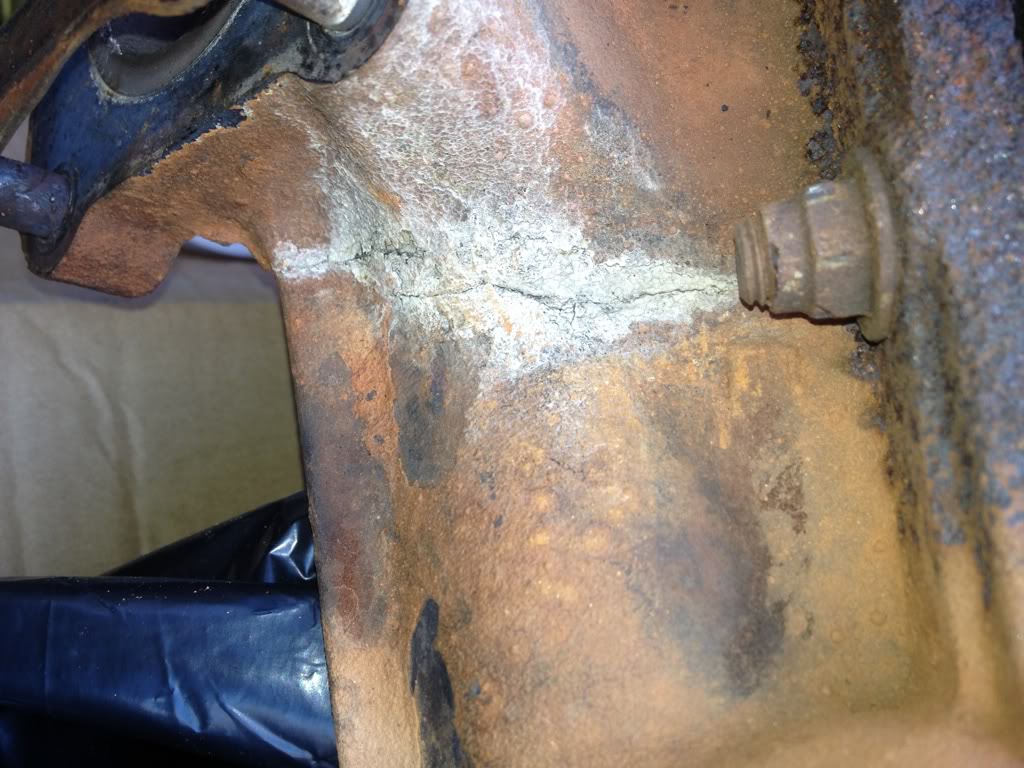
Yeah, i can't believe that it was running so well! The only problem that I knew of was the high idle problem and 14mpg highway. I actually thought it was in really good shape because it drove so well. I really can't imagine how well this thing is gonna run when I'm done
And yeah I'm just working on it slowly but surely. Cleaning everything and painting. I need more wire brushes and degreaser lol. I hate putting dirty bolts and parts back onto a clean engine.
My dual row conversion and gasket set came today. It's a great looking kit. And I'm gonna get all new hoses and lines.
Thinking about doin away with the ac. Will keep everything to put it back in. But right now there's a few things that I'd have to replace just to get it working again. I haven't decided fully yet. (It would free up alot of room for an intercooler ) that's about all for now, more to come!
Yeah, i can't believe that it was running so well! The only problem that I knew of was the high idle problem and 14mpg highway. I actually thought it was in really good shape because it drove so well. I really can't imagine how well this thing is gonna run when I'm done
And yeah I'm just working on it slowly but surely. Cleaning everything and painting. I need more wire brushes and degreaser lol. I hate putting dirty bolts and parts back onto a clean engine.
My dual row conversion and gasket set came today. It's a great looking kit. And I'm gonna get all new hoses and lines.
Thinking about doin away with the ac. Will keep everything to put it back in. But right now there's a few things that I'd have to replace just to get it working again. I haven't decided fully yet. (It would free up alot of room for an intercooler
) that's about all for now, more to come!
03-28-2013, 03:23 PM
#29
Registered User
Thread Starter
Join Date: Feb 2013
Location: eastern nc
Posts: 149
Likes: 0
Received 0 Likes
on
0 Posts
Been a few days, not really anything big going on, this thing is starting to become a money pit. I've just been meticulously cleaning and painting, cleaning and even more cleaning. And I have to apologize for the lack of pictures, but I figure nobody wants to see before and after dirty bolts and nuts. Lol, I did clean and paint the engine bay, just the frame and such, not the fender wells. Looks alot better tho!
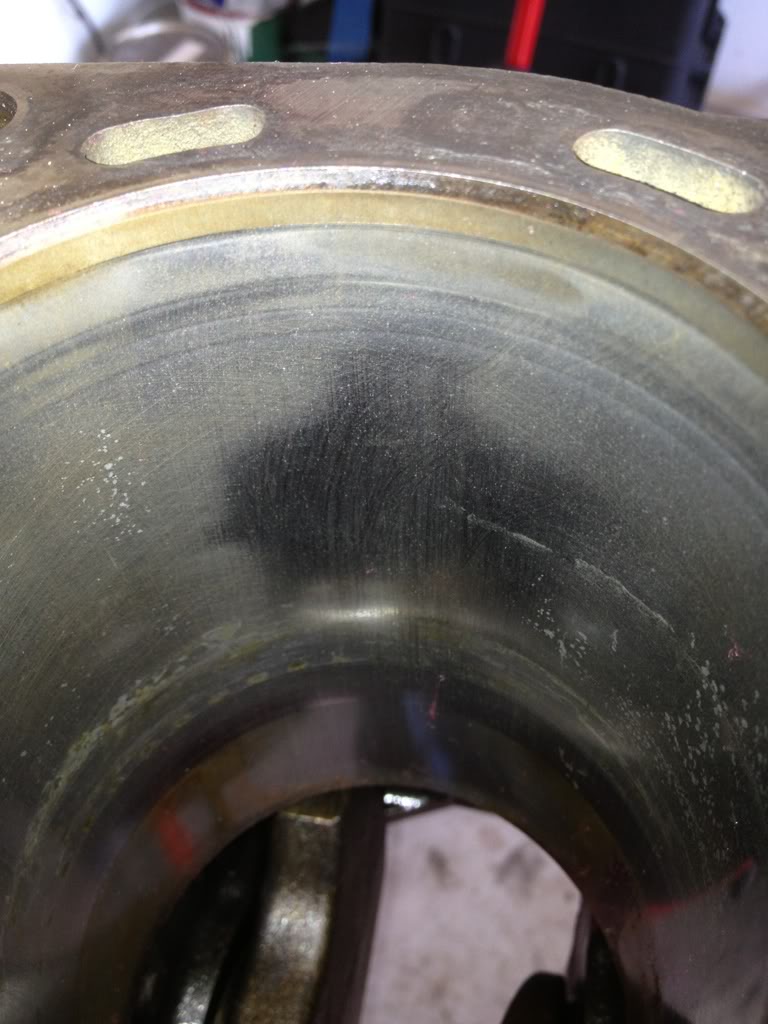
Just one random cylinder... I think is kind o elliptical cuz I can feel the ring lip on the sides but not front and back, also the piston skirts showed a little wear/scuffing. Is this normal? And is it bad?

#1 cylinder connecting rod bearing. I don't think it would've lasted much longer, no damage to crank tho.
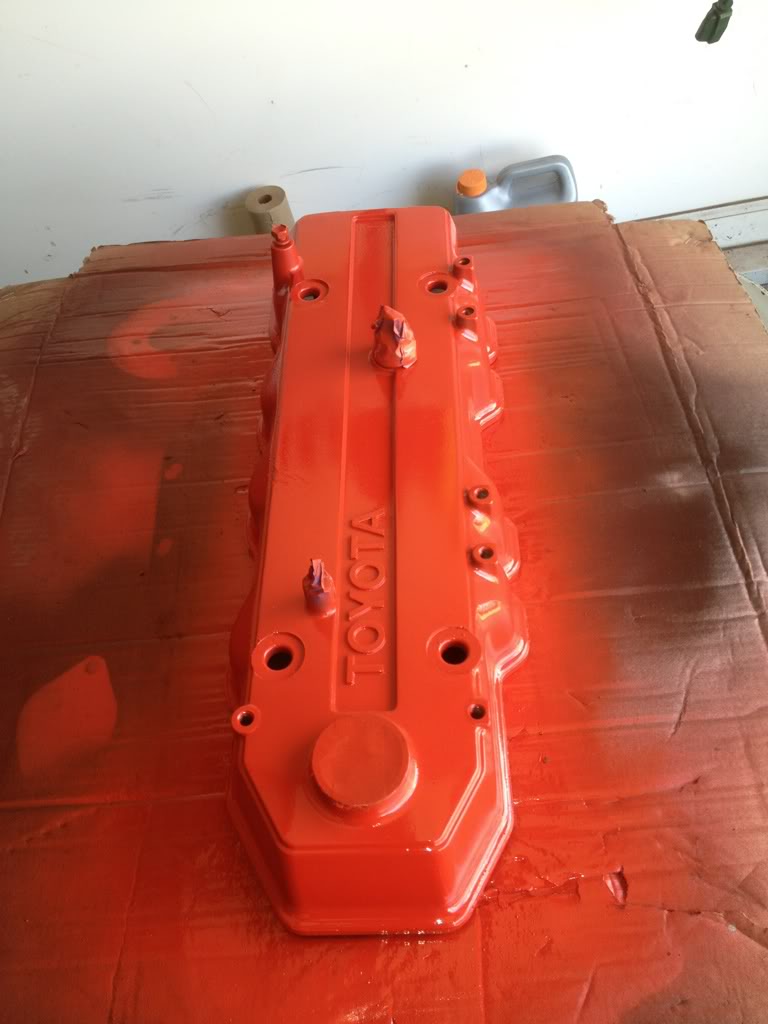
Just one of the things I've painted, and the picture doesn't do it justice. Came out pretty good, still needs clear coat.
Just one random cylinder... I think is kind o elliptical cuz I can feel the ring lip on the sides but not front and back, also the piston skirts showed a little wear/scuffing. Is this normal? And is it bad?
#1 cylinder connecting rod bearing. I don't think it would've lasted much longer, no damage to crank tho.
Just one of the things I've painted, and the picture doesn't do it justice. Came out pretty good, still needs clear coat.
03-28-2013, 05:47 PM
#30
It's the normal wear pattern, but that doesn't mean it's in spec.
Cylinder inspection is on Eg1-56 (PDF page 11). Pin inspection is on the next page and I'd imagine they're shot.
I'd be more worried about the pitting, or atleast what looks like pitting in the photo. Can see it in the thrust wear which means it's deep.
Cylinder inspection is on Eg1-56 (PDF page 11). Pin inspection is on the next page and I'd imagine they're shot.
I'd be more worried about the pitting, or atleast what looks like pitting in the photo. Can see it in the thrust wear which means it's deep.
03-28-2013, 06:45 PM
#31
Registered User
Thread Starter
Join Date: Feb 2013
Location: eastern nc
Posts: 149
Likes: 0
Received 0 Likes
on
0 Posts
I thought the cyl's looked decent(no gouges/serious damage, and some crosshatch visible, they FEEL smooth, and I know that's not the scientific term lol. I was hoping I'd get away with honing and new rings. I'll take a closer look and start lookin for some bore quotes at some local shops.
Thanks for the link and thoughts!
Thanks for the link and thoughts!
04-02-2013, 03:41 PM
#32
Registered User
Thread Starter
Join Date: Feb 2013
Location: eastern nc
Posts: 149
Likes: 0
Received 0 Likes
on
0 Posts
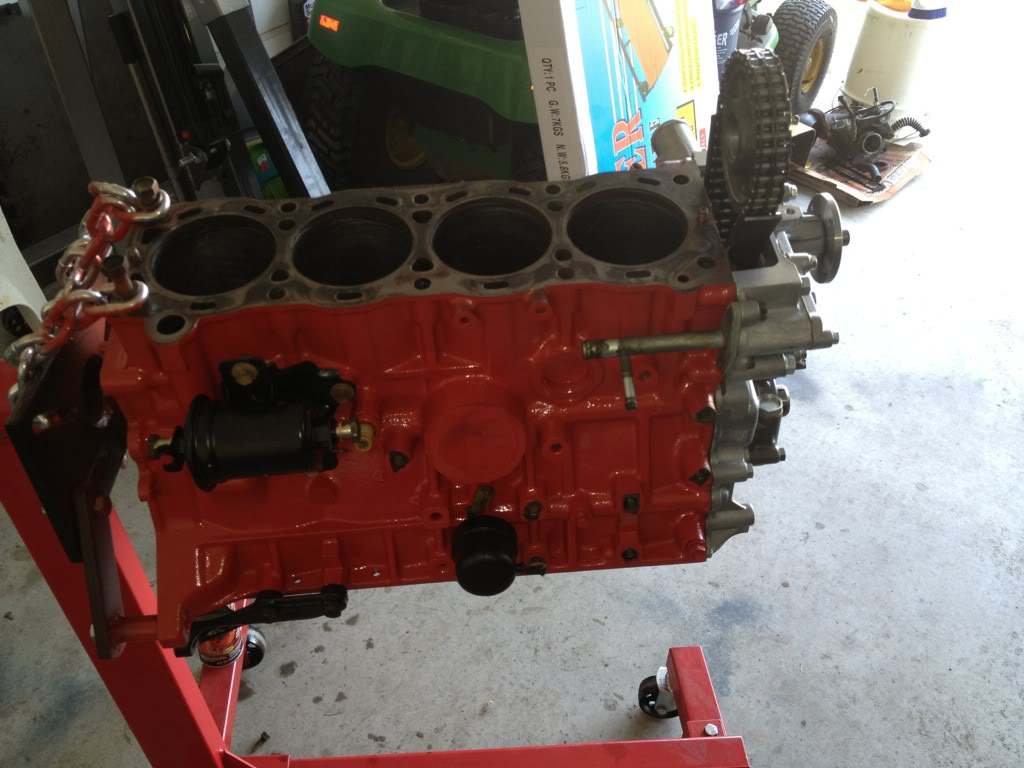
Cleaned and painted the engine bay.
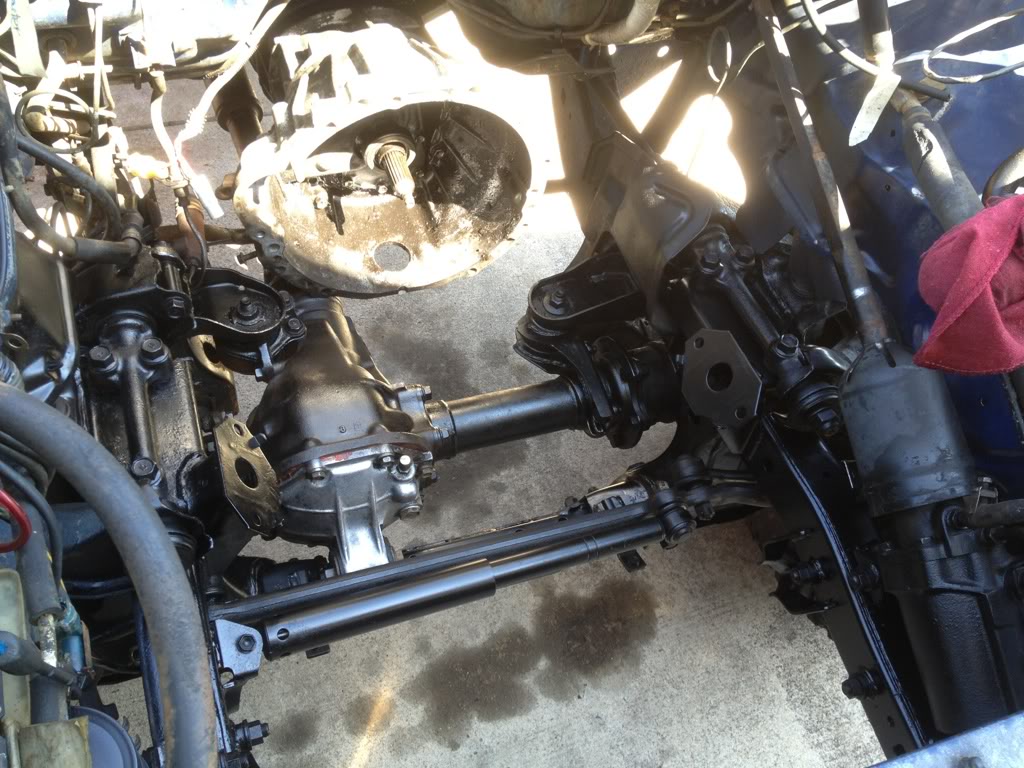
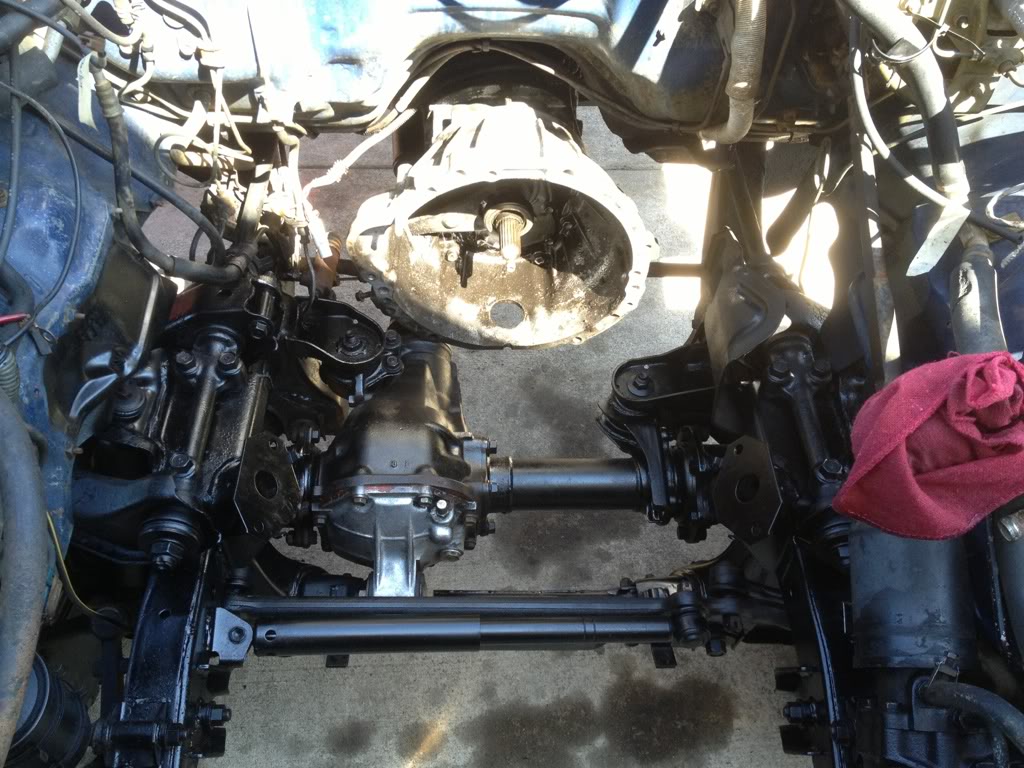
Got the block completely torn down, cleaned, honed the cylinders, and replace the main bearings. Installed crank, haven't torqued it yet. But things are going pretty good with it.
Got the block completely torn down, cleaned, honed the cylinders, and replace the main bearings. Installed crank, haven't torqued it yet. But things are going pretty good with it.
04-10-2013, 03:57 PM
#34
Registered User
Thread Starter
Join Date: Feb 2013
Location: eastern nc
Posts: 149
Likes: 0
Received 0 Likes
on
0 Posts
Ok so I haven't updated in a while, but I've been workin on it just about everyday.
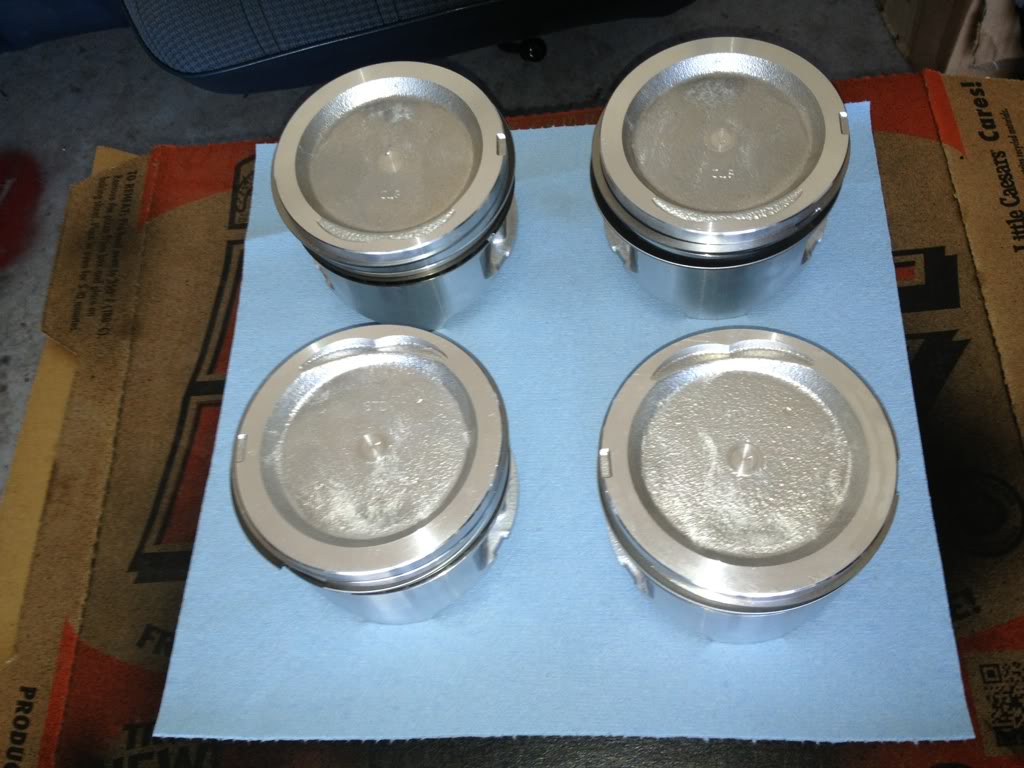
So far I've got the engine about 1/2 back together( just need the head and cam) got new pistons for it, and installed those, torqued everything down. Got the oil pump pick up on, and the oil pan is on. Letting he rtv dry over night and I'll torque it down in the morning.
Mostly been cleaning parts and such.
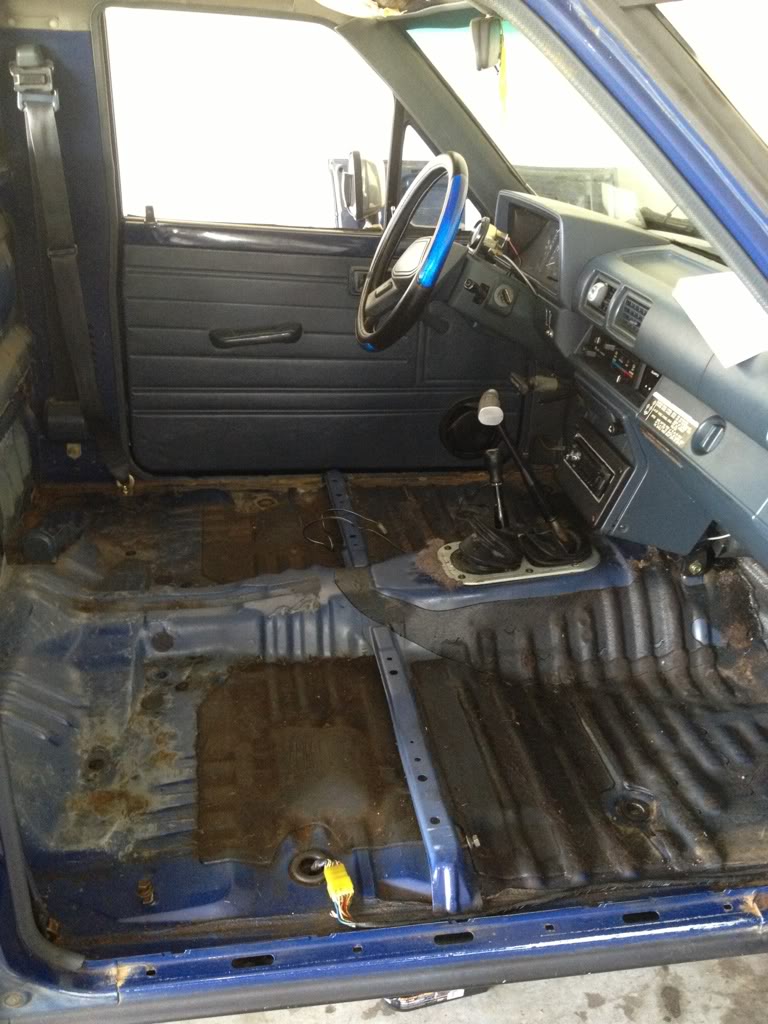
Non engine related, I installed a clock in the truck, I love how toyota already had the harness in there. Took out the bench seat to have it reupholstered. Took the vinyl floor out. Cleaned underneath. And I'm thinking I'm going to get gray or black carpet.
Removed the sway bar. Wasn't gonna make it permanent but the bolts broke off and I'll see how I like it the way it is
Today I changed the fluid in the tranny, tcase, and rear diff. (Ran out of oil to do the front diff)
Gonna fill it up tomorrow and also gonna tint the windows.
I've been doing alot but I never think to take pics of the progress. But most of the stuff I'm doing is the lame behind the scenes kinda stuff lol.
So far I've got the engine about 1/2 back together( just need the head and cam) got new pistons for it, and installed those, torqued everything down. Got the oil pump pick up on, and the oil pan is on. Letting he rtv dry over night and I'll torque it down in the morning.
Mostly been cleaning parts and such.
Non engine related, I installed a clock in the truck, I love how toyota already had the harness in there. Took out the bench seat to have it reupholstered. Took the vinyl floor out. Cleaned underneath. And I'm thinking I'm going to get gray or black carpet.
Removed the sway bar. Wasn't gonna make it permanent but the bolts broke off and I'll see how I like it the way it is
Today I changed the fluid in the tranny, tcase, and rear diff. (Ran out of oil to do the front diff)
Gonna fill it up tomorrow and also gonna tint the windows.
I've been doing alot but I never think to take pics of the progress. But most of the stuff I'm doing is the lame behind the scenes kinda stuff lol.
04-10-2013, 05:29 PM
#35
Nice work man! Love that color on the VC and block. What color is that.
Engine bay is looking really good also. I wish I had the patience to do that.
It's definitely nice when harnesses are already there and you don't have to I running a crap ton of wires just to add something simple.
Engine bay is looking really good also. I wish I had the patience to do that.
It's definitely nice when harnesses are already there and you don't have to I running a crap ton of wires just to add something simple.
04-11-2013, 05:55 AM
#36
Registered User
Thread Starter
Join Date: Feb 2013
Location: eastern nc
Posts: 149
Likes: 0
Received 0 Likes
on
0 Posts
Thanks man!
the color is just rustoleum engine enamel red($2 a can at Ollie's)
And believe me, this is the most detailing I've ever done during an engine build mostly because parts are trickling in and I can't put it all together anyways so I have more time to really clean and paint everything. Also having a little pressure washer made it alot easier, I'd just spray everything down with degreaser let it soak and then take the pressure washer to it.
Next item to buy will be the the new head and cam, then steed speed turbo manny(talked to steed and they said they would tap the manifold for an egt probe so it wouldn't void warranty), and finally a little t3 turbo.
04-11-2013, 11:43 AM
#38
Registered User
Thread Starter
Join Date: Feb 2013
Location: eastern nc
Posts: 149
Likes: 0
Received 0 Likes
on
0 Posts
Went and did some work on it today, just minor stuff.
Started out tinting the back glass
Before:
After tint.... And got a wild idea that just didn't turn out like I had it in my mind lol
This is how the inside is gonna be for a while.
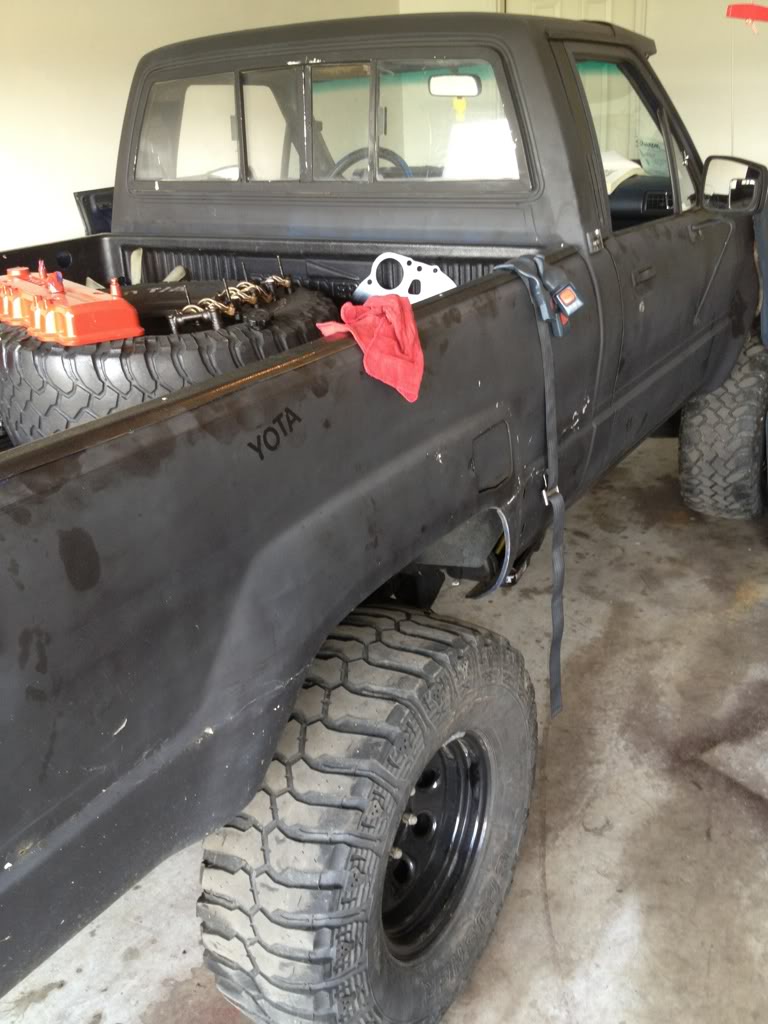
Intakes all cleaned and painted
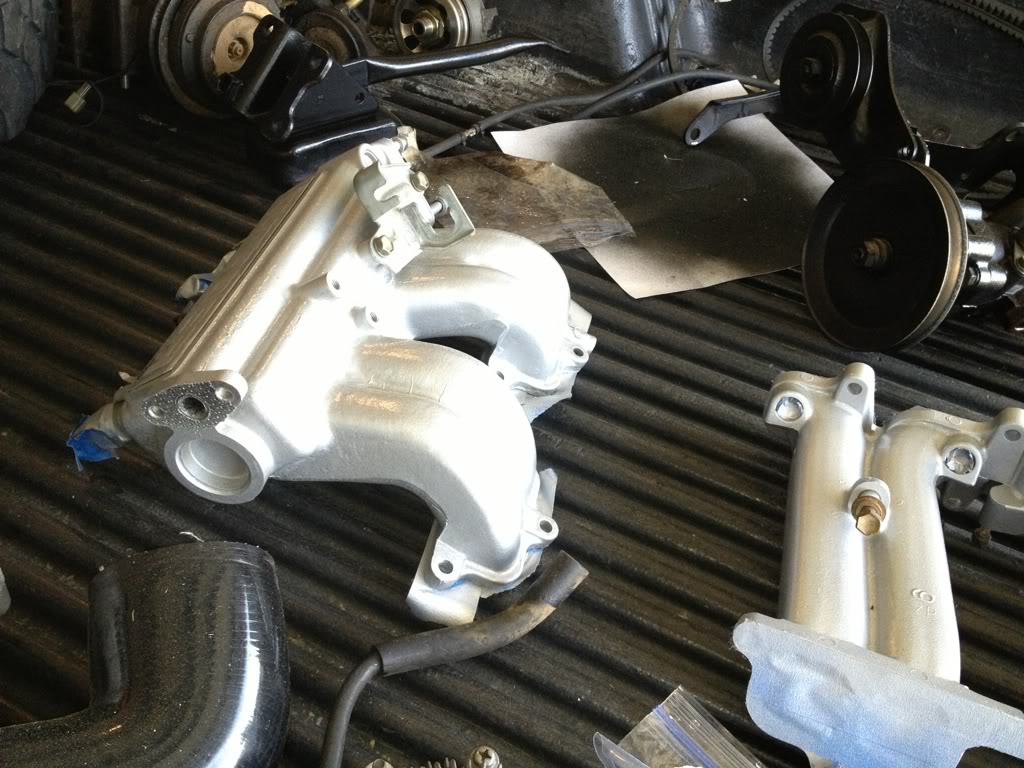
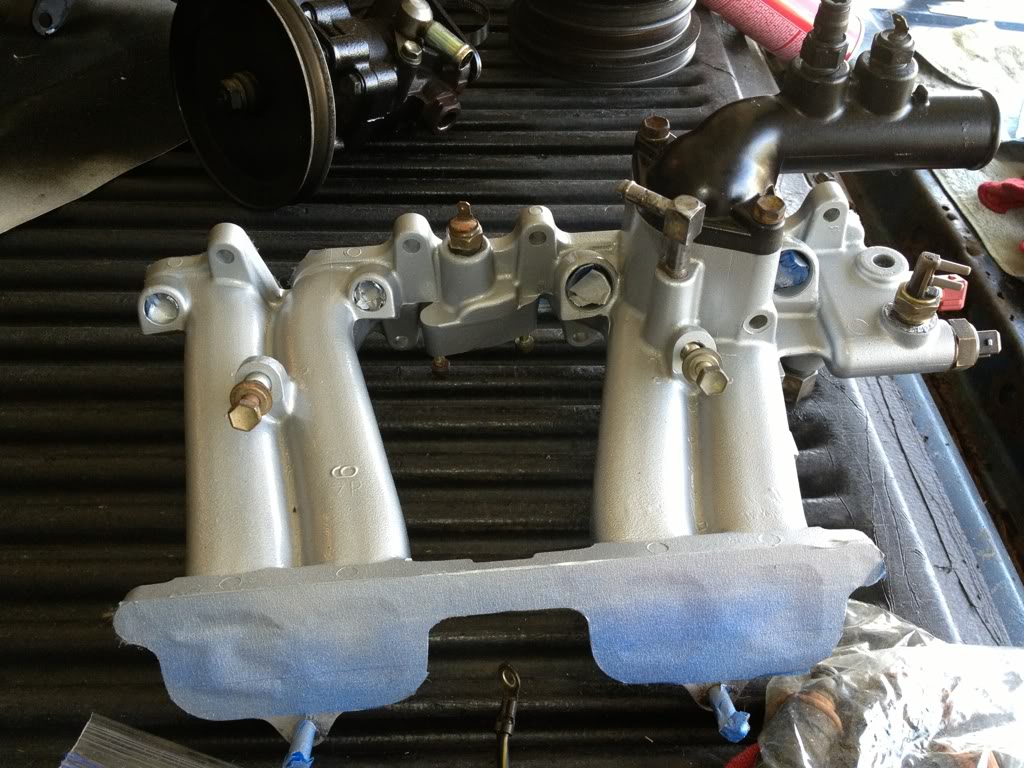
One last pic of the engine as it sits now.(gotta get some more engine stand bolts)
The mailman brought me some presents today. I got some fittings for my oil cooler
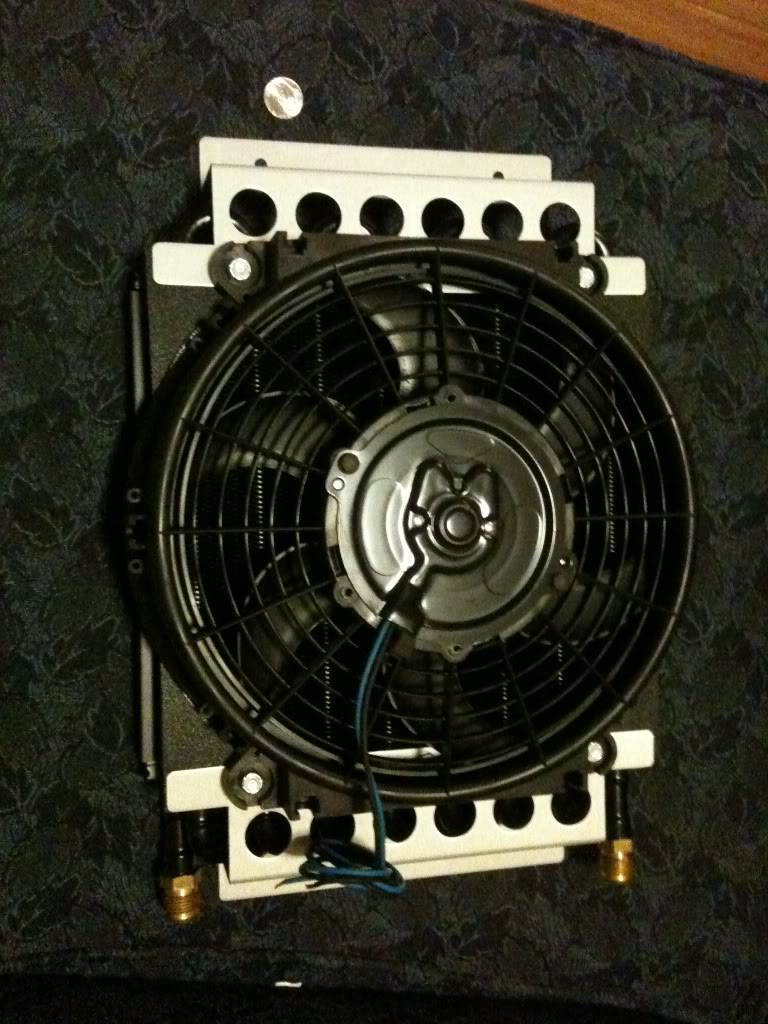
Plan for this right now is to get a front skid plate and mount it to it.
i WAS thinking of mounting it on the bottom of the hood, but it's a pretty big cooler.
And when It's in there it's going to have a thermostat switch to turn the fan on when oil temp reaches 200 and off at 185. It's gonna be wired up to my turbo timer also, so when I turn the ignition off, it'll stay on to cool the oil down before the engine turns itself off (just maximizing the usefulness of the t-timer) plus it should add another quart of oil to the engine.
As far as exhaust it's going to have the turbo mani and then a 3" downpipe all the way back with a flow through slp loudmouth 2, to keep it free flow yet quiet...ish.
Started out tinting the back glass
Before:
After tint.... And got a wild idea that just didn't turn out like I had it in my mind lol
This is how the inside is gonna be for a while.
Intakes all cleaned and painted
One last pic of the engine as it sits now.(gotta get some more engine stand bolts)
The mailman brought me some presents today. I got some fittings for my oil cooler
Plan for this right now is to get a front skid plate and mount it to it.
i WAS thinking of mounting it on the bottom of the hood, but it's a pretty big cooler.
And when It's in there it's going to have a thermostat switch to turn the fan on when oil temp reaches 200 and off at 185. It's gonna be wired up to my turbo timer also, so when I turn the ignition off, it'll stay on to cool the oil down before the engine turns itself off (just maximizing the usefulness of the t-timer) plus it should add another quart of oil to the engine.
As far as exhaust it's going to have the turbo mani and then a 3" downpipe all the way back with a flow through slp loudmouth 2, to keep it free flow yet quiet...ish.
04-13-2013, 08:38 PM
#39
Registered User
Thread Starter
Join Date: Feb 2013
Location: eastern nc
Posts: 149
Likes: 0
Received 0 Likes
on
0 Posts
Went over and changed the front diff fluid. And tinted my passenger window, it turned out really well. Didn't snap a pic, will do tomorrow or whenever I see it next. I was also trying to clean an egr component that came off the back of the head. It was completely blocked with carbon, and I was using a little metal hook tool and it was just solid carbon, so it's sitting in some solvent to loosen it up. Didn't take pics cuz I've seen alot of dirty egr parts and I'm sure everyone knows what they look like.
Did a quick jotting of what the present plans are for the rig.
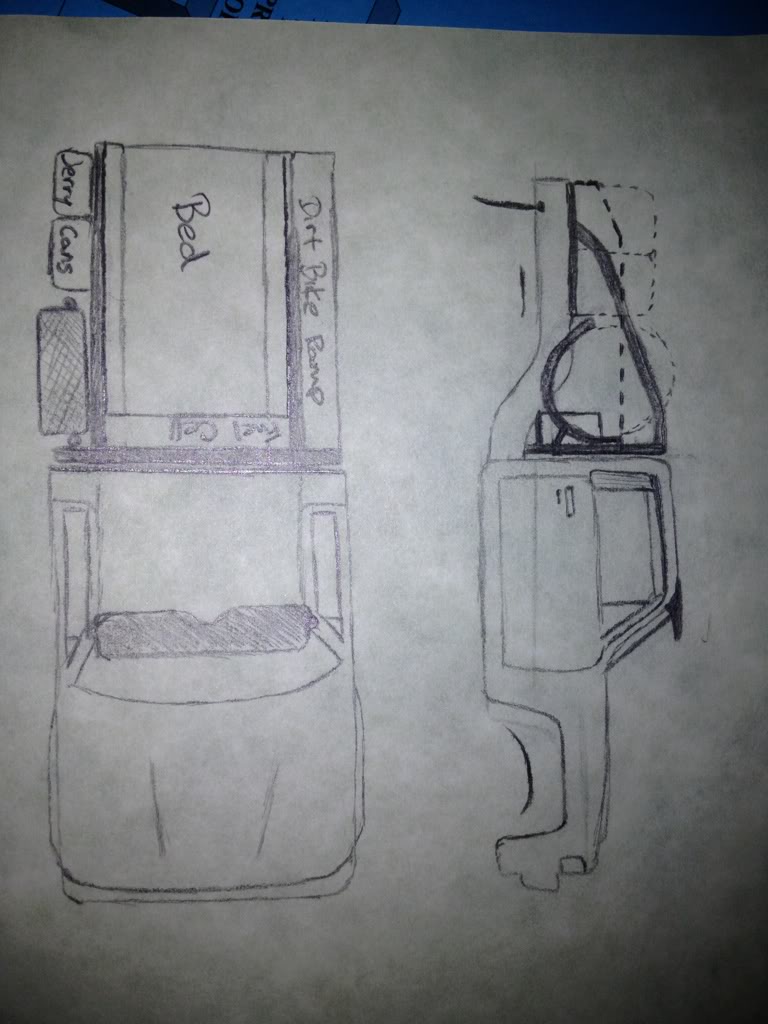
I'm kinda thinking about doing an on board air system. We'll see, I thought it'd be cool and useful on a bunch of different levels. If i were to do it, it'd be a York ac compressor with a 2.5 gal res.
Did a quick jotting of what the present plans are for the rig.
I'm kinda thinking about doing an on board air system. We'll see, I thought it'd be cool and useful on a bunch of different levels. If i were to do it, it'd be a York ac compressor with a 2.5 gal res.


