1987 4Runner Cyber Dude
 07-31-2012, 04:26 PM
#1
1987 4Runner Junk4u (aka Cyber Dude)
Been coming around here for sometime now just looking things people are doing. This gave me the urge to restore my 86 blue 4runner bought new back in 1986, but because it would take to long to restore, I went out and purchased one which also needs to be restored, but a whole lot less than what I had for the last 26 years.
I know this is a buildup section, but a restore section doesn't exist. This thread would be for the 1987 4runner I just purchased.
I don't have pics yet of the truck, but I will start taking pictures.
So far what i have done:
1) I purchased a 22re engine (1993) which sprang a water leak into the block do to time chain. Check out the engine to see if seized. Everything still good internally.
2) Sent Block, Head and Crank to Machine shop. Cleaned, bored cylinders to .030 (oval shaped) and honed. Head just cleaned and lapped valves, new seals, and shaved the surface. cam shaft was in good shape as well very smooth.
3) Order new Pistons .030, Standard Main Bearing, Rod Bearing, new Valve Seals, Complete Gaskets, Freeze Plugs, Oil Seals, Head Gasket, O-rings, Water Pump, Oil Pump, Time Chain Cover, Timing chain, and Timing chain tensioner.
4) Just got back the Block, Head and crankshaft from the machine shop. Looks good so far. I have to paint the block, thy did a terrible job at painting it.
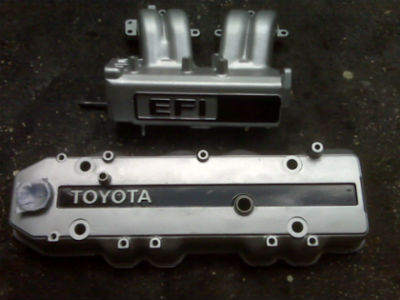
5) Painted the Valve Cover and intake plenum.
6) Working on the A/C the blower wasn't working, checked the blower resistor, that was shot changed it, but still not working. Started pulling out the cables and found one burnt. Spliced it up fan blows good now. A/C Not working yet, PO took the belt off so I have to put one on.
6) Took off the back tail gate access panel. Right side lock jammed, took it out found out why the cable was stuck so the original PO jammed the locked. Had to removed the locked to figure out what exactly did they do to jam it. Lock works now looking for a cable or going to make one from bicycle cable and parts.
Thats what I've done so far. Lookig to put together the engine this week, will try to get some pics along the way.
I know this is a buildup section, but a restore section doesn't exist. This thread would be for the 1987 4runner I just purchased.
I don't have pics yet of the truck, but I will start taking pictures.
So far what i have done:
1) I purchased a 22re engine (1993) which sprang a water leak into the block do to time chain. Check out the engine to see if seized. Everything still good internally.
2) Sent Block, Head and Crank to Machine shop. Cleaned, bored cylinders to .030 (oval shaped) and honed. Head just cleaned and lapped valves, new seals, and shaved the surface. cam shaft was in good shape as well very smooth.
3) Order new Pistons .030, Standard Main Bearing, Rod Bearing, new Valve Seals, Complete Gaskets, Freeze Plugs, Oil Seals, Head Gasket, O-rings, Water Pump, Oil Pump, Time Chain Cover, Timing chain, and Timing chain tensioner.
4) Just got back the Block, Head and crankshaft from the machine shop. Looks good so far. I have to paint the block, thy did a terrible job at painting it.
5) Painted the Valve Cover and intake plenum.
6) Working on the A/C the blower wasn't working, checked the blower resistor, that was shot changed it, but still not working. Started pulling out the cables and found one burnt. Spliced it up fan blows good now. A/C Not working yet, PO took the belt off so I have to put one on.
6) Took off the back tail gate access panel. Right side lock jammed, took it out found out why the cable was stuck so the original PO jammed the locked. Had to removed the locked to figure out what exactly did they do to jam it. Lock works now looking for a cable or going to make one from bicycle cable and parts.
Thats what I've done so far. Lookig to put together the engine this week, will try to get some pics along the way.
Last edited by junk4u; 04-24-2013 at 04:10 AM.
 08-01-2012, 03:31 AM
#2
Super Moderator
Staff
iTrader: (1)
Join Date: Aug 2008
Location: Anderson Missouri
Posts: 11,788
Likes: 0
Received 22 Likes
on
20 Posts
Welcome to Yotatech. Probably need to call this section the Rebuilt section.lol They all need some kind of rebuilding. Look forward to your restore. Also it seems everyone has to undo a PO hack job on something. Sure wish I had one that I had bought new, but can see where cost is prohibitive.
I have gotten an 88 Runner fairly close to restored and am restoring an 86 for myself now. Will be looking to see yours come along.
I have gotten an 88 Runner fairly close to restored and am restoring an 86 for myself now. Will be looking to see yours come along.
08-02-2012, 07:14 AM
#3
Welcome to Yotatech. Probably need to call this section the Rebuilt section.lol They all need some kind of rebuilding. Look forward to your restore. Also it seems everyone has to undo a PO hack job on something. Sure wish I had one that I had bought new, but can see where cost is prohibitive.
I have gotten an 88 Runner fairly close to restored and am restoring an 86 for myself now. Will be looking to see yours come along.
I have gotten an 88 Runner fairly close to restored and am restoring an 86 for myself now. Will be looking to see yours come along.
Thank Terrys87, I have been looking at your build too for the several months. Looks really cool.
I just figured out the intake plumem that's in the pic is different from the 87, should of know as the engine came out of a 93. I guess if I want to use it that I have to calibrate the TPS to specs for the 87.
Working on some pics, I just found pics from the PO before I bought it. He owned it for 1 month, so he just flipped it. I did a title search and he bought it off the original owner in May 2012 and sold it to at the end of June 2012.
I'll post the PO's pic later today.
08-02-2012, 01:05 PM
#5
this is going to be a slow restore so it will come and go. I'm doing what I can with what ever time and $ I have available.
I found some pics of the truck by the PO:
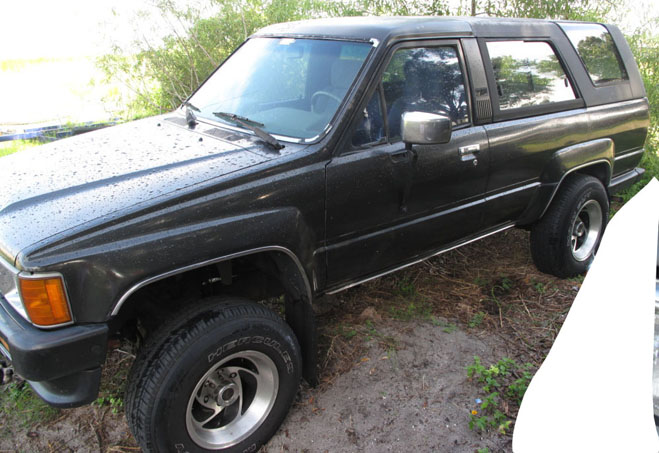
Cropped out a section just in case(for the PO). Not the original paint, original was black, the First Owners painted it grey and did a bad job it even has a clear coat on it which in some places is peeling off. You can even see the original strips on the door as they never sanded it off. as I said before, the original color was Black, eventually I will paint it black again.
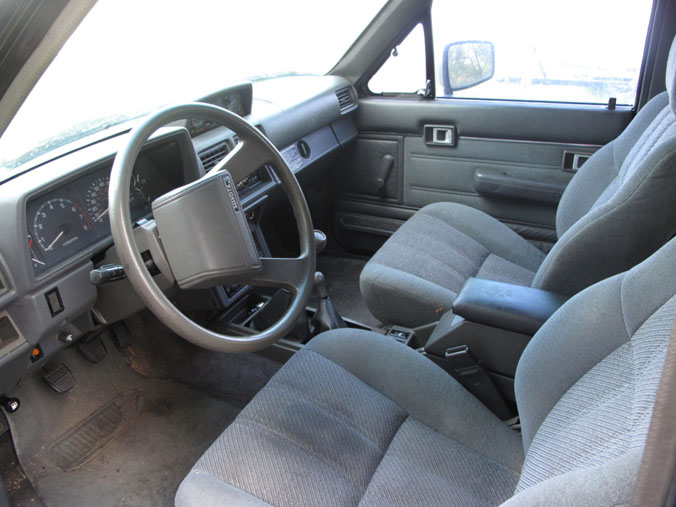
Interior is OK, but detail wise, there is a lot of things that need to be done. Heater lever is broken or needing repair. Why the Heater control valve is stuck and the original owners must of forced it to try and close the valve which didn't happen. The valve is still stuck today. Actually what I found out is if you want to keep using the old one you can take the valve off and look at the output end and see the actual valve which is like a plunger it's stuck because of rust. Grease it up and lightly tap it and it will slide back or on the opposite side the leg that sticks out give it a few taps after greasing up the inside and it should free up. Then work it by hand and PB Blaster. Does the job, but not perfect, you will have a small amount of seepage, but nothing major. Beats spending $107 bucks for a new one.
Shift cover needs work as well, that will come once I replace the transmission since it seems that 4th gear doesn't engage.
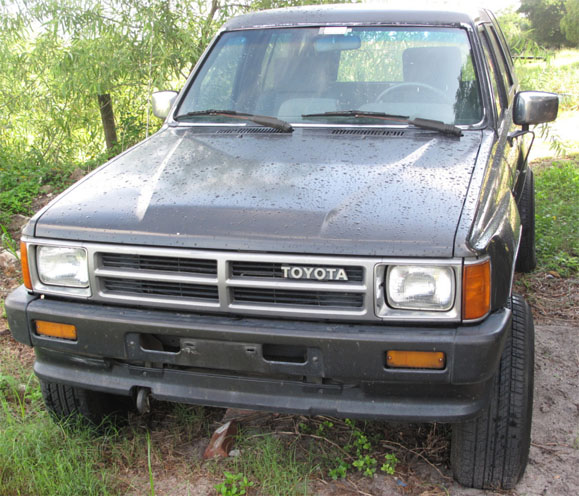
And here's another picture of the truck.
I found some pics of the truck by the PO:
Cropped out a section just in case(for the PO). Not the original paint, original was black, the First Owners painted it grey and did a bad job it even has a clear coat on it which in some places is peeling off. You can even see the original strips on the door as they never sanded it off. as I said before, the original color was Black, eventually I will paint it black again.
Interior is OK, but detail wise, there is a lot of things that need to be done. Heater lever is broken or needing repair. Why the Heater control valve is stuck and the original owners must of forced it to try and close the valve which didn't happen. The valve is still stuck today. Actually what I found out is if you want to keep using the old one you can take the valve off and look at the output end and see the actual valve which is like a plunger it's stuck because of rust. Grease it up and lightly tap it and it will slide back or on the opposite side the leg that sticks out give it a few taps after greasing up the inside and it should free up. Then work it by hand and PB Blaster. Does the job, but not perfect, you will have a small amount of seepage, but nothing major. Beats spending $107 bucks for a new one.
Shift cover needs work as well, that will come once I replace the transmission since it seems that 4th gear doesn't engage.
And here's another picture of the truck.
08-02-2012, 01:35 PM
#6
Today I got the chance to work on the Block. I didn't like the way the they painted or clean it  . Started out with a wire brush cleaning it. Found out they didn't do a good job in the first place as the paint came off in some places where it was still dirty.
Here's a little close up of an area that I wire brushed and the paint came right off because of the dirt that was under it.
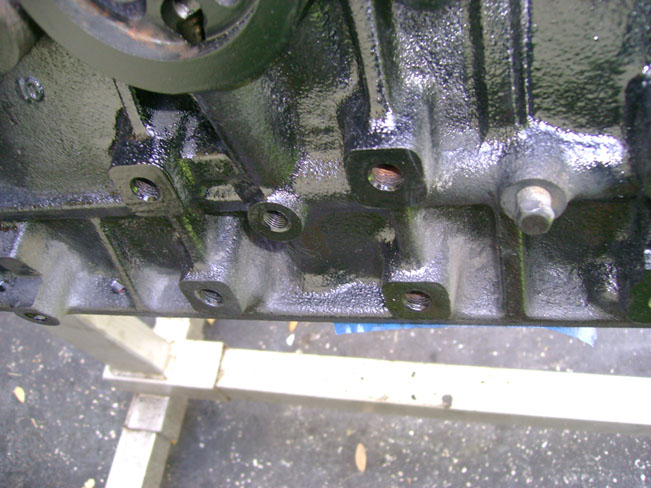
They painted the front side of the block where the timing chain goes. Didn't like that at all . Scraped all of that paint off.
Finished scrapping/cleaning up and them wiped it down clean with some degreaser.
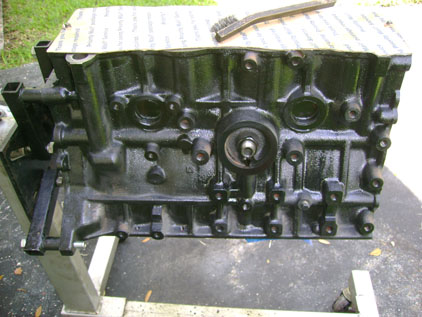
Ready to be painted.
I painted the block already, but I got side tracked. I'll post pictures of it painted tomorrow. It does look better than when I got it from the machine shop.
. Started out with a wire brush cleaning it. Found out they didn't do a good job in the first place as the paint came off in some places where it was still dirty.Here's a little close up of an area that I wire brushed and the paint came right off because of the dirt that was under it.
They painted the front side of the block where the timing chain goes. Didn't like that at all
. Scraped all of that paint off.Finished scrapping/cleaning up and them wiped it down clean with some degreaser.
Ready to be painted.
I painted the block already, but I got side tracked. I'll post pictures of it painted tomorrow. It does look better than when I got it from the machine shop.
Last edited by junk4u; 08-08-2012 at 03:50 AM.
08-02-2012, 01:44 PM
#7
I was side tracked today because....
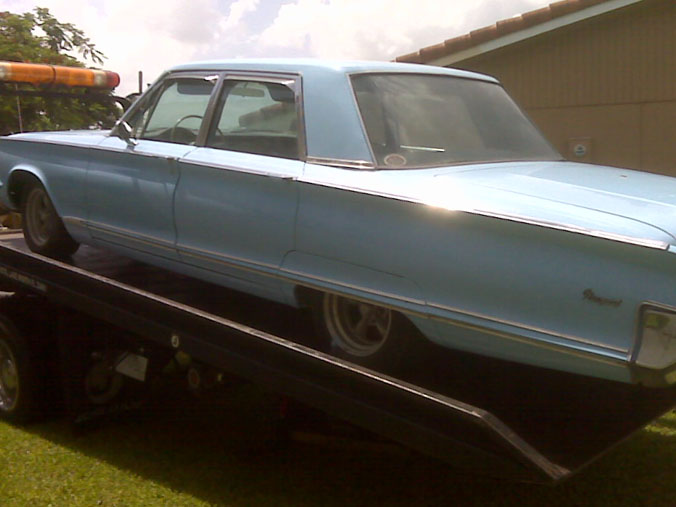
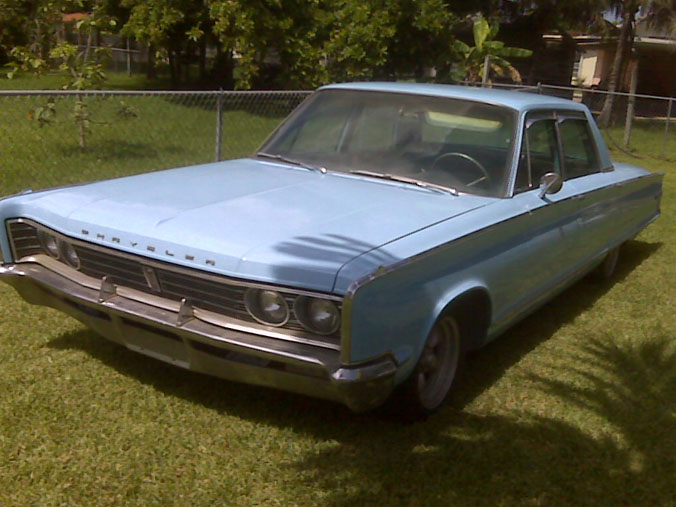
I was side tracked today because I got a call from a towing company. A friend of mine had a car and decided he didn't want it, so he gave it to me. The only trouble was he lives about 125 miles north of me. I live down in the Miami area. This way off the thread topic, and I hope you guys don't get upset, but its was a super sweet ride in its days.
Here's the pics:
Towed all the way down.
Needs some interior work as the seats need to be redone.
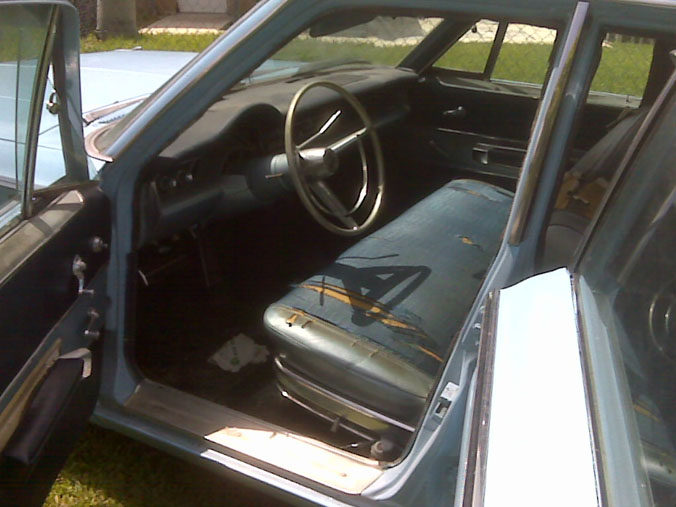
My son want to paint it black for a Batman look.
It still runs, just needs a battery and brake work to get it moving around.
Here's the pics:
Towed all the way down.
Needs some interior work as the seats need to be redone.
My son want to paint it black for a Batman look.
It still runs, just needs a battery and brake work to get it moving around.
Trending Topics
08-03-2012, 07:18 AM
#8
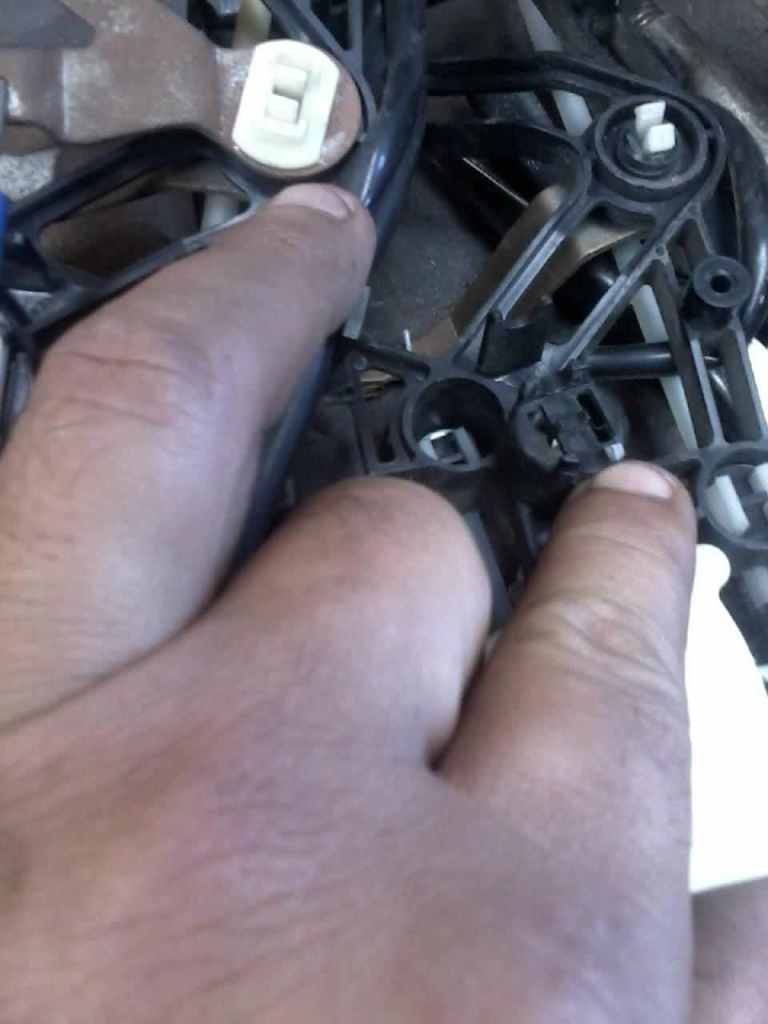
Took a look at the Heater control switch today to see how to fix the lever since it was kind of damaged by the Original PO because the heater valve control is frozen.
I marked off in red the lever I'm talking about here on this picture.
Here is the pivot point that need to be locked in place so it doesn't come off.
Anybody have any idea what holds it in place please let me know.
I marked off in red the lever I'm talking about here on this picture.
Here is the pivot point that need to be locked in place so it doesn't come off.
Anybody have any idea what holds it in place please let me know.
Last edited by junk4u; 08-08-2012 at 03:58 AM.
08-03-2012, 08:47 AM
#10
I think something maybe missing, here's what I'm talking about(see picture posted again below). There's 2 screw holes for something (pointed out in orange), must be a cover plate or something that maybe the PO may have taken out because the lever was stuck. Well that didn't help considering what is stuck is the Heater Control Valve under the hood.
Last edited by junk4u; 08-08-2012 at 04:04 AM.
08-03-2012, 09:27 AM
#11
Registered User
iTrader: (2)
Join Date: Dec 2009
Location: Pleasanton, CA - SF Bay Area
Posts: 2,159
Likes: 0
Received 7 Likes
on
5 Posts
Ahh, I see now. I think you're right. Probablya plate with 3 holes (2 outside for screws, and the middle hole is what that white plastic peg snaps into. I think a flanged, metal pin and cotter pin would serve the same purpose?
I'll let others chime in since I've never services this part before
I'll let others chime in since I've never services this part before
08-03-2012, 12:24 PM
#12
Ahh, I see now. I think you're right. Probablya plate with 3 holes (2 outside for screws, and the middle hole is what that white plastic peg snaps into. I think a flanged, metal pin and cotter pin would serve the same purpose?
I'll let others chime in since I've never services this part before
I'll let others chime in since I've never services this part before
Hey Thanks for the reply. Did some looking around on here found a pic and its a plastic piece that clips right over those legs and holds in place. Those screw holes aren't for anything they are just there maybe for some other make of toyota using the same mold.
Here's a clip.
Rather than replacing it with the same old clip or like, I figured I could rig something better up using a flat piece of metal and punching holes in it to fit those screw holes and legs holding it much more secure and stronger than the original.
Here's the idea, just a quick sketch.

Last edited by junk4u; 08-08-2012 at 04:05 AM.
08-03-2012, 01:30 PM
#13
Registered User
iTrader: (2)
Join Date: Dec 2009
Location: Pleasanton, CA - SF Bay Area
Posts: 2,159
Likes: 0
Received 7 Likes
on
5 Posts
I would just make sure that those 2 plastic holes you're planning to use on the outside of your fabbed piece are strong enough to support it. Or, just stick a metal pin in there
Good luck!
Good luck!
08-04-2012, 04:39 AM
#14
Super Moderator
Staff
iTrader: (1)
Join Date: Aug 2008
Location: Anderson Missouri
Posts: 11,788
Likes: 0
Received 22 Likes
on
20 Posts
You got a solid looking little truck. Those heater controls do get broken. There is a center piece that goes inbetween the white clip. That is either broken out or the clip that holds the cable to it. Just got done working on mine. If you are just missing that piece, get a junk one out of the bone yard. It is a good idea to keep it for parts even if it is broken. These get brittle over time and if someone just starts forcing it, you will need more pieces.
Here is the center that usually gets broken.
I believe this is the piece you are needing. Where my other finger is, that is a common problem of the clip that holds the cable.
Here is the center that usually gets broken.
I believe this is the piece you are needing. Where my other finger is, that is a common problem of the clip that holds the cable.
08-04-2012, 12:42 PM
#16
Good guess on the Year 1966 Chrysler... Its a Newport. It was given to me, but I'm just going to off loaded. It's got to much work that needs to be done to it. I would like to get a hand on a 72 Mach 1 or a 1972 Roadrunner.
It cranks, I just jumped the battery. Looks like I've got to run over to the gas station and get some gas.
It cranks, I just jumped the battery. Looks like I've got to run over to the gas station and get some gas.
08-04-2012, 12:46 PM
#17
You got a solid looking little truck. Those heater controls do get broken. There is a center piece that goes inbetween the white clip. That is either broken out or the clip that holds the cable to it. Just got done working on mine. If you are just missing that piece, get a junk one out of the bone yard. It is a good idea to keep it for parts even if it is broken. These get brittle over time and if someone just starts forcing it, you will need more pieces.
Here is the center that usually gets broken.

I believe this is the piece you are needing. Where my other finger is, that is a common problem of the clip that holds the cable.

Here is the center that usually gets broken.
I believe this is the piece you are needing. Where my other finger is, that is a common problem of the clip that holds the cable.
thank for that info. I wish I had a yard down here in South Florida (specifically Miami) that has Yota's in there yard, but I've been to a few and none have and models dating back to the 80's or the early 90's.
I though about it, I might just make one out of plastic the way I described out of metal. With a little heat bending it.
08-04-2012, 01:03 PM
#18
I hate working on the engine in the weather we are having this week in Miami. Since I just got the block all I have done is paint it.
In the meantime I've been working on the seats. That I know of the rear seats were all Aftermarkets. The trucks back then were imported without seats to bypass duty reducing the cost of the truck. I remember when i bought my original truck I had to wait for the truck while they installed the after market seats. The truck had a one of the flip cargo covers where the seats are. They gave me it when they finished putting the seats in as they left it in the back of the truck. I still have that just don't know the name of it.
I took out the rear seats and took of the seat covers down to the foam cushion and metal frame. The metal frame and latch where damaged and this week end I'm going to try to weld them back together and figure out a better way to mount the latch.
Last edited by junk4u; 08-04-2012 at 01:05 PM.
08-04-2012, 01:25 PM
#19
Super Moderator
Staff
iTrader: (1)
Join Date: Aug 2008
Location: Anderson Missouri
Posts: 11,788
Likes: 0
Received 22 Likes
on
20 Posts
These trucks get stripped quick in the yards just about everywhere as I hear it. I have gone to Kansas City just to get 4Runner parts, a 3 hour drive, a few trucks get in and some of those parts will intechange. We only have 2 for runners in our bone yards here and there isnt much left of them.
08-05-2012, 08:11 AM
#20
Front Passenger seat Repair.
Okay quick picture of what I've done with the passenger seat.
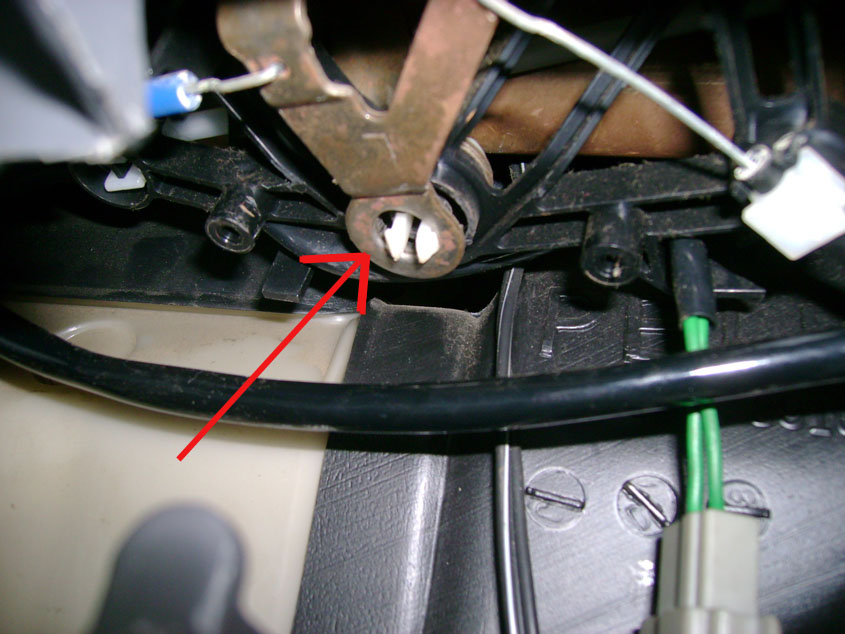
Blocked out in red, I got a spring for the seat. The PO must of removed it or maybe it just broke off. I went over to my 86 4runner and pulled the spring from it and ran down to ACE Hardware, they had an almost exact fit. I think they called it a #56 spring.
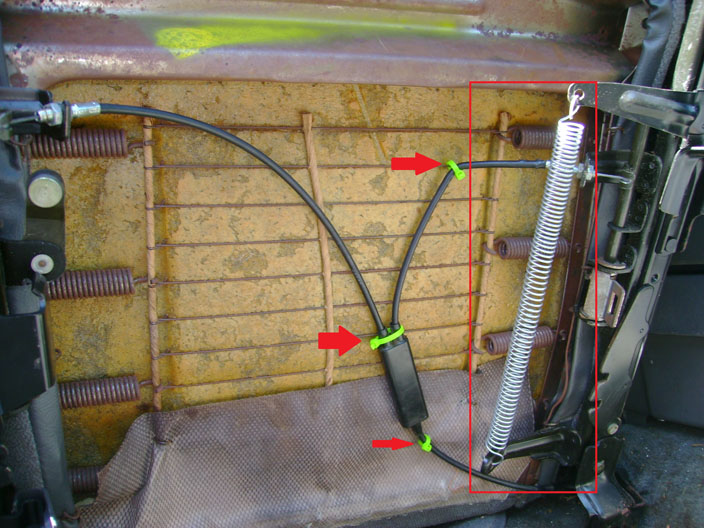
I've know this from the past as well, on my 86 4runner the cables always brushed the spring. After a while the cables would break and you would have to purchase a new one. Before mine breaks I tie-wrapped it as you see in the picture where the red arrows are.
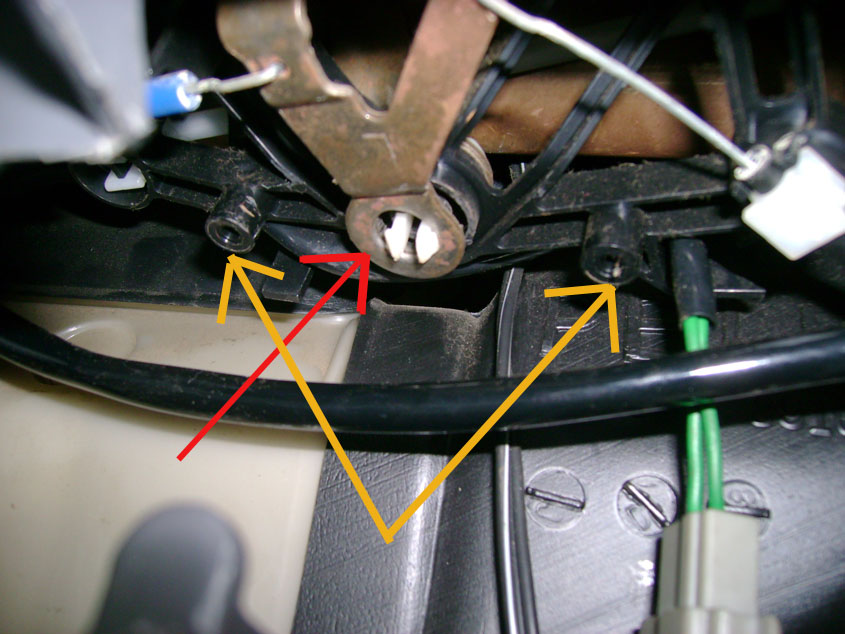
Here is a close up of what must of been the reason for the removal of the original spring by the PO the damage already done.
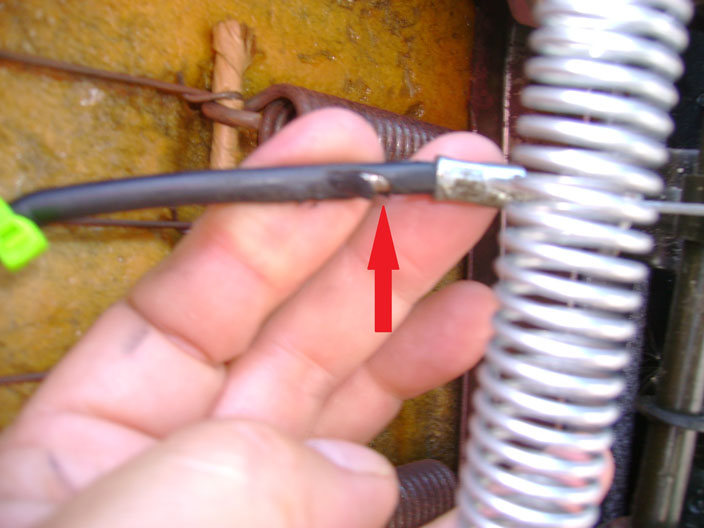
Blocked out in red, I got a spring for the seat. The PO must of removed it or maybe it just broke off. I went over to my 86 4runner and pulled the spring from it and ran down to ACE Hardware, they had an almost exact fit. I think they called it a #56 spring.
I've know this from the past as well, on my 86 4runner the cables always brushed the spring. After a while the cables would break and you would have to purchase a new one. Before mine breaks I tie-wrapped it as you see in the picture where the red arrows are.
Here is a close up of what must of been the reason for the removal of the original spring by the PO the damage already done.
Last edited by junk4u; 08-08-2012 at 03:42 AM.


