What is in the picture?
 12-07-2012, 03:10 PM
#1
Registered User
Thread Starter

What is in the picture?
Let me just start by admitting that I am one of the most mechanically inept people you might ever meet when it comes to vehicles.
I can put in gas, change the oil and oil filter (on most cars), sometimes a fuel filter and change a flat tire but that is pretty much where it ends.
I just purchased a 1987 Toyota Hilux and muddled through replacing the valve cover gasket and adding a filter type thing to the top....I was quite proud of myself.
Anyway, I'll add some pictures and I am curious to know what, if anything, the depicted items are called, used for, and if I need them hooked up, fixed, etc.
Please forgive my ignorance, but I am trying to learn.
Thank you for any and all help!
I know it's a battery cable, but the wiring looks like a hackjob....is there a better way?

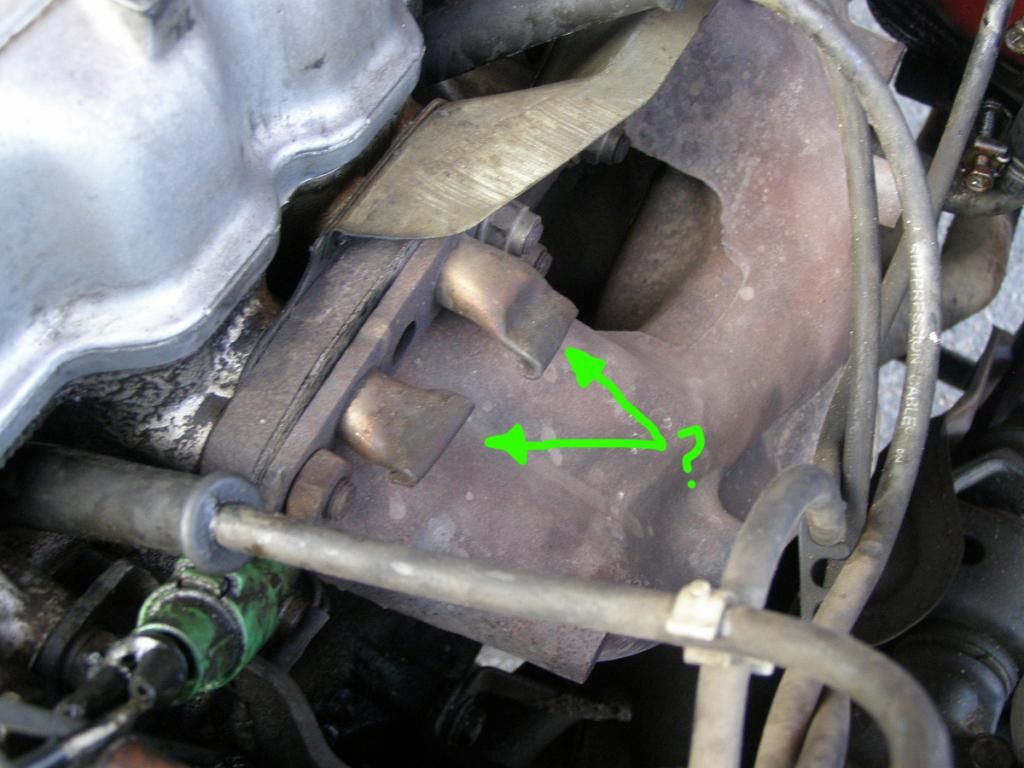
What are these tubes and why are they folded up like this?
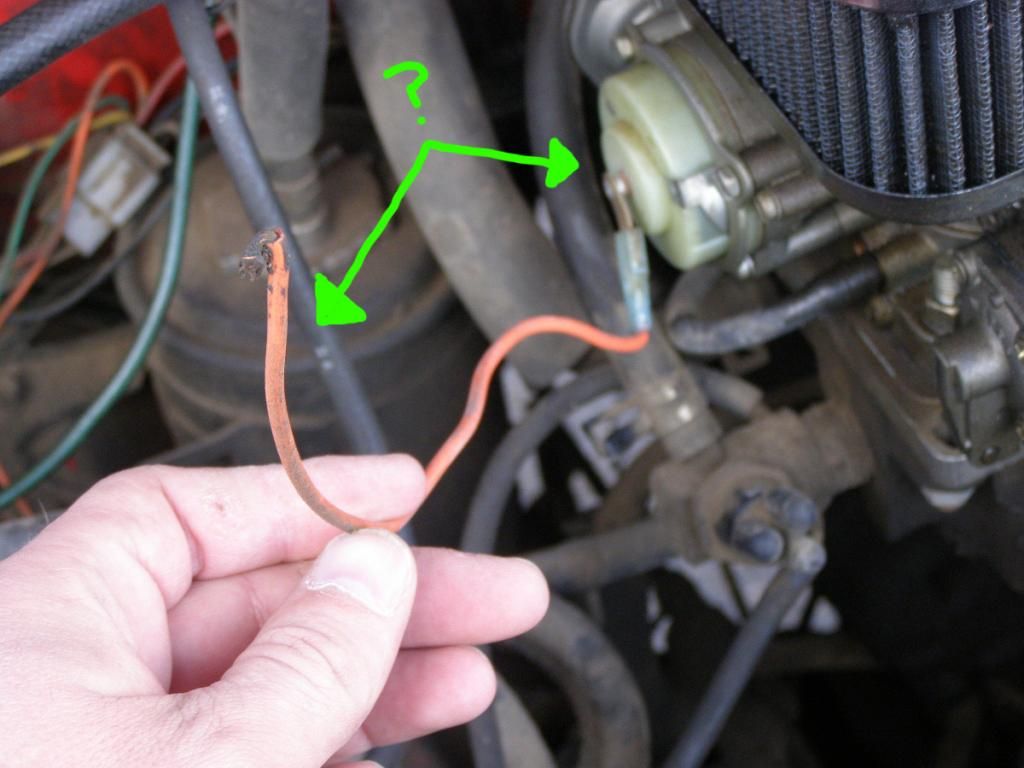
What do these wires go to and why would they be cut up like this?

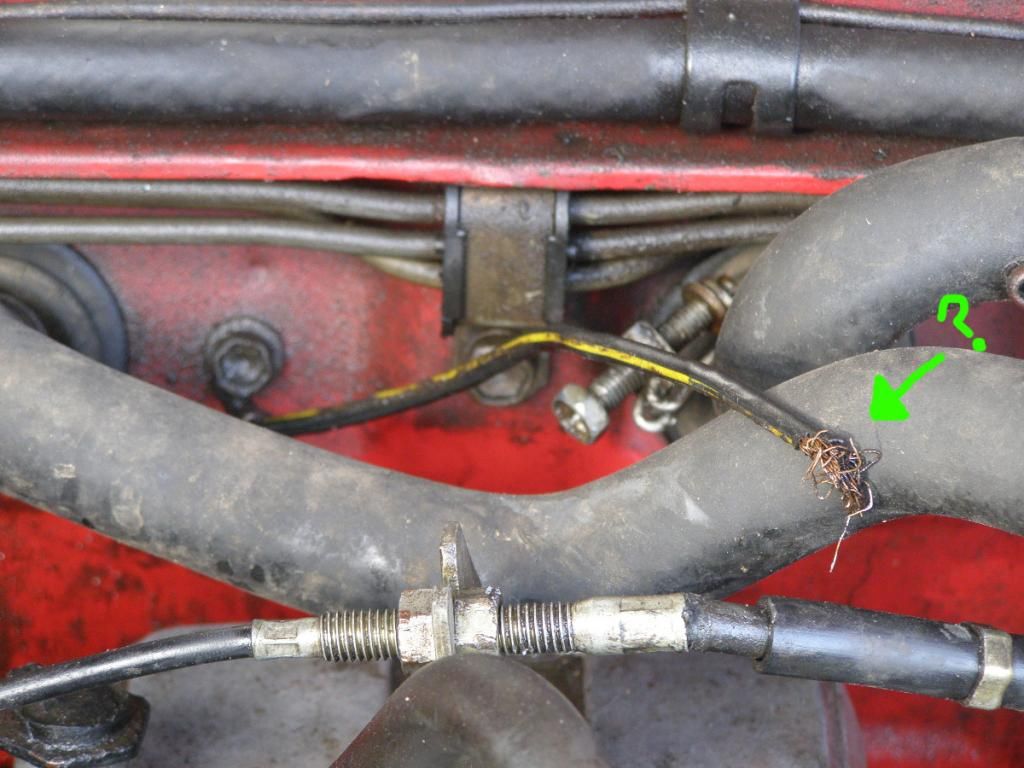
I have a good inkling that this is/was a ground wire, but for what?
...and does it probably need to be regrounded if it's still there?
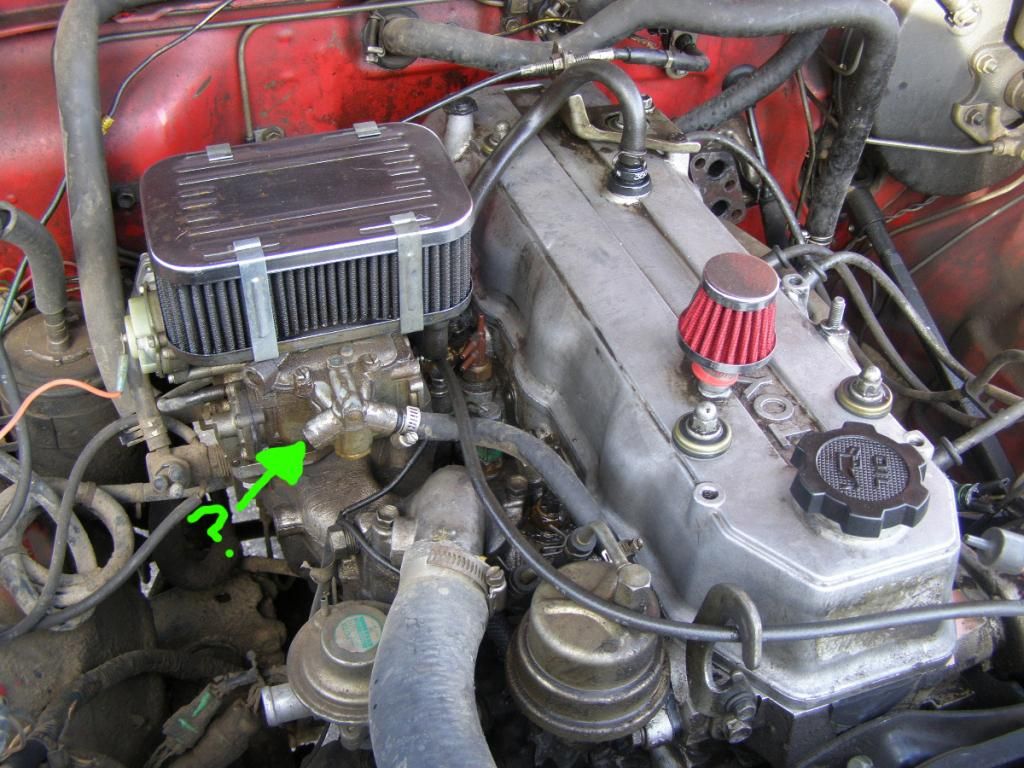
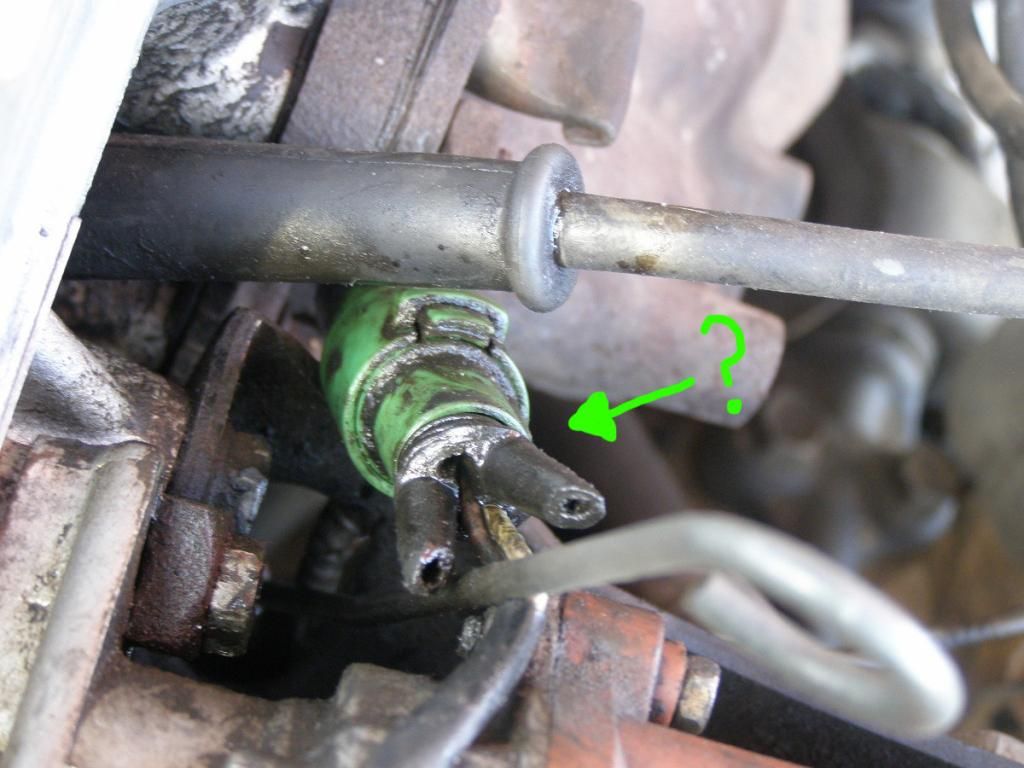
There is a tube coming out of one side, should there be one coming out of this side as well?
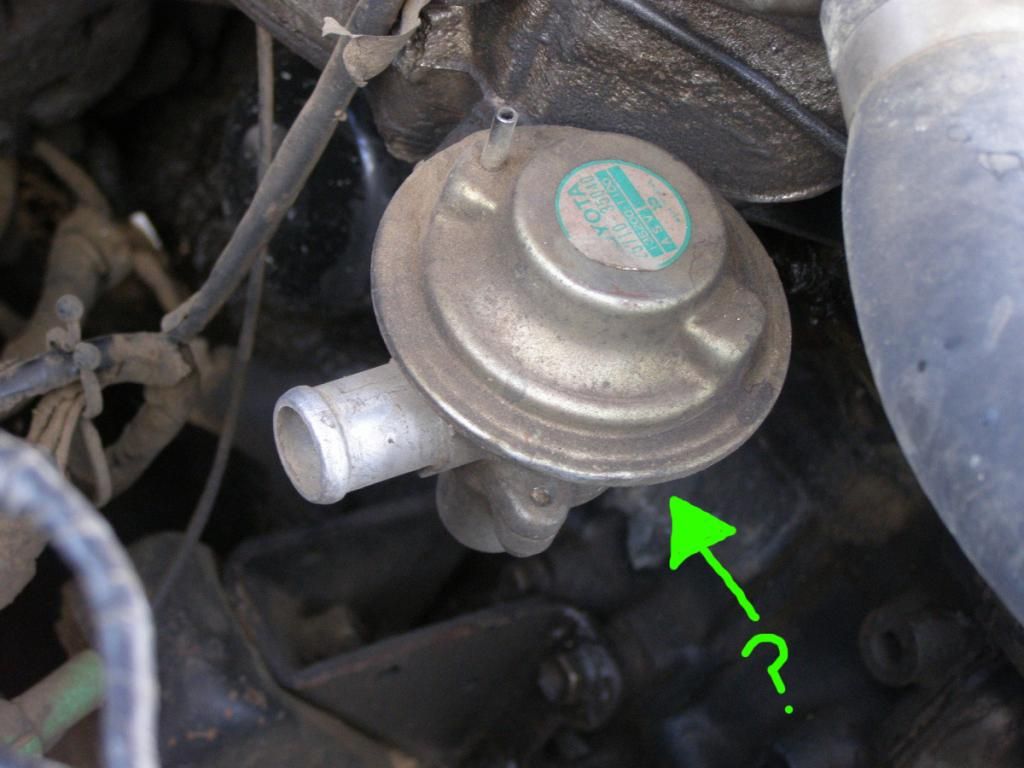
What's this thing for?

Again, what's this thing for?
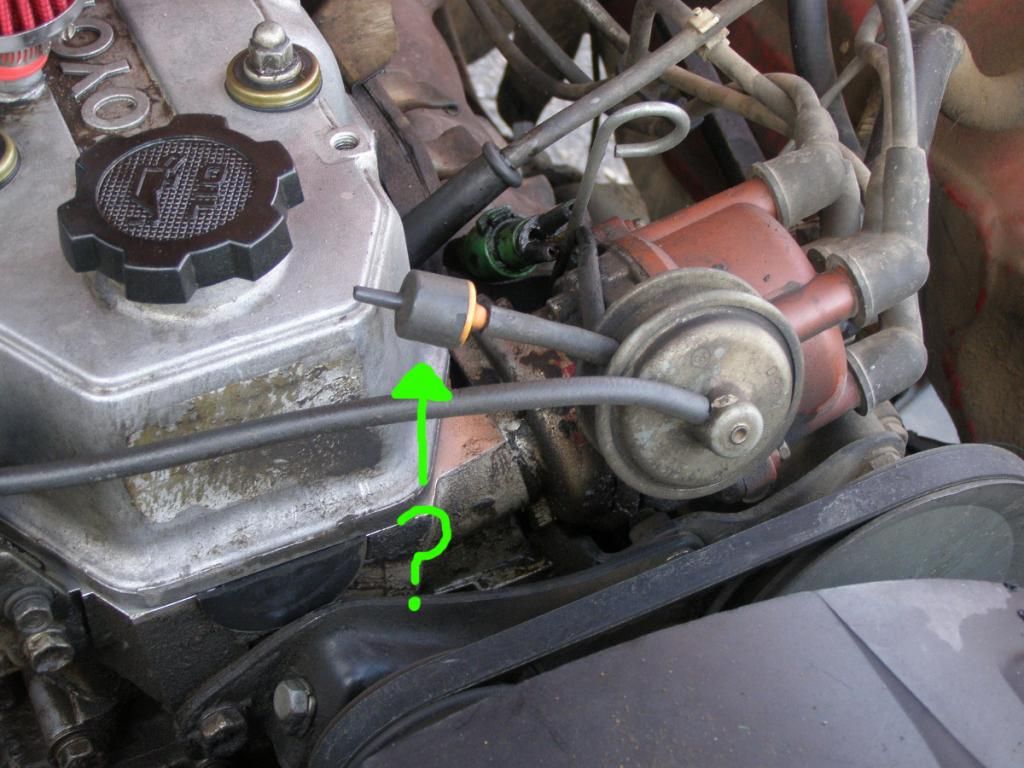
Should this wire being going to something and what is the thing it's attached to?
What is this thing?
I am going to assume that this is for Air Conditioning, am I right?

What is this for?
What do I connect it to if anything?
I can put in gas, change the oil and oil filter (on most cars), sometimes a fuel filter and change a flat tire but that is pretty much where it ends.
I just purchased a 1987 Toyota Hilux and muddled through replacing the valve cover gasket and adding a filter type thing to the top....I was quite proud of myself.
Anyway, I'll add some pictures and I am curious to know what, if anything, the depicted items are called, used for, and if I need them hooked up, fixed, etc.
Please forgive my ignorance, but I am trying to learn.
Thank you for any and all help!
I know it's a battery cable, but the wiring looks like a hackjob....is there a better way?
What are these tubes and why are they folded up like this?
What do these wires go to and why would they be cut up like this?
I have a good inkling that this is/was a ground wire, but for what?
...and does it probably need to be regrounded if it's still there?
There is a tube coming out of one side, should there be one coming out of this side as well?
What's this thing for?
Again, what's this thing for?
Should this wire being going to something and what is the thing it's attached to?
What is this thing?
I am going to assume that this is for Air Conditioning, am I right?
What is this for?
What do I connect it to if anything?
 12-07-2012, 04:18 PM
#2
Registered User
Wow someone had a wiring nightmare party!!!!! First pic looks like some sort of aftermarket relay, pic 4 looks to be a body ground, I would start following the wires that are cut and see where they go. All the other pics looks like they went nuts on deleting emission equipment.
Does it run good? Any issues? Looks to be a mess though
Search google images or the board here and see if you can get a good close up of an engine bay that might help too.
Does it run good? Any issues? Looks to be a mess though
Search google images or the board here and see if you can get a good close up of an engine bay that might help too.
 12-07-2012, 04:56 PM
#3
Registered User
Join Date: Jul 2012
Location: Seattle, WA
Posts: 416
Likes: 0
Received 0 Likes
on
0 Posts
Wow, what a mess! I might be able to point you in the right direction with some of this. Here we go...
Pic 2 is the start of the EGR system. Usually you would use a block off plate instead of crimping the tubes like that, but it has the same effect.
Pic 10 is the next part of the EGR system where the cut off, crimped tube would have gone.
Pic 7, I think, is the EGR valve.
Pic 4 is one of the grounds. this one goes from the firewall to somewhere on the head. I put mine where the hoisting hook bolts to the head.
Pic 6 looks like the should have vacuum lines on them. Not sure what for or where they go to though.
The last pic, that looks normal, but I'm not 100%.
Whew...hope that helps a little.
12-07-2012, 05:14 PM
#4

Pic 6 is a temp controlled vacuum switch.
Pic 8 is an electronic choke.
Pic 9 is the connector for the distributor pick up coil "i think"
Been a while since I've worked on a carbed 22r but maybe thats an aftermarket carb and someone decided to remove what they thought was extra/unnecessary smog and vacuum components.
Pic 8 is an electronic choke.
Pic 9 is the connector for the distributor pick up coil "i think"
Been a while since I've worked on a carbed 22r but maybe thats an aftermarket carb and someone decided to remove what they thought was extra/unnecessary smog and vacuum components.
12-07-2012, 05:31 PM
#5
Registered User
Join Date: Sep 2008
Location: middle of no where Alaska
Posts: 4,355
Likes: 0
Received 2 Likes
on
2 Posts
-----------
1. Not sure. A relay of some sort.
2. see above.
3. Not sure. Could be lots of things. Follow the wires.
4. Engine ground. It should be attached to the the bolt holding the hook onto the head.
5. I am not familiar with Carbs, but I do not believe there should be anything attached there in stock form.
6. A vacuum port. I believe it is part of Fuel Injection.... Why its on your Carb, I do not know.
7. Reed valve for #2 and #10.
8. Electric choke?
9. Does that attach to the distributor? Where does it run to?
10. See above
11. Part of the Vacuum advance on the distributor.
It almost looks like your vehicle originally had fuel injection. Do any of the tags under the hood mention it being a 22R or 22RE? If its not originally a 22re, it seems like someone used fuel injection parts on a rebuild of some sort....
12-07-2012, 05:55 PM
#6
Registered User
Thread Starter
Thanks for all of the replies fellas.
I'll have to look under the hood to see if I see anything listed as such, but pretty sure it was carbed to begin with....just added the aftermarket imitation Weber (Read up on here and found out mine is a fake from Spain)
It does not run very optimum right now, sputters about midway through throttle in 3rd and 4th..... haven't even tried it in 5th yet.
When I bought it the dude had the throttle set so frickin' high it sounded like the engine was going to blow.
I turned down the idle a bit, but now when I come up to a stop it starts to die unless I give it gas before I stop....which makes stopping a pain.
Trending Topics
 12-07-2012, 06:30 PM
#12
Hmmm..not bad on the outside..glad.the PO took better care of the outside better..dude had no clue under the Hood.
I have always like the turbine style wheels since I was a kid
Edit: I hear you--i am working on an hour of sleep in last 28 hrs...the small tube off the distributor needs to be extended to the Carb.
You should be able to find the vaccum diagram under the Hood or a downloadable factory service manual.
Sorry am on my phone and.don't have the link handy..
Last edited by dropzone; 12-07-2012 at 06:34 PM.
 12-07-2012, 06:43 PM
#14
You should totally be able.to fix it.
I did find a link for Weber Carb stuff
https://www.yotatech.com/forums/f123/weber-carb-info-241822/
Working on the manual link
I did find a link for Weber Carb stuff
https://www.yotatech.com/forums/f123/weber-carb-info-241822/
Working on the manual link
12-07-2012, 07:27 PM
#16
Registered User
Love the old school wheels but holy frickin moly let's not fix the rust lets just cut everything off!! Amazing what people do to vehicles. Other than the obvious looks to be a lot of work but it will come together. Research and fix little bits at a time it will come together nicely. Welcome to the site, start your own build fix thread on what you do and make sure to mob us with pics we love pics!!!!!
we love pics!!!!!
12-07-2012, 09:37 PM
#17
Registered User
Join Date: Nov 2012
Location: florida
Posts: 698
Likes: 0
Received 0 Likes
on
0 Posts
lmao wow looks like my dad worked on that truck lol but both of his run goodish one purs one lopes like a v8
but i think the green plug in pic9 gose to the back of altarnater
looks like your truck was reworked a couple of times and they left the old wiring and didnt cap off old vac lines
but i think the green plug in pic9 gose to the back of altarnater
looks like your truck was reworked a couple of times and they left the old wiring and didnt cap off old vac lines
Last edited by Stetson_md; 12-07-2012 at 09:41 PM.
12-07-2012, 11:46 PM
#18
Registered User
Thread Starter
When I looked at the pic before I bought it I thought he hacked up the tin as well, but it's all there! Just rhino-lined is all.
This Hilux is all there!
This Hilux is all there!
12-12-2012, 09:20 PM
#19
Registered User

Just to add or to confirm what others have said:
Pic 1 top: aftermarket relay.
Could be for that alarm that is in the same pic.
Pic 1 bottom: a whooole bunch of power eyelets connected to the positive side of the battery.
Pic 2, 7 & 10 are all related: they are part of the Air Injection or Air Suction system for emissions.
That system will add air from the air cleaner to the exhaust to control emissions.
Pic 3: a spaghetti factory of, what appears to be, aftermarket wires.
Pic 4: rear ground strap. From body (firewall) to back side of cylinder head.
Pic 5: since that look like an aftermarket Weber carburetor, I would answer no on the 2nd tube.
It has the casting in the body of the carburetor for the purpose of orienting the carburetor on different vehicles. Since yours is the 22R, the fuel inlet tube is on that side. If the carburetor was going on a different vehicle the carburetor would be positioned differently with the fuel inlet on the other side.
Pic 6: Bi-metal Vacuum Switch Valve (BVSV) for the original Aisan carburetor.
The purpose of the BVSV is to control vacuum for the Auxiliary Acceleration Pump (AAP) and the Choke Opener.
Pic 7: see Pic 2 explanation above.
Pic 8: wire to power the aftermarket carburetor choke.
Pic 9: that is the connector plug for the Signal Generator (a.k.a. Pickup Coil) inside the distributor.
Pic 10: see Pic 2 explanation above.
Pic 11: that looks to be a one-way vacuum valve (check valve) to cap off the sub-diaphragm on the distributor.
That modification is related to the aftermarket carburetor. The OEM Aisan carburetor used both ports on the distributor diaphragm.
12-13-2012, 06:53 PM
#20
Registered User
Join Date: Oct 2007
Location: Roy, WA
Posts: 606
Likes: 0
Received 0 Likes
on
0 Posts
The unplugged vacuum lines are un-needed emissions crap, same with the tubes on the exhaust manifold and leading behind the head. Cap the one on the distributor, you don't have anywhere to put it on that Weber. Unless you need to pass smog with this truck, your head is being filled with worry about nothing by a few folks in this thread.


