First Gen 4Runner Leaf Packs
 05-30-2013, 09:09 AM
#1
Registered User
Thread Starter
Join Date: Nov 2012
Location: Las Vegas, NV
Posts: 78
Likes: 0
Received 0 Likes
on
0 Posts
First Gen 4Runner Leaf Packs
Ok so I have done alot of looking around on these forums for suggestions on leaf packs. I have found the ZUK mod threads and they are cool but I would rather go the leaf spring route. The problem is that all the leaf spring threads and recommendations are for Downey and OME for the most part with your occasional "I got the Skyjacker leaf pack and it did _____ for my truck."
While I appreciate the information that is available I am sure that myself and many others could benefit from a bit more information. Such as how much lift was achieved from center of the axle to the fender, maximum minimal travel and maybe even what kind of shocks you used with your new leafs. At a minimum a manufacturer and a part number would be a great start!
I know that all the major brands(Skyjacker, Rancho, Superlift, etc.) list the additional lift per shock. It is a shot in the dark picking the ones that work best for you though because 25 year old trucks are all "unique". So what is the reference point that the companies use to decide how my truck will sit.
So I am hoping me and all the other new guys with the help of you guys who have already done it can give us some examples of what you put on and how it affected your ride.
My particular situation is stock flat leaf packs with 4 inch lift blocks to compensate and give a little lift. from the ground to fender is " and from the center of the hub to the fender is ". I am sure that this situation is common with alot of these old trucks. Sometimes you have to go the cheap route with the lift blocks, but when you can afford to I am sure all will agree that it is best to get rid of them!
Thanks in advance from all of us who have flat leaf packs and lift blocks installed by PO's that we want to get rid of.
 05-30-2013, 09:47 AM
#2
I have no need for lifting my vehicles so I just go with Stock replacement springs.
I buy all my Springs from General Spring in Kansas City Kansas ..
Better price Shipped to the garage then the place a few miles away.
These are great people to deal with .
I guess it comes down to just what you want to do.
I buy all my Springs from General Spring in Kansas City Kansas ..
Better price Shipped to the garage then the place a few miles away.
These are great people to deal with .
I guess it comes down to just what you want to do.
05-30-2013, 12:57 PM
#3
Registered User
Thread Starter
Join Date: Nov 2012
Location: Las Vegas, NV
Posts: 78
Likes: 0
Received 0 Likes
on
0 Posts
I have no need for lifting my vehicles so I just go with Stock replacement springs.
I buy all my Springs from General Spring in Kansas City Kansas ..
Better price Shipped to the garage then the place a few miles away.
These are great people to deal with .
I guess it comes down to just what you want to do.
I buy all my Springs from General Spring in Kansas City Kansas ..
Better price Shipped to the garage then the place a few miles away.
These are great people to deal with .
I guess it comes down to just what you want to do.
Distance between wheel hub and fender both front and back?
Tire size?
Fender height front and rear?
Anything that would alter stock height(BJS, Torsion adjustment, etc.)?
This would give me a great idea of the factory specs for a reference point. I would really appreciate your help!
05-30-2013, 02:51 PM
#5
The tires are Merit 235 -75/15" XLT All Country M/T
tread about 3/8 left on all 4 wheels Tire pressure is around 35 PSI
These are quick measurements so they could be off a tad
Front Hub to Fender 20 3/8" Ground to fender 34 1/2"
rear hub to fender 17 1/4" Ground to fender 31 1/2"
The only thing that might cause any difference is the amount of weight in the vehicle All other suspension is stock
05-30-2013, 03:30 PM
#6
Registered User
Thread Starter
Join Date: Nov 2012
Location: Las Vegas, NV
Posts: 78
Likes: 0
Received 0 Likes
on
0 Posts
Wow, thanks for helping out to both of you. It was reassuring to see that you both came in with about the same measurements. Hell even the rear is exactly the same considering the extra half inch Stetsons mom has from her tires I will figure out what I am gonna do and I will post the results for future use to those who have similar questions.
Currently I am running 265 75/16 all around with about 22 inches in front and 21.5 inches in back from center of hub to fender. My tires are about 31.6 inches by 10.5 which means my torsion bars are adjusted for about 1 inch of lift in front and I have about 3 inches of lift on the back.
So now I am leaning towards a 2-4 inch lift on the back and adjust the front torsion bars or add ball joint spacers to relax them. I have heard mixed reviews on the BJS so I am unsure about that.
Thanks for your help again guys! You have made things much clearer for me.
Trending Topics
06-09-2013, 12:12 PM
#8
Registered User
Thread Starter
Join Date: Nov 2012
Location: Las Vegas, NV
Posts: 78
Likes: 0
Received 0 Likes
on
0 Posts
Well I would have a better update on this but Summit sent me a leafpack for a land cruiser. So I ordered from Amazon and the installation of my new rear springs is set back a week. I will post results when it is complete.
06-19-2013, 09:16 PM
#9
Registered User
Thread Starter
Join Date: Nov 2012
Location: Las Vegas, NV
Posts: 78
Likes: 0
Received 0 Likes
on
0 Posts
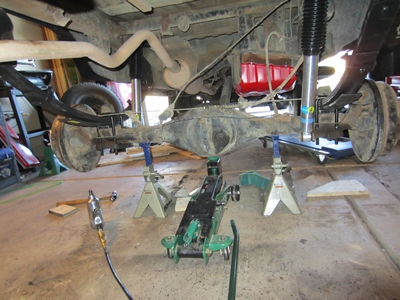
So it all started out looking like this.
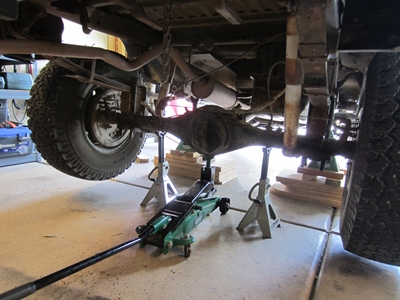
I left the truck hanging about a foot and a half out of the garage to give me extra room to work because this was only going to take a few hours and then I was going to take my wife to the drive-in... or so I thought.
So along the way I came up with this little idea. I am sure some of you have used it before, for those who haven't maybe it will come in handy when breaking loose hard to get to bolts.
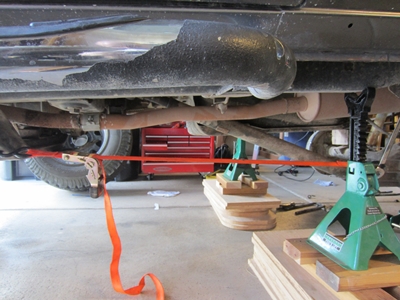
Anyways so right after my proud moment of what I thought was a great idea, I discovered there was no way I was getting those bolts out. I gave up after a while of trying to figure out and feeling defeated. Then I had to figure out how to get it back all the way in my garage without completely reassembling it. I ended up having a buddy come over, we put floorjacks under the u bolt brackets and pushed the truck back. It took us a good bit to figure out how exactly to do this, would have been nice to have a Hi-Lift.
So tips and lessons learned.
Don't disassemble everything in a place that isn't ok to leave it if you dont finish as quickly as expected.
A Cargo strap makes for one hell of a nice breaker in tight space.
leaf spring brackets are a nightmare.
Day 2
So I got the front side of the springs loose by the following.
Drivers side: I cut off the bolt flush with the bracket on both sides with an angle grinder. I set the bushing on fire with a torch and then hammered the bolt out.
Passenger side: It was more difficult because I had no intention of dropping the gas tank. I cut off the bolt flush with the bracket again. In order to access the backside without moving the gas tank I had to cut the leaf spring in half close to the bracket. Angle grinder again. This side was tougher to get out since the bushing was still in tact. I drilled a hole in the end of the bolt to keep my punch from slipping. I punched it through and then beat it out. It took some doing but did no damage to the bracket. Here is where I was finally.
So during the downtime I removed the rust and painted the gas tank slider, bumpstops, and hangers.
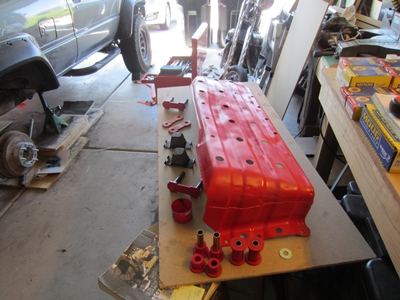
Sure it is kinda flashy but I like the look and it will help protect against corrosion.
So I reinstalled everything and added new shocks to compensate for the length. As you can see in my picture my brake line is pretty much maxed out and a hard right flex will probably snap it so I am goin to get a new one. That one is for one of the old Toyota Van's it is the front line. same fittings and specs except it is a few inches shorter. Great for getting a couple inches, not so much for the 4 inches I got.
Before: 36.5"
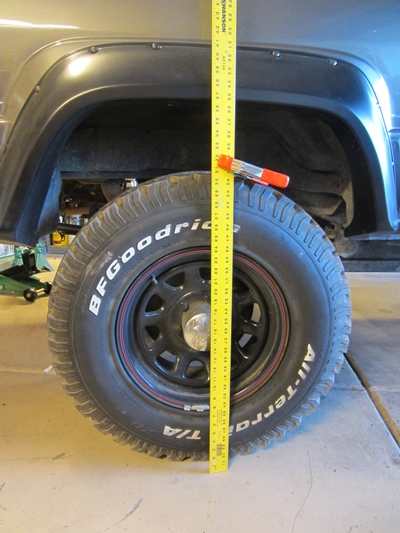
After: 41.25" (It settled to 40.5" in the first 5 days)
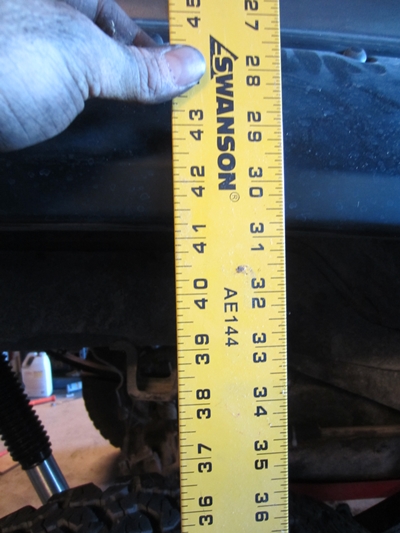
So I netted about 4.75 inches. This is with the top off and I am sure they will settle a bit. Skyjacker advertises that you get 4 inches from these on a 4 runner, 6 on a pickup.
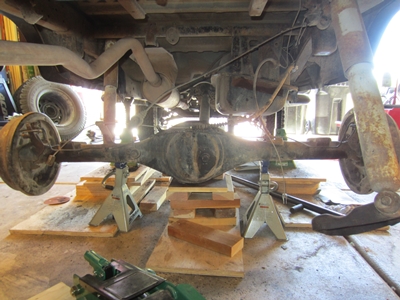
This is what she looks like underneath now.

Day 2 takeaway notes. When you install the TR60S springs they will not reach the shackles. My solution for this was to bolt the front and then I put the min the hangers with the hangers fully forward. After that I cargo strapped to my tow hitch and in front of rear spring eye then pulled the hanger into place. once you apply the weight on the vehicle, torque it down and it will stay in place just fine! Also dont forget the longer brake hose and bushings for your shackle to shackle mount hanger. I got just the ones with the springs, didn't even think about the ones on top! They are at Autozone you just need one box to do both side as there are four which is not listed on their site.
And the final product.
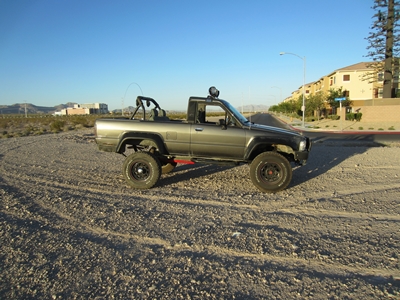
So now onto the front. I was thinking BJS before but now I am leaning toward the SkyJacker T422 bracket lift. Any thoughts? I considered going blazeland LT but that is really pricey!
The parts I used in this job were the Skyjacker TR60S springs, Duralast SK6570 shackle bushings for hangers and Bilstein 24-185752 Shocks. Hope someone finds this useful someay

I left the truck hanging about a foot and a half out of the garage to give me extra room to work because this was only going to take a few hours and then I was going to take my wife to the drive-in... or so I thought.
So along the way I came up with this little idea. I am sure some of you have used it before, for those who haven't maybe it will come in handy when breaking loose hard to get to bolts.

Anyways so right after my proud moment of what I thought was a great idea, I discovered there was no way I was getting those bolts out. I gave up after a while of trying to figure out and feeling defeated. Then I had to figure out how to get it back all the way in my garage without completely reassembling it. I ended up having a buddy come over, we put floorjacks under the u bolt brackets and pushed the truck back. It took us a good bit to figure out how exactly to do this, would have been nice to have a Hi-Lift.
So tips and lessons learned.
Don't disassemble everything in a place that isn't ok to leave it if you dont finish as quickly as expected.
A Cargo strap makes for one hell of a nice breaker in tight space.
leaf spring brackets are a nightmare.
Day 2
So I got the front side of the springs loose by the following.
Drivers side: I cut off the bolt flush with the bracket on both sides with an angle grinder. I set the bushing on fire with a torch and then hammered the bolt out.
Passenger side: It was more difficult because I had no intention of dropping the gas tank. I cut off the bolt flush with the bracket again. In order to access the backside without moving the gas tank I had to cut the leaf spring in half close to the bracket. Angle grinder again. This side was tougher to get out since the bushing was still in tact. I drilled a hole in the end of the bolt to keep my punch from slipping. I punched it through and then beat it out. It took some doing but did no damage to the bracket. Here is where I was finally.

So during the downtime I removed the rust and painted the gas tank slider, bumpstops, and hangers.

Sure it is kinda flashy but I like the look and it will help protect against corrosion.
So I reinstalled everything and added new shocks to compensate for the length. As you can see in my picture my brake line is pretty much maxed out and a hard right flex will probably snap it so I am goin to get a new one. That one is for one of the old Toyota Van's it is the front line. same fittings and specs except it is a few inches shorter. Great for getting a couple inches, not so much for the 4 inches I got.

Before: 36.5"

After: 41.25" (It settled to 40.5" in the first 5 days)

So I netted about 4.75 inches. This is with the top off and I am sure they will settle a bit. Skyjacker advertises that you get 4 inches from these on a 4 runner, 6 on a pickup.
This is what she looks like underneath now.

Day 2 takeaway notes. When you install the TR60S springs they will not reach the shackles. My solution for this was to bolt the front and then I put the min the hangers with the hangers fully forward. After that I cargo strapped to my tow hitch and in front of rear spring eye then pulled the hanger into place. once you apply the weight on the vehicle, torque it down and it will stay in place just fine! Also dont forget the longer brake hose and bushings for your shackle to shackle mount hanger. I got just the ones with the springs, didn't even think about the ones on top! They are at Autozone you just need one box to do both side as there are four which is not listed on their site.
And the final product.

So now onto the front. I was thinking BJS before but now I am leaning toward the SkyJacker T422 bracket lift. Any thoughts? I considered going blazeland LT but that is really pricey!
The parts I used in this job were the Skyjacker TR60S springs, Duralast SK6570 shackle bushings for hangers and Bilstein 24-185752 Shocks. Hope someone finds this useful someay
Last edited by Bama; 06-23-2013 at 09:57 AM.
06-25-2013, 02:30 PM
#10
Registered User
Thread Starter
Join Date: Nov 2012
Location: Las Vegas, NV
Posts: 78
Likes: 0
Received 0 Likes
on
0 Posts
Well I ended up going with the Skyjacker T422, it came in today. As soon as I recover from my surgery I will be getting it installed to level out that truck and then I will be able to fit bigger tires!
07-03-2013, 05:59 AM
#11
Registered User
This is great, please keep us up on the progress of the front end! I have an '87 I am restoring to original specs and one of my next projects is to replace the old sagging rear springs. No lift, just back to where she sat in 1987, and your pics and tips are already helping. By the way, I'm originally from Reno and I love seeing the pictures of that desert. "Home means Nevada to me."
Thanks!
Thanks!
07-03-2013, 07:45 AM
#12
Registered User
Thread Starter
Join Date: Nov 2012
Location: Las Vegas, NV
Posts: 78
Likes: 0
Received 0 Likes
on
0 Posts
Sure thing and thanks! So for the front end I am working on getting everything pulled off. So far I have pulled off everything with the steering system except the steering idler arm. It needs a bigger puller than the other components.
The problem has come with the Lower Control Arms. One of the 4 camber bolts came right out. The other 3 are rustwelded into the bushings and I am having a hell of a time getting them out. The right one I cut out but I still have to get the bushings out of the control arm. The left one is still being a pain in the butt. So after trying to get them off if they are rust welded you have to get new bolts and bushings. Bushings are gonna be $80 per side for Moog. For a total of $160 and the bolts are going to be 60 from the dealer. So that is another $220 I added onto the job along with the headache. So if you decide to replace those then be ready for that lol. I have spent more on the front and rear end than some people pay for their trucks haha! So yeah it is a headache. I will update with tips and pictures when I finish, whenever that is....
The problem has come with the Lower Control Arms. One of the 4 camber bolts came right out. The other 3 are rustwelded into the bushings and I am having a hell of a time getting them out. The right one I cut out but I still have to get the bushings out of the control arm. The left one is still being a pain in the butt. So after trying to get them off if they are rust welded you have to get new bolts and bushings. Bushings are gonna be $80 per side for Moog. For a total of $160 and the bolts are going to be 60 from the dealer. So that is another $220 I added onto the job along with the headache. So if you decide to replace those then be ready for that lol. I have spent more on the front and rear end than some people pay for their trucks haha! So yeah it is a headache. I will update with tips and pictures when I finish, whenever that is....
07-06-2013, 08:58 PM
#14
Registered User
Thread Starter
Join Date: Nov 2012
Location: Las Vegas, NV
Posts: 78
Likes: 0
Received 0 Likes
on
0 Posts
Honestly man I haven't gotten enough time in it to give you a good answer. I will tell you that I immediately noticed improvement over those stupid blocks. I had surgery the day after I installed it so I only got to drive it maybe 15 miles. I just got released by the doc to start normal activities and I am installing the front lift now. It should be done in the next few days, I am just waiting on parts. Once it is finished and I have the chance to take it off road I will post some pics and let you guys know what I think. We will see if it has any flex, I dont know if there will be much, those leafs are pretty curved. I am sure with some time on them they will settle out a bit and get better. Ill try and give you an update soon and another one in a couple of months if anyone is still interested.
Edit: I just reviewed your build thread, looking good man! I will def let you know you aren't liking the Zuk Mod? I actually ordered springs to do it but I wasn't happy with the size I ordered. I just got new Leaf packs instead haha. I really wanted to try it out though! Let me get this truck out a bit and I will get back to you. Hopefully you will hear back from me within a week or two but I can't make any promises. Between work and being a few weeks away from my son being born I am pretty busy.
Edit: I just reviewed your build thread, looking good man! I will def let you know you aren't liking the Zuk Mod? I actually ordered springs to do it but I wasn't happy with the size I ordered. I just got new Leaf packs instead haha. I really wanted to try it out though! Let me get this truck out a bit and I will get back to you. Hopefully you will hear back from me within a week or two but I can't make any promises. Between work and being a few weeks away from my son being born I am pretty busy.
Last edited by Bama; 07-06-2013 at 09:25 PM.
07-07-2013, 11:52 AM
#15
Registered User
I have SkyJacker rear leaf springs on my 4 Runner but with 3" blocks and longer shackles. I needed 6" of lift to match the front combo kit. I dialed the rear to get the lift I needed but there were some issues because of the blocks. As for the ride it was decent and I was able to get good articulation. The blocks however over leveraged the torque of the axle creating wheel hop and axle wrap. The longer shackle allowed the leaf spring to go into negative arch even with 2" thick shims to the bump stops and I damaged the springs 1st trip out to TDS.
I'd say as long as you don't modify things like I did these springs are a decent affordable way to get some lift. The Skyjacker leafs have work well on the front of my 1985.
Bama, tell us about your experience swapping out those Moog LCA bushings, I have never gone that route? Any reason you didn't do a Poly bushing conversion all around? A number of mfg's offer Poly Bushing kits for all four control arms- for around $60. Are you still feeling installing Blazeland Long Arms was out of your budget? I would think there is quite a bit more work installing a drop bracket kit and rebuilding control arms.
I dig on those Bushwacker fender flares!
07-07-2013, 02:06 PM
#16
Registered User
Thread Starter
Join Date: Nov 2012
Location: Las Vegas, NV
Posts: 78
Likes: 0
Received 0 Likes
on
0 Posts
Did you get the TR40s or the TR60s springs? The axle wrap was the main reason I got rid of the blocks. Mine were 4 inch blocks. I could feel it a bit but that is all taken care of now. I am thinking the longer shackles probably helped you with articulation? I don't know alot about such things but it seems like it would give the springs a little bit more room to compress?
Well my experience was pretty much terrible. I am definitely going to go into detail about that on my write up in a few days. To be brief about it for now though, there were some unexpected expenses that came along with it, and there were also many bumps in the road. I would expect that once I am finished with my writeup anyone who reads it will probably direct their business to Blazeland lol. As for me, what is done is done and here I am with my bracket lift. Hindsight is always 20/20. I went with the moogs because I got sick of trying to get the old bushings out. I actually ordered the polys which I got Prothane for $37. The down side was that they didn't have the inner or outer metal sleeves with that kit. Maybe the more expensive one does? Anyways more to come in the next couple of days. The machine shop will get my LCAs back to me on tomorrow and hopefully my Eccentric bolts will come in the mail also.
Thanks, I wanted them for a long time and I ordered them while I was deployed as a welcome home present. They were an easy install. I feel better not having to worry about throwing rocks and busting peoples windshields lol.
07-08-2013, 09:52 PM
#17
Registered User
I'd have to check my paperwork. I do remember that on a pickup it was a 4" lift while a 4 Runner it was 3" The difference was due to weight.
As for the poly bushing kits they all require (as far as I know) re-using the steel inner sleeves and captured washers. The problem is on the inner sleeves the nub that captures the washers sometimes ruptures or rips off then your screwed. I had 80 of the steel sleeves machined (reproduced) to replace the damaged ones for my kits and have sold some here and there as special request.
I designed and built a prototype for a re-usable washers and sleeves set but its not finalized. Its going to be expensive to machine these items so it may be not pan out.
07-09-2013, 06:59 AM
#19
Registered User
Thread Starter
Join Date: Nov 2012
Location: Las Vegas, NV
Posts: 78
Likes: 0
Received 0 Likes
on
0 Posts
I'd have to check my paperwork. I do remember that on a pickup it was a 4" lift while a 4 Runner it was 3" The difference was due to weight.
As for the poly bushing kits they all require (as far as I know) re-using the steel inner sleeves and captured washers. The problem is on the inner sleeves the nub that captures the washers sometimes ruptures or rips off then your screwed. I had 80 of the steel sleeves machined (reproduced) to replace the damaged ones for my kits and have sold some here and there as special request.
I designed and built a prototype for a re-usable washers and sleeves set but its not finalized. Its going to be expensive to machine these items so it may be not pan out.
As for the poly bushing kits they all require (as far as I know) re-using the steel inner sleeves and captured washers. The problem is on the inner sleeves the nub that captures the washers sometimes ruptures or rips off then your screwed. I had 80 of the steel sleeves machined (reproduced) to replace the damaged ones for my kits and have sold some here and there as special request.
I designed and built a prototype for a re-usable washers and sleeves set but its not finalized. Its going to be expensive to machine these items so it may be not pan out.
That sounds cool. Yeah as for me it would have been pretty much impossible to get that old rubber out. I tried to burn it out with Mapp but it wasnt worth the gas it would have taken!
07-09-2013, 08:17 AM
#20
Registered User
Edit: I just reviewed your build thread, looking good man! I will def let you know you aren't liking the Zuk Mod? I actually ordered springs to do it but I wasn't happy with the size I ordered. I just got new Leaf packs instead haha. I really wanted to try it out though! Let me get this truck out a bit and I will get back to you. Hopefully you will hear back from me within a week or two but I can't make any promises. Between work and being a few weeks away from my son being born I am pretty busy.


