When you click on links to various merchants on this site and make a purchase, this can result in this site earning a commission. Affiliate programs and affiliations include, but are not limited to, the eBay Partner Network.
Question, I'm getting ready to do this procedure so that I can eliminate the slop I have on my Non-ADD passenger side. I have read on other threads that you have to remove the needle bearing on the drivers side so that the non-ADD axle will slide into the carrier but it was not mentioned in this thread. Is there any truth to this or can I leave the needle bearing in?
is there supposed to be a seal behind that gear like the passenger side? I got mine out with no seal present.
Is this to allow oil to flow to the ADD housing?
is there supposed to be a seal behind that gear like the passenger side? I got mine out with no seal present.
Is this to allow oil to flow to the ADD housing?
I�ve been reading all about this, and really glad you posted this pic, it tied things together for me I think- would be nice to get someone to confirm. This is my interpretation of the steps for eliminating the add.
1. Remove add differential (in my case 4 cyl. 7.5� ifs add differential) from vehicle.
2. Remove add �axle tube� from carrier
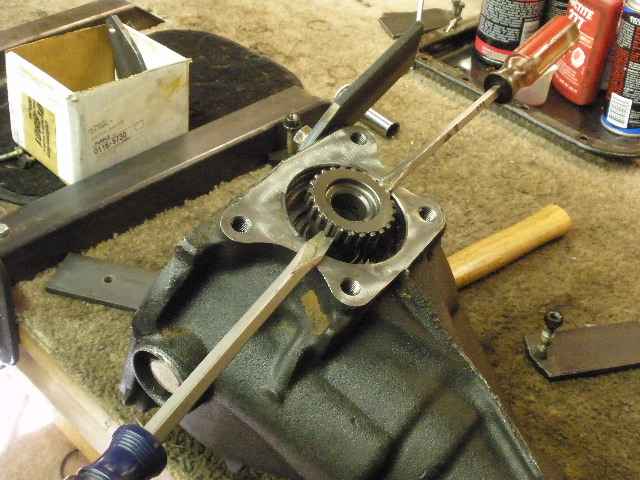
3. Once the add axle tube is removed there will be a small gear looking thing left in the carrier where you just separated the axle tube from the carrier- that is part of the old add system- basically it�s the part that will engage or disengage when the add shift fork slides over to make 4wd active- that gear needs to be removed, leaving you with the condition shown in the picture above.
4. Install the required seal that zuk mentions on his site (you can buy it from dealerships or yota shop.com)into the void shown in picture above.
5. Bolt on non add axle tube to carrier
please update/correct this if you have actually performed the operation. I�m still confused why people say you can just pry that small gear out of the carrier- they specifically say there�s a snap ring on the inside- if you pry it out did you just release a snap ring to be ground up in your carrier? Seems like removing cover, removing snap ring, and then prying out with bars/screwdriver would be the right way.
The snap ring is a spring wire type that is captive in the axle stub and it will come out on it.
No worries. Just pop that stub out. No need to remove the cover.
You WILL need to install a seal on that side.
The snap ring is a spring wire type that is captive in the axle stub and it will come out on it.
No worries. Just pop that stub out. No need to remove the cover.
You WILL need to install a seal on that side.
got it, so pry out the axle stub (gear looking thing- I�m learning!) place seal, insert non add axle and axle tube assembly, bolt it up fill with oil and call it done. Any need to replace the snap ring on the non add axle shaft? Or will it come out with the snap ring on it, and you just pound it back through? Seems like you would have to remove the cover so you could insert the non add axle shaft (without a snap ring on it) into the add carrier, then place a snap ring on the shaft as a �keeper�, then put the cover back on the carrier. Let me hear some opinions on that part, and I�ll retype the entire procedure to solve this mfer once and for all haha. Then I�ll do the operation and modify the write up if I learn anything new.
The non-ADD unit should have a spring wire ring in a grove just like the ADD axle stub does.
If there's not one, you could swap the ring from the old ADD part.
It is NOT necessary to remove the gear cover to swap these parts out.
The non-ADD unit should have a spring wire ring in a grove just like the ADD axle stub does.
If there's not one, you could swap the ring from the old ADD part.
It is NOT necessary to remove the gear cover to swap these parts out.
10-4, waiting on my new 8� for the rear so I can do both front and rear at same
time, when I get it I�ll take out my front non add diff- and trasfer both long and short axle tubes/shaft assemblies from it to my add carrier (guy must have kept his short side assembly for some reason). Reason I�m doing that is I found a 5.29 geared 7.5� add diff on Craigslist for $150, but I don�t want the add junk on there. I have seen you can lock the shifter fork in place with a zip tie or hose clamp, but I�ve also read there are benefits of the add carrier- mainly the needle bearing it has on the long side axle tube that isn�t on the non add diff. I was able to remove the axle stub just now as shown in zuk step by step- when you�re about to say it can�t be done yell something like brrmggffff and it�ll come out. I then used a 2� schedule 40 pvc coupler, 2lb sledge, and wood block to gently tap in the new seal on the long tube side- only advice there is to go slow, I started too hard the first time and had to dig the seal back out and try again because it got wonky on me. The seals come in two packs- I�m not going to replace the short side cause it seems to be in good condition and I do not own a seal puller. I�ll post some pics
Your 4WD light will no longer light up with that ADD stuff removed.
The ADD shift collar position indicator is what put power to that dash light.
Should be possible to wire that light into the switch on the transfer case somehow, but I've never done it.
Here�s some notes having completed the swap of non add axle shaft tubes onto add clamshell.
1. Definitely nock the splined stud bolts out of the end of the long side axle tube as zuk suggests in his step by step. I did not grind the splines off as he suggests- I think that�s a waste of time personally- just suck them back in on the reinstall. Removing those bolts made it way easier to put everything back in- I was able to do it by myself. No need to mess with that on the short side. Actually better to leave them as is on the short side, then when you reinstall you can push the short side into the cv and it will hold that side up while you get the long side bolts through that CV.
2. Don�t forget your lock tite on everything.
3. As mentioned above, you 100% do not need to remove the clamshell to get the shaft tubes out. It was actually really easy to remove the non add shafts from the third member- couple screw drivers.
if anyone has issues or questions on this, I learned a lot and am happy to help, I wouldn�t have been able to do this without the help of this forum. Thanks everyone!
Just a question on seal depth, had a Spartan locker installed with a ADD delete and new side seals both sides, the driver side is leaking- looks like he messed up the seal install which I have to fix. How well does the PVC coupler trick work?
The PVC coupler is just a convenient driver that happens to be the appropriate diameter to drive the seal.
A piece of metal pipe or a large socket would work just as well if their diameter is correct.
I just examined an IFS diff I have apart and the driver side seal is seated to the bottom of it's pocket in the diff casting.
This should be correct for a factory seal.
Other aftermarket seals might well be a different thickness and require a different depthing. IDK.
Just a question on seal depth, had a Spartan locker installed with a ADD delete and new side seals both sides, the driver side is leaking- looks like he messed up the seal install which I have to fix. How well does the PVC coupler trick work?
it worked well for me- just start very slow. And like the comment below that was just an item I had where the diameter matched, anything with correct diameter will work. Keep it square/level going on, if it starts going sideways correct it by tapping more on the opposite side. It�s been a while I think I had a board over the pvc to distribute the taps and keep it straight.
I've a bit of experience with different seals, but they've always gone in a finite amount 1/ bottom out on a register or 2/ finish driven to a surface. I've never seen these diff's before and had hoped to avoid getting into this again especially after paying for it to be done. From what I have read people drive them in too far and have leaks. I grabbed a pvc sleeve and the diameter is quite a but oversize to the seal although it does catch the seal on the outside. Another thing is I didn't change to the non ADD cover plate- but I really don't see that as an issue with good seals.
Soooo got into this today and had enough QA issues that prompted me to remove diff. Loose fasteners, noticed both seals weeping.
- I had a Spartan locker installed and really never drove it since due to turbo installation and standalone project that took some time to sort.
- CV flanges just better than finger tight.
- stub shaft end damaged (dropped?) will stone it and reinstall. No steel found in case.
- long shaft has witness marks from lock pin on end.
- needle bearing cage damaged, took a punch and nudged it true, roller bearing turns with no issue.
- bolts on flange holding axle tube were loose.
- there was NO seal installed after ADD was changed out, axle tube was full of oil.
And I paid good cash for this abuse......


 09-16-2012, 05:31 AM