Strykersd's Turbo 4runner build
 07-16-2012, 10:47 AM
#81
Ugh, even with the new head gasket the 4runner still heats up on highway grades. It runs fine everywhere else, just on those darn grades! Here's what I've established so far
-replaced the thermostat with an OEM temp unit and tested that thermostat before installing it.
-pulled the aisin water pump and that checked out good. Not losing water out of weap holes and the shaft doesn't have any play
-radiator fan checks out, but I wasn't too worried about that since this only happens at highway speeds
-no coolant leaks
-for the radiator, I pulled both hoses off and put a garden hose on full blast into the top port and it all ran out the bottom. Leading me to believe that it was fine. But the garden hose was a smaller diameter than the upper radiator hose, the garden hose actually fit inside the upper radiator hose.
So at this point, I'm thinking about replacing radiator with one from radiator barn.com . Any other ideas?
 07-16-2012, 11:05 AM
#82
pic of your current radiator? might be the issue, but since you have the turbo, that throws in a few more variables
also, you won't regret the e-locker skid plate. first time out with mine and i got some nice dings and scrapes in the plate. $40 well-spent
also, you won't regret the e-locker skid plate. first time out with mine and i got some nice dings and scrapes in the plate. $40 well-spent
07-16-2012, 11:14 AM
#83
There is a pic on the first page of this build showing the backside of the radiator. It's still in the truck and I can't remove it since my other car is still in paint but from when it was out a few months ago it looked fine to me. All the fins looked good, but the truck did sit for 13 years, probably with coolant in the radiator.
While searching Autozone's website for radiators, I noticed that they sell OEM replacement antennas for just $14! I thought they only sold universal antennas! Crap, I could have saved $46! Oh well you live and you learn.
While searching Autozone's website for radiators, I noticed that they sell OEM replacement antennas for just $14! I thought they only sold universal antennas! Crap, I could have saved $46! Oh well you live and you learn.
Last edited by strykersd; 07-16-2012 at 11:34 AM.
09-05-2012, 06:01 PM
#84
Ok, I've been slacking on updating this so this is a big update! I didn't end up going out the Colorado Jamboree that I was building the 4runner up for. After working on the 4runner like crazy for weeks leading up to it, the 4runner just wasn't ready. It was still overheat on highway grades and my air conditioning had a leak so I would have been without AC. Since I had the time off, I still went out to Colorado in my car!

That's my buddy Tim on the left and me on the right.
But back to the 4runner. After spending a ton of time and money on the 4runner leading up to the Colorado Jamboree I was a little burntout so I took a break from working on the 4runner for a bit. After taking a few weeks off I started giving the 4runner a treatment I give all of my vehicles, limo tint. On my last 4runner I installed the limo tint on all the back windows, but on this one I tinted the sunroof too. Long days in the desert under a lightly tinted sunroof sucked! Here's a pic of the 4runner with the limo tint.

Since I can't drive the 4runner to any real trails due to it overheating on grades I've just done a local trail by my house a few times. Here's a shot of a panoramic with my 4runner from a few weeks back!

Next up, I ordered the one thing I always wished I had on my last 4runner a bikini top from Wabfab offroad. I ordered it May 7th so that I could have it for the upcoming summer here in San Diego. When I ordered the bikini top the website said there was a 4-6 week wait time which I was ok with. After a few days I was notified that there was a supply problem so that the bikini top would take longer than expected. Ten weeks after I ordered it, I received the UPS shipping notification that it would be delivered a week later. A week and a half later, still no bikini top. My bikini top finally came in 15 weeks to the day after I ordered it! Although the quality of the bikini top is second to none, I will never order from Wabfab Offroad again because of bad customer service. I called, emailed and texted numerous times and the only response I received were autoresponses via email. Come late July and August, I was trying to cancel my order but couldn't get ahold of anyone to do so. Oh well, I'm happy with the product at least! Here's a shot of it parked at my work.

I'm finally starting to really work on the 4runner again! I just pulled the wideband O2 sensor from my car today and I'll weld an O2 bung on my turbo downpipe tomorrow, isntall the wideband and see if I can adjust the fuel with the AFM enough to stop it from overheating on highway grades.
As far as cost... the window tint set me back $60, the bikini top with the Pirate4x4 discount code was another $210, brining me to a total of $4057!
That's my buddy Tim on the left and me on the right.
But back to the 4runner. After spending a ton of time and money on the 4runner leading up to the Colorado Jamboree I was a little burntout so I took a break from working on the 4runner for a bit. After taking a few weeks off I started giving the 4runner a treatment I give all of my vehicles, limo tint. On my last 4runner I installed the limo tint on all the back windows, but on this one I tinted the sunroof too. Long days in the desert under a lightly tinted sunroof sucked! Here's a pic of the 4runner with the limo tint.
Since I can't drive the 4runner to any real trails due to it overheating on grades I've just done a local trail by my house a few times. Here's a shot of a panoramic with my 4runner from a few weeks back!
Next up, I ordered the one thing I always wished I had on my last 4runner a bikini top from Wabfab offroad. I ordered it May 7th so that I could have it for the upcoming summer here in San Diego. When I ordered the bikini top the website said there was a 4-6 week wait time which I was ok with. After a few days I was notified that there was a supply problem so that the bikini top would take longer than expected. Ten weeks after I ordered it, I received the UPS shipping notification that it would be delivered a week later. A week and a half later, still no bikini top. My bikini top finally came in 15 weeks to the day after I ordered it! Although the quality of the bikini top is second to none, I will never order from Wabfab Offroad again because of bad customer service. I called, emailed and texted numerous times and the only response I received were autoresponses via email. Come late July and August, I was trying to cancel my order but couldn't get ahold of anyone to do so. Oh well, I'm happy with the product at least! Here's a shot of it parked at my work.
I'm finally starting to really work on the 4runner again! I just pulled the wideband O2 sensor from my car today and I'll weld an O2 bung on my turbo downpipe tomorrow, isntall the wideband and see if I can adjust the fuel with the AFM enough to stop it from overheating on highway grades.
As far as cost... the window tint set me back $60, the bikini top with the Pirate4x4 discount code was another $210, brining me to a total of $4057!
Last edited by strykersd; 05-10-2014 at 07:30 AM.
09-06-2012, 07:06 PM
#85
Oh and I forgot that while I was waiting for my bikini top to come in I bought some Alpine speakers since I knew that I wouldn't have been able to hear anything with my stock speakers when the bikini top came. 4" speakers up front and 6.5" speakers in the rear in the stock locations.

The front speakers screwed into place, but I had to make some sheet metal mounts for the rear speakers. I wish I had a sheet metal press, but since I didn't I just bent the aluminum sheet utilizing a 1/4 sheet of aluminum and a hammer.

Sadly with the bikini top and Alpine speakers, I can still hardly hear the music with my windows down at highway speeds. For anyone with a first gen 4runner who wants a bikini top, learn from me and just install large front speakers from the get go. I might be adding another set of speakers in the future.
The speakers set me back another $100, bringing my grand total up to $4157!
The front speakers screwed into place, but I had to make some sheet metal mounts for the rear speakers. I wish I had a sheet metal press, but since I didn't I just bent the aluminum sheet utilizing a 1/4 sheet of aluminum and a hammer.
Sadly with the bikini top and Alpine speakers, I can still hardly hear the music with my windows down at highway speeds. For anyone with a first gen 4runner who wants a bikini top, learn from me and just install large front speakers from the get go. I might be adding another set of speakers in the future.
The speakers set me back another $100, bringing my grand total up to $4157!
Last edited by strykersd; 05-10-2014 at 07:30 AM.
09-06-2012, 07:20 PM
#86
Registered User
Is it the Bikini top flapping around that keeps you from hearing music?
I can hear mine with the windows up... I'll try with them down on the way home.. I have 6.5" and 4" and a 10" I dropped back in..
I do have the bar in to keep the top tight..the wab fab kit should come with it.
I made it out of conduit...
I can hear mine with the windows up... I'll try with them down on the way home.. I have 6.5" and 4" and a 10" I dropped back in..
I do have the bar in to keep the top tight..the wab fab kit should come with it.
I made it out of conduit...
09-06-2012, 08:22 PM
#87
Nope, the bikini top hardly flaps at ll. I can hear it, but it isn't as clear and loud as it is with the top on. It might just be the bass that destorts it, I'll probably add a shallow mount 10" sub and redirect the bass from the speakers to the subwoofer.
10-05-2012, 11:17 AM
#88
Thanks to my road trip to Colorado and recent NYC trip I haven't had much money to drop on the 4runner. The only recent change I've done to the 4runner is that I changed the way my rear interior panels are held in place. From the factory these panels are held in place with one-use plastic clips, which if you load up your side storage compartments, the panels still rattle. To remedy this problem, I drilled out the mounting holes for these clips, installed nutserts and used flanged allen head bolts to hold the panels in place. I just learned of nutserts and I love the things! It's a great way to add a threaded hole onto sheet metal. Plus it was only a $15 tool at Harbor Freight, http://www.harborfreight.com/45-piec...-kit-1210.html .
All in all a much more robust option. Here's a picture of the final product.

Although I haven't had the time to really wheel this 4runner I did take it out for it's first camping trip last weekend. Here's a picture of it loaded up when we arrived at the campsite.

All in all a much more robust option. Here's a picture of the final product.
Although I haven't had the time to really wheel this 4runner I did take it out for it's first camping trip last weekend. Here's a picture of it loaded up when we arrived at the campsite.
Last edited by strykersd; 01-30-2013 at 07:58 AM.
01-30-2013, 07:57 AM
#90
The last few months have been pretty busy for me, just moved into a new place and haven't done much on the 4runner. Plus I got a cut in my work hours so I was short on cash for a while there. I'm finally making enough money to start working on the 4runner again.
Ever since I bought this 4runner, my armrest has been broken. Instead of trying to track down another brittle first generation 4runner arm rest and center console I decided to do the same modification I did to my last 4runner and add a second generation armrest and center console. Here's a shot of my old console on top and the new one on the bottom
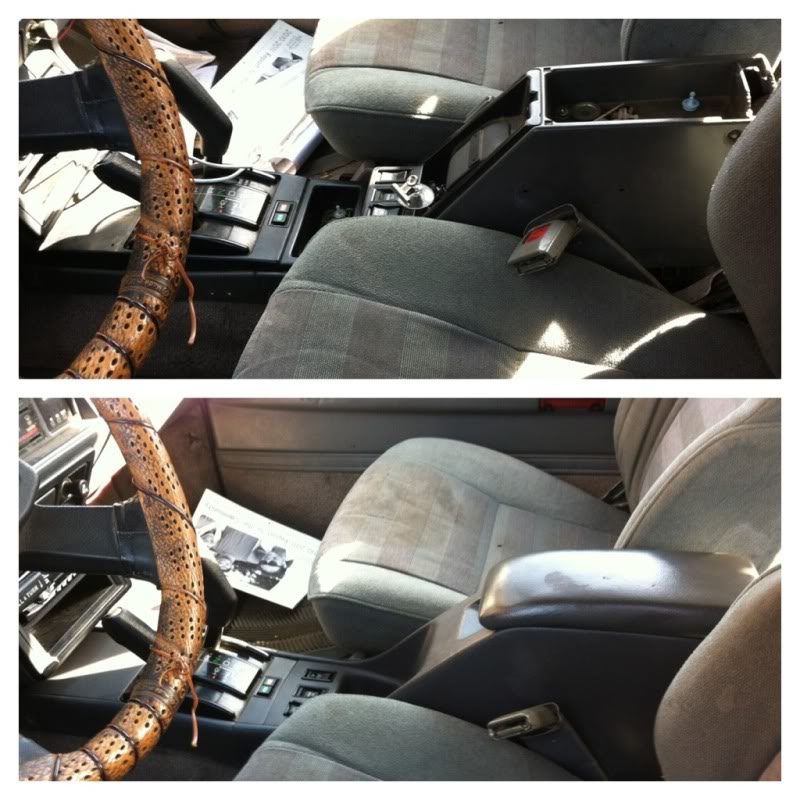
The only modification needed was to use a rat tail file and open up some of the screw holes a bit, but other than that it's a direct bolt in and all the switches drop right in. It was actually easier than on my old stick shift 4runner since I didn't have to do any trimming for a transfer case shifter.
Next up for the 4runner I'm installing a manual boost controller so I can up the boost. According to it's tracking number I should be recieveing it tomorrow!
The center console and arm rest set me back another $45, bringing my grand total up to $4202!
Next up for the 4runner
-pick up a heavy duty transfer case mount since mine is torn
-picking up a Total Chaos idler arm, at this rate my stocker won't last long
-if I want to wheel this thing hard I need some kind of rear bumper, I'm leaning towards purchasing another Marlin Crawler bumper
Ever since I bought this 4runner, my armrest has been broken. Instead of trying to track down another brittle first generation 4runner arm rest and center console I decided to do the same modification I did to my last 4runner and add a second generation armrest and center console. Here's a shot of my old console on top and the new one on the bottom
The only modification needed was to use a rat tail file and open up some of the screw holes a bit, but other than that it's a direct bolt in and all the switches drop right in. It was actually easier than on my old stick shift 4runner since I didn't have to do any trimming for a transfer case shifter.
Next up for the 4runner I'm installing a manual boost controller so I can up the boost. According to it's tracking number I should be recieveing it tomorrow!
The center console and arm rest set me back another $45, bringing my grand total up to $4202!
Next up for the 4runner
-pick up a heavy duty transfer case mount since mine is torn
-picking up a Total Chaos idler arm, at this rate my stocker won't last long
-if I want to wheel this thing hard I need some kind of rear bumper, I'm leaning towards purchasing another Marlin Crawler bumper
Last edited by strykersd; 05-10-2014 at 07:31 AM.
01-30-2013, 09:53 AM
#91
Registered User

Join Date: Jan 2013
Location: Albuquerque, NM
Posts: 52
Likes: 0
Received 0 Likes
on
0 Posts
Nice build, I am impressed with what you have done for the $$ you have spent. I just got my 87 and just failed smog. I am thinking of buying a new cat, which cat did you replace your hollow one with?
Thanks in advance.
Ian
Thanks in advance.
Ian
01-30-2013, 10:09 AM
#92
Thanks! I just welded in a universal cat from Autozone.
Last edited by strykersd; 02-02-2013 at 09:39 PM.
01-30-2013, 01:58 PM
#94
Registered User
Join Date: Jun 2012
Location: seattle
Posts: 48
Likes: 0
Received 0 Likes
on
0 Posts
I love the build! I just swapped a 22rte into my 4runner, ive been thinking about upping the boost with mine as well. Please do a write up of any tweaking/tuning you do to up the boost.
01-30-2013, 04:29 PM
#95
I threw my wideband sensor on my 4runner before ordering my manual boost controller and it read 10:1 air to fuel ratios in stock form. I normally tune to about 12:1 so I'll probably keep upping the boost until I hit that, then I might retard the timing a hair.
02-09-2013, 07:15 AM
#96
Registered User
Join Date: Dec 2008
Location: Logan, Ut
Posts: 258
Likes: 0
Received 0 Likes
on
0 Posts
How much boost are you hitting now? I can only hit about ten before it hits fuel cut. These things are hard to get more power out of with the stock efi. I know you can tweak the afm spring to get a pound our two extra, but then you start fighting other problems
 02-19-2013, 08:32 PM
#99
While playing with my boost controller I noticed I had a small pinhole leak in my radiator. I pulled the radiator, took it to a local radiator shop and the guy pointed out a few pinhole leaks on the top tank of my radiator. So that's why my truck overheats on grades! Turns out it's a common problem with these turbo 4runner and they even stocked upper tanks for these radiators. After talking with him for a few minutes he advised me that it would be cheaper if I were to just go out and buy a new radiator with a lifetime warranty elsewhere. Now that's great customer service! Giving an honest opinion even if it means turning away business!
I thought about order a radiator from Radiatorbarn.com but it seems like there prices have skyrocket over the last year or two. I decided to go with a V6 radiator from Autozone because if I ever break it on the trail, I'll probably be able to find an autozone location within 100 miles!
Here's a picture of my old radiator vs my new radiator and the radiator bolted into my 4runner.

Bolting it in was the easy part! It sat a bit higher but still cleared my hood!
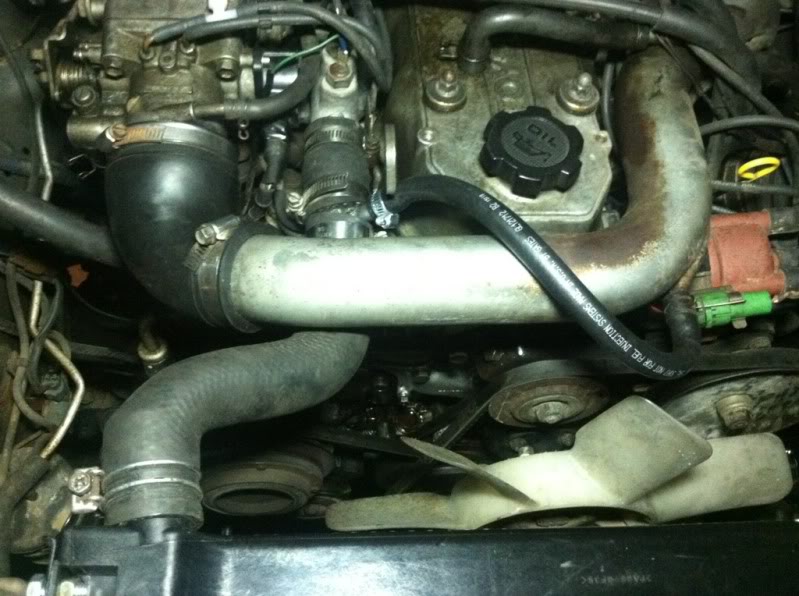
One issue with the non-turbo radiator is that it doesn't have a turbo coolant feed port, so I would have to make my own. I started by measuring the coolant ports on the radiator and thermostat housing and found that they were 1 3/8" diameter. After searching the shop to not find any steel tubing that size I had an epiphany! Why not use an extra hard coolant line that runs on the driver side of all 22re blocks! I ran over to my parts bin, found one and thanks to a magnet I discovered that was in fact steel! For those of you not familiar with the tubing, here's a picture of what I'm talking about.

I cut off the ends, welded them together and welded on a steel nipple I found in my garage.
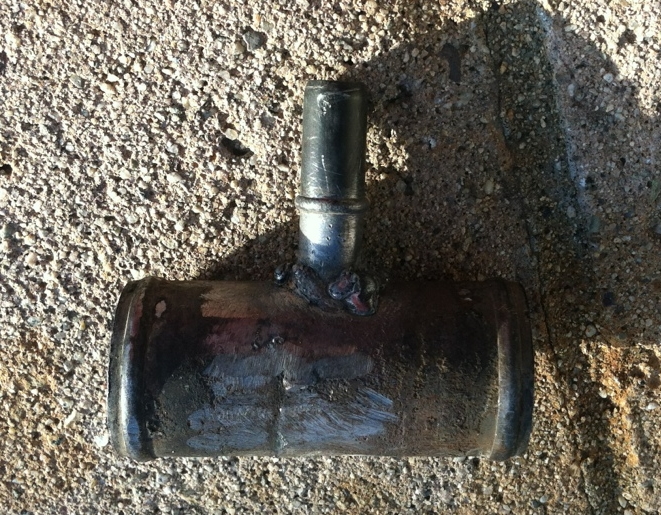
Not the greatest welds, but they have yet to leak!
And last but not least, the finished product installed.
Although everything is up and running I still need to figure out what to do about my radiator shroud. My 22re shroud doesn't line up right or cover my whole radiator. I need to go find a v6 radiator shroud and see if it'll line up with the fan placement on a 22re. Has anyone done this before and can chime in?
The radiator set me back $140 and miscellaneous rubber tubing from Kragen was another $10. So I'm $150 in on this radiator, bringing my total cost of the 4runner up to $4352!
I've come to the harsh realization that I've owned the 4runner for a year and haven't hit a real trail with it yet! I just need one or two more parts before I trust it on the trail! Expect big things in this thread soon!
I thought about order a radiator from Radiatorbarn.com but it seems like there prices have skyrocket over the last year or two. I decided to go with a V6 radiator from Autozone because if I ever break it on the trail, I'll probably be able to find an autozone location within 100 miles!
Here's a picture of my old radiator vs my new radiator and the radiator bolted into my 4runner.
Bolting it in was the easy part! It sat a bit higher but still cleared my hood!
One issue with the non-turbo radiator is that it doesn't have a turbo coolant feed port, so I would have to make my own. I started by measuring the coolant ports on the radiator and thermostat housing and found that they were 1 3/8" diameter. After searching the shop to not find any steel tubing that size I had an epiphany! Why not use an extra hard coolant line that runs on the driver side of all 22re blocks! I ran over to my parts bin, found one and thanks to a magnet I discovered that was in fact steel! For those of you not familiar with the tubing, here's a picture of what I'm talking about.
I cut off the ends, welded them together and welded on a steel nipple I found in my garage.
Not the greatest welds, but they have yet to leak!
And last but not least, the finished product installed.
Although everything is up and running I still need to figure out what to do about my radiator shroud. My 22re shroud doesn't line up right or cover my whole radiator. I need to go find a v6 radiator shroud and see if it'll line up with the fan placement on a 22re. Has anyone done this before and can chime in?
The radiator set me back $140 and miscellaneous rubber tubing from Kragen was another $10. So I'm $150 in on this radiator, bringing my total cost of the 4runner up to $4352!
I've come to the harsh realization that I've owned the 4runner for a year and haven't hit a real trail with it yet! I just need one or two more parts before I trust it on the trail! Expect big things in this thread soon!
Last edited by strykersd; 05-10-2014 at 07:34 AM.


