Reviving a long-dormant, low-mile 22RE
 12-01-2011, 01:51 PM
#61
Registered User
Thread Starter
Join Date: Dec 2010
Location: Torrance, CA
Posts: 53
Likes: 0
Received 0 Likes
on
0 Posts
I just recently finished rebuilding my 22re. I spent 300ish for the engnbldr master kit w/ 368 cam. Machine work I spent around 360. They Boiled the block, bored 20 over, installed new pin bushings and honed them. and Decked my block and timing cover polished crank. I ended up having to buy a new head, Mine had a bad crack in it from #2 exhaust valve to water jacket. So that was 450, I got the engnbldr street rv head with the os ss valves. Add stuff like fipg and paint and I got it done around 1100. I know I could have done it cheaper. And for about 100 dollars more I could have bought a brand new long block from attarco. But I'm glad I got it done. Very good power so far in the 250ish miles driven thus far.
Thank you, sir! Hopefully my weird case of rebuilding a low-mile engine will help in some way. At the least, it has been cool to see exactly how the factory put them together, since this one had never been apart and everything was intact and un-messed-with.

Last edited by Duder; 12-01-2011 at 04:35 PM.
 12-20-2011, 02:21 PM
#62
Registered User
Thread Starter
Join Date: Dec 2010
Location: Torrance, CA
Posts: 53
Likes: 0
Received 0 Likes
on
0 Posts
After talking with the guys at 22REPerformance.com, I decided to replace the driver's side (long, straight) chain guide with a new steel part. I also ordered new plugs, plug wires, distributor cap and rotor from them, as well as a new Japanese water pump just for peace of mind.
They were also able to sell me a good used water temp sensor "#2" in the intake manifold (mine had failed and wasn't switching in cold water) as well as a good used vacuum manifold (hard steel lines near the carb - mine was cracked). I can definitely recommend these guys for customer service and quick shipping of quality parts.
So I moved on to the cylinder head and started cleaning carbon off of the original valves. Getting the head ready to reassemble, I was checking the valve seating patterns using Prussian Blue compound. They were all looking nice and even with good contact patterns when I found that the #1 intake valve is not seating at all more than halfway around the seat. It's just not coming into contact with the seat on one side. Looks like the guide and seat aren't concentric, which to me seems to be a factory error since there wasn't any noticeable wear on any of these parts.
As a result, the head is now in transit to the 22REPerformance guys, who agreed to inspect it and correct the seating issue. I'm guessing it's going to need a new seat and/or guide on the #1 intake, along with a re-grind on that one valve. Crossing my fingers that they won't find any other problems!
In the meantime I'll be swapping the chain guide, installing the water pump and moving on to cleaning and testing more of the wonderful emissions bits. Onward!
03-08-2012, 03:50 PM
#63
Registered User
Thread Starter
Join Date: Dec 2010
Location: Torrance, CA
Posts: 53
Likes: 0
Received 0 Likes
on
0 Posts
Too long since an update...the longblock is back together now. Valve & seat work was completed by 22REPerformance and now all valves show a good even seating pattern without any spring pressure. I also had them do their 5-angle valve seat cut on all of the seats for better flow and a claimed 5hp at the wheels. We'll see how that turns out.
Currently working on replacing the rusty battery tray with a nice clean one sourced from a local dismantler. I used a spot weld cutter to remove the old one and am almost ready to weld the replacement back in.
Next up will be carb cleaning / rebuild as necessary, and more engine reassembly. Pics soon.
04-04-2012, 09:34 PM
#64
Registered User
Thread Starter
Join Date: Dec 2010
Location: Torrance, CA
Posts: 53
Likes: 0
Received 0 Likes
on
0 Posts
Pictures and progress from the last few months:
Valve seats cut, a 22REPerformance 5-angle valve job.

Valves as ground by 22REPerformance:

Checking the seating pattern with Prussian Blue compound. Looks good now!

Using a big gnarly valve spring compressor that my dad gave me, the valvetrain went back in with no problems. I used brand new Toyota springs with the original keepers.

Longblock officially back together...original rocker assembly back in, original cam & bearing caps, head bolts torqued, timing chain installed.

Valve seats cut, a 22REPerformance 5-angle valve job.
Valves as ground by 22REPerformance:
Checking the seating pattern with Prussian Blue compound. Looks good now!
Using a big gnarly valve spring compressor that my dad gave me, the valvetrain went back in with no problems. I used brand new Toyota springs with the original keepers.
Longblock officially back together...original rocker assembly back in, original cam & bearing caps, head bolts torqued, timing chain installed.
04-04-2012, 09:41 PM
#65
Registered User
Thread Starter
Join Date: Dec 2010
Location: Torrance, CA
Posts: 53
Likes: 0
Received 0 Likes
on
0 Posts
I've been working on swapping over a lot of the smaller stuff like brackets, pulleys, etc which you can see in the picture above.
But I took a detour from engine work to fix the only major rust on the truck, in the battery tray. At some point in the truck's past before I bought it, the battery exploded, ate a bunch of paint and rusted out the tray.


So I used a spot weld cutter to remove the old tray, then sanded the inner fender to remove the loose rust. After that some metal-prep phosphoric acid to neutralize the remaining iron oxide.

Primed the area with standard automotive primer and some copper-rich weld through primer where the spot welds go.

Here's the new tray I bought from a local dismantler. I had to straighten it a bit, and sandblasted it to remove some light surface rust. In the shot below you can see that I painted the underside (except for the spot weld areas) before welding it back in. I also painted the inner fender under the tray.

After a few short bursts with my MIG, the new tray was in and subsequently shot with primer.

Then the whole front left corner of the engine bay got a fresh coat of paint, blended in to the original paint by hand buffing using a good rubbing compound.

All of the wonderful wiring harnesses, connectors, and emissions bits reinstalled and lookin' good. I also decided to splurge on a new OEM Toyota battery bracket and hardware, shown here sitting on the plastic tray liner.

But I took a detour from engine work to fix the only major rust on the truck, in the battery tray. At some point in the truck's past before I bought it, the battery exploded, ate a bunch of paint and rusted out the tray.
So I used a spot weld cutter to remove the old tray, then sanded the inner fender to remove the loose rust. After that some metal-prep phosphoric acid to neutralize the remaining iron oxide.
Primed the area with standard automotive primer and some copper-rich weld through primer where the spot welds go.
Here's the new tray I bought from a local dismantler. I had to straighten it a bit, and sandblasted it to remove some light surface rust. In the shot below you can see that I painted the underside (except for the spot weld areas) before welding it back in. I also painted the inner fender under the tray.
After a few short bursts with my MIG, the new tray was in and subsequently shot with primer.
Then the whole front left corner of the engine bay got a fresh coat of paint, blended in to the original paint by hand buffing using a good rubbing compound.
All of the wonderful wiring harnesses, connectors, and emissions bits reinstalled and lookin' good. I also decided to splurge on a new OEM Toyota battery bracket and hardware, shown here sitting on the plastic tray liner.
Last edited by Duder; 04-04-2012 at 09:42 PM.

 04-07-2012, 03:44 PM
#70
Registered User
Thread Starter
Join Date: Dec 2010
Location: Torrance, CA
Posts: 53
Likes: 0
Received 0 Likes
on
0 Posts
Thanks for the compliments...almost done with the carb now so I'll be sure to post pics of the rebuild. It won't be long now until the engine is reunited with the pickup.
 04-16-2012, 10:07 PM
#72
Registered User
Thread Starter
Join Date: Dec 2010
Location: Torrance, CA
Posts: 53
Likes: 0
Received 0 Likes
on
0 Posts
Thanks - it has indeed been quite the project. My intent was to get this vehicle back to being 100% reliable for daily driving use as well as normal pickup duties. I am taking my time and being thorough so I don't ever have to do it again! Anyways, that's the theory I'm operating on.
Back to the project updates...
I went through the entire carb since it had never been apart before, and I suspected that some of the rubber seals and bits may have "perished," as the Brits say. I don't think any of the vacuum lines had even been touched.
Here it is before the engine was pulled:

On the bench for a better look

 .
.
I took many, many close-up shots of the wonderfully complex linkages to aid in reassembly later on down the road!
After the battery tray project was done, I started tearing the carb down per the FSM rebuild instructions.
First off was de-gunking the outside as best I could with carb cleaner and purple power...looking good already.

A few small linkages and five screws later, the "air horn" (top cover) is off, exposing the throats and float bowl. On the left is an electric solenoid valve that vents to atmosphere...I think I'm remembering that correctly.

I was "well chuffed" to find the plastic floats were in "good nick" (please forgive the excessive Britishisms; I've been watching too much Wheeler Dealers).

There was just a light dusting of reddish-brown silt in the bowl, no corrosion or varnish, not bad at all considering the truck is an '86.

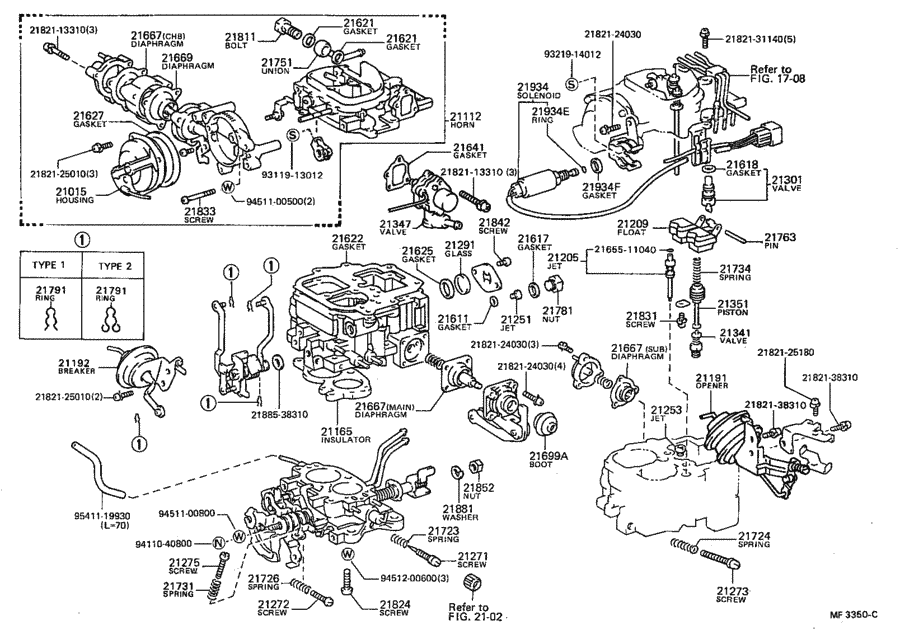
All the jets, valves, solenoids, linkages, actuators, etc. etc. etc. were taken off and safely stored in small plastic bins. After a bit more cleaning and scraping of gaskets, I was happy to find nothing majorly wrong. I had a factory Toyota rebuild kit on hand...the only extra parts needed were a new secondary main jet (damaged during removal) and the two accelerator pump diaphragms (not included in the kit, and damned expensive).
The diaphragms are #s 21667(MAIN) and 21667(SUB) in the exploded diagram. The jet I screwed up (literally) is 21253.
Back to the project updates...
I went through the entire carb since it had never been apart before, and I suspected that some of the rubber seals and bits may have "perished," as the Brits say. I don't think any of the vacuum lines had even been touched.
Here it is before the engine was pulled:
On the bench for a better look
.I took many, many close-up shots of the wonderfully complex linkages to aid in reassembly later on down the road!
After the battery tray project was done, I started tearing the carb down per the FSM rebuild instructions.
First off was de-gunking the outside as best I could with carb cleaner and purple power...looking good already.
A few small linkages and five screws later, the "air horn" (top cover) is off, exposing the throats and float bowl. On the left is an electric solenoid valve that vents to atmosphere...I think I'm remembering that correctly.
I was "well chuffed" to find the plastic floats were in "good nick" (please forgive the excessive Britishisms; I've been watching too much Wheeler Dealers).
There was just a light dusting of reddish-brown silt in the bowl, no corrosion or varnish, not bad at all considering the truck is an '86.
All the jets, valves, solenoids, linkages, actuators, etc. etc. etc. were taken off and safely stored in small plastic bins. After a bit more cleaning and scraping of gaskets, I was happy to find nothing majorly wrong. I had a factory Toyota rebuild kit on hand...the only extra parts needed were a new secondary main jet (damaged during removal) and the two accelerator pump diaphragms (not included in the kit, and damned expensive).
The diaphragms are #s 21667(MAIN) and 21667(SUB) in the exploded diagram. The jet I screwed up (literally) is 21253.
04-16-2012, 10:36 PM
#73
Registered User
Thread Starter
Join Date: Dec 2010
Location: Torrance, CA
Posts: 53
Likes: 0
Received 0 Likes
on
0 Posts
Here's the new primary accelerator pump diaphragm on the right, next to the old hardened original on the left.

And the secondary accel. pump diaphragm (new on left). Compared to the old one it's easy to see the new one is more pliable based on the bulbous shape.

Both went back together easily with their respective pump parts and springs, after cleaning the housings of course. The primary pump got a new dust boot which was supplied with the carb rebuild kit.


Nice clean carb base piece, with both throttle butterflies and cleanly scraped gasket surfaces.

Fully cleaned main carb body prior to reassembly.

The "slow jet" (idle jet?) gets a new o-ring to replace the hard and flattened old one.

New top gasket in place...

...and linkages going back together with new circlips.

I tested both of the little vacuum actuator cans with a MityVac and they both moved easily and didn't leak down, so they went back into service. The one above is the choke opener I believe.
I didn't take a picture of the finished carb on the bench for some reason, but it's back together and looking good. All in all, I was pleasantly surprised at how smoothly the rebuild went; this was the part of the whole project I was dreading the most.
And the secondary accel. pump diaphragm (new on left). Compared to the old one it's easy to see the new one is more pliable based on the bulbous shape.
Both went back together easily with their respective pump parts and springs, after cleaning the housings of course. The primary pump got a new dust boot which was supplied with the carb rebuild kit.
Nice clean carb base piece, with both throttle butterflies and cleanly scraped gasket surfaces.
Fully cleaned main carb body prior to reassembly.
The "slow jet" (idle jet?) gets a new o-ring to replace the hard and flattened old one.
New top gasket in place...
...and linkages going back together with new circlips.
I tested both of the little vacuum actuator cans with a MityVac and they both moved easily and didn't leak down, so they went back into service. The one above is the choke opener I believe.
I didn't take a picture of the finished carb on the bench for some reason, but it's back together and looking good. All in all, I was pleasantly surprised at how smoothly the rebuild went; this was the part of the whole project I was dreading the most.
04-16-2012, 10:45 PM
#74
Registered User
Thread Starter
Join Date: Dec 2010
Location: Torrance, CA
Posts: 53
Likes: 0
Received 0 Likes
on
0 Posts
Of course the nice rebuilt carb needs a clean place to sit, so I turned my attention next to the intake manifold. I degreased it thoroughly with purple power, which was especially needed in the EGR port. It took me a while to get all the carbon build-up out of there.
After what seemed like hours of scraping old hardened gaskets, the coolant bypass chamber was ready for reassembly with new gaskets.

The cover is back on, along with the intake manifold heater and its corresponding gasket. I had to chase a few of these bolt holes with an M6 x 1.0 tap to get the bolts to install easily. The threads had corroded due to living in coolant, apparently.

The original coolant bypass fitting was heavily pitted so I went ahead and got a new one and tightened 'er up.

So here are the shots I should have taken on the bench first...the rebuilt carb perched on the spankin' clean intake manifold.


Also, it's not too obvious in the pics above but I replaced the vacuum manifold - that bundle of hard steel lines that snakes across the intake manifold and connects all of the numerous vacuum hoses. The original was broken in half (which I found when pulling the engine apart) but I was able to get a good used replacement from the guys at 22REPerformance.com. Sweet!
After what seemed like hours of scraping old hardened gaskets, the coolant bypass chamber was ready for reassembly with new gaskets.
The cover is back on, along with the intake manifold heater and its corresponding gasket. I had to chase a few of these bolt holes with an M6 x 1.0 tap to get the bolts to install easily. The threads had corroded due to living in coolant, apparently.
The original coolant bypass fitting was heavily pitted so I went ahead and got a new one and tightened 'er up.
So here are the shots I should have taken on the bench first...the rebuilt carb perched on the spankin' clean intake manifold.
Also, it's not too obvious in the pics above but I replaced the vacuum manifold - that bundle of hard steel lines that snakes across the intake manifold and connects all of the numerous vacuum hoses. The original was broken in half (which I found when pulling the engine apart) but I was able to get a good used replacement from the guys at 22REPerformance.com. Sweet!
 04-16-2012, 10:58 PM
#76
Registered User
Thread Starter
Join Date: Dec 2010
Location: Torrance, CA
Posts: 53
Likes: 0
Received 0 Likes
on
0 Posts
And of course I couldn't forget the exhaust manifold. I pulled the manifold off of the original engine a few days ago, and found out a possible explanation for why my cylinder leakdown test showed some issues. There are obvious white deposits on the #1 and #2 ports, which I believe is evidence that it was burning coolant in those cylinders. So I think the head gasket was on its way out. Might also explain why it used to foul the plugs so quickly.
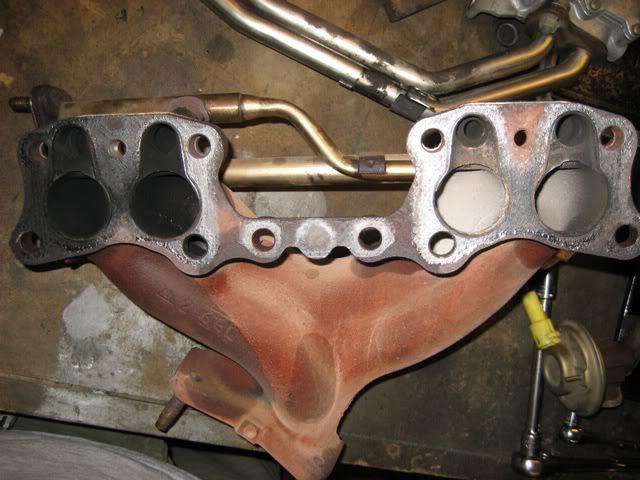
A while back I did a very light gasket-match porting job on the exhaust ports in the head, shown by the shinier spots. I also installed all new exhaust studs.

New OEM exhaust gasket goodness.

After scraping the original lead-like gasket off of the manifold, all it needed a light internal cleaning with a steel wire brush. Installation was easy - I left the original air injection manifolds alone since they seemed very clean and good to go. Here's the engine as it sits today:

But what's that in the background? A stack of BFGs? Yes!
New 31x10.5R15 ATs as a treat for the truck. I even got five so it will have a matching spare.

It will be so much better looking with these - not to mention some real trail capability. I've never had anything other than the stock street tires on this truck so I'm excited to try it out. The comparison pic makes the stockers look even wimpier than they really are (if that's possible). I'm thinking of mounting them with white letters out to compliment the stock white steelies and keep the 80's theme alive

A while back I did a very light gasket-match porting job on the exhaust ports in the head, shown by the shinier spots. I also installed all new exhaust studs.
New OEM exhaust gasket goodness.
After scraping the original lead-like gasket off of the manifold, all it needed a light internal cleaning with a steel wire brush. Installation was easy - I left the original air injection manifolds alone since they seemed very clean and good to go. Here's the engine as it sits today:
But what's that in the background? A stack of BFGs? Yes!
New 31x10.5R15 ATs as a treat for the truck. I even got five so it will have a matching spare.
It will be so much better looking with these - not to mention some real trail capability. I've never had anything other than the stock street tires on this truck so I'm excited to try it out. The comparison pic makes the stockers look even wimpier than they really are (if that's possible). I'm thinking of mounting them with white letters out to compliment the stock white steelies and keep the 80's theme alive
04-17-2012, 04:37 AM
#77
Registered User
And Bob's your uncle! (I watch the heck out of wheeler dealers too!)
Man, you haven't spared a penny, you replaced absolutely everything and boy does it show. That truck is gonna love you forever.
Great work.
Man, you haven't spared a penny, you replaced absolutely everything and boy does it show. That truck is gonna love you forever.
Great work.
04-17-2012, 07:23 PM
#78
Registered User

Join Date: Nov 2009
Posts: 50
Likes: 0
Received 0 Likes
on
0 Posts
Fascinating thread and excellent work!
Though it's a bit too late, I'd like to chime in on the timing chain guides... My '94 broke the *passenger* side (not the long, straight one) at somewhere between 30 and 35k miles. Replaced both with an aftermarket set and got another 125k miles without them breaking. Head is warped and a maybe a stuck valve now, but no timing chain problems
/ Friendly drivers don't let their Toyotas overheat
04-18-2012, 08:44 AM
#80
Registered User
Thread Starter
Join Date: Dec 2010
Location: Torrance, CA
Posts: 53
Likes: 0
Received 0 Likes
on
0 Posts
I have tried to replace anything suspect on the truck, any rubber parts, gaskets, seals, things like that. But the majority of the hard parts are original to the truck. I'm looking at it as a "long block swap" and reconditioning/inspecting everything else that bolts to the longblock. I hope the truck appreciates it! I will be keeping the original longblock just so I can say I still have the original engine. It still runs, it's just tired. Maybe when this new engine wears out, I'll rebuild the original and swap that back in. In about 25 years.
Fascinating thread and excellent work!
Though it's a bit too late, I'd like to chime in on the timing chain guides... My '94 broke the *passenger* side (not the long, straight one) at somewhere between 30 and 35k miles. Replaced both with an aftermarket set and got another 125k miles without them breaking. Head is warped and a maybe a stuck valve now, but no timing chain problems
/ Friendly drivers don't let their Toyotas overheat
Though it's a bit too late, I'd like to chime in on the timing chain guides... My '94 broke the *passenger* side (not the long, straight one) at somewhere between 30 and 35k miles. Replaced both with an aftermarket set and got another 125k miles without them breaking. Head is warped and a maybe a stuck valve now, but no timing chain problems
/ Friendly drivers don't let their Toyotas overheat
The other reason is that the donor 22RE motor had been sitting outside for a very long time, in the sun, rain, etc. So all of the plastic parts, wiring, connectors, hoses, everything was turning into crumbly dust. The steel and aluminum parts were pretty badly corroded. I'm sure someone could use some of it, but I would have needed another complete donor engine to get all the necessary EFI-specific parts at a reasonable price. So it just made sense to convert this engine to a 22R and keep the truck stock.
Hope that makes sense!


