anyone interested in seeing a paint how-to on my 87?
 03-25-2009, 03:05 PM
#21
Registered User
Thread Starter
Join Date: Mar 2009
Location: indiana
Posts: 257
Likes: 0
Received 0 Likes
on
0 Posts
a before rattle can pic and some damage close ups

[IMG]
 [/IMG]
[IMG]
 [/IMG]
the first pic is what the truck looked like when i first got it. if you look closely you can see that it says 'you can't touch this' on the bed side. the second pic is of the grill. the factory chrome has flaked off and been painted over so i will strip and refinish it. the last is of a rust spot on the front of the hood. i am probably just going to paint it back the original color (3D7) so it matches the jambs and underhood. i will start with the easier stuff before i move on to the more difficult. i am not going to be replacing any sheetmetal so no cab corner replacement info at this time. no need to worry though i have a door and cab corner that will need plenty of body work.


 03-26-2009, 12:51 AM
#25
Registered User
Join Date: Sep 2008
Location: Manchester, NH
Posts: 107
Likes: 0
Received 0 Likes
on
0 Posts
When painting I recommend taking off the hood, fenders, doors, tail gate, and painting them separate from the body. If you have a pickup make sure you pull the bed off so you can get between the cab and the bed. I also recommend taking trim off instead of taping it up. And remember to paint your door jambs!
I hate seeing spots that people missed.
I hate seeing spots that people missed.
03-26-2009, 07:14 AM
#26
Registered User
 03-28-2009, 03:58 PM
#27
Registered User
Thread Starter
Join Date: Mar 2009
Location: indiana
Posts: 257
Likes: 0
Received 0 Likes
on
0 Posts
fenders stripped

i took the passenger side fender to replace the antenna base. i decided to just go ahead and take the other one off as well, it was starting to rain after all. i stripped all of the spray paint off because it would not react well with the solvents in the primer. overall the fenders are in pretty good shape there are a few dents and a couple rust spots. i will do the body work with the fenders off the truck but i will reinstall them before i block and paint them. i will probably remove the doors as well because the hinges need replaced and jamb them at this time. for a professional job you should spray the vehicle as one and not in pieces. if you paint in pieces the body bolts wont be nice and shiny as the rest of the vehicle, it just depends on the quality you are going for. as for the kawasaki green paint any place that mixes paint should be able to mix it. most mixing computers have a searchable database and should be able to look up the formula without a problem.
 04-02-2009, 05:02 PM
#29
Registered User
Join Date: Dec 2008
Location: NFM, Florida
Posts: 432
Likes: 0
Received 0 Likes
on
0 Posts
this is kind of a hijack....
anyways, i've been wanting to paint my truck for a little while now. the only thing really stopping me is the damn sanding! I HATE SANDING!! my truck is an offwhiteish color, and i want it olive drab.... so could i just sand it down with 320 real fast, and spray it, or should i sand it with something finer, and finer, and finer, and get it smooth, then paint it? also got the factory graphics on the side.... can i just sand em off or what's the deal with that?
EDIT: i painted my wheels gloss black, and plan to redo them when i do the truck. should i paint the bumber valance gloss black too, or olive drab? i think either way it'd look cool. i'm leaving the bumbers chrome.
anyways, i've been wanting to paint my truck for a little while now. the only thing really stopping me is the damn sanding! I HATE SANDING!!
my truck is an offwhiteish color, and i want it olive drab.... so could i just sand it down with 320 real fast, and spray it, or should i sand it with something finer, and finer, and finer, and get it smooth, then paint it? also got the factory graphics on the side.... can i just sand em off or what's the deal with that?EDIT: i painted my wheels gloss black, and plan to redo them when i do the truck. should i paint the bumber valance gloss black too, or olive drab? i think either way it'd look cool. i'm leaving the bumbers chrome.
Last edited by mattaway; 04-02-2009 at 05:08 PM.
04-02-2009, 05:12 PM
#30
Registered User
i just took some 320 grit sandpaper and went at it with my '80..lol
i also did it in the Krylon OLIVE DRAB..it looks GREAT..and has been sitting out in the weather for like 8 months or so..its been through about 1000 carwashes..500 different fields, stands of timber, swamps and what not..and it still looks GREAT!..i did 2coats
didnt primer it either..just sanded, wiped clean with mineral spirits, let that dry..spray it..let it dry..give it a light sand to get the roughness out with like 800grit..then spray it again..
i did it in stages..like i did my front end(fenders and hood) one day..then did my doors the next..then my bed and tailgate the day after that...also got the roof same day as the doors..
dont worry about it..just get you about 10sheets of sandpaper..and about 15cans of KRYLON OLIVE DRAB and go at it!!!!!!!
 04-04-2009, 07:40 AM
#33
Registered User
Join Date: Nov 2008
Posts: 98
Likes: 0
Received 0 Likes
on
0 Posts
Here is mine the day I brought it home.
[IMG] [/IMG]
Here it is during the sanding.
[IMG] [/IMG]
And after i sprayed it.
[IMG] [/IMG]
How it sits now.
[IMG]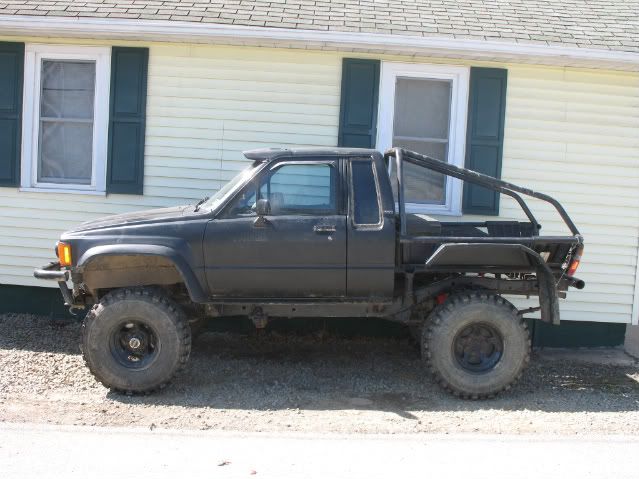 [/IMG]
I first washed the truck with dish soap. Want somthing with a degreaser not car soap with wax in it.
Then I took off the fender flares. Sanded the whole truck with 180 the something finer like 500. I wasnt too worried about hwo smooth it was. I then taped everything off with green painters tape from napa. I used spray cans from tractor supply. It was satin black. I did not primer. I always remove the tape before the paint dries. I dont want to lift paint where it oversprays over tape.
When I do it again I would rempve the hood. It did not come out too good because the cans did not want to spray on that angle. I would wetsand for a better finish too. You can even work it up to 2000 grit. It almost feels like a sheet of paper. I just wanted to seal it for the winter when I did mine. After you wetsand it wash again with dish soap and make sure you get all the soap off. Before you tape it off and paint I always get a air compresser and blow out water from all cracks. It will hide anywhere and can ruin a good paint job.
I would like to see how you do it. Mabey a better step by step with pics. than I got.
[IMG]
[/IMG]Here it is during the sanding.
[IMG]
[/IMG]And after i sprayed it.
[IMG]
[/IMG]How it sits now.
[IMG]
[/IMG]I first washed the truck with dish soap. Want somthing with a degreaser not car soap with wax in it.
Then I took off the fender flares. Sanded the whole truck with 180 the something finer like 500. I wasnt too worried about hwo smooth it was. I then taped everything off with green painters tape from napa. I used spray cans from tractor supply. It was satin black. I did not primer. I always remove the tape before the paint dries. I dont want to lift paint where it oversprays over tape.
When I do it again I would rempve the hood. It did not come out too good because the cans did not want to spray on that angle. I would wetsand for a better finish too. You can even work it up to 2000 grit. It almost feels like a sheet of paper. I just wanted to seal it for the winter when I did mine. After you wetsand it wash again with dish soap and make sure you get all the soap off. Before you tape it off and paint I always get a air compresser and blow out water from all cracks. It will hide anywhere and can ruin a good paint job.
I would like to see how you do it. Mabey a better step by step with pics. than I got.
Last edited by regularjoe; 04-04-2009 at 10:18 AM.
04-05-2009, 05:46 PM
#34
Registered User
Join Date: Mar 2009
Location: Central Calif. Sierra Foothills
Posts: 5
Likes: 0
Received 0 Likes
on
0 Posts
heck yeah, do a body and paint how-to!!!!!! let us know what worked for you and what didn't!!! that might help me and others in the future!!!
Thanks!
Thanks!
04-06-2009, 09:20 AM
#35
Registered User
Thread Starter
Join Date: Mar 2009
Location: indiana
Posts: 257
Likes: 0
Received 0 Likes
on
0 Posts
sorry about the delay but i have had a busy couple of weeks. first a reply to a couple of things i have seen on this post.
one 320 is a little too coarse. over time the sand scratches will probably show through. it is not too bad with a solid color but will look like hell with a metallic. i would finish with 600 grit for a solid color and 800 to 1000 grit for a metallic color. with anything much finer than 1000 grit there is a real possibility for adhesion problems. there a couple of different forces at work with adhesion and mechanical adhesion, aka sanding, is the most important.
dish soap works but i would get a can of comet or equivalent and a red scratch pad for final scuffing for a solid color, gray for metallics. it does a really good job of removing wax and oil and it is cheap. you scuff it wet and then wash the vehicle after you are done. you end up with a clean surface that is well prepared for paint.
as for whether it is better to wet or dry sand it really is just personal preference. there are benefits and drawbacks to each but i prefer wet sanding because it cuts out the dust. you have to be sure to blow out all of the cracks really well because water can screw things up especally for single stage paints. if no compressor you can just park it in the sun and open every thing up and wait for a few hours, this dries out things pretty well. with dry sanding you get dust and a lot of it. if you are working in a garage this can be a disaster because everything will get covered in dust and when you go to spray your paint will be full of dirt. if you are determined to dry sand do it outside and blow it off the best you can. with dry sanding you wll have to get the surface clean before you start because dirt will cut deep scratches and road grime will gum up your sandpaper. also you must do a very thorough job of wiping down with a wax and grease remover when dry sanding. while you still need to do this if you wet sand, the surface is cleaner especially if you use the comet trick.
factory graphics it all depends on what you want. if you want to get rid of them peel them off or better yet get a rubber wheel that is designed to remove decals which attaches to a drill or die grinder. i think they are pretty inexpensive and would be well worth the investment to remove all of the factory graphics. if you can't find one or don't have as many to remove just soak a rag with laquer thinner and wipe them a couple of times, it will soften up the adhesive making them easier to remove. if you paint over them you are going to see the edges and possibly even worse the solvents in the paint will cause them to split ruining your paint job. if you are going to use base/clear coat you can just tape them up and then remove the tape and clear over them. they look great this way but make sure you sand them lightly before you mask them up.
Last edited by wheatus; 06-09-2009 at 07:30 PM.
04-11-2009, 04:45 PM
#36
Registered User
Thread Starter
Join Date: Mar 2009
Location: indiana
Posts: 257
Likes: 0
Received 0 Likes
on
0 Posts
ok time for an update. removed: bed, door handles, lock cylinders, mirriors, black pieces on cab, emblems, windshield chrome trim, decals, and hood. i had to cut one of the bolts holding on the drivers side doorhandle so i need to order a new one as well as some door hinges. haven't started work on the doors yet, i will probably be taking them off. i will also be taking the sunroof out when i get to the top of the cab.

looking sad with the old bed gone.


the worst of the body damage is in the passenger side cab corner. no idea what happened this is how i bought the truck. this is a tough area to work on because there are two layers of sheet metal here. i had to cut a hole inside the cab to pound it out because it was too tough for just the slide hammer


after it was beat out and dura-glassed up


there was some rust in the fenders so i just ground it down and filled it with dura-glass sanded it down and then some bondo on top. the PO drilled a hole in the hood? so same deal here fill it up with dura-glass and bondo over the top. something, probably braked fluid, had eaten up the finish on the hood pretty good so we just stripped it down to bare metal. i will etch prime and then primer it, not the easiest but it is effective.
looking sad with the old bed gone.
the worst of the body damage is in the passenger side cab corner. no idea what happened this is how i bought the truck. this is a tough area to work on because there are two layers of sheet metal here. i had to cut a hole inside the cab to pound it out because it was too tough for just the slide hammer
after it was beat out and dura-glassed up
there was some rust in the fenders so i just ground it down and filled it with dura-glass sanded it down and then some bondo on top. the PO drilled a hole in the hood? so same deal here fill it up with dura-glass and bondo over the top. something, probably braked fluid, had eaten up the finish on the hood pretty good so we just stripped it down to bare metal. i will etch prime and then primer it, not the easiest but it is effective.
Last edited by wheatus; 04-11-2009 at 04:58 PM.
04-12-2009, 11:28 AM
#37
Registered User
Thread Starter
Join Date: Mar 2009
Location: indiana
Posts: 257
Likes: 0
Received 0 Likes
on
0 Posts
making progress
using PPG products, this is their etch prime. the paint gun is a devilbiss


the doghouse has been repaired and primed. the next thing i am going to work on is getting the doors ready. i will remove them so i can jamb and edge everything all at once then i will reinstall everything to paint.
the doghouse has been repaired and primed. the next thing i am going to work on is getting the doors ready. i will remove them so i can jamb and edge everything all at once then i will reinstall everything to paint.
04-12-2009, 01:16 PM
#38
Registered User
Join Date: Mar 2007
Location: Fairbanks Ak
Posts: 1,209
Likes: 0
Received 0 Likes
on
0 Posts
Ok question:
If I was to do this to my truck i would take it down to primer or just rough it up so that the primer can adhere to the surface? Also how may layers should be done of primer?
If I was to do this to my truck i would take it down to primer or just rough it up so that the primer can adhere to the surface? Also how may layers should be done of primer?
04-12-2009, 01:27 PM
#39
Banned

Join Date: Feb 2007
Location: (Rednecks Inbreed In) Kansas
Posts: 1,349
Likes: 0
Received 1 Like
on
1 Post
After workin a body shop as long as I have it really burns my arse when people think you have to primer before you paint, primer serves TWO purposes, ONE-Fills small inmperfections in the surface TWO-Gives paint something to stick to instead of bare metal, you only need to rough the surface with 3m scratch pads or use like, 320, or 400 grit sand paper before you paint, make sure to wipe with alcahol.
04-12-2009, 01:51 PM
#40
Registered User
Join Date: Mar 2007
Location: Fairbanks Ak
Posts: 1,209
Likes: 0
Received 0 Likes
on
0 Posts
ok thanks i just need some clarification since its glazed over in many threads. Im not trying to piss in the wind or anything just a question so dont burn me.
Last edited by spanish-road; 04-12-2009 at 01:52 PM.


