
2nd Gen 3VZE engine: R U thinking of doing timing belt/water pump? My observations
 12-15-2013, 09:05 PM
#81
Registered User

Join Date: Sep 2007
Location: San Francisco East Bay
Posts: 8,255
Likes: 0
Received 823 Likes
on
650 Posts
No. The plugs fire at (before) the top of the compression stroke, and not at the top of the exhaust stroke. How does the cylinder "know" which stroke it is? From the position of the cam (which sets the valve openings). How does the distributor know? The distributor is geared to the driver's side cam.
From another viewpoint: the piston is at TDC at BOTH the top of the compression stroke and the exhaust stroke. What distinguishes those two is the position of the cam.
From another viewpoint: the piston is at TDC at BOTH the top of the compression stroke and the exhaust stroke. What distinguishes those two is the position of the cam.
 12-16-2013, 03:37 PM
#82
Registered User

Join Date: Dec 2013
Posts: 2
Likes: 0
Received 0 Likes
on
0 Posts
OK....that answers my question.......Thank you. Good to have a simple explanation..........z
03-16-2014, 08:08 PM
#83
Registered User
Join Date: Jun 2011
Posts: 5
Likes: 0
Received 0 Likes
on
0 Posts
I curious ivused a impact it was easy..... But I know reading this thread there must be a reason no one suggested it and not I curious why,..,. Truck runs great but I cab feel it someone gonna say you could have ruined or shortened the life of somthing,..
03-17-2014, 08:41 AM
#84
Registered User
Join Date: Apr 2013
Location: Pennsylvania, East
Posts: 101
Likes: 0
Received 0 Likes
on
0 Posts
I don't think it would be a problem when taking off bolts but I wouldn't when putting them on because of the possibility of over tightening.
08-04-2015, 12:12 PM
#85
Registered User

Join Date: Aug 2015
Location: WA state.
Posts: 3
Likes: 0
Received 0 Likes
on
0 Posts
This thread should never die as someone else said earlier on.
I have been a toyota truck owner for a decent amount of time. I bought my first one (a 1991 3vze 3.0 with 155k in a 93 body) off of a car lot about 8 years ago. I did many standard part replacement and other routine maintenance on it when i got it, as well as on ongoing. Therefore, over the years I never had any real issues until recently.
Then, things began to happen mechanically. Mostly little tics that pointed to bigger issues. Rather than tear this truck down right now, I opted to get another one with less mileage and a better body and give the 91 to my son as a project he and I can work on at leisure.
So, I ended up purchasing another truck, a 1990 3vze 3.0 with 155k original miles and only one original owner, in a private craigslist transaction. I should have known I would have my work cut out when I got this truck, as it had sat 2 years idle due to what the prior owner had said was a power steering issue. (I did know...I had my work cut out for me, I just didn't want it to be true...heh.)
I fixed the power steering issue by replacing the vacuum valve on the power steering pump and then refilling with dexron II/III ATF. the valve had failed and was drawing/dumping the steering/ATF fluid into the air intake. I also replaced a faulty oil sending unit that was sending a false oil level reading. Then I did an oil/filter change and topped off and checked other fluids. I also replaced a rusted out muffler with a new one to restore back pressure. I noted that the timing had been done at 30k, 90k and assumed that it would need done sooner than later. It ends up sooner came rather than later, when on a short trip into town, my water pump seized. I knew then, that a timing belt/water pump replacement was in the works.
Until now, I have never had to dive into the oh so joyful task required when needing to replace a timing belt/water pump. Not on a toyota anyways..... In anticipation of doing so on the other truck however, I had already purchased a set of 1991 toyota truck factory repair manuals, complete with an additional technical service bulletin manual too. So, all that was left for me to do was to get this truck home and begin to tear into it.
One of the very first things I noticed was the water pump design on this 1990.
https://www.yotatech.com/attachment....1&d=1438715656
https://www.yotatech.com/attachment....1&d=1438715656
https://www.yotatech.com/attachment....1&d=1438715656
The water pump appears to be the original and says TOYOTA and AISIN, however, it does not have a water outlet for an oil cooler as this toy doesn't have an oil cooler. Looking online for an Aisin replacement pump only led to ones with the outlet for oil cooler. I wanted an Aisin pump without a cooler hose outlet, but was unable to locate one. I didn't really want to get an Aisin with an outlet and cap it off, so reluctantly I settled on ordering a GMB timing kit instead. http://www.ebay.com/itm/300935163819?_trksid=p2060353.m2749.l2649&ssPageName=STRK%3AMEBIDX%3AIT
Along with ordering the timing kit above, I also went to O'reilly's and picked up a new thermostat (going to take it back and get a better quality one), a few gallons of pink ZEREX antifreeze coolant ($14.99 p.gal) and some gasket sealant.
More on coolant.
The repair manual https://www.yotatech.com/attachment....1&d=1438717966 recommends a coolant that has a 50% and no more than 70% ethylene-glycol content and this coolant seems to satisfy that requirement and is sold as an ASIAN coolant. Here is a link for the type of coolant I purchased. http://www.ebay.com/itm/371373511717?_trksid=p2060353.m1438.l2649&ssPageName=STRK%3AMEBIDX%3AITThe ZEREX was not my first pick, but it was within my budget right now, or I would have gone with a Toyota brand or the PENTOFROST A1 red coolant at this link. http://www.ebay.com/itm/2-Gallons-PENTOFROST-A1-Red-Engine-Coolant-Antifreeze-Fluid-for-Lexus-Toyota-/371399935423?fits=Make%3AToyota&hash=item56792945bf&vxp=mtr
As the water pump pics above show, my water pump seized. This happened while waiting on a light at an intersection. The moment it seized, the truck died.
What happened, was the metal impeller blade in the pump had somehow hit the edge of the flow channel and stuck fast. This in turn melted my timing belt as the cam pulleys drug it around the locked pump pulley.
Luckily I was able to restart my truck after the light changed and drive less than an 1/8 mile (80 yard approx.) and park it in an easily towable place. (It had seized at a busy intersection stop signal on a busy highway.) Had the belt snapped at the same time, I would have been in a truly lousy spot. Thankfully it held until I got it parked and then I immediately shut the truck off and popped the hood. When I saw coolant pouring from behind my timing cover, I knew I had a job on my hands.
Anyways, this thread has been helpful. I have been reading it while I tear into my truck and wait for my parts to arrive.
I only wish I could find an Aisin water pump without the cooler outlet. Does anyone know if they still manufacture them this way or do they only manufacture them with the outlet now?
Also about applying gaskets. I assume you coat both sides of the gasket with sealant? What type of sealant is recommended? I purchased https://www.yotatech.com/attachment....1&d=1438717966 This should be more than adequate right?
I also am waiting on getting a SST for removing my Cam pulleys. I found a decent one for $35.00 that should do fine. It is the same as the one shown in post #16. And yes....in post #12 as another poster pointed out, the right pulley in that pic is on backwards, at least in relation to what I see on my own truck.... Good to have a FSM by your side, but check and double check your work, then check it again!
Last edited by DIYmossrock; 08-05-2015 at 12:28 AM.
08-04-2015, 12:46 PM
#86
Registered User
Join Date: Sep 2007
Location: San Francisco East Bay
Posts: 8,255
Likes: 0
Received 823 Likes
on
650 Posts
Inexpensive "Cam sprocket" tool
The cam has a 27mm hex flat cast into the middle. Drop on a 27mm wrench ($10.50 at Home Depot, a 1 1/16" will work just fine if you can't get a 27mm), lean it against a 2x4 sitting on the edge of the fender, and wail away on the cam bolt with the appropriate wrench.
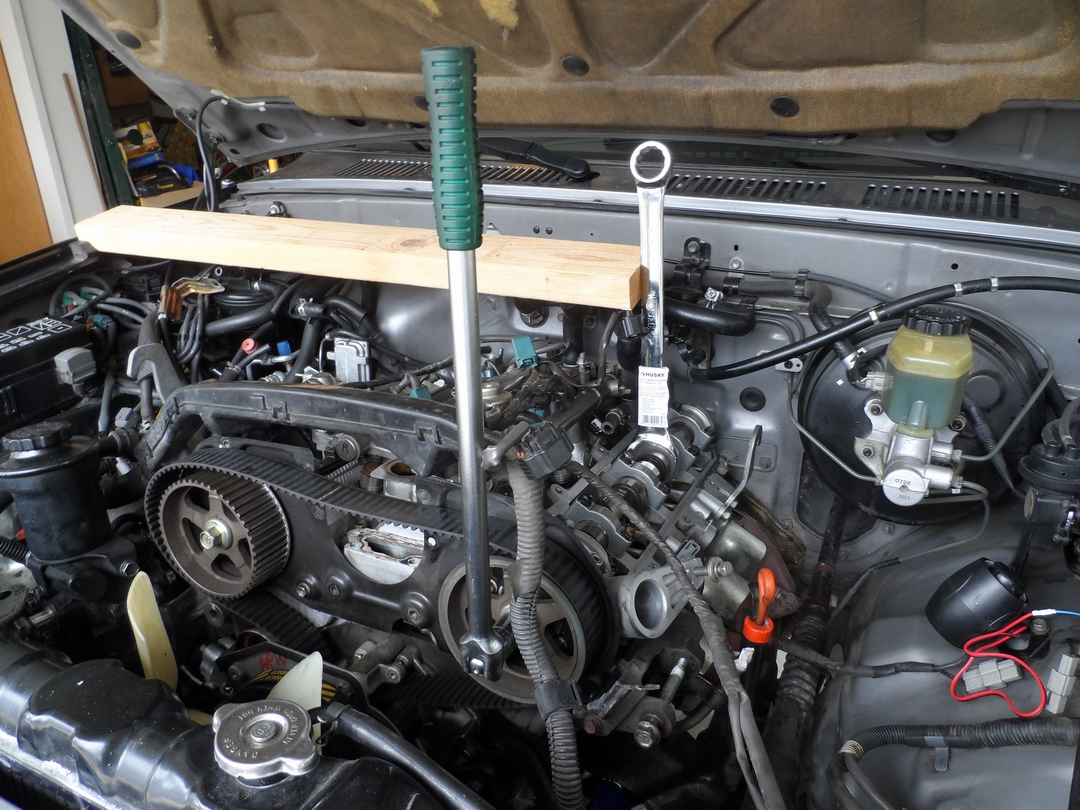
The disadvantage of this method is that you remove the valve covers before removing the back timing cover; the valve covers "tuck" into the timing cover so it is slightly easier to remove/replace them with that cover off. You can't remove that cover with the cam sprockets in place. But that's the way you remove the valve covers every time you adjust valve lash, so it's no big deal.
The advantages of this method is that it is a) pretty cheap; if you don't have the wrench already it's just $10.50, and b) easier to put torque on the cam bolt; you don't have to hold the tool.
More importantly, you are less likely to bend the "knock pins" that keep the cam sprockets from turning on the cam. When I first disassembled mine, both knock pins had a shear bend of about 2mm! (with the accompanying divot in the sprockets) This is because all the torque (removing and installing) is carried through those pins when using the ordinary SST. The 27mm wrench method puts no torque on the sprockets or pins.
Last edited by scope103; 08-04-2015 at 12:47 PM.
08-04-2015, 01:30 PM
#87
Registered User
Join Date: Aug 2015
Location: WA state.
Posts: 3
Likes: 0
Received 0 Likes
on
0 Posts
The cam has a 27mm hex flat cast into the middle. Drop on a 27mm wrench ($10.50 at Home Depot, a 1 1/16" will work just fine if you can't get a 27mm), lean it against a 2x4 sitting on the edge of the fender, and wail away on the cam bolt with the appropriate wrench.
The disadvantage of this method is that you remove the valve covers before removing the back timing cover; the valve covers "tuck" into the timing cover so it is slightly easier to remove/replace them with that cover off. You can't remove that cover with the cam sprockets in place. But that's the way you remove the valve covers every time you adjust valve lash, so it's no big deal.
The advantages of this method is that it is a) pretty cheap; if you don't have the wrench already it's just $10.50, and b) easier to put torque on the cam bolt; you don't have to hold the tool.
More importantly, you are less likely to bend the "knock pins" that keep the cam sprockets from turning on the cam. When I first disassembled mine, both knock pins had a shear bend of about 2mm! (with the accompanying divot in the sprockets) This is because all the torque (removing and installing) is carried through those pins when using the ordinary SST. The 27mm wrench method puts no torque on the sprockets or pins.
08-04-2015, 04:27 PM
#88
Registered User
Join Date: Sep 2007
Location: San Francisco East Bay
Posts: 8,255
Likes: 0
Received 823 Likes
on
650 Posts
Maybe I should have pointed out: you DON'T need to remove the cam sprockets to replace the timing set. I don't know why the FSM lists that as a step. With the tensioner off you have plenty of slack to remove the belt.
You DO have to remove the crank sprocket, and for that you need a crank holding tool (for no other reason that you also need to hold the crank when you put the crank bolt back in.)
You DO have to remove the crank sprocket, and for that you need a crank holding tool (for no other reason that you also need to hold the crank when you put the crank bolt back in.)
08-04-2015, 06:03 PM
#89
Registered User
Join Date: Aug 2015
Location: WA state.
Posts: 3
Likes: 0
Received 0 Likes
on
0 Posts
Maybe I should have pointed out: you DON'T need to remove the cam sprockets to replace the timing set. I don't know why the FSM lists that as a step. With the tensioner off you have plenty of slack to remove the belt.
You DO have to remove the crank sprocket, and for that you need a crank holding tool (for no other reason that you also need to hold the crank when you put the crank bolt back in.)
You DO have to remove the crank sprocket, and for that you need a crank holding tool (for no other reason that you also need to hold the crank when you put the crank bolt back in.)
1 Timing Belt (193 teeth)
1 GMB Tensioner (bearing assembly)
1 GMB Idler upper "large" (roller)
2 Camshaft Seals
1 Crankshaft Seal
1 GMB Water Pump with gasket (without outlet pipe)
This kit fits to what the FSM tells you to do. So based upon that, I would guess that is the reason for removal. But, i agree, if the kit I am purchasing didn't have these, I wouldn't be doing it. I thought about not doing them anyways, but since they are in the kit, and I am already this far into it, why not?
Last edited by DIYmossrock; 08-04-2015 at 06:08 PM.
03-17-2020, 04:19 PM
#90
Registered User

Join Date: Mar 2020
Posts: 1
Likes: 0
Received 0 Likes
on
0 Posts
Thanks a million
I came across this thread, and it is better than any manual out there. All in one place. Usually I just read and don't post anything, but this time is different as this site probably saved me a lot of time and potentially lots of headaches.
Anyway, so I own 2008 4Runner with over 140k miles and just recently the alternator went bad. So, being a person I don't really trust a mechanic, I figure I would do it myself.
Making long story short, decided to go the extra steps and replace the timing belt and tack on a water pump as well. Originally it was just suppose to be a timing belt, but after reading this thread decided I don't want to redo the same job twice in case the water pump goes bad. So anyway, I don't have specific tools but decided to buy a couple to make this job easier. The biggest obstacle I guess was to figure out how to loosen the bolt on the crank pulley. Decided to go with the starter trick, so I bought an impact socket, 25in breaker bar, set it up against the frame and here goes nothing.
Instead of shorting the points on the starter I decided to use the ignition key. Yeah I know, but guess what IT WORKED, LUCKY ME RIGHT. It took me like a good minute, then I closed my eyes, and really really quick turned the key ON and OFF. All I heard was a metal clank and reluctantly looked under the hood to discover that I could turn the bolt by hand now, phew nothing broken. Good old PITTSBURGH TOOLS stood up to the test. Now I just have to figure out how to tighten the bolt to the 180 torque, never mind I think I just found something:
Now I just wish some would post a magic way on how to safely remove exhaust manifold from my 2008 Toyota 4Runner. I have all the bolts and nuts soaked in pb blaster for a day now. Hopefully no breakage.
Once again thank you guys for this post.
03-17-2020, 09:19 PM
#91
Registered User
Join Date: Sep 2007
Location: San Francisco East Bay
Posts: 8,255
Likes: 0
Received 823 Likes
on
650 Posts
Welcome to YotaTech! At least you learned why the so-called "starter trick" is a waste of time. Yeah, you got the bolt loose, but you still need the tool to put the bolt back in. You could have saved yourself all that drama.
Using a 2x4 for this job is pretty risky. It looks like the YouTube author got away with it, but I would expect the wood to split at the worst possible moment. Also, using 1 1/2" of bolts through the wood means they are loaded in bending; you might not care about the bolts, but you don't want to bugger the holes in the Harmonic Balancer.
So I suggest this tool: https://www.yotatech.com/forums/f116...h-3vze-137934/ There are plenty of others just as good (and not as dangerous as a splitting board) to be found on this site. The cost of a piece of angle iron is only a few cents more than a 2x4.

Thread
Thread Starter
Forum
Replies
Last Post
zd92655
86-95 Trucks & 4Runners
9
03-06-2022 12:58 PM
B. Graves
95.5-2004 Tacomas & 96-2002 4Runners
4
07-03-2015 04:10 AM
UKMyers
95.5-2004 Tacomas & 96-2002 4Runners
10
06-11-2002 08:19 PM


