83 yota 4x4 clutch replacement!!
 12-03-2012, 04:16 PM
#1
Registered User
Thread Starter
Join Date: Nov 2012
Location: pearl ms
Posts: 47
Likes: 0
Received 0 Likes
on
0 Posts
83 yota 4x4 clutch replacement!!
im getting ready to change my clutch on my 83 yota pickup and was wondering if theres an easy way doing it ive never changed a clutch out
 12-03-2012, 06:39 PM
#2
Registered User
Join Date: May 2011
Location: Spokane, WA
Posts: 75
Likes: 0
Received 0 Likes
on
0 Posts
I have never changed the clutch in a Pickup, but I have in a Tacoma a few times. From what I remember, all you need to do is take off the whole shifting assembly inside the cab (This allows the transmission to slide back). Undo the clutch slave cylinder, front and rear drive shaft, transfer case crossmember and the bell housing bolts. Then using a transmission jack under the tranny and transfer case, slide the whole assembly back. Then change the clutch, and install in reverse order. This is if my memory serves me correct, it has been a while.
12-03-2012, 07:02 PM
#3
xcfunrunner pretty much has it right. I did mine in an afternoon, but I've also swapped a lot of clutches in my days. I would highly recommend using a transmission jack if you can get a hold of one because the transfer case is awkward and makes the transmission really out of balance when dropping it down. Don't forget to swap your throw out and pilot bearings. Pay attention to how you take your throw out bearing off the carrier - it is possible to put it on backwards and you don't want that. Scope out YouTube for the grease or wet paper tricks to pulling out the pilot bearing (unless you have a bearing puller). Pilot bearing removal is pretty much the same most vehicles. Good luck!
12-04-2012, 04:07 AM
#4
Registered User
Thread Starter
Join Date: Nov 2012
Location: pearl ms
Posts: 47
Likes: 0
Received 0 Likes
on
0 Posts
thanks for info. i talked to a guy who said to get my transmission bolts and take them to the hardware and get studs matched to the threads. he said it keeps you from having to take the whole transmission down has anyone done this or heard of this
12-04-2012, 06:16 AM
#5
Registered User
No idea what that means...
Other than what everyone else mentioned, there's just the speedometer cable to take out. I think that about covers it.
Transmissions are a pain, especially the first couple times, but they're really pretty straightforward. The only reason they're a pain is because they're big and heavy and awkward.
The top two bellhousing bolts are a bit of a pain to get at, but they just take longer. I used a shorter ratchet with neck that bent, and could get little quarter turns in. Another way, if you have a seriously long extension and some kind of swivel, is to sit on the ground back by the transfer case and just crank it from there with the extensions.
The bellhousing will be pretty well fused to the engine. You'll want a couple people under the tranny, holding it tight, and gently (or not so gently) rock it back & forth until you break it loose. Then pull it straight back until the input shaft clears the clutch, and you can then gently set it down.
12-04-2012, 08:05 AM
#6
Registered User
Join Date: Jan 2012
Location: Kansas City, Missouri
Posts: 325
Likes: 0
Received 0 Likes
on
0 Posts
easy pilot bearing removal
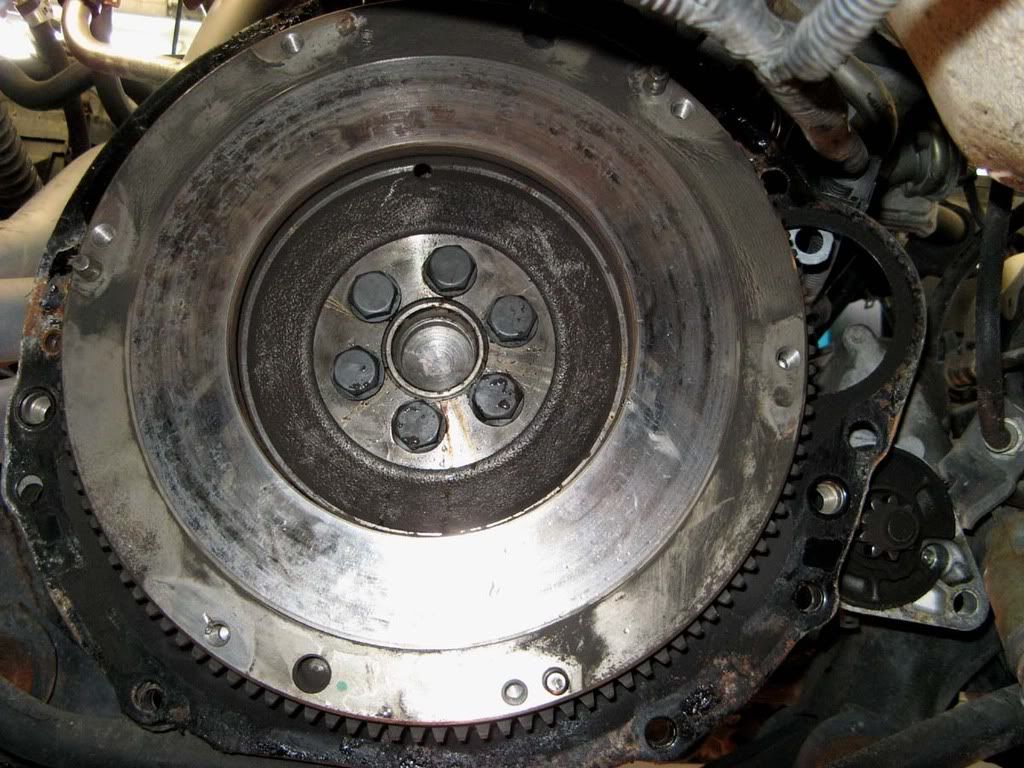
You'll get a pilot bearing in the clutch kit (should!). This is pressed into the center of the flywheel in a machined recess. Easy removal:
Get a newspaper and shred it into 2 inch wide strips. Get a bowl of water. Wet the strips and stuff them into the recess through the center hole of the pilot bearing. Keep doing it until it is full, and then use a snug fitting bolt, and hammer, to compress the wet newspaper. Add more wet newspaper as it comes out. It pushes the pilot bearing out from the inside in a snap. Amazingly simple.
Some people have talked about using grease. This is MUCH cleaner, and the newspaper holds the water nicely. I used a 19mm bolt, which had perfect shaft size. You can see it in the picture.
Last edited by 83pingpong; 12-04-2012 at 08:17 AM.
Trending Topics
12-04-2012, 08:09 AM
#8
Registered User
Join Date: Jan 2012
Location: Kansas City, Missouri
Posts: 325
Likes: 0
Received 0 Likes
on
0 Posts
xcfunrunner pretty much has it right. I did mine in an afternoon, but I've also swapped a lot of clutches in my days. I would highly recommend using a transmission jack if you can get a hold of one because the transfer case is awkward and makes the transmission really out of balance when dropping it down. Don't forget to swap your throw out and pilot bearings. Pay attention to how you take your throw out bearing off the carrier - it is possible to put it on backwards and you don't want that. Scope out YouTube for the grease or wet paper tricks to pulling out the pilot bearing (unless you have a bearing puller). Pilot bearing removal is pretty much the same most vehicles. Good luck!
See the bowl of water "tool" next to the jack?
Other pics:

You can see where the pilot bearing was in the center of the flywheel. Clean and ready for the new one. This was my old '94 2WD.
You can make more room by setting the truck up on jack stands:
Note the slide hammer I tried to remove the pilot bearing with before I found out about the wet newspaper trick. Duh!

The clutch replacement job was useful right away. I SOLD THIS TRUCK a couple of years ago, planning to get the 1st gen 4x4 eventually. Finally did. Now I want to work on it. I was working on the foundation for my shop in this photo. The shop is done, but I have lots of other crap to deal with before I can work on the truck. I mean, really work on the truck, not just fix it!

Last edited by 83pingpong; 12-04-2012 at 05:54 PM.
12-04-2012, 04:30 PM
#9
Registered User
Thread Starter
Join Date: Nov 2012
Location: pearl ms
Posts: 47
Likes: 0
Received 0 Likes
on
0 Posts
thank you for the info. i was going to try to do this week but its been raining for a past couple of days. im going to try to do this over the weekend. ill take pictures of the project
12-04-2012, 05:45 PM
#10
Registered User
iTrader: (1)
Join Date: May 2012
Location: GWS,Colorado
Posts: 299
Likes: 0
Received 0 Likes
on
0 Posts
The top two bellhousing bolts are a bit of a pain to get at, but they just take longer. I used a shorter ratchet with neck that bent, and could get little quarter turns in. Another way, if you have a seriously long extension and some kind of swivel, is to sit on the ground back by the transfer case and just crank it from there with the extensions.
12-04-2012, 05:50 PM
#11
Registered User
Join Date: Jan 2012
Location: Kansas City, Missouri
Posts: 325
Likes: 0
Received 0 Likes
on
0 Posts
I rememeber those two top bolts. I bought long 1/5" drive extensions to get to it. I can't remember if I needed two universals, but definitely one. One was enough, as I recall, but I was working way back by the transmission, up on top!!! Or on the side (tight!). It worked, but I remember holding my arms and torso in very painful positions while I loosened, and then tightened them after job! Yup. BRUTAL.
Last edited by 83pingpong; 12-04-2012 at 05:52 PM.
12-05-2012, 06:22 AM
#13
Registered User
Like I said, I've always gone from the top of the engine compartment, back by the firewall. I just go in behind the valve cover with a little half size socket wrench with the adjustable/angle-able head. Little quarter turns, and not much contortioning. But I don't have huge hands.
My friend, the last time we took it out, had FEET of extension (possibly 4'). He did no contortioning. He just sat on the ground, behind the transmission, and cranked away. If the socket slipped off, I just put it back on for him. He had those two bolts out in less than 2 minutes each.
I don't know what the tools are called...but a couple long extensions, a little swivel end to put the socket on, so it can go any direction, then a crank/handle thing at the other end instead of the actual ratchet.
I don't know that it's necessarily worth it to buy these tools (unless you want to) just for this job, but if you have them, or know somebody with them, they really come in handy for those bolts.
Last edited by 83; 12-05-2012 at 06:23 AM.
12-05-2012, 06:22 AM
#14
Registered User
Join Date: Jan 2012
Location: Kansas City, Missouri
Posts: 325
Likes: 0
Received 0 Likes
on
0 Posts
On my '94 2WD, I could loosen one with a flex head ratchet, but that's all. Just the first turn...I think after that the least knuckle busting solution is just go buy the extensions and a universal if you don't have it. I went with 1/2" drive. It will take some patience, but they'll come out. Good luck. Like 83 sez, lots of extension is a little easier, but I loosened first with a ratchet (or maybe it was a combination wrench-first turn only), at least on the driver side. I don't think I could get to the other side except with extensions.
Last edited by 83pingpong; 12-05-2012 at 06:40 AM.
12-05-2012, 06:29 AM
#15
Registered User
good luck on the clutch. I re-did mine a few weeks ago in 6 hours including re-doing the output flange on the transmission that was loose, and fighting with the starter for 2 hours.
12-09-2012, 02:06 PM
#17
Registered User
Join Date: Jun 2006
Location: Teays Valley, WV
Posts: 296
Likes: 0
Received 0 Likes
on
0 Posts
So....how'd it go? I've gotta do a clutch replacement in the Trekker as soon as deer season ends. I've done it about 5 times in my 82 2WD, this will be the first time with a 4WD. Did you replace with a quality OEM (Aisin) clutch or one from Marlin or what??
12-09-2012, 05:25 PM
#18
Registered User
Thread Starter
Join Date: Nov 2012
Location: pearl ms
Posts: 47
Likes: 0
Received 0 Likes
on
0 Posts
well unfortunately i couldnt start on this weekend got stuck doing other things. im hopeing i can start sometime next week or weekend. i got asian clutch im hopeing i can get this done this week its been bugging me to start on it
12-09-2012, 05:35 PM
#19
 12-09-2012, 06:01 PM
#20
Registered User
iTrader: (1)
Join Date: Oct 2011
Location: VA
Posts: 599
Likes: 0
Received 0 Likes
on
0 Posts
I recently did the one in my 87, coming from the poor side, we used two floor jacks, there were two of us doing the process. After getting it off we lowered the jacks on to cinder blocks that had wood on top of it, then we each got on one side and wiggled it back until it was out of the way. It took us awhile but it was both of our first mechanic adventure. Don't be scared to yank on the trans when removing it, it was pretty tight on my truck.
Good luck, its not hard, just time consuming.
Good luck, its not hard, just time consuming.


