When you click on links to various merchants on this site and make a purchase, this can result in this site earning a commission. Affiliate programs and affiliations include, but are not limited to, the eBay Partner Network.
Ok,
have new relay ready to install and diagrams make sense.
now how the eff do I get back there? Speedometer comes off but is wired, same with radio etc.
do I need to remove the whole dash?
Got to it. didn't have to take anything apart, just a little awkward on my back.
- I used diagrams to install new relay and was so excited but then... it did the same thing. Double check wiring... same thing.
I guess i'm moving on to oil pressure switch? does anyone have experience on this?
You can test the Oil Pressure Switch by cranking the engine. Light should come on when you turn on the Ignition ("RUN"), then the light should go out within a few seconds of cranking, whether the engine starts or not. Cranking the engine over runs the oil pump (it's mechanical) & if working right, should provide enough pressure to make the Oil Pressure Switch work and turn off the "OIL" light. If your "OIL" light doesn't come on when you turn on the Ignition, you have a dirty connection, the switch isn't hooked up or the oil pressure switch is defective. The Oil Pressure Switch is located on the passengers side of the engine block, low on the block, and should have a brown wire connected to it. If it's connected & the connectors are clean & you still have no "OIL" light it's likely the switch is bad. They are easy to replace with nothing more than an open-end wrench.
By the way, when cranking the engine the fuel pump gets full battery voltage. The Oil Pressure Switch and Fuel Pump resistor are NOT a part of the fuel pump circuit when cranking the engine ("START" position of the key). The resistor is part of the "RUN" circuit and only sees power when the Oil Pressure Switch opens (good oil pressure). The resistor is only part of the fuel pump circuit when the Oil Pressure Switch opens when you have enough oil pressure.
I'm assuming you did check the connector for the fuel pump resistor and those connections are clean? I know you said the resistor tested out at 1.4 Ohms, but did you heat test it with a hair dryer as I suggested? (curious)
Just take it one thing at a time, you'll get it, one way or another.
I have a '78 that I have been "through the mill" with & I've fixed & redone every system, including ignition & fuel. My research (and it's been TONS) tells me that the '77 & '78 are identical in systems and components.
I think you can forget the coil for now. If it starts while cranking the coil is working. Also means your Ignitor (Ignition Control Module) and Distributor Pickup Coil are working. You shouldn't have a ballast resistor on the coil, those were only used with the earlier "points" distributors. If you want to test the coil with an Ohm Meter anyway, the specs are:
Primary Resistance: 1.3 to 1.7 Ohms
Secondary Resistance: 6500 to 10500 Ohms
Make sure you remove/disconnect all 3 leads to the coil before you test it. If you don't have a "self-zeroing" Ohm Meter, connect the leads together on the 200 Ohms scale to see what the resistance is in the test leads, & subtract this amount from the reading for the Primary Resistance. The extra resistance in the leads doesn't matter that much on the Secondary Resistance reading.
Fuel Pump test - The '77 does have an electric fuel pump in the tank. Have you tested it for fuel flow? I mean a visual verification of fuel flow under certain conditions. I would disconnect the fuel feed line to the carb & put the end in a container to catch any gas, then try to start the engine. There should be enough gas left in the carb to do this. If you get flow while cranking & then flow stops when it starts (key released to "RUN" position) see #2 below. If engine starts & you still get THE SAME* fuel flow when key is released to the "RUN" position, see #1 below. Also remember that your truck is 42 years old & probably needs some attention to the things I am going to outline below. My '78 sure did. BTW, fuel flow on these pumps is about 1 quart (32 ounces) every 15 seconds, or approx. 1 gallon per minute, so make sure your catch container is big enough.
I think you have one of 2 different possible problems:
#1 - FUEL/VACUUM ISSUES - Bad Fuel Filter. Idle Passage(s) partially or completely blocked, Throttle Shaft Bushings worn causing a vacuum leak, small crack(s) in rubber fuel line(s), Loose Fuel Line Clamp(s). You didn't say how old your carb was, when it was rebuilt last, whether you've recently cleaned it or not, how old the fuel filter is, what condition the rubber line are in, whether or not you check clamp tightness, & more. You have to go over all the small stuff BEFORE you try diagnosing or replacing parts.
Loose hose clamps can cause the fuel system to suck in air. Same with small cracks in the rubber lines. You said you "emptied out the fuel filter" & it refilled after a few attempts at cranking, but that doesn't mean that the filter media inside is good. Over time the filter can get partially blocked up causing a restriction. Replace the fuel filter, they are cheap, it's easy to do & will give you one less suspect.
Worn Throttle Shaft Bushings can cause large vacuum leaks in the carb. If you recently EXTERNALLY cleaned the carb this could have removed dirt or grime that was acting like a vacuum seal on the worn shaft bushings. The engine will start cold because the choke is making the mixture rich, or will start hot giving it a little extra gas with the pedal. But once started the vacuum leak leans it out too much & it dies. Check for looseness or "wobble" on the shaft; there should be none if it's good. This is the larger shaft at the base of the carb.
Blocked Idle Passage(s) - I had this problem, and with a freshly pro rebuilt carb too. Turns out the Ethanol blend fuel of today was eating away the insides of my old rubber fuel lines. Tiny particles of rubber clogged up my idle passages in the carb, so the engine would start but not keep running. Another good reason to check & perhaps replace your old fuel lines with Ethanol resistant lines. I fixed the problem by removing the fuel bowl drain bolts, idle cutoff solenoid & mixture screw, so I could get access to the idle passages. Used carb cleaner to spray out the fuel bowl, shoot cleaner through both jets, into the port for the solenoid & the mixture screw hole. The blew it all out with some compressed air then put everything back. it worked. Just had to check how many turns out the mixture screw was before completely removing it, so I could put it back at the right "setting". I also replaced every rubber fuel line on the truck with new, ethanol resistant fuel line, as well as all new clamps
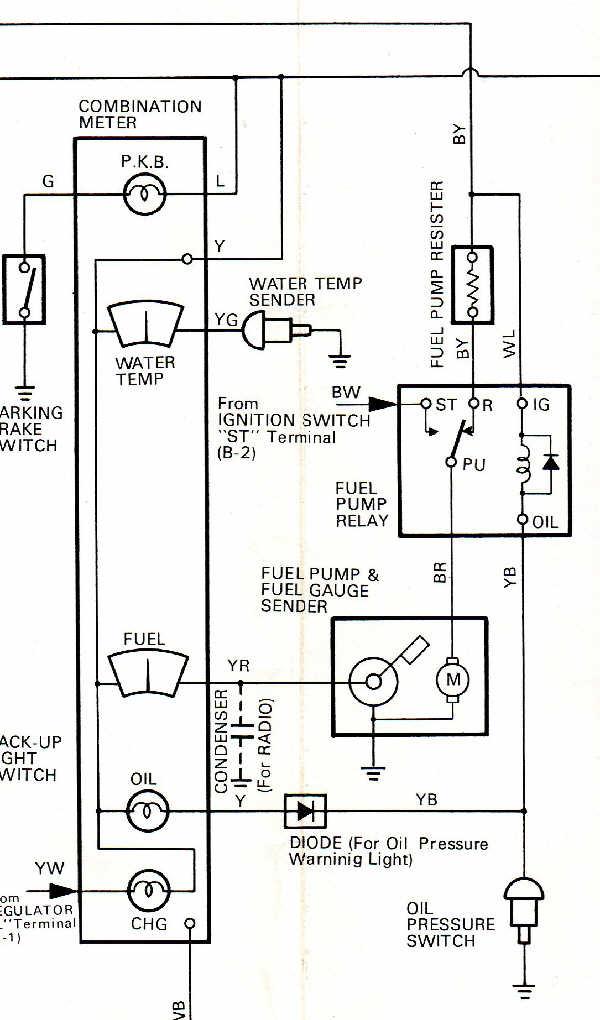
#2 - Issue with the Electrical Circuit for the Fuel Pump. If you get no flow or noticeably reduced flow of fuel when the key is released to the "RUN" position, I would suspect that your Fuel Pump Resistor is the cause. Here is a diagram of the electrical system for the fuel pump:
I will explain the circuit. In looking at the diagram, you'll notice that the fuel pump circuit gets full battery power from the "START" side of the ignition through the Fuel Pump Relay. The relay is energized & switches the "pole" inside the relay to the START side whenever you have low or no oil pressure, thanks to the Oil Pressure Switch. The switch is "closed" at low or no oil pressure & allows voltage to flow to the coil in the relay, and sends voltage to your "OIL" warning light on the dashboard. Once enough oil pressure is built up, the pressure "opens" the switch, turns off the "OIL" light & allows the pole to flop back to the "RUN" side. This brings the resistor into play. The resistor drops the battery voltage to the fuel pump down to about 9.5 volts. This extends the life of the fuel pump & makes it run quieter. The pump is designed to run at this voltage & provide the correct fuel pressure & volume for running conditions.
Over time, the fuel pump resistor, due to exposure to engine heat & who knows how many cycles, will begin to fatigue & change in resistance to a higher level & this only gets worse as it heats up. The higher resistance drops the voltage to a point where there may not be enough voltage to the pump for it to pump properly. My old resistor when hot read more than double it's spec, & my calculations showed the pump was only getting something like 3 volts instead of the usual 9.5 volts(!). This results in little or no fuel flow when the key was in the "RUN" position, & why the engine would not keep running after starting.
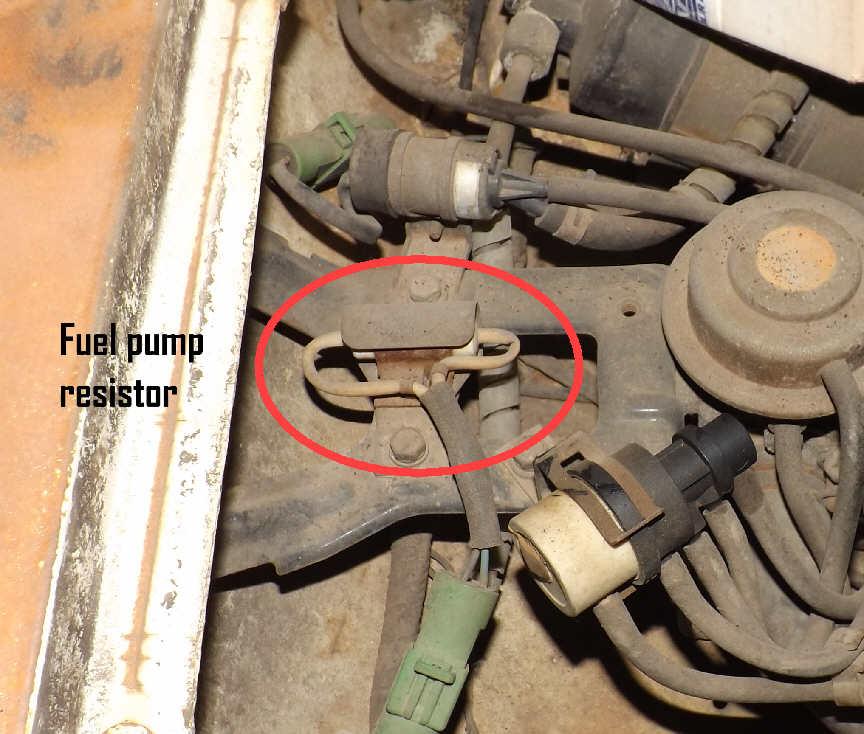
First, make sure your fuel pump resistor is still connected & that the contacts in the plug & socket are clean. It is located in top of the passenger side fender well & looks like this:
You can test it with an Ohm Meter like the coil. The spec on it is:
Ceramic Power Resistor, 1.4 Ohms, 10 Watts, 10% Tolerance
Cold, it might read within spec, so it's a good idea to get a hair dryer or heat gun & heat it up some while watching the ohm meter. If it's good, you shouldn't see anything beyond 1.6 Ohms, even when hot (200 F maximum). When I tested mine with a hair dryer it eventually topped out at 2.9 Ohms, more than double the original spec.
You can also test it by bypassing the resistor. Disconnect the green plug & put a jumper wire in the socket that is part of the wire harness. Then try to start the engine & see if it runs after start. If it does, then the resistor is your most likely suspect. If it still dies after starting, either the relay is going bad or you still have a fuel issue.
WARNING - Only bypass the resistor for testing. DO NOT DRIVE THE TRUCK WITH THE RESISTOR BYPASSED. Your fuel pump is designed to run on 9.5 volts most of the time. It only gets full battery voltage for very short periods of time, on startup. If you bypass the resistor the pump will be getting full battery voltage all the time, & could burn out the pump or cause other system damage if run this way for an extended period of time.
If it turns out that the resistor is the problem let me know, I have a fix for that & can point you in the right direction. If the resistor checks as totally fine, it may be the relay. I have more info on that as well but since this post is long enough, just ask.
Let us know what you find out.
@13Swords I have been following your threads on your fuel issues with your pickup and I have been having a similar issue. I have a 79 Toyota pickup that I just desmogged and have been having issues with it shutting off. Has a hard time starting but when it does only runs for maybe 30 sec and then shuts off. Well reading your threads I took a look at my fuel pump relay and resistor to see if that was causing my issue. BINGO. When I did the desmog I tossed out my resistor not knowing that�s what it was I jumped the fuel pump resistor plug and started right up and stayed running. Now I don�t know what to do since I do not have my fuel pump resistor anymore. Can�t seem to find one on eBay either
I'm glad the threads have helped you, but sorry to hear you got rid of the resistor. You definitely need to have one in the circuit or you're going to end up replacing fuel pumps more often. As I mentioned in the write-up, the fuel pump isn't designed to run all the time in 12 volts, only on start-up, so running the truck with a bypass wire in the resistor socket isn't a good answer.
Of course, a new replacement original part is no longer available from Toyota. You have 2 options here, easiest one first:
1. Give Jim's Used Toyota Truck Parts a call. They have a website (http://yodajims.com/) but you have to call them to order any parts. I have dealt with them in the past and they are pretty good, and should also have the part on hand. Just make sure you are very specific with them on the phone about exactly what you need.
There may also be the bonus of them possibly having some RV models in their yard, which is going to mean low mileage parts. Definitely a bonus on electrical parts like this one. As long as it tests good (both hot & cold) it would be an easy mount, plug in & go solution.
2. Fabricate a resistor unit like I did. You're going to need the resistor, some lengths of 16 gauge stranded & insulated wire, 2 Female Spade Terminals - crimp on or solder on (I prefer solder on) which if I remember correctly are 1/4" size*, some shrink tubing*, soldering iron & solder & two small self-tapping sheet metal screws.
*Hint - You can get a selection of terminals & shrink tubing, both of various sizes, from your local Harbor Freight for reasonably cheap.
Here's a link to the resistor you need: https://www.mouser.com/ProductDetail...2FJkRXfA%3D%3D
I know it says that it is rated at 1.5 Ohms instead of 1.4 Ohms but it will work fine with no loss of fuel pump pressure or volume, plus it's moisture resistant and rated to 200 degrees C (about 400 F) so engine compartment heat won't hurt it any.
You need to solder one wire to each lug on the resistor then slide a bit of shrink tube up each wire, just long enough to cover the solder joints. This is to prevent corrosion later & to insulate the connections. Slide another piece of shrink tube of the right size over both wires, leaving about an inch of wire exposed on the "free" ends & shrink it down (see reference pic below).
This makes the finished result neater & you won't have loose wires flopping around. Strip the insulation off the "free" ends & crimp or solder on the female lugs. Plug each female lug onto each male lug in the socket for the resistor. It doesn't matter which wire goes on which terminal in this case.
Use the two sheet metal screws to mount the resistor to the bracket that used to hold the old resistor assembly. Reference pic: Fuel Pump Resistor Assembly. Note black bracket beneath.
You may have to drill some small pilot holes for the screws. There should be tabs on the resistor's casing that you can use to mount it (see pic on resistor link above).
That's it. I run a very similar setup to this & so far it's been bulletproof for almost 3 years now. Only difference in mine is I used the old resistor assembly to hold the new resistor, and used the old socket plug & leads & soldered them to the new resistor.
As long as the terminals you use make solid connections it will work just as well.
Any questions or need additional info let me know.
Ok, so as luck would have it - I'm having issues again.
This time, no fuel at all, none in RUN, none in START - fuel pump ain't delivering the goods!
Looking for suggestions on where to start troubleshooting.
Fuel pump resistor is reading 1.4 ohms
I have located the relay under the dash. no sure what 2 check withbthe relay?
yellow/red wire from fuel pump is NOT getting voltage - do believe that is the right one to check?
TIA!
Aaron
According to my info (see fuel pump wiring diagram above), the power wire from the relay to the fuel pump is black/red, not yellow/red.
I don't understand your previous post about the fuel pump power coming from the HEATER fuse??? That should not be at all. It should be through the ENGINE fuse/circuit. Check that fuse out, as well as the clips that hold the fuse for any dirt/corrosion/gunk. I've also seen some old "BUSS" type glass fuses that have separated; the ends can come off the glass tube part. This breaks the fuse wire near the cap inside, but visually the fuse wire looks intact thru the glass. If in doubt, pull the fuse & resistance test it with an ohm meter for continuity.
The relay and how Toyota set it up to work can make testing for fuel pump power tricky, if you don't know how the system is supposed to work. Whether or not you get power out of the relay for the fuel pump on the Black/Red wire depending on what the oil sender switch is doing. I will explain.
If you are testing for fuel pump power at the pump (connection at the fuel sender flange, at the tank), and have the key in the RUN position, you will read zero power. This is because the (non-running) engine has no oil pressure. No oil pressure at the oil sender switch makes the switch close. This lights up your dash "OIL" light, but also energizes the coil inside the fuel pump relay. This switches the contact arm inside over to the "START" side (see diagram). That means the "RUN" side of the circuit has no power.
For testing & to prevent the fuel pump relay from doing this, you have to disconnect the wire from the oil sender switch at the engine. The oil sender switch is located low on the engine block on the passenger side, & should have a single brown wire going to it. The connector just pulls straight off.
Disconnecting the oil sender will allow the contact arm inside the relay to be on & stay on the "RUN" side to complete the "RUN" circuit.
Then with the key on "Run" you can test for voltage at the tank or by connecting your volt meter to a good clean ground point under the dash & probing the fuel pump connector where the Black/Red wire comes out of it.
If you do this as described & can confirm you have a good battery, good battery connection at the terminals, ENGINE fuse confirmed good, fuse terminals clean with good connection to fuse, & confirmed good ignition switch, then your fuel pump relay is likely the problem.
Another way to check whether or not the problem is (possibly) the relay is to bypass the relay. I say possibly because it could be the pump itself or a bad ground connection at the pump.
Unplug the relay connector & use a short length of wire to temporarily connect the Black/Yellow & Black/Red terminals. Then put the key in the "RUN" position & see if you get any gas delivery at the carb.
WARNING: Only do this for testing purposes.
DO NOT drive the vehicle or run the engine for any extended time with it wired this way. It is dangerous. The fuel pump relay was designed & intended by Toyota to be a safety device. I DO NOT recommend that it be permanently bypassed.
You haven't mentioned what age/condition the fuel pump itself is in. Knowing what's been done with the pump would help.
You say you've measured the fuel pump resistor at 1.4 Ohms. That is what it should be but there are other questions.
Is the resistor original? If it is, it should be a round, white ceramic type. These resistors can lose some function over time, & actually have a higher resistance when power is applied to them. This could lower the voltage to the fuel pump enough where you'd get reduced fuel flow, or possibly no flow at all.
The only way I know to test for this is a heat test. With a fatigued or somewhat worn out resistor, heat applied to it will make it's resistance rise. Supplying power to a weakened resistor will also heat it up. A resistor in good shape will not rise in resistance or only very minorly go up in resistance.
What I do is disconnect the resistor, put my ohm meter probes into the connectors terminals, take a reading, then direct a hair blow dryer or heat gun at the resistor from about a foot away. I watch the ohm meter for any rise in resistance. This takes several or more minutes to do a good test.
Anything above the 10% tolerance spec on the resistor (1.4 Ohms X 10% (0.10), 1.4 X 0.10 - 0.14 Ohms, 1.4 Ohms + 0.14 Ohms = 1.54 Ohms) the resistor needs to be replaced.
NOTE: I DO NOT recommend that the resistor be permanently bypassed or eliminated from the circuit. The stock-type fuel pump is not designed to run at full battery voltage at all times. Doing so will drastically shorten the pumps lifespan.
That's all I've got for now. Just take your time & be thorough, you'll find the problem.
my '77 has 127k miles, I'm the 2nd owner. I'm pretty doubtful that the fuel pump has ever been renewed. The Relay and Resistor both look day-one stock as well.
This "gas shortage" all started on Sunday when I filled the bed full of wood chips to take to my farm - which makes me wonder about connections under the bed...
Here's an update:
I tested the fuses and confirmed connectivity (all new fusible links)
I disco'd the oil pressure sender, jumped the Black/Yellow & Black/Red terminals - under the hood it shows the 11.37 on the Black/Red wire that goes to the Fuel Pump
reconnected the harness under the hood and....Still no gas delivery in either START or RUN. Just nothing!
I'm going to check the resistor under warm conditions next....
Question: Is there a way to access the fuel pump connections w/o removing the bed? *edit - just watched your video re: dropping the tank****
Last edited by amorphous; 01-24-2023 at 04:02 PM.
Reason: update
Good work. You've got good voltage to the Black/Red that feeds voltage to the pump, at least at the terminal point in the relay connector. That means you either have a break in the Black/Red wire to the pump, or the pump itself is no longer functional. I'd be more suspect of the pump personally given that it's original.
I don't see how a load of anything could have affected the wire or the connection.
If your hands are small enough, it is possible to reach up on top of the tank to the pump power connector. Not easy but possible. Since the pump is already suspect dropping the tank is probably the right move.
If it is the pump & you want to keep things in the "original" state, here's the correct part: https://www.rockauto.com/en/catalog/...fuel+pump,6256
US MOTOR WORKS USEP8188. This is the one I used to replace my old pump on my '78. It's made by Airtex. Been working fine over 6 years now with no issues. Genuine Denso replacements are no longer available from Toyota.
For this threads OP & for any future readers: Notes for anyone doing this pump replacement, based on my experience. The specific info below applies to 1975 to 1978 pickups with the stock 20R engine.
1. If your stock pump is dead, it should still be able to flow gas through it, unless the impeller vanes inside have broken into pieces & restrict or block the pump. In the past many people didn't bother dropping the tank to replace the pump. They just used an aftermarket pump of the correct spec, installed inline near the tank location. I don't like this shortcut personally but it can work.
2. Required pump specs: 140-150 Liters per hour (35-40 gallons per hour) flow rate, Fuel Pressure PSI - Minimum 5 PSI, Maximum 8 PSI**.
3. There is a stock combination check valve/overflow valve installed with the original pumps. New valves do not come with new fuel pump kits. Transfer this valve to the new pump.
It does 2 things. It circulates the gas in the tank to help keep it cool, & it acts as an anti-drainback valve to keep fuel in the line from the tank to the carb.
I made the mistake of not using this valve when I replaced my pump. Without the anti-drain back, the gas in the line all drains back to the tank once I shut of the engine. On cold starts (truck sitting more than a few hours) I had to crank the engine longer when cold to get fuel back in the line & to the carb.
Not great for your battery or starter over time. I have since installed an aftermarket anti-drainback valve in the rubber line between the tank & the steel fuel hardline.
Stock rubber fuel line size: 5/16" or 8mm.
**4. If you're running a Weber 32/36 carb instead of the stock carb, this stock fuel pressure is too high for the Weber & will cause it to flood. The Weber 32/36 needs 2.5 to 3 PSI(max) to work well. You'd need an adjustable fuel pressure regulator if you're running a stock style pump with the Weber.
It never fails that anytime you need to get into a gas tank, it's just been recently filled up.
Choice is yours in which way will be less trouble for you. Me personally, I drain & drop.
 12-02-2019, 09:37 AM


 I jumped the fuel pump resistor plug and started right up and stayed running. Now I don�t know what to do since I do not have my fuel pump resistor anymore. Can�t seem to find one on eBay either


