22r tear-down analysis
 01-13-2014, 06:39 PM
#1
Registered User
Thread Starter
Join Date: Dec 2013
Posts: 36
Likes: 0
Received 0 Likes
on
0 Posts
22r tear-down analysis
Hey guys, wanted to start this thread with some pictures showing my tear-down of my 22r. Welcome to any feedback. I am just learning some of the mechanics and rebuild knowledge and experience for the 22r motor.
A little past history. This motor was a family friends, he bought it from a reputable shop rebuilt around 2001. He drove it for about 10k to 15k miles and then parked it. I bought it from them a few months ago running. After a month and a half it started puking oil out of the valve cover breathers (so much it would empty the oilpan in a couple miles of driving. So I decided it would be a good time for me to learn how to rebuild a motor. After getting the pistons out I decided to re-ring them, hone the walls lightly, new con rod bearings and slap it back together. I got 545 miles on the rebuild now. I started to notice a couple days ago that it was running poor and did a compression check to find out the cylinder 2 and 3 wear at 145ish and 1 and 4 were at 170. Strange I thought so at first I thought the valves in the head might be stuck or burnt. I decided to do a leak down test but after fighting with my air compressor I gave up and decided to just take the motor apart again. I'll take the head in to get inspected, rebuilt or buy a new one tomorrow. But while I am at it I decided to go ahead and check the rings again and see if they are still good and because I have a leak in the rear main and in the timing cover I decided this time I will go ahead and reseal and gasket those while I am at it.
So far I have the head off and will start on the lower end tomorrow.
Here is the pics from the tear down of the upper end today. Feel free to let me know your thoughts if you more experienced individuals see anything in the pictures that might need addressed.
Note* these initial tear-down pictures are before any type of cleanup or wiping down. Just raw pictures.
My 83" pickup build up thread - jahstrength's 1983 SR5 4x4 Pickup Build
Last edited by jahstrength; 01-14-2014 at 11:06 AM.
 01-13-2014, 06:39 PM
#2
Registered User
Thread Starter
Join Date: Dec 2013
Posts: 36
Likes: 0
Received 0 Likes
on
0 Posts
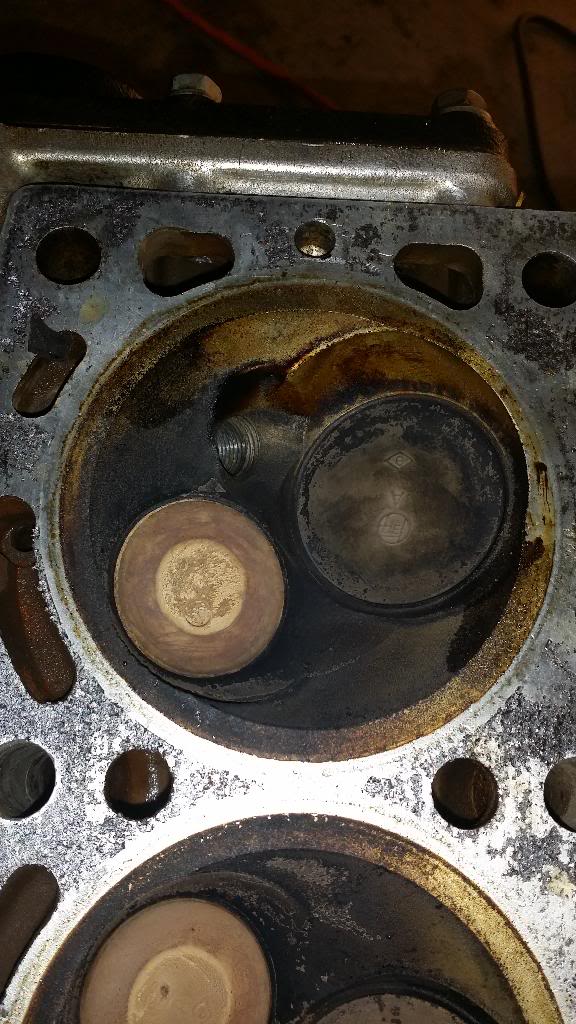
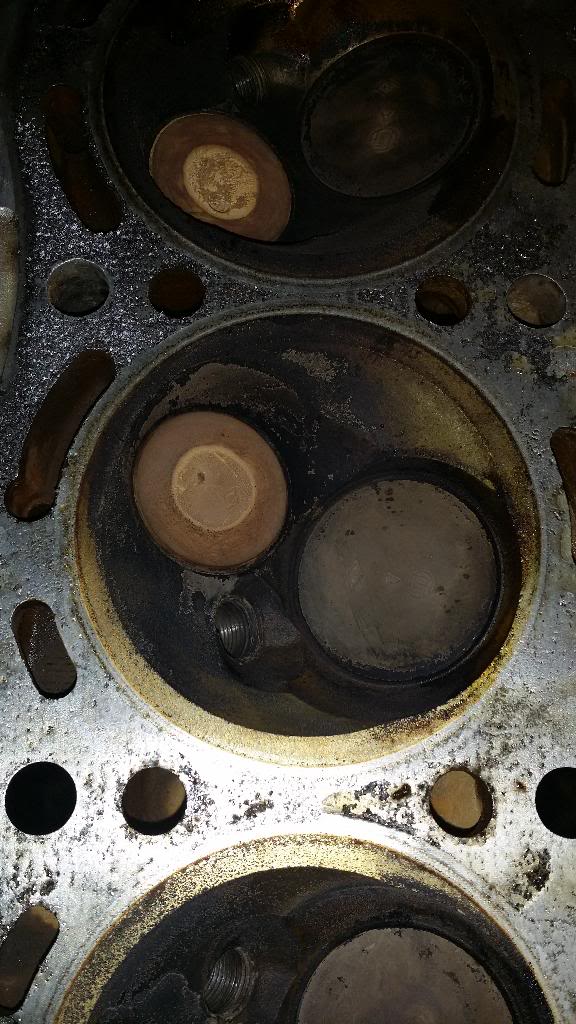
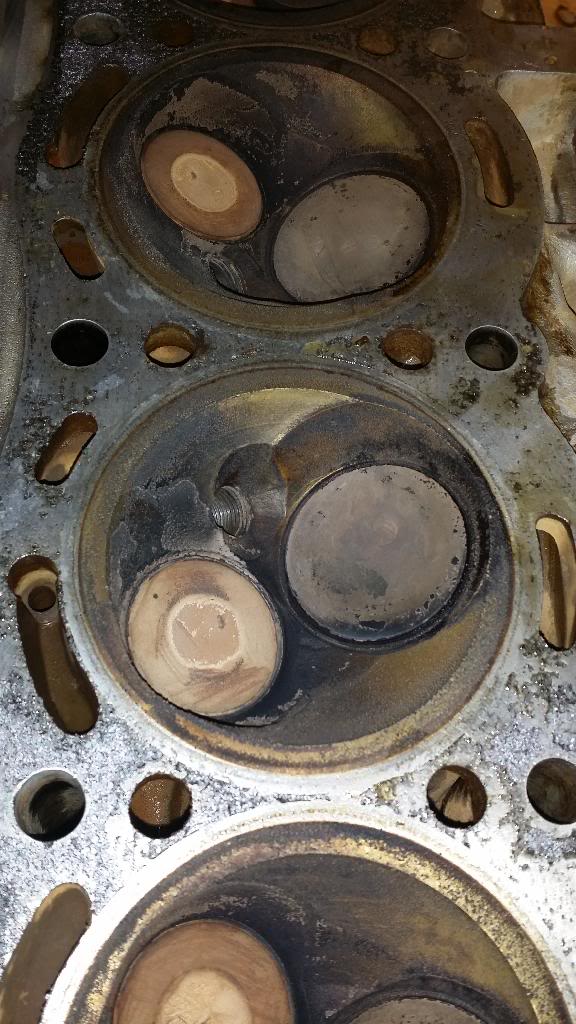
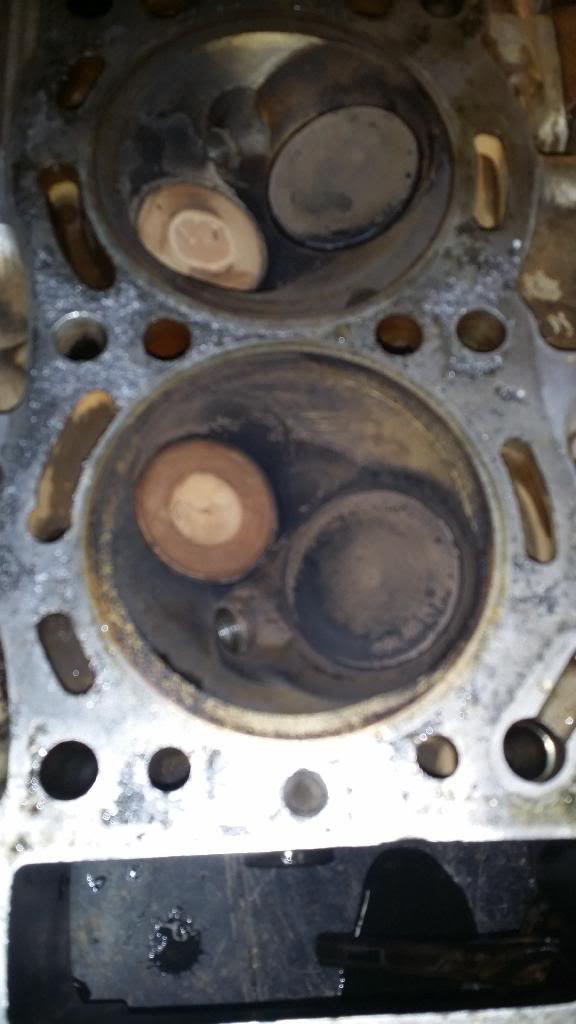
Pics of the Cylinder Head:
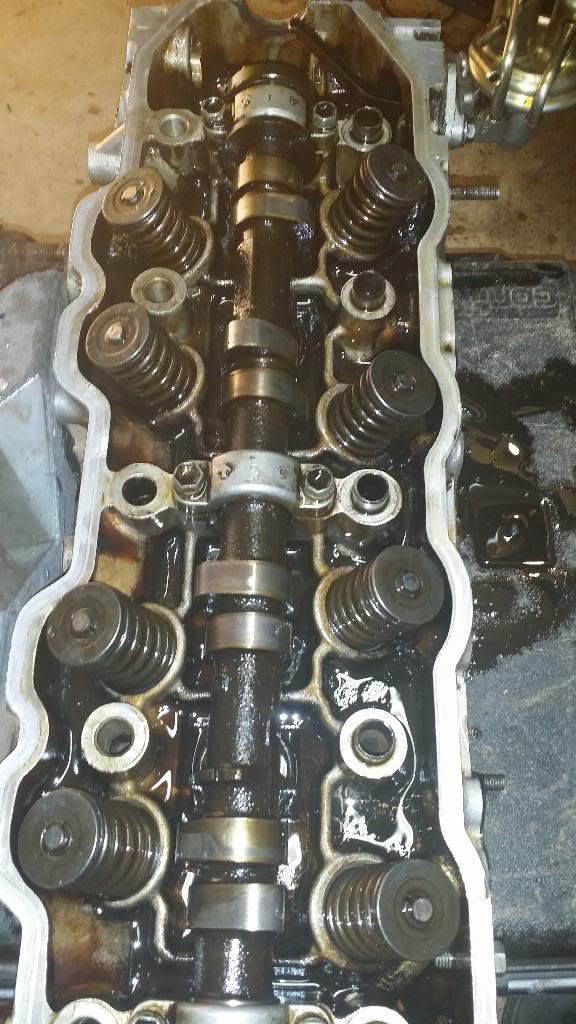
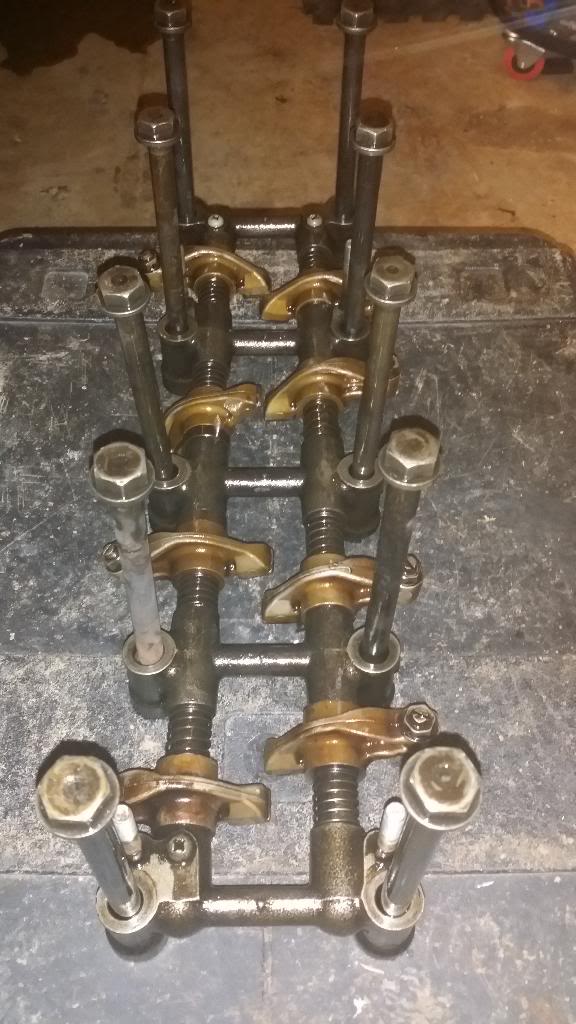
Rocker Arm:
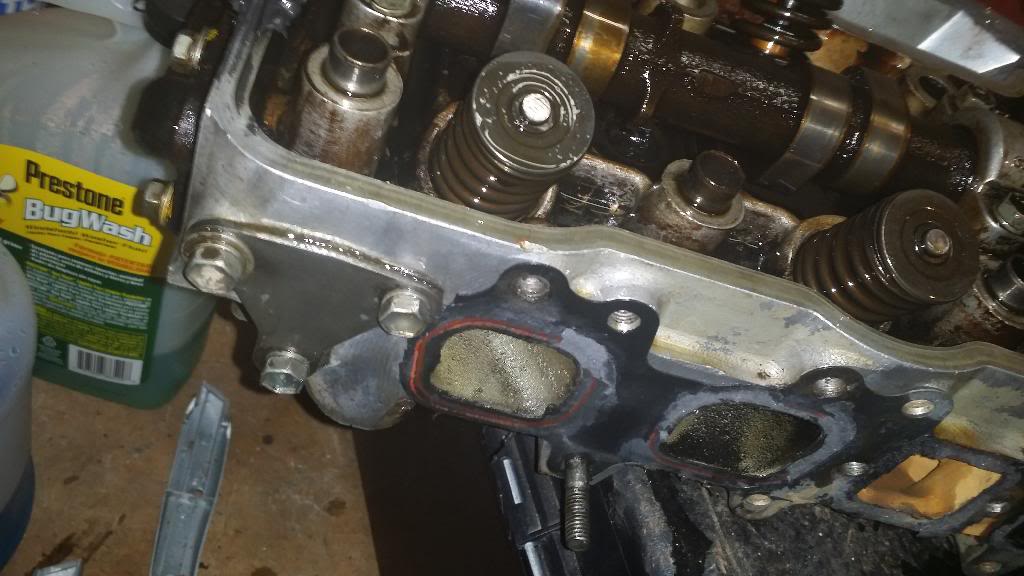
Intake side Head:

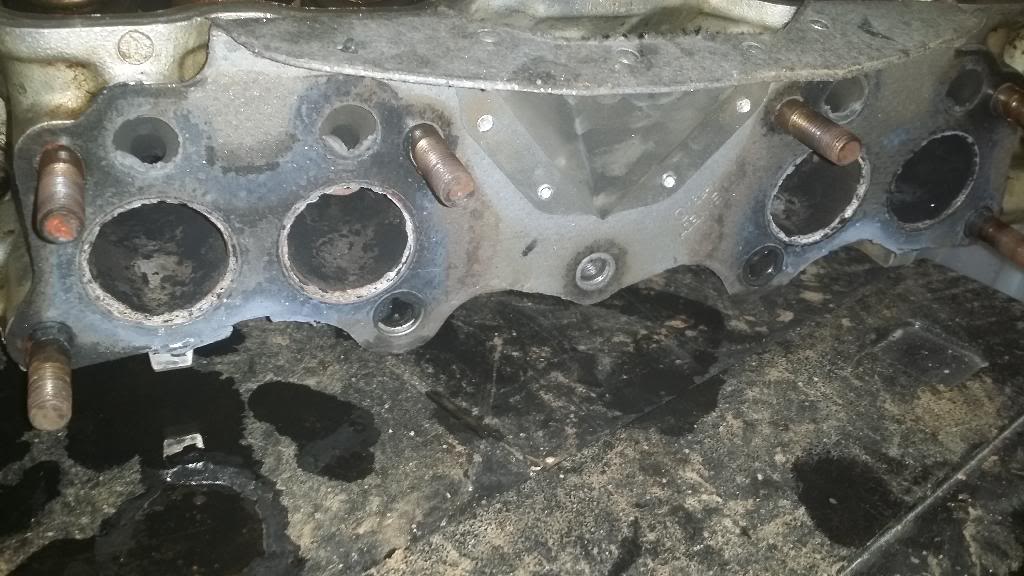
Exhaust side head:
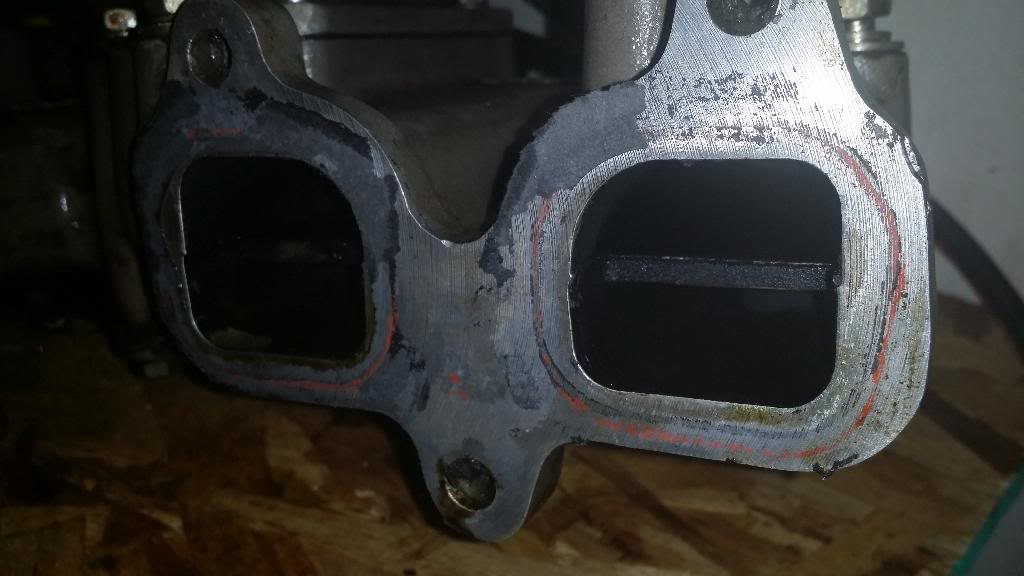
Offenhauser duel port intake manifold:

Valves:

Rocker Arm:

Intake side Head:


Exhaust side head:

Offenhauser duel port intake manifold:


Valves:


Last edited by jahstrength; 01-13-2014 at 06:56 PM.


 01-14-2014, 06:19 AM
#5
Offy intake...NICE!
First let me start by claiming my experience. I have rebuilt dozens of Kawasaki and Suzuki (4 cylinder) engines for racing applications, a hand full of Ford and Chevy engines and couple 22R engines.
*From looking at your pictures, your exhaust valves are slightly burnt (particularly on what appears to be the #2 cylinder). Those are Toyota valves so the engine was either rebuilt with Toyota valves or not "fully" rebuilt at all. Judging by the condition of the pistons, I am 99% sure that they are the original valves. I can also tell that those are not the original pistons because they do not have the notch that points to the front of the engine (Most replacement pistons have that notch too). You can see the notch that I'm talking about in this picture:
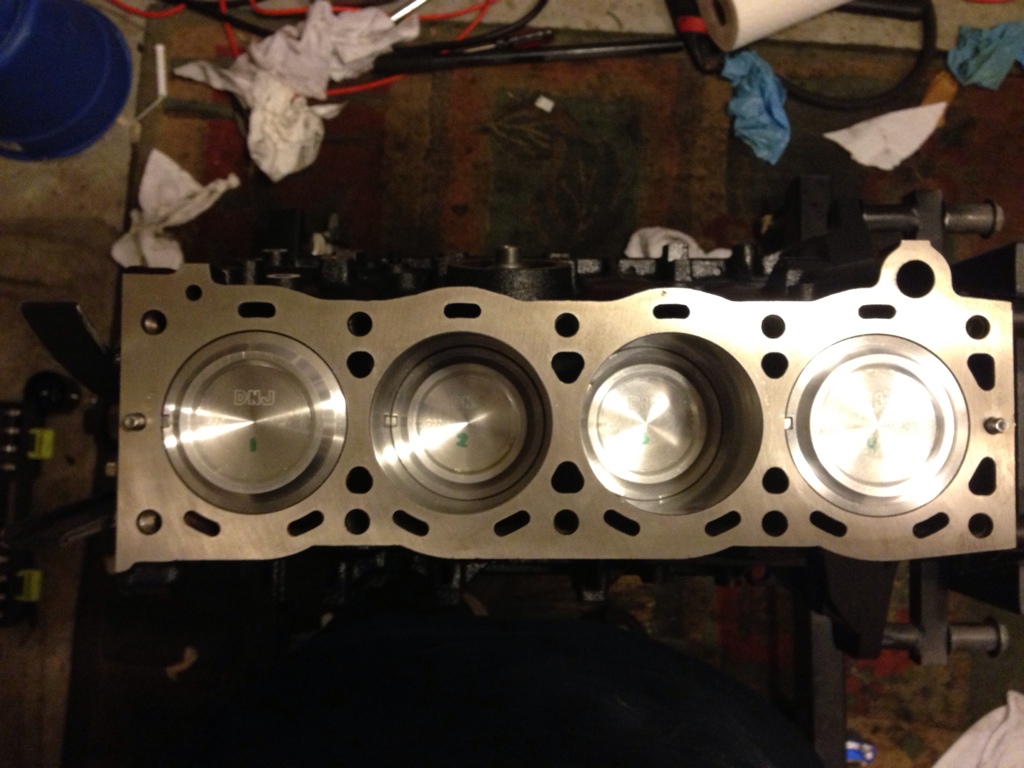
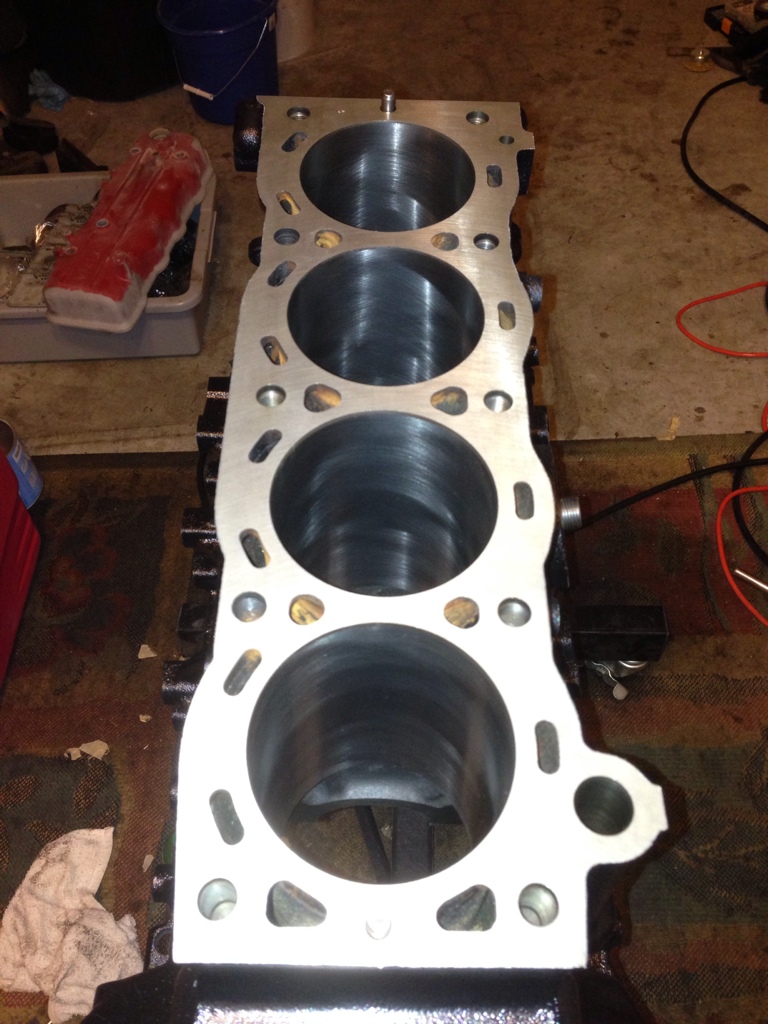
*Those cylinder walls do not look good at all. I can clearly tell that they were honed, but they were not honed properly. No offense to you, but honing is something that a professional needs to do to be done properly or you'll end up out of round cylinders and poor hatching. You should have a nice cross hatch at about 45* up and down the cylinders, but you can see where your's are not hatched at all and they just run perpendicular to the bore. A poor honing job will cause the rings not to seat well. Also, if you hone a cylinder too much it will not properly "fit" the pistons and rings and cause compression issues. You also have some pretty significant vertical scoring which could have been caused by a debris during installation or possibly a bad ring gap job. The hone should look something like this, even after it has been ran:
*I also noticed that the distributor appears to be original and has a well "burnt" rotor. You're at least going to want to replace the rotor and cap, if not the whole distributor.
My suggestion, get that block to a machine shop so that they can mic it. See if it is within the FSM specs (do you have an FSM? If not, let me know and I can point you in the right direction). If in needs to be bored, ask the machine shop what size pistons you need and order the pistons BEFORE they bore it out. Take the pistons to the machinist and they will match the bores to the pistons. While you have it apart, you might as well have the head rebuilt too. Doing it right won't be cheap, but it beats having to do it twice.
I'm not intending to offend you, just pointing out the things that I see so that you can learn from it. Let me know if you need any help with a rebuild.
First let me start by claiming my experience. I have rebuilt dozens of Kawasaki and Suzuki (4 cylinder) engines for racing applications, a hand full of Ford and Chevy engines and couple 22R engines.
*From looking at your pictures, your exhaust valves are slightly burnt (particularly on what appears to be the #2 cylinder). Those are Toyota valves so the engine was either rebuilt with Toyota valves or not "fully" rebuilt at all. Judging by the condition of the pistons, I am 99% sure that they are the original valves. I can also tell that those are not the original pistons because they do not have the notch that points to the front of the engine (Most replacement pistons have that notch too). You can see the notch that I'm talking about in this picture:

*Those cylinder walls do not look good at all. I can clearly tell that they were honed, but they were not honed properly. No offense to you, but honing is something that a professional needs to do to be done properly or you'll end up out of round cylinders and poor hatching. You should have a nice cross hatch at about 45* up and down the cylinders, but you can see where your's are not hatched at all and they just run perpendicular to the bore. A poor honing job will cause the rings not to seat well. Also, if you hone a cylinder too much it will not properly "fit" the pistons and rings and cause compression issues. You also have some pretty significant vertical scoring which could have been caused by a debris during installation or possibly a bad ring gap job. The hone should look something like this, even after it has been ran:

*I also noticed that the distributor appears to be original and has a well "burnt" rotor. You're at least going to want to replace the rotor and cap, if not the whole distributor.
My suggestion, get that block to a machine shop so that they can mic it. See if it is within the FSM specs (do you have an FSM? If not, let me know and I can point you in the right direction). If in needs to be bored, ask the machine shop what size pistons you need and order the pistons BEFORE they bore it out. Take the pistons to the machinist and they will match the bores to the pistons. While you have it apart, you might as well have the head rebuilt too. Doing it right won't be cheap, but it beats having to do it twice.
I'm not intending to offend you, just pointing out the things that I see so that you can learn from it. Let me know if you need any help with a rebuild.
Last edited by kawazx636; 01-14-2014 at 06:22 AM.
01-14-2014, 06:59 AM
#6
Registered User
Thread Starter
Join Date: Dec 2013
Posts: 36
Likes: 0
Received 0 Likes
on
0 Posts
No offense taken, your reply was exactly what I was looking for. I really appreciate the analysis and sharing. I also thought the hatches on the cylinder wall looked too horizontal and there are notches on the piston tops. I do remember facing them forward when I put them back in. I do have an original hard copy FSM specific for my year, a Chiltons and a Haynes, they all came with the truck. Oh the pistons are 1.00 mm oversized. If I am right that is 60 over on the bore and I beleive that's about max that you would want to bore this block. Again thanks a lot. I am going to get the head into a shop today and further disassemble the motor. I'll get more pics up later this evening.
I am also probably going to take my transfer case and transmission apart and rebuild them. Since I have two other cars I might as well do this truck right. Its my baby and I want to be able to take it on trips without worrying about failures, or worse, actually having one
I am also probably going to take my transfer case and transmission apart and rebuild them. Since I have two other cars I might as well do this truck right. Its my baby and I want to be able to take it on trips without worrying about failures, or worse, actually having one
Last edited by jahstrength; 01-14-2014 at 07:02 AM.
01-14-2014, 10:52 AM
#7
Registered User
Thread Starter
Join Date: Dec 2013
Posts: 36
Likes: 0
Received 0 Likes
on
0 Posts
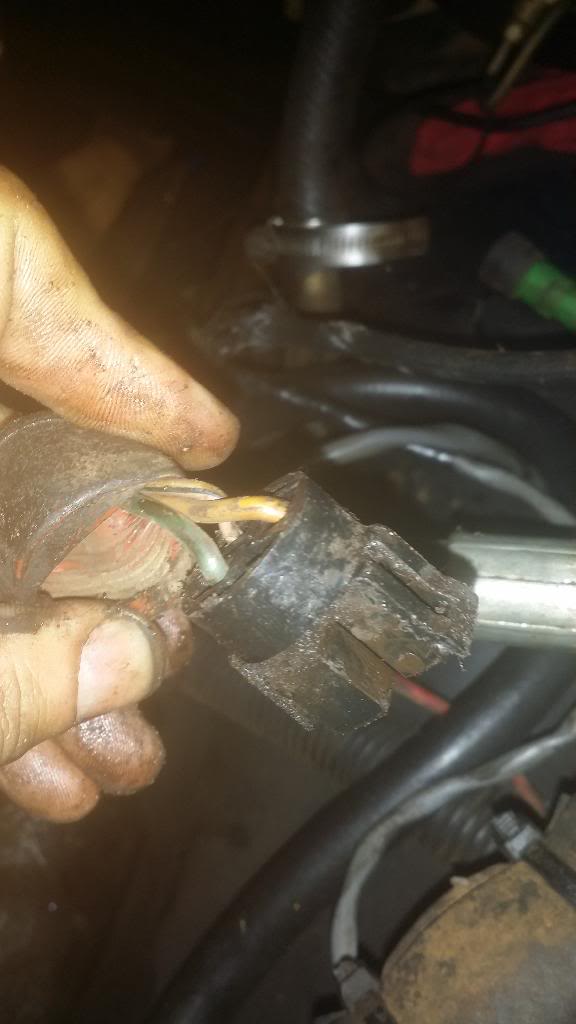
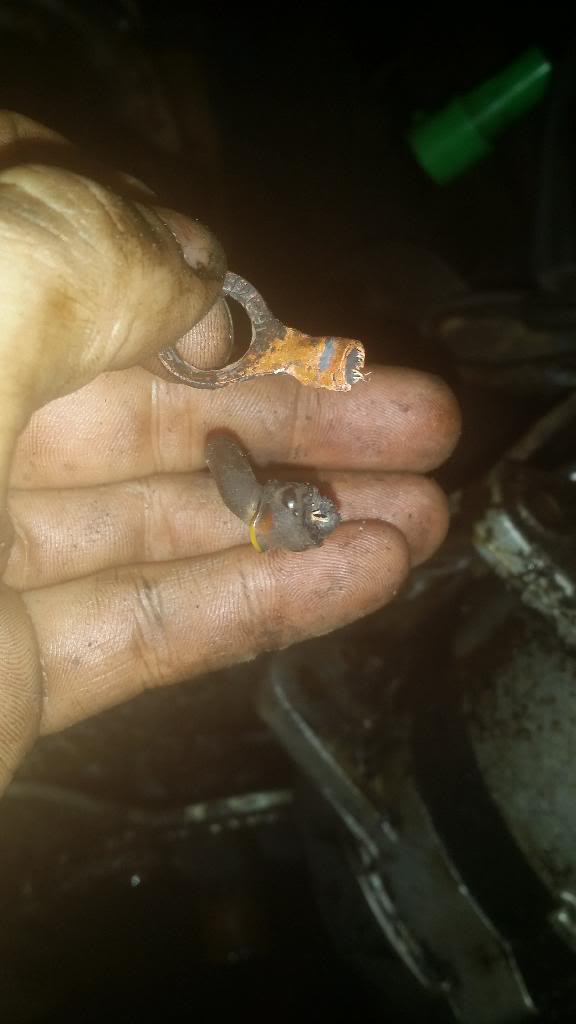
Took the head in to the machine shop they are going to clean, check warpage and do a leak down test on it and give me a call. Started more tear down. Glad I decided to do this. The ground wire to the alternator was hanging by only a couple wires and crumbled apart in my hand.
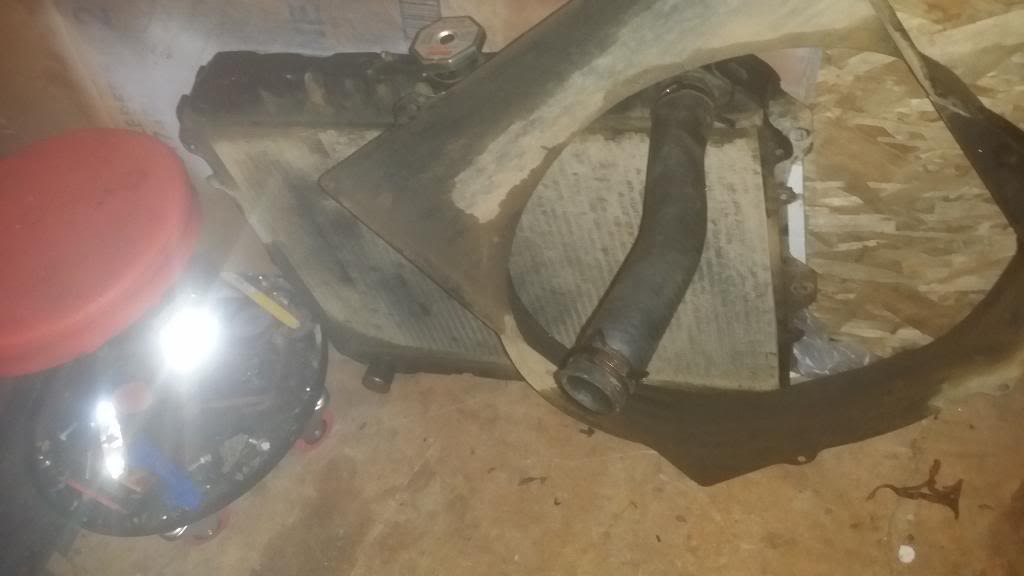
Radiator and shroud:
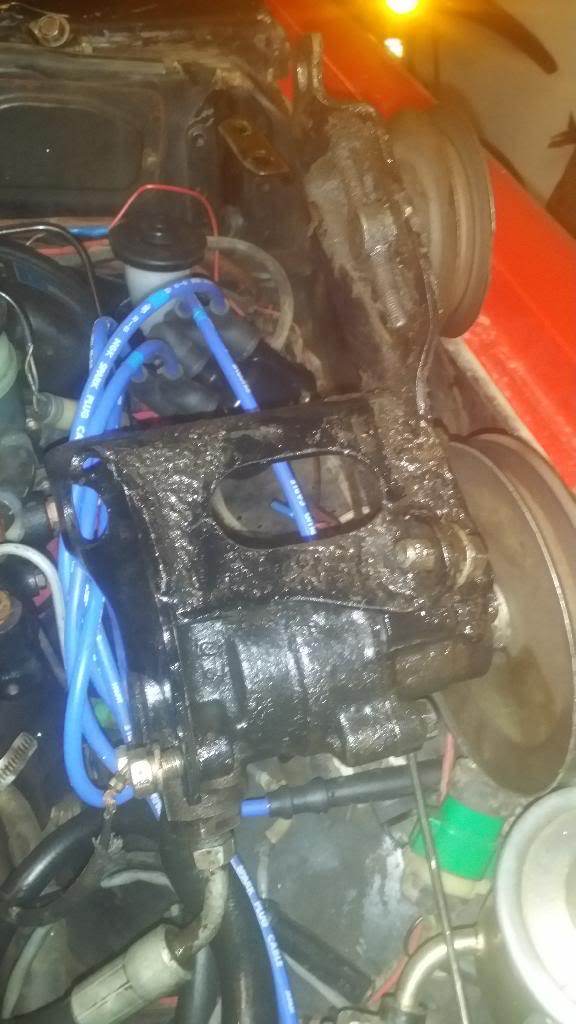
Powersterring pump:
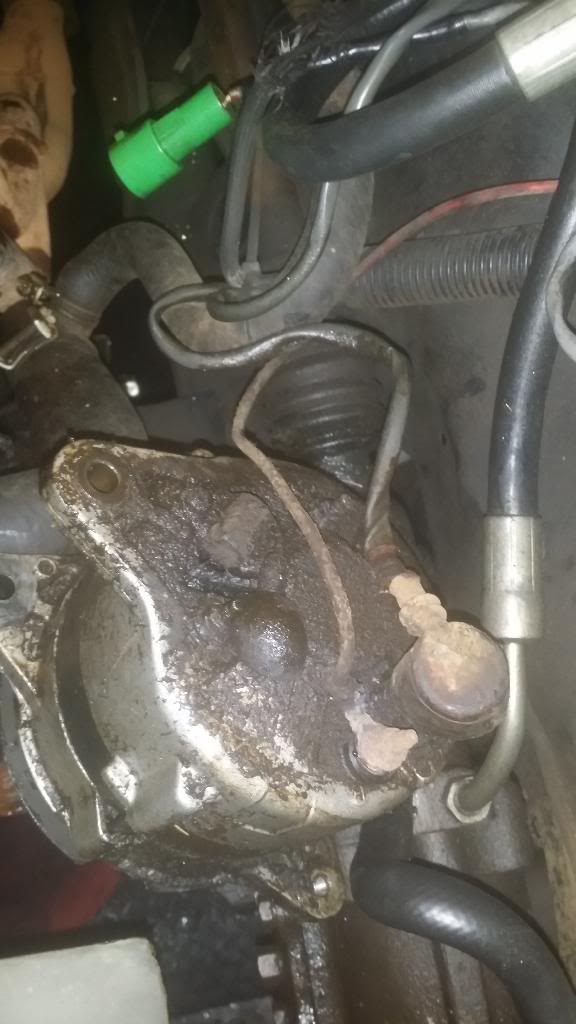
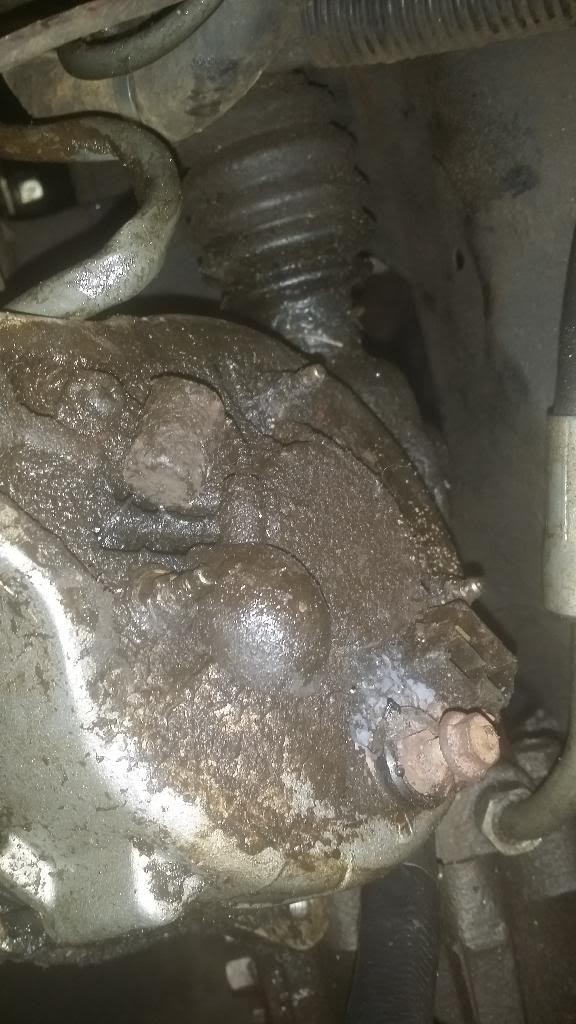
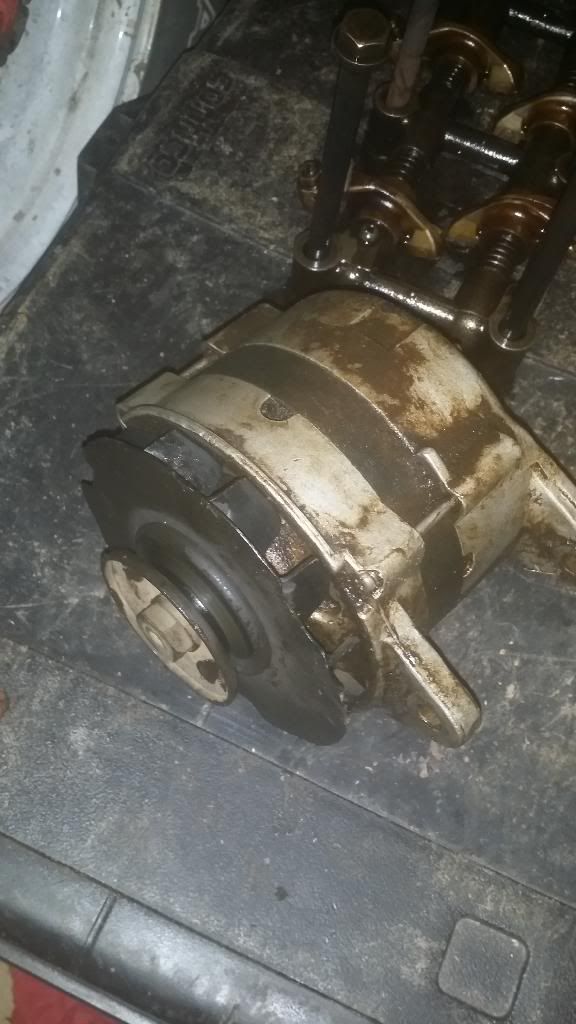
Alternator:
3 wire green plug for alternator:
Broken alternator ground wire:
Radiator and shroud:

Powersterring pump:

Alternator:


3 wire green plug for alternator:

Broken alternator ground wire:

Last edited by jahstrength; 01-14-2014 at 10:57 AM.
Trending Topics
01-14-2014, 04:59 PM
#8
Registered User
Thread Starter
Join Date: Dec 2013
Posts: 36
Likes: 0
Received 0 Likes
on
0 Posts
Took a long lunch and got back to tear down. Good news is the pistons and rings look good, and the con rod bearings look good to me to. As-well as the crank.
Pictures are uploading, will get them on this thread when they are done.
Lunch:
Water pump:
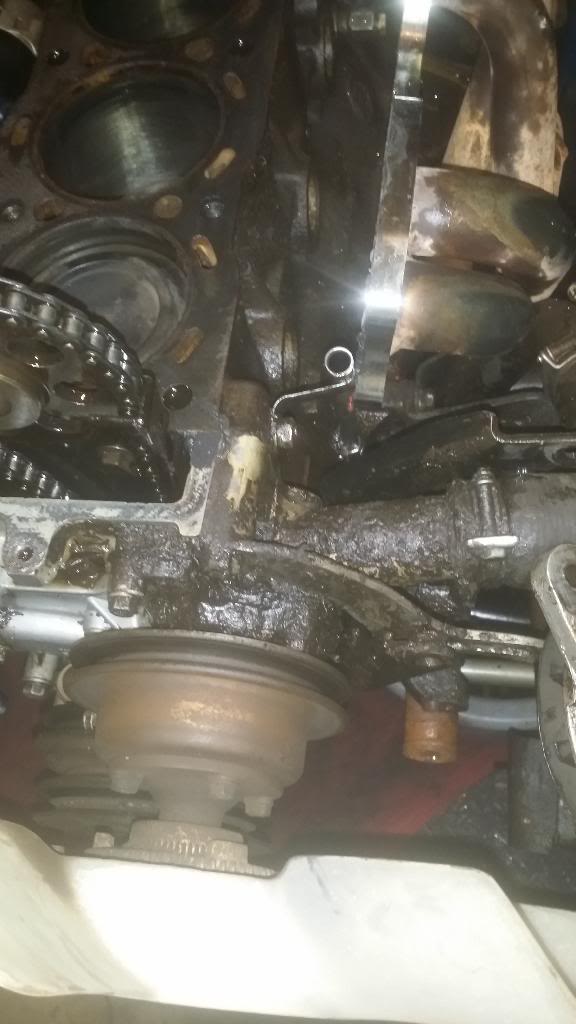
Crank pulley:
Oil pump/timing cover:
Oil Pan and pickup:
Piston and con rod bearings:
To DO list:
Clean engine and bay up
Re install pistons
Rebuild p/s pump (order rebuild kit)
New gaskets and seals for oil pump and timing cover (order what I dont already have)
New head gasket (order)
New gaskets all around for water tube etc. (order)
New oil pan gasket (order)
Fix/replace alternator ground wire
Have alternator checked (possible upgrade to higher output)
Replace other wires and cables (upgrade headlight harness, clean, replace ground and power and connections)
Pictures are uploading, will get them on this thread when they are done.
Lunch:
Water pump:
Crank pulley:
Oil pump/timing cover:
Oil Pan and pickup:
Piston and con rod bearings:
To DO list:
Clean engine and bay up
Re install pistons
Rebuild p/s pump (order rebuild kit)
New gaskets and seals for oil pump and timing cover (order what I dont already have)
New head gasket (order)
New gaskets all around for water tube etc. (order)
New oil pan gasket (order)
Fix/replace alternator ground wire
Have alternator checked (possible upgrade to higher output)
Replace other wires and cables (upgrade headlight harness, clean, replace ground and power and connections)
Last edited by jahstrength; 01-14-2014 at 05:13 PM.
01-14-2014, 06:58 PM
#9
Just so you know, 1mm is .040 over. I also think that you would be making a mistake by re-installing the old pistons and rings; mostly the rings. If those rings didn't seat properly the first time, they are mostlikely never going to seat. Spend the money and buy some new ones. You could actually get a full ebuild kit from Engnbldr for around $350 which would get you all new pistons, rings, bearings, wrist pins, every gasket under the hood and even a new oil and water pump. You have it apart, might as well do it right or you'll surely regret it later when you have to tear it down again.
Last edited by kawazx636; 01-15-2014 at 09:31 AM.
01-15-2014, 10:51 AM
#11
Registered User
Thread Starter
Join Date: Dec 2013
Posts: 36
Likes: 0
Received 0 Likes
on
0 Posts
Block only has 10k on it from a professional rebore. It was checked last time and was fine. The rings are new and sealed fine. The problem was not the rings, but the head. Since its like 30 mins more to take the pistons out I decided to do that for my own curiosity of what 500 miles on the job looks like. Also my oil pump cover was leaking and I wanted to fix that so I had to drop the oil pan
01-15-2014, 11:41 AM
#12
Hey it's your truck and you can choose to do what you wish, but you'll hear an "I told you so" when you're back here in 2,000 miles or so with low compression and an astronomical amount of blowby and oil consumption.
01-15-2014, 11:56 AM
#13
Registered User
iTrader: (1)
Join Date: Feb 2013
Location: baton rouge,louisiana
Posts: 447
Likes: 0
Received 0 Likes
on
0 Posts
Kawaz sums it up perfect your cylinders are in bad shape you can see the black stuff witch in terms is glazing and there is a lot of it and the scares on your wall need attention, we here on yotatech will help you as much as possible and we're not bashing you at all its your truck and you do what you want to it. But if it's something that your gonna keep and make long trips like your talking about you need to have those cylinders at least re honed and plus your down that far why not spend a little extra to give yourself peace of mind, cause I'm telling you now you will bolt it up and yeah you mite get a lot of miles out of it but you will regret it down the road when you could have gotten 200 plus thousand out of it. But I wish you the best of luck whatever route you take and just ask questions if you need somethi there's a lot of knowledge on here

Thread
Thread Starter
Forum
Replies
Last Post
buckz6319
86-95 Trucks & 4Runners
23
08-05-2017 03:50 AM
Toys4parts
86-95 Trucks & 4Runners (Build-Up Section)
2
09-26-2015 01:56 PM


